Yes, you can make your own wood pellets! Wood pellets are a sustainable and eco-friendly alternative to traditional fuel sources. They are made by compacting wood biomass, such as sawdust or wood shavings, into dense pellets that can be used for heating or cooking. By utilizing a pellet mill or pellet machine, you can easily produce your own pellets at home, reducing your carbon footprint and saving on energy costs. Making your own wood pellets is a great way to become self-sufficient and support renewable energy.
DIY Wood Pellets: A Step-by-Step Guide to Making Your Own Fuel
Wood pellets are a popular source of fuel that can be used for heating, cooking, and even generating electricity. They are known for their high energy content, low emissions, and ease of use. While you can purchase wood pellets from stores, making your own can be a cost-effective and rewarding option. In this section, we will provide you with a step-by-step guide to making your own wood pellets.

1. Selecting the Right Wood
The first step in making wood pellets is selecting the right type of wood. Hardwoods such as oak, maple, and cherry are ideal as they have a higher energy content and produce less ash. Avoid using softwoods like pine, as they have a lower energy content and can cause issues with your pellet mill.
2. Preparing the Wood
Once you’ve chosen the right wood, it’s time to prepare it for pelletizing. Start by cutting the wood into small pieces, around 1-2 inches in length. Remove any bark or knots that may affect the quality of the pellets. It’s also recommended to let the wood dry for a few months to reduce its moisture content.
3. Grinding the Wood
After the wood has been prepared, it needs to be ground into a fine powder. You can use a wood chipper or a hammer mill for this process. The goal is to achieve a consistent particle size to ensure the best quality pellets.
4. Pelletizing the Wood
Now that you have the wood powder, it’s time to pelletize it. This is done using a pellet mill, which compresses the wood powder into dense pellets. The mill applies heat and pressure to bind the particles together. Make sure to follow the manufacturer’s instructions when operating the pellet mill.
5. Cooling and Packaging
Once the pellets have been formed, they need to be cooled to room temperature. Spread them out on a flat surface or use a pellet cooling machine for faster cooling. Once cooled, you can package the pellets in bags or store them in a dry, airtight container.
6. Using the Wood Pellets
Now that you have your homemade wood pellets, it’s time to put them to use. Wood pellets can be used in pellet stoves, boilers, and even pellet grills. They provide a clean and efficient source of heat and can be a sustainable alternative to fossil fuels.
In summary, making your own wood pellets can be a rewarding and cost-effective alternative to purchasing them. By following these six steps, you can produce high-quality wood pellets that can be used for various purposes. Remember to select the right wood, prepare it properly, pelletize it using a pellet mill, and store the pellets in a suitable container. With homemade wood pellets, you can enjoy the benefits of a renewable and eco-friendly fuel source.
Necessary Equipment for Producing Wood Pellets at Home
If you’re interested in producing your own wood pellets at home, it’s important to have the right equipment. Wood pellets are a popular fuel source due to their sustainability and efficiency, making them an excellent choice for heating and cooking. In this section, we will discuss the necessary equipment needed for producing wood pellets at home.
1. Wood Chipper
A wood chipper is an essential tool for processing raw materials into wood pellets. It is used to chip or shred logs, branches, and other wood waste into smaller, consistent-sized pieces. This uniformity in size ensures a more efficient pellet production process. There are various types of wood chippers available, including electric, gas-powered, and manual options.
2. Hammer Mill
A hammer mill is another crucial piece of equipment for wood pellet production. It is used to crush the chipped wood into smaller, finer particles, making it easier to process and form into pellets. The hammer mill utilizes rotating hammers to pulverize the wood, creating a uniform texture for efficient pelletization.
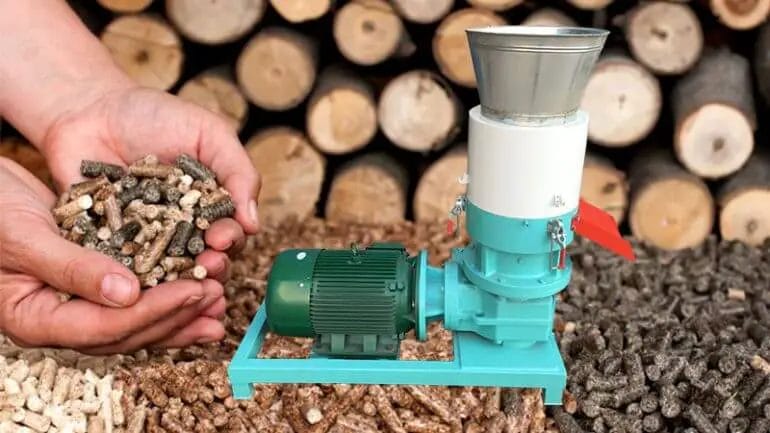
3. Pellet Mill
The pellet mill is the heart of the wood pellet production process. It is responsible for compressing the crushed wood particles into dense, cylindrical pellets. The pellet mill applies high pressure and heat to the wood, activating lignin, a natural binder, which helps hold the pellets’ shape. There are different types of pellet mills available, including flat die and ring die pellet mills.
4. Cooler
After the pellets are formed, they need to be cooled down to reduce their temperature and moisture content. The cooler is used to facilitate this process. It utilizes cold air or water to rapidly cool the pellets, making them more durable and stable. Cooling the pellets also helps to prevent spoilage and extend their shelf life.
5. Sieve or Sifter
A sieve or sifter is used to separate any oversized or undersized pellets from the final product. It ensures that only uniformly sized pellets make it through for packaging and use. This step is crucial to maintain the quality and consistency of the wood pellets, ensuring they meet the desired specifications.
6. Packaging Equipment
Once the pellets have been cooled and sieved, they need to be packaged for storage or distribution. Packaging equipment, such as bagging machines or bulk packaging systems, is used to efficiently pack the wood pellets into bags, totes, or larger containers. This equipment helps streamline the packaging process, saving time and effort.
In summary, producing wood pellets at home requires a set of specific equipment. A wood chipper is needed to shred the raw material, while a hammer mill crushes it into smaller particles. The pellet mill compresses the crushed wood into pellets using high pressure and heat. The cooled pellets are then sieved to remove any irregularities, and finally, they are packaged using appropriate equipment. With these essential tools, you can produce your own high-quality wood pellets for various heating and cooking applications.
Choosing the Right Wood Species for Homemade Pellets
When it comes to making homemade pellets, one of the key factors to consider is the choice of wood species. The type of wood you use can greatly impact the quality of your pellets, as well as the overall performance of your pellet stove or grill. In this section, we will discuss the different wood species commonly used for making pellets and their specific characteristics.
1. Hardwood vs Softwood
The first decision you need to make is whether to use hardwood or softwood for your pellets. Both have their pros and cons, so it’s important to understand the differences.
Hardwood species, such as oak, maple, and cherry, are known for their density and slow-burning properties. They produce a high-energy output and produce long-lasting heat. Hardwood pellets also tend to have a higher ash content compared to softwood pellets.
On the other hand, softwood species, like pine and spruce, are known for their quick-burning characteristics. They ignite easily and produce a high heat output, making them ideal for quick heating. Softwood pellets also tend to have a lower ash content compared to hardwood pellets.
2. Wood Species and Flavor
If you’re using pellets for grilling or smoking, the choice of wood species becomes even more important. Different wood species impart unique flavors to your food, enhancing the taste and aroma.
For example, fruit woods, such as apple and cherry, are popular choices for adding a sweet and fruity flavor to your grilled or smoked dishes. Hickory and mesquite, on the other hand, provide a stronger and smokier taste, perfect for meats like ribs and brisket.
It’s important to note that not all wood species are suitable for grilling or smoking. Avoid using softwood species like pine, as they can release harmful chemicals and create an unpleasant taste in your food.
3. Availability and Cost
Another important factor to consider is the availability and cost of the wood species you choose. Some wood species may be more readily available in your area, while others may be imported or harder to find.
The availability of wood species can also affect the cost of your pellets. If a particular wood species is in high demand or requires additional processing, it may be more expensive compared to other options.
It’s a good idea to research the local availability and price of different wood species before making a decision. Consider factors such as sustainability and environmental impact as well.
4. Testing and Experimentation
Lastly, don’t be afraid to mix and match different wood species to find the perfect blend for your specific needs. Testing and experimentation can help you determine the optimal combination for achieving the desired heat output, flavor, and burn time.
Keep in mind that different wood species may have different moisture content, density, and pelletizing characteristics. It’s important to adjust your pellet mill or equipment accordingly to achieve consistent and high-quality pellets.
Summary
Choosing the right wood species for homemade pellets is crucial for achieving optimal performance and flavor. Consider factors such as hardwood vs softwood, flavor preferences, availability, and cost. Don’t be afraid to experiment and test different wood species to find the perfect blend. With the right choice of wood species and proper pellet production techniques, you can enjoy efficient heating or flavorful grilling with your homemade pellets.
Best Practices for Drying and Preparing Wood for Pellet Production
Wood pellets are a popular and environmentally friendly source of energy. They are made from dry, compressed wood fibers and can be used for heating homes, generating electricity, or even as a biofuel. However, the production of high-quality wood pellets requires proper drying and preparation of the raw wood material. In this section, we will discuss some best practices for drying and preparing wood for pellet production.
Selecting the Right Wood Species
The first step in preparing wood for pellet production is to select the right wood species. Not all types of wood are suitable for making pellets. Hardwoods such as oak, maple, and beech are generally preferred over softwoods like pine or spruce. Hardwoods have higher energy content, lower moisture content, and produce more heat when burned.
When selecting wood for pellet production, it is also important to consider the availability and sustainability of the wood species. Choose wood that is locally available and harvested from sustainably managed forests to minimize the environmental impact.
Properly Drying the Wood
The moisture content of the wood is a critical factor in pellet production. Wood that is too wet can result in low-quality pellets with high ash content and poor combustion efficiency. Ideally, the moisture content of the wood should be below 10% for optimal pellet production.
There are several methods for drying wood, including air drying, kiln drying, and using a drying agent. Air drying involves stacking the wood in a well-ventilated area and letting it naturally dry over time. Kiln drying, on the other hand, uses a controlled heating process to accelerate the drying time. Using a drying agent, such as silica gel or calcium chloride, can also help reduce the moisture content of the wood.
Regardless of the drying method used, it is important to monitor the moisture content of the wood regularly. Investing in moisture meters can help ensure that the wood is properly dried before pellet production.
Preparing the Wood for Pellet Production
Once the wood is adequately dried, it needs to be prepared for pellet production. This involves grinding the wood into small particles or sawdust. The size and uniformity of the particles play a crucial role in the quality of the pellets.
A hammer mill or a wood chipper can be used to break down the wood into smaller pieces. The wood particles should be of a consistent size, typically around 6mm to 8mm in diameter, to ensure uniformity in pellet size and density.
After grinding, the wood particles may need to be further screened to remove any oversized or undersized pieces. This step helps to ensure that only the properly sized wood particles are used in pellet production.
Storing the Prepared Wood
Once the wood has been dried and prepared, it needs to be stored properly to maintain its quality. The wood should be stored in a dry and well-ventilated area to prevent reabsorption of moisture. Using pallets or racks can help promote proper airflow and reduce the risk of mold or fungal growth.
It is also important to protect the wood from exposure to sunlight and rain, as these can increase the moisture content and degrade the quality of the prepared wood.
In summary, proper drying and preparation of wood are essential for producing high-quality wood pellets. Selecting the right wood species, ensuring proper moisture content, and grinding the wood into uniform particles are crucial steps in the pellet production process. By following these best practices, pellet manufacturers can produce pellets that are efficient, clean-burning, and environmentally friendly.
5. Tips for Efficiently Pelletizing Wood at Home
Pelletizing wood at home can be a cost-effective and environmentally friendly way to produce your own fuel for heating or cooking. Wood pellets are a renewable energy source and can be made from various types of wood waste such as sawdust, wood chips, or even branches and twigs.
If you’re planning to pelletize wood at home, here are some tips to help you do it efficiently:
1. Choose the Right Equipment
Investing in the right equipment is crucial for efficient wood pellet production. Look for a high-quality pellet mill that can process the type of wood waste you have effectively. Consider factors such as the capacity, power supply, and ease of maintenance when choosing your equipment.
2. Prepare the Wood Waste
Before pelletizing the wood, it’s essential to properly prepare the wood waste. Start by ensuring that the wood waste is dry, as moisture content can affect the pelletizing process and the quality of the pellets. If needed, use a wood chipper or a hammer mill to reduce the size of the wood waste for easier pelletization.
3. Use a Binder
Adding a binder to the wood waste can improve the pelletizing process and increase the durability of the pellets. Common binders used include vegetable oil, starch, or even water. The binder helps to hold the wood particles together during the pelletizing process, resulting in more robust and consistent pellets.
4. Control the Pelletizing Process
During the pelletizing process, it’s crucial to maintain optimal conditions to ensure efficient production. Adjust the moisture content of the wood waste to achieve the desired pellet quality. Monitor the temperature and pressure within the pellet mill to prevent overheating or excessive wear on the equipment. Regularly clean and maintain the pellet mill to avoid clogging and optimize performance.
5. Store the Pellets Properly
After pelletizing, it’s important to store the wood pellets correctly to maintain their quality. Store the pellets in a cool, dry place to prevent moisture absorption and degradation. Choose appropriate storage containers that are airtight and protect the pellets from pests and rodents. Regularly inspect the pellets for any signs of damage or deterioration.
In summary, efficiently pelletizing wood at home requires the right equipment, proper preparation of the wood waste, the use of a binder, careful control of the pelletizing process, and appropriate storage of the pellets. By following these tips, you can produce high-quality wood pellets for your heating or cooking needs while minimizing waste and maximizing efficiency.

FAQs
1. Can I make my own wood pellets?
Yes, you can make your own wood pellets. You will need a pellet mill, which compresses wood shavings or sawdust into pellet form. It’s important to ensure you have the necessary equipment and knowledge of the process before attempting to make your own pellets.
2. What type of wood can I use to make pellets?
You can use a variety of wood types to make pellets, including hardwoods and softwoods. Common choices include oak, pine, maple, and birch. It’s important to choose wood that is dry and free of any contaminants for optimal pellet production.
3. Are there any benefits to making your own wood pellets?
Yes, there are several benefits to making your own wood pellets. It allows you to use locally sourced and sustainable wood materials, reducing transportation costs and environmental impact. Additionally, homemade pellets can be tailored to your specific needs and preferences, such as size and composition.
Conclusion
In conclusion, making your own wood pellets can be a rewarding and cost-effective solution for heating or powering your home. By utilizing a wood pellet mill, you can easily convert waste wood, sawdust, or other biomass materials into high-quality pellets. This DIY approach not only allows you to save money on purchasing commercially-made pellets but also gives you greater control over the pellet quality and ingredients used. Additionally, producing your own wood pellets promotes sustainability and reduces environmental impact by utilizing renewable resources. So why not give it a try and start enjoying the benefits of homemade wood pellets today?