Are you looking for a simple and effective way to cut wood paneling? Look no further! Cutting wood paneling can be done easily with the right tools and techniques. Whether you’re a DIY enthusiast or a professional, this guide will provide you with the necessary steps to achieve clean and precise cuts. From choosing the right saw to measuring and marking your paneling, we’ll walk you through each step to help you achieve the perfect cut every time.
The first step in cutting wood paneling is to gather the necessary tools. A circular saw with a fine-toothed blade is highly recommended for clean and accurate cuts. Additionally, make sure you have a measuring tape, pencil, and clamps to secure the paneling in place. Safety is also a top priority, so don’t forget to wear protective goggles and gloves while working with power tools.

Before making any cuts, it’s important to measure and mark the wood paneling properly. Measure the dimensions you need and use a pencil to mark the cutting line. Double-check your measurements to ensure accuracy. If you’re cutting multiple panels, it’s helpful to number them to avoid confusion.
Now it’s time to secure the wood paneling in place. Use clamps to hold the paneling firmly onto a workbench or sawhorses. This will prevent any movement during the cutting process, resulting in cleaner cuts. Make sure the paneling is positioned in such a way that the
Step-by-Step Guide to Cutting Wood Paneling
Wood paneling can be a beautiful addition to any room, adding warmth and texture to your walls. Whether you’re installing new paneling or making adjustments to existing panels, cutting wood paneling correctly is essential for achieving a professional-looking result. In this step-by-step guide, we will walk you through the process of cutting wood paneling with precision and ease.
Materials You Will Need:
- Wood paneling
- Measuring tape
- Straight edge
- Pencil
- Circular saw or jigsaw
- Clamps
- Safety goggles
- Dust mask
Step 1: Measure and Mark
The first step in cutting wood paneling is to accurately measure and mark the areas where you need to make cuts. Use a measuring tape to determine the length and width needed for each panel. Mark the measurements with a pencil on the backside of the paneling to avoid visible marks on the finished surface.
Step 2: Set Up the Saw
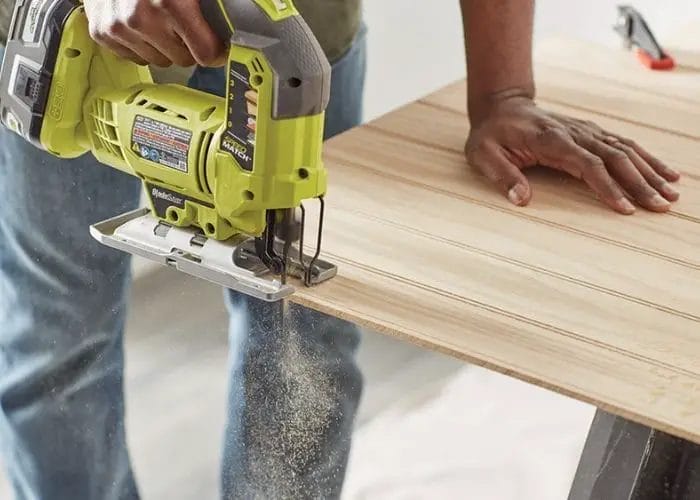
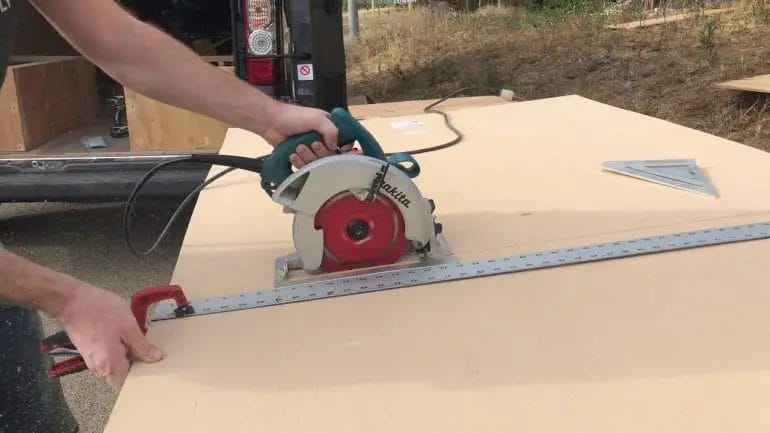
Depending on the thickness of your wood paneling, choose the appropriate cutting tool – a circular saw for thicker panels or a jigsaw for thinner panels. Install the appropriate blade on the saw and adjust the cutting depth according to the thickness of the paneling. Ensure that you have a firm and stable work surface to prevent any accidents.
Step 3: Secure the Paneling
Before making any cuts, secure the wood paneling to prevent it from moving during the cutting process. Use clamps to hold the paneling firmly in place, ensuring that it won’t shift or vibrate while cutting.
Step 4: Start Cutting
When you are ready to start cutting, position the saw blade just outside the marked line to account for the width of the blade. Hold the saw with a firm grip and slowly guide it along the marked line, applying steady pressure. Take your time and let the saw do the work, avoiding any sudden movements that may result in uneven or jagged cuts.
Step 5: Safety First
Always prioritize safety when working with power tools. Wear safety goggles to protect your eyes from flying debris, and a dust mask to prevent inhaling any wood particles. Additionally, make sure to follow the manufacturer’s instructions and guidelines for operating the saw safely.
Step 6: Sand and Finish
After cutting the wood paneling, remove any rough edges or splinters using sandpaper. Lightly sand the cut edges to create a smooth and seamless finish. You can also apply a wood sealer or stain to enhance the appearance and protect the paneling.
Step 7: Installation
Once all the necessary cuts have been made, you can proceed with the installation of the wood paneling. Follow the manufacturer’s instructions for attaching the panels to the wall, whether it involves using adhesive, nails, or a tongue-and-groove system.
Summary
Cutting wood paneling requires careful measurement, proper tool selection, and attention to safety. By following this step-by-step guide, you can achieve precise and clean cuts that will ensure a professional-looking finish for your wood paneling project. Remember to always work in a well-ventilated area and take the necessary safety precautions. With these instructions in hand, you are now ready to tackle your wood paneling cutting tasks with confidence!
Tips for Achieving Clean and Precise Cuts on Wood Paneling
Wood paneling is a popular choice for adding warmth and character to interiors. Whether you are installing new paneling or making modifications to existing panels, it is essential to achieve clean and precise cuts for a professional-looking finish. Here are some tips to help you achieve accurate and seamless cuts on wood paneling:
1. Measure and mark accurately
Before making any cuts, take precise measurements of the area where the paneling needs to fit. Use a tape measure and a pencil to mark the dimensions on the paneling. Double-check your measurements to ensure accuracy before proceeding.
2. Use the right tools
Investing in high-quality tools specifically designed for cutting wood paneling can make a big difference in the outcome. A table saw or a circular saw equipped with a fine-toothed blade is ideal for clean and precise cuts. Additionally, make sure your saw blade is sharp to prevent splintering and tearing of the wood.
3. Use a guide
When cutting longer sections of wood paneling, it can be challenging to maintain a straight and even cut. To overcome this, use a straightedge or a guide to guide your saw along the marked line. This will help you achieve a clean and straight cut with minimal effort.
4. Cut from the backside
When making cuts on wood paneling, it is advisable to cut from the backside of the panel. This helps to prevent splintering on the visible side and ensures a cleaner finish. Make sure to position the paneling with the finished side facing down when cutting.
5. Use masking tape
An effective way to minimize splintering on the visible side of the wood paneling is to apply masking tape along the cut line. The tape helps to stabilize the wood fibers and reduces the risk of tear-out during the cutting process.
6. Take it slow
Rushing through the cutting process can lead to mistakes and uneven cuts. Take your time and cut slowly, allowing the blade to do the work. This will help you achieve cleaner and more precise cuts on the wood paneling.
7. Sand the edges
After making the cuts, the edges of the wood paneling may require sanding to smooth out any roughness or imperfections. Use sandpaper or a sanding block to carefully sand the cut edges until they are smooth and even.
8. Test on a scrap piece
If you are uncertain about the accuracy of your cuts or the effectiveness of your cutting technique, it is always a good idea to test on a scrap piece of wood paneling first. This allows you to make adjustments and perfect your technique before working on the actual panels.
9. Pay attention to safety
When working with power tools, it is crucial to prioritize safety. Wear appropriate safety gear, such as safety glasses and gloves, to protect yourself from potential accidents or injuries. Additionally, make sure to follow the manufacturer’s instructions and guidelines for the tools you are using.
In summary, achieving clean and precise cuts on wood paneling requires careful measurement, the use of proper tools, and the implementation of precise cutting techniques. By following these tips, you can ensure a professional-looking finish and enhance the overall aesthetic of your space.
Safety Precautions to Consider When Cutting Wood Paneling
Wood paneling can be a great addition to any home, providing warmth and texture to walls. Whether you are installing new paneling or making modifications to existing paneling, it’s important to prioritize safety. Cutting wood paneling requires the use of sharp tools and can present potential hazards if not done carefully. This section outlines important safety precautions to consider when cutting wood paneling.
1. Wear Personal Protective Equipment (PPE)
Before you start cutting wood paneling, it’s essential to wear the appropriate personal protective equipment (PPE) to ensure your safety. This includes safety glasses or goggles to protect your eyes from flying wood chips, a dust mask or respirator to prevent inhalation of wood dust, and work gloves to protect your hands from sharp edges.
2. Choose the Right Tools
Using the right tools for cutting wood paneling is crucial for your safety and the quality of the cuts. A circular saw with a fine-toothed blade is commonly used for cutting paneling. Ensure that the blade is sharp and in good condition. It’s also important to have a stable work surface and appropriate clamps to secure the paneling during cutting.
3. Measure and Mark Carefully
Precision is key when cutting wood paneling. Before making any cuts, carefully measure and mark the paneling using a pencil or a marking tool. Double-check your measurements to ensure accuracy. This step helps you avoid unnecessary errors and ensures that your cuts align properly.
4. Set the Blade Depth Correctly
When using a circular saw or any other cutting tool, it’s important to set the blade depth correctly. The blade should extend slightly below the thickness of the paneling. Setting the blade too deep can lead to binding or kickback, while setting it too shallow may result in incomplete cuts. Follow the manufacturer’s instructions for your specific tool.
5. Cut in a Well-Ventilated Area
When cutting wood paneling, it’s essential to work in a well-ventilated area. This helps to minimize exposure to wood dust, which can be harmful if inhaled. If working indoors, open windows or use exhaust fans to improve air circulation. Additionally, consider using a dust collection system or vacuum to capture wood dust at the source.
6. Slow and Steady Cutting
When making cuts on wood paneling, maintain a slow and steady pace. Rushing the cutting process can increase the risk of accidents and result in uneven or jagged cuts. Apply consistent pressure and let the saw or cutting tool do the work. Avoid forcing or pushing the tool too hard, as this can lead to kickback.
7. Secure Sheet Materials Properly
If you are cutting large sheets of wood paneling, it’s important to have adequate support and secure the material properly. Use sawhorses or a stable workbench to support the paneling, ensuring it is level and positioned securely. Avoid overreaching or standing on unstable surfaces while cutting, as this can compromise your balance and safety.
8. Clean up Wood Dust Regularly
Wood dust can accumulate quickly during the cutting process. Regularly clean up wood dust using a vacuum or dustpan and brush. This helps to maintain a clean work area and reduces the risk of slips and falls. Dispose of wood dust in a proper waste container to prevent it from becoming a fire hazard.
9. Store Tools Safely
After completing your wood paneling project, store your cutting tools safely. Disconnect power tools and store them in a secure location, out of reach of children or unauthorized individuals. Keep blades covered or stored in protective cases to prevent accidental injuries when handling or storing the tools.
In summary, cutting wood paneling requires attention to safety precautions. Always wear appropriate personal protective equipment, choose the right tools, measure and mark carefully, set the blade depth correctly, work in a well-ventilated area, cut at a slow and steady pace, secure sheet materials properly, clean up wood dust regularly, and store tools safely. By following these safety precautions, you can ensure a safer and more enjoyable wood paneling cutting experience.
Creative Ideas for Using Cut Wood Paneling in DIY Projects
Wood paneling is a versatile material that can be used in various DIY projects to add warmth, texture, and a rustic touch to any space. From accent walls to furniture makeovers, cut wood paneling can be a great addition to your home decor. In this section, we will explore some creative ideas for using cut wood paneling in DIY projects.
1. Accent Wall
One of the most popular uses for cut wood paneling is to create an accent wall in a room. This can instantly transform a plain and boring space into a focal point. You can choose to cover the entire wall with wood paneling or create a unique pattern or design. The natural grains and textures of the wood will add depth and character to the wall, creating a cozy and inviting atmosphere.
2. Headboard
A wooden headboard can add a touch of rustic charm to your bedroom. By using cut wood paneling, you can easily create a custom headboard that fits your style and preferences. You can choose to paint or stain the wood to match your existing decor, or leave it natural for a more organic look. Adding some decorative elements like carved details or metal accents can further enhance the visual appeal of the headboard.
3. Floating Shelves
Cut wood paneling can also be repurposed into floating shelves. These shelves can be a practical and stylish addition to any room, providing extra storage space while showcasing your favorite decor items. You can use the paneling as the base of the shelf and add brackets or supports for a seamless floating effect. Finish the wood with a protective coat of varnish or paint to enhance its durability and aesthetics.
4. Coffee Table
If you’re looking to create a unique centerpiece for your living room, consider using cut wood paneling to build a coffee table. The warmth and natural beauty of the wood will instantly elevate the look of your space. You can customize the size, shape, and design of the table to fit your needs and preferences. Add a layer of clear epoxy resin to the tabletop to create a smooth and glossy finish.
5. Room Divider
Cut wood paneling can also be used to create a room divider, providing privacy and structure to an open space. Whether you prefer a simple design or a more intricate pattern, wood paneling can be a great material to achieve the desired look. You can stain or paint the wood to match the color scheme of your room and add some decorative elements like hinges or latches for a finished and polished look.
In summary, cut wood paneling can be a versatile and creative material to use in DIY projects. Whether you’re looking to add an accent wall, create a unique furniture piece, or divide a room, wood paneling can add warmth and character to your space. Get creative and explore different ideas to incorporate cut wood paneling into your next DIY project.
FAQs
1. How to cut wood paneling?
To cut wood paneling, start by measuring and marking the desired dimensions on the panel. Then, using a circular saw or a jigsaw with a fine-toothed blade, carefully follow the marked lines to make the cut. Ensure the panel is securely clamped or supported to prevent splintering.
2. What type of saw is best for cutting wood paneling?
A circular saw or a jigsaw with a fine-toothed blade is commonly used to cut wood paneling. A circular saw is ideal for straight cuts, while a jigsaw allows for more intricate shapes and curves. Choose a blade with a high tooth count to minimize splintering.
3. Are there any safety precautions to consider when cutting wood paneling?
Absolutely! When cutting wood paneling, always wear safety goggles, gloves, and a dust mask to protect yourself from flying debris and sawdust. Ensure the work area is well-ventilated, and follow the manufacturer’s instructions for operating the saw safely.
Conclusion
In conclusion, learning how to cut wood paneling can be a worthwhile skill for any DIY enthusiast or homeowner looking to enhance their space. By following the proper techniques and safety precautions, you can easily and accurately cut wood paneling to fit any desired shape or size.
Whether you’re renovating a room, building custom furniture, or creating a unique accent wall, understanding the process of cutting wood paneling will ensure your project’s success. Remember to measure twice and cut once, use appropriate tools such as a circular saw or jigsaw, and always wear safety goggles and gloves. With practice and patience, you can achieve professional-looking results and transform your space with beautifully cut wood paneling.
So, go ahead and take the plunge into the world of wood paneling. With the right tools, knowledge, and a touch of creativity, your projects will become a true reflection of your personal style and craftsmanship.