Learning how to draw wood planks can be a fun and rewarding experience for artists of all skill levels. Whether you want to create a realistic landscape or add texture to your illustrations, mastering the technique of drawing wood planks can greatly enhance your artwork.
By understanding the basic principles of perspective, shading, and texture, you can create convincing and detailed wood plank drawings. With practice and patience, you can develop the ability to bring depth and realism to your wood plank illustrations.
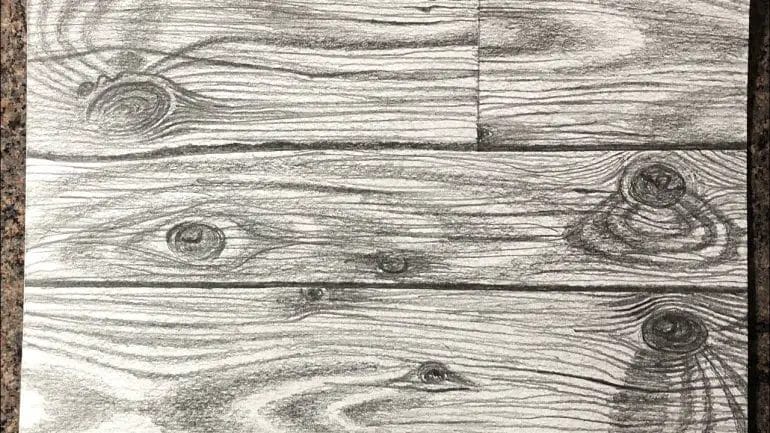
Start by studying reference images of wood planks to familiarize yourself with the different patterns and variations in wood grain. Pay attention to the direction of the wood grain, the spacing between planks, and any knots or imperfections.
Next, sketch out the basic shape of the wood plank using light, loose strokes. Use a pencil to add details such as the wood grain and any knots or cracks. Remember to vary the thickness and spacing of the lines to create a realistic effect.
To add depth and dimension to your drawing, use shading techniques to create highlights and shadows. Consider the direction and intensity of the light source to determine where the highlights and shadows should be placed.
Finally, add texture to your wood plank drawing by using cross-hatching or stippling techniques to create the appearance of wood grain. Pay attention to the direction and shape of the lines to mimic the natural patterns found in wood.
With practice

Preparing the Surface for Drawing Wood Planks
Before starting the process of drawing wood planks, it’s important to properly prepare the surface to ensure the best results. This step is crucial for achieving a smooth and long-lasting finish. Here are some steps to follow:
1. Clean the Surface
The first step in preparing the surface is to make sure it’s clean and free from any dust, dirt, or debris. Use a broom or vacuum cleaner to remove loose particles from the area. You can also use a damp cloth or sponge to wipe down the surface and remove any stubborn dirt.
2. Sand the Surface
Next, you’ll need to sand the surface to create a smooth and even texture. Use sandpaper or a sanding block to gently sand the surface in the direction of the wood grain. This will help to remove any rough spots or imperfections and create a uniform surface for drawing.
3. Fill in Cracks and Holes
If there are any cracks or holes in the surface, it’s important to fill them in before proceeding. Use a wood filler or putty that matches the color of the wood to fill in any gaps. Smooth out the filler with a putty knife and allow it to dry completely before continuing.
4. Prime the Surface
Before you can start drawing on the wood, it’s recommended to apply a layer of primer. Primer helps to create a barrier between the wood and the drawing materials, ensuring better adhesion and preventing the wood from absorbing the pigments. Choose a primer that is suitable for wood surfaces and apply it evenly using a brush or roller. Allow the primer to dry according to the manufacturer’s instructions.
5. Sand the Primer (Optional)
If you want an ultra-smooth surface for your wood plank drawing, you can lightly sand the dried primer with fine-grit sandpaper. This step will remove any brush strokes or imperfections, providing a clean canvas for your artwork. Be sure to wipe away any dust after sanding.
6. Apply a Base Coat (Optional)
If you want to add a colored background to your wood plank drawing, you can apply a base coat before starting the actual artwork. Choose a paint or stain in your desired color and evenly apply it to the primed surface. Allow the base coat to dry completely before proceeding.
In summary, preparing the surface for drawing wood planks involves cleaning the surface, sanding it to create a smooth texture, filling in any cracks or holes, priming the surface, and optionally applying a base coat. By following these steps, you’ll have a well-prepared surface that is ready for your creative wood plank drawing.

Techniques for Drawing Realistic Wood Grain
Drawing wood grain can add a realistic and natural texture to your artwork. Whether you are an experienced artist or just starting out, understanding the techniques for drawing realistic wood grain can greatly enhance your drawings. In this section, we will explore some effective techniques that can help you achieve a lifelike wood grain texture in your drawings.
1. Observing and Studying Wood Grain Patterns
Before you start drawing wood grain, it is important to observe and study real wood grain patterns. Take a close look at different types of wood and notice the intricate details and patterns. Pay attention to the direction of the grain, the variations in color, and the knots and lines that make up the texture. By studying the real thing, you will have a better understanding of how to recreate these elements in your drawings.
2. Establishing the Basic Shape and Direction
When drawing wood grain, it is important to start by establishing the basic shape and direction of the grain. Use light pencil strokes to sketch out the overall shape of the wood surface. Then, using slightly tilted lines, indicate the direction of the grain. Remember that wood grain tends to follow the natural growth rings of the tree, so observe the reference and replicate this in your drawing.
3. Adding Variation and Texture
To create a realistic wood grain texture, it is important to add variation and texture to your drawing. Start by using different pencil pressures to create light and dark areas. This will help to simulate the natural variations in color and tone found in wood. Next, use a fine-tipped pencil or an ink pen to add the details of the grain. Pay attention to the knots, lines, and subtle variations in the texture. Remember to follow the direction of the grain lines you established earlier.
4. Blending and Shading
Blending and shading are essential techniques for creating realistic wood grain. Use a blending stump or a soft brush to blend the pencil strokes and create a smooth transition between light and dark areas. This will give your wood grain a more polished and realistic appearance. Additionally, use shading techniques such as cross-hatching or stippling to add depth and dimension to your drawing.
5. Creating Highlights and Shadows
To further enhance the realism of your wood grain drawing, it is important to create highlights and shadows. Use a kneaded eraser or a white gel pen to add highlights and reflections on the smooth areas of the wood. This will give the impression of light hitting the surface. For shadows, use a darker pencil or shading technique to create depth and add a sense of volume to your drawing.
6. Practice and Experimentation
Like any skill, drawing realistic wood grain requires practice and experimentation. Take the time to practice different techniques and experiment with different types of wood. Try drawing different species of trees, each with their distinct grain patterns. Allow yourself to make mistakes and learn from them. With time and practice, you will develop your own unique style and approach to drawing wood grain.
In summary, drawing realistic wood grain can be achieved by observing and studying real wood grain patterns, establishing the basic shape and direction, adding variation and texture, blending and shading, creating highlights and shadows, and practicing and experimenting. By incorporating these techniques into your drawings, you can achieve a lifelike and natural wood grain texture that will enhance the overall realism of your artwork.
Adding Depth and Texture to Your Wood Plank Drawing
Creating a realistic wood plank drawing can be a rewarding and satisfying artistic endeavor. However, to truly bring your drawing to life, it is important to add depth and texture. These elements will give your drawing a three-dimensional appearance and make it look more realistic. In this section, we will explore various techniques and tips to help you add depth and texture to your wood plank drawing.
1. Layering Colors
One effective way to add depth to your wood plank drawing is by layering colors. Start by selecting a base color for the wood planks and apply it evenly across the entire drawing. Then, choose a slightly darker shade of the same color and apply it to certain areas, such as the edges or knots of the wood. This will create a sense of depth and make the planks appear more realistic.
Another technique you can use is dry brushing. Dip a dry brush into a lighter or darker shade of paint and lightly brush it over the surface of the wood planks. This will create subtle variations in color and add texture to your drawing.
2. Creating Shadows
Shadows play a crucial role in creating depth in any drawing. When drawing wood planks, it is important to consider the direction of the light source. Determine where the light is coming from and imagine how it would cast shadows on the planks. Use a darker shade or a different color to fill in the shadowed areas, paying attention to the angles and shapes of the shadows.
By adding shadows, you can create the illusion of depth and make your wood plank drawing appear more realistic. Remember to blend the shadows with the surrounding colors to achieve a smooth transition.
3. Adding Texture
To make your wood plank drawing look more textured, you can use various techniques such as cross-hatching, stippling, or scumbling. Cross-hatching involves drawing intersecting lines to create a woven or textured effect. Stippling is done by applying small dots or stipules to create a textured appearance. Scumbling involves gently rubbing or smudging the surface to create a softer and more organic feel.
Experiment with these techniques to see which one works best for your wood plank drawing. Remember to start with light strokes and gradually build up the texture to avoid making your drawing look too busy or overwhelming.
4. Adding Details
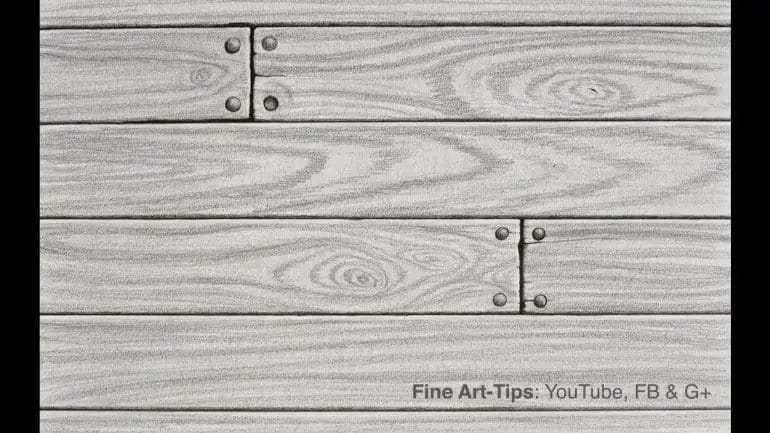
Lastly, adding small details can significantly enhance the realism of your wood plank drawing. Pay attention to the grain pattern of the wood and carefully recreate it in your drawing. Use a fine-tipped pen or pencil to add subtle lines and knots. You can also use an eraser to lift off some color in certain areas to create highlights or areas of weathering.
Don’t be afraid to study real wood planks or reference images to get inspiration and ideas for adding details. Small touches like nail holes, cracks, or imperfections can make your drawing appear more authentic.
Summary
Adding depth and texture to your wood plank drawing is essential for creating a realistic and visually engaging artwork. By layering colors, creating shadows, adding texture, and incorporating small details, you can bring your drawing to life. Remember to experiment with different techniques, study real wood planks, and stay patient as you work on perfecting your drawing. With practice and dedication, you’ll soon be able to create wood plank drawings that are full of depth and texture.
5. Enhancing Your Wood Plank Drawing with Shading and Highlights
Adding shading and highlights to your wood plank drawing can bring it to life and create a realistic three-dimensional effect. This technique can make your drawing more visually interesting and help to create depth and texture in your artwork.
Here are some tips on how to enhance your wood plank drawing with shading and highlights:
1. Determine the Light Source
Before you begin shading and adding highlights, it’s important to determine the direction and intensity of the light source in your drawing. This will help you create realistic shadows and highlights that correspond to the light hitting the wood planks.
2. Start with Basic Shading
Begin by shading the individual wood planks using a light to medium pencil. Start with light pressure and gradually build up the darkness by layering the graphite or charcoal. Pay attention to the direction of the wood grain and shade accordingly, keeping in mind the light source.
3. Create Contrast
To make your wood plank drawing more realistic, create contrast between the light and dark areas. Darken the areas that are in shadow or away from the light source, and lighten the areas that are hit by the light. This will add depth and dimension to your drawing.
4. Blend and Smudge
Blend and smudge your shading using a blending stump or a tortillon. This will help to smooth out the transitions between light and dark areas and create a more seamless look. Be careful not to over-blend, as you still want to maintain some texture and grain in the wood.
5. Add Highlights
Using an eraser or a white colored pencil, add highlights to the areas of the wood plank that are directly hit by the light source. This will create a shiny or reflective effect and make the wood appear more three-dimensional. Be strategic with your highlights and place them where the light would naturally hit.
6. Pay Attention to Details
Lastly, pay attention to the small details in your wood plank drawing. Add knots, cracks, and other imperfections that are common in wooden surfaces. These details will add realism and make your drawing more compelling.
In summary, enhancing your wood plank drawing with shading and highlights can elevate it to the next level. By understanding the light source, using basic shading techniques, creating contrast, blending, adding highlights, and paying attention to details, you can create a realistic and visually striking wood plank drawing.
FAQs
1. How can I draw wood planks?
To draw wood planks, start by sketching parallel lines to represent the edges of the planks. Then, draw shorter lines intersecting these parallel lines to create the wood grain. Add some shading to give depth and texture to the planks. Finally, erase any unnecessary lines and add details like knots or cracks for a realistic effect.
2. What tools or materials do I need to draw wood planks?
To draw wood planks, you will need paper, a pencil, an eraser, and shading tools like pencils or charcoal. You may also use a ruler or straight edge to create straight lines for the plank edges. It’s helpful to have a reference image of wood planks to guide your drawing.
3. Are there any tips for drawing realistic wood planks?
When drawing wood planks, pay attention to the direction and variation in the wood grain. Use different pressure when shading to create depth and highlights. Additionally, observe the texture and patterns of real wood and try to replicate them in your drawing. Practice regularly to improve your skills in drawing realistic wood planks.
Conclusion:
In conclusion, learning how to draw wood planks can be a valuable skill for artists and designers alike. By following a few simple techniques and practicing regularly, you can create realistic and detailed wood textures in your artwork. Remember to pay attention to the direction of the wood grain, variations in color and texture, and the overall perspective. Whether you’re working on a traditional drawing or a digital illustration, these tips will help you bring depth and authenticity to your wood plank designs. So grab your pencils or digital tools, and start bringing wood planks to life in your art!