Looking to create a wood whistle? You’ve come to the right place! Making a wood whistle is a fun and rewarding DIY project that allows you to explore your creativity. Whether you’re a beginner or an experienced woodworker, this guide will walk you through the step-by-step process of crafting your own unique wood whistle. From selecting the right wood to shaping and tuning, you’ll learn all the essential techniques to create a beautiful and functional whistle. So grab your tools and let’s get started on this exciting woodworking adventure!
Tools and Materials Needed for Making a Wood Whistle
Making a wood whistle can be a fun and rewarding project for both beginners and experienced woodworkers alike. To create your own wooden whistle, you will need a variety of tools and materials. Here is a list of the essential items you will need:

Tools:
- Band saw or coping saw – Used to cut the wood into the desired shape.
- Drill press – Used to create the sound-producing holes in the whistle.
- Sandpaper – Used to smooth the edges and surfaces of the whistle.
- Clamps – Used to hold the wood securely in place during the cutting and drilling process.
- File – Used to shape and refine the whistle’s mouthpiece and air hole.
- Wood carving tools – Optional, but can be used to add decorative details to the whistle.
Materials:
- Wood – Choose a hardwood such as maple, cherry, or walnut for durability and a pleasing tone.
- Wax or finish – Used to protect and enhance the appearance of the finished whistle.
It’s important to note that the specific tools and materials you will need may vary depending on the design and complexity of the whistle you intend to make. Additionally, some woodworkers may have their own preferred tools or techniques for whistle-making.
When selecting wood for your whistle, it’s essential to choose a suitable type that is free from knots, cracks, or defects. The wood should also be dry and stable to prevent warping or splitting as the whistle is being crafted.
Once you have gathered all of the necessary tools and materials, you can begin the process of making your wood whistle. Start by cutting the wood into the desired shape using a band saw or coping saw. Next, use the drill press to create the sound-producing holes in the whistle, carefully spacing them according to the design you have chosen. Use a file to shape and refine the mouthpiece and air hole, creating a smooth and comfortable blowing surface.
After the basic shape and holes are complete, use sandpaper to smooth the edges and surfaces of the whistle, removing any rough or sharp edges. This will not only improve the appearance of the whistle but also ensure a comfortable and enjoyable playing experience.
Once you are satisfied with the shape and smoothness of the whistle, you can apply a wax or finish to protect the wood and enhance its natural beauty. Be sure to follow the manufacturer’s instructions for applying and drying the chosen finish.
In summary, to make a wood whistle, you will need tools such as a band saw, drill press, sandpaper, clamps, file, and optional wood carving tools. The materials required are hardwood, wax or finish. Remember to choose the right type of wood, free from defects, and dry. With these tools and materials, you can create your own beautiful and functional wood whistle.
Step-by-step guide to carving a wood whistle
Carving a wood whistle can be a fun and rewarding project for both beginners and experienced woodworkers. With a few basic tools and some patience, you can create a unique and functional musical instrument. In this guide, we will walk you through the step-by-step process of carving a wood whistle.
Materials and tools you will need:
- A block of hardwood (such as maple, walnut, or cherry)
- A pencil
- A coping saw or band saw
- A carving knife or chisel set
- Sandpaper (various grits)
- A drill with a small drill bit
- A file or rasp
- A finish of your choice (such as beeswax or varnish)
- Safety goggles and gloves
Step 1: Design and mark the whistle
Start by designing the shape and size of your whistle on the block of wood. You can draw it directly on the wood using a pencil. Consider the overall length, diameter, and shape of the whistle, keeping in mind that the longer the whistle, the lower the pitch. Once you are satisfied with your design, mark the outline of the whistle on the wood.
Step 2: Cut out the whistle blank
Using a coping saw or band saw, carefully cut out the whistle blank along the marked outline. Take your time to ensure smooth and precise cuts. Remember to wear safety goggles and gloves to protect yourself from any potential injuries.
Step 3: Shape the whistle
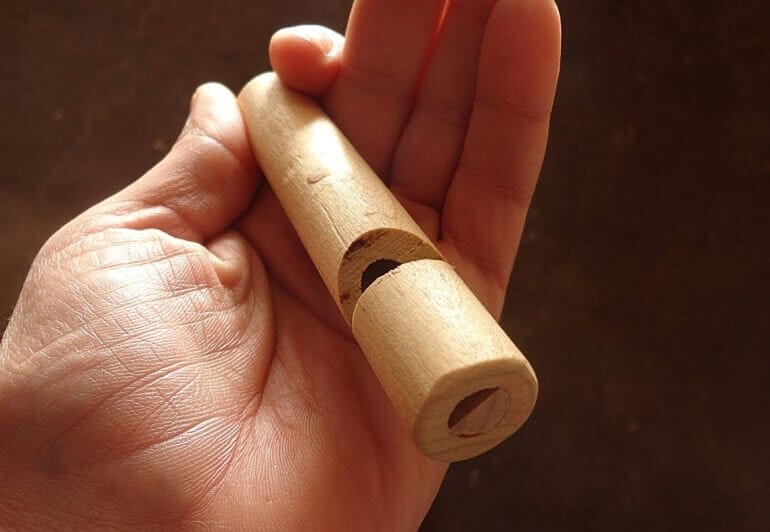
Now it’s time to shape the whistle. Start by carving the mouthpiece area at one end of the whistle. Use a carving knife or chisel to carefully remove the excess wood, creating a beveled edge for blowing into. Take small, controlled cuts and test the fit regularly. Once you are satisfied with the mouthpiece, move on to shaping the body of the whistle. Round off the corners and smooth out any rough edges using sandpaper. The overall shape should resemble a cylindrical tube.
Step 4: Drill the sound hole
Using a drill with a small drill bit, carefully drill a sound hole near the mouthpiece end of the whistle. This hole will allow the air to escape and produce sound. Start with a small hole and gradually enlarge it until you achieve the desired sound. Be careful not to drill too close to the edge of the whistle to avoid weakening the wood.
Step 5: Fine-tune and finish
Once the whistle is shaped and drilled, use a file or rasp to fine-tune the sound hole and make any necessary adjustments to the overall shape. Smooth out any rough surfaces using sandpaper, starting with a coarser grit and gradually moving to a finer grit. This will give the whistle a polished and professional look. Finally, apply a finish of your choice to protect the wood and enhance its appearance.
Step 6: Test and enjoy
After the finish has dried, it’s time to test your wood whistle. Hold it firmly and blow into the mouthpiece to create sound. Experiment with different blowing techniques and finger placements to produce different notes and melodies. With practice, you will be able to play tunes on your handmade wood whistle.
In summary
Carving a wood whistle is a rewarding woodworking project that allows you to create a unique musical instrument. By following this step-by-step guide, you can carve your own wood whistle and enjoy the process of crafting something beautiful and functional. Remember to take your time, use proper safety precautions, and have fun exploring the world of wood carving.
Adding the Finishing Touches to Your Wood Whistle
Now that you have successfully crafted your wood whistle, it’s time to add the finishing touches to make it truly shine. These final steps will ensure that your whistle looks polished and professional, while also enhancing its functionality. Follow these simple instructions to complete your wood whistle project.
Sanding the whistle
The first step in adding the finishing touches to your wood whistle is sanding. Start by using a fine-grit sandpaper to smooth out any rough edges or imperfections on the whistle. Sand in the direction of the wood grain to achieve a smooth and even finish. Be sure to sand all sides of the whistle, including the top and bottom.
Once you have sanded the whistle with the fine-grit sandpaper, switch to a higher grit sandpaper, such as 400 or 600, for a finer finish. Continue sanding until the wood feels smooth to the touch and all visible marks and scratches have been removed.
Applying a finish
After sanding, it’s time to apply a finish to your wood whistle. There are several options to choose from, including varnish, shellac, or wood oil. Each finish has its own unique characteristics, so choose the one that best suits your preferences.
If you prefer a glossy and protective finish, consider using varnish. Apply a thin coat of varnish to the whistle using a clean brush or cloth, following the manufacturer’s instructions for drying and curing times. Repeat this process until you achieve the desired level of glossiness.
For a more natural and subtle finish, you can use shellac. Apply a thin coat of shellac to the whistle, allowing it to dry between each application. This will give your whistle a warm and smooth appearance.
If you prefer a more rustic and traditional look, wood oil is a great option. Apply a generous amount of wood oil to the whistle using a clean cloth, allowing it to soak into the wood. Wipe off any excess oil and let it dry completely.
Adding a decorative touch
To further enhance the look of your wood whistle, you can add a decorative touch. This can be done by carving intricate patterns or designs on the whistle using a wood carving tool. Alternatively, you can use woodburning techniques to create unique and personalized designs. Be sure to sand the area before carving or woodburning to achieve a smooth surface.
Testing the whistle
Before considering your wood whistle project complete, it’s important to test the sound and functionality of the whistle. Blow into the mouthpiece and listen for a clear and consistent tone. Adjust the air hole if necessary to achieve the desired pitch and volume. Make any necessary modifications before proceeding.
Final inspection
Once you are satisfied with the sound and appearance of your wood whistle, give it a final inspection. Check for any loose or sharp edges that need to be sanded or smoothed out. Ensure that all parts are securely attached and in good working condition.
In summary, adding the finishing touches to your wood whistle involves sanding, applying a finish, adding a decorative touch, testing the whistle, and conducting a final inspection. By following these steps, you will not only enhance the appearance of your wood whistle but also ensure that it produces a clear and pleasing sound. Enjoy the fruits of your labor and impress others with your craftsmanship!
Tips for testing and fine-tuning your wood whistle
Once you have completed the construction of your wood whistle, it is important to thoroughly test and fine-tune it to ensure optimal performance. The following tips will help you in this process:
- Blowing technique: Start by experimenting with different blowing techniques to produce a clear and consistent sound. Adjust the angle and force of your breath until you achieve the desired tone.
- Finger placement: Proper finger placement is crucial for controlling the pitch and producing different notes. Practice covering and uncovering the finger holes to find the right combination for each note.
- Check for air leaks: Inspect your wood whistle for any gaps or cracks that could cause air leaks. Seal these areas using wax or putty to ensure a tight seal and prevent loss of sound.
- Adjust the barrel length: The length of the barrel affects the pitch of the whistle. If the pitch is too high, trim the barrel slightly and test again. If the pitch is too low, lengthen the barrel by adding a small extension piece.
- Sand the finger holes: Use fine-grit sandpaper to smooth out the edges of the finger holes. This will prevent any sharp or rough edges from interfering with the sound production.
- Experiment with materials: Different types of wood can produce variations in tone and resonance. Try constructing your whistle with different wood species to achieve the desired sound quality.
- Test in different environments: Test your wood whistle in various environments to gauge its performance. Try playing it indoors, outdoors, in humid conditions, and in different temperatures to see how it responds.
- Record and analyze: Record yourself playing the wood whistle and listen back to identify any areas that need improvement. Analyze the sound quality, pitch consistency, and overall tone to make necessary adjustments.
- Seek feedback: Share your wood whistle with others who have experience in woodworking or musical instruments. Their feedback can provide valuable insights and help you fine-tune your whistle further.
- Practice and refine: Like any musical instrument, playing the wood whistle requires practice. Devote time to practicing different tunes, scales, and techniques to improve your skills and master the instrument.
In summary, testing and fine-tuning your wood whistle is essential for achieving the desired sound quality and performance. By following these tips and refining your technique, you can create a wood whistle that produces clear, consistent notes and brings joy to your music-making endeavors.
Frequently Asked Questions (FAQs)
1. How can I make a wood whistle?
To make a wood whistle, start by selecting a suitable piece of wood and cutting it into a whistle shape. Carve out a mouthpiece and drill a hole for sound production. Fine-tune the whistle by adjusting the size and shape of the sound hole until the desired pitch is achieved. Finish the whistle by sanding and polishing it.
2. What tools and materials do I need to make a wood whistle?
To make a wood whistle, you will need a piece of wood, a saw for cutting, carving tools for shaping and hollowing, a drill with a suitable bit, sandpaper for smoothing, and a polishing agent for finishing. You may also require a ruler or measuring tape to ensure accurate dimensions.
3. Are there any safety precautions I should take while making a wood whistle?
Yes, when making a wood whistle, it is important to wear protective goggles and gloves to prevent injuries. Use caution when handling sharp tools, and make sure to work in a well-ventilated area to avoid inhaling wood dust. Take breaks as needed and follow proper tool usage instructions to ensure safety.
Conclusion:
In conclusion, learning how to make a wood whistle is a fulfilling and creative endeavor. By following the step-by-step instructions and using the right tools, you can craft a unique musical instrument that produces enchanting melodies. Whether you are a woodworking enthusiast or a music lover, making a wood whistle allows you to combine your passions and create something truly special. Not only will you gain a sense of accomplishment, but you will also have a functional and beautiful whistle to enjoy. So, unleash your inner craftsman and start the journey of making your very own wood whistle today!