Looking to add a touch of warmth and natural beauty to your space? Learn how to make a wood wall and transform any room into a stylish and inviting oasis. With just a few simple steps, you can create a stunning feature wall that showcases the timeless elegance of wood.
Start by selecting the type of wood that best suits your design vision and budget. Whether it’s reclaimed barn wood for a rustic look or sleek, polished hardwood for a more contemporary feel, the possibilities are endless.

Next, carefully measure and prepare your wall surface, ensuring it is clean and free of any imperfections. Proper planning and preparation are key to achieving a seamless and professional-looking wood wall.
Once your wall is ready, it’s time to install the wood. Whether you choose to use individual planks, shiplap, or a peel-and-stick wood paneling system, follow the manufacturer’s instructions for a secure and precise installation.
After the wood is in place, take the time to sand and finish your wall to enhance its natural beauty and protect it from wear and tear. Applying a sealant or clear coat will help to preserve the wood’s color and texture while providing added durability.
Finally, step back and admire your handiwork. A wood wall adds depth, character, and a touch of elegance to any space, making it the perfect DIY project for those looking to elevate their interior design game.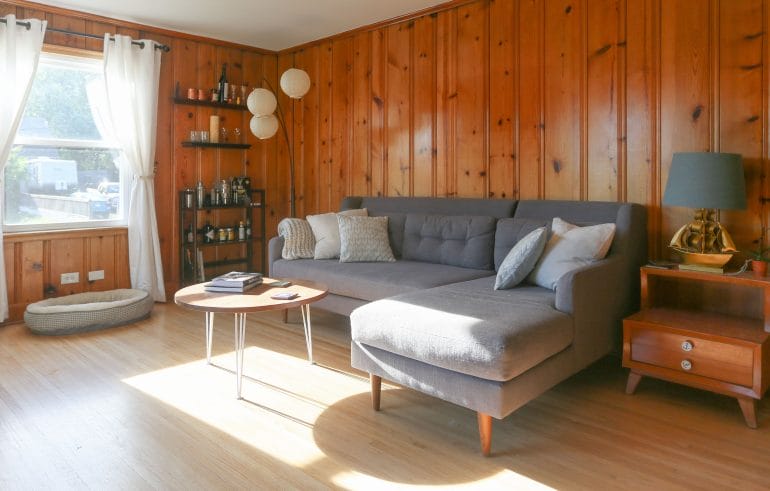
Choosing the Right Wood for Your Wall
When it comes to adding warmth and natural beauty to your home, there’s nothing quite like a wood accent wall. Not only does it create a focal point in the room, but it also adds texture and interest to an otherwise plain space. However, choosing the right type of wood for your wall is crucial to ensure that you achieve the desired look and feel. In this section, we will explore different types of wood and factors to consider when selecting the perfect wood for your wall.
1. Hardwood
Hardwood is a popular choice for accent walls due to its durability and timeless appeal. It is known for its strength and resistance to wear and tear, making it suitable for high-traffic areas. Common hardwood options include oak, walnut, cherry, and maple. Each type of hardwood has its own unique grain pattern and color variations, allowing you to customize the look of your wall.
When choosing hardwood for your wall, consider the overall aesthetic of your space. If you prefer a rustic or farmhouse style, oak with its prominent grain and warm tones may be the perfect choice. On the other hand, if you prefer a more modern and sleek look, walnut or cherry with their smooth and consistent finish can add elegance to your room.
2. Softwood
Softwood, such as pine, cedar, and fir, is another popular option for accent walls. Unlike hardwood, softwood is less dense, making it easier to work with and more budget-friendly. Softwood also tends to have a lighter color palette, ranging from pale yellow to light brown.
Pine is a versatile softwood that can be stained or painted to match your desired aesthetic. It is known for its knots and natural wood patterns, which can add character to your wall. Cedar, on the other hand, is resistant to rot and insect damage, making it a great choice for areas with high humidity. It also has a distinct aroma that can add a pleasant scent to your space.
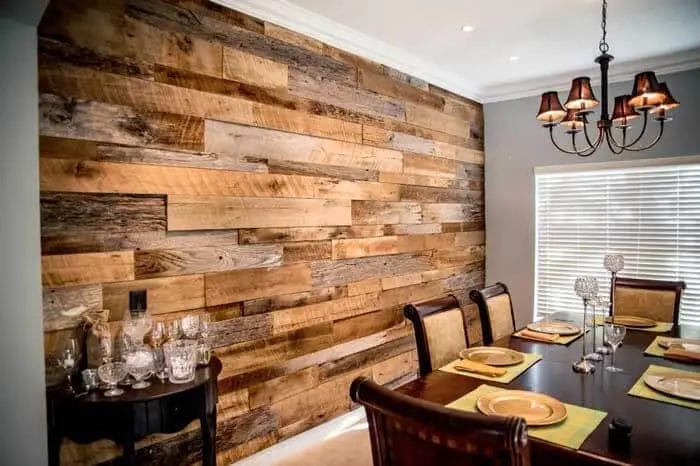
3. Reclaimed Wood
For those looking for a more sustainable and unique option, reclaimed wood is an excellent choice for an accent wall. Reclaimed wood is salvaged from old barns, factories, or other structures and repurposed for interior design. This not only gives new life to old wood but also adds a sense of history and character to your space.
Reclaimed wood is available in a variety of species, such as oak, pine, and fir, each with its own distinct features. It may have nail holes, saw marks, and other signs of its previous use, which add to its charm. Before using reclaimed wood for your wall, make sure it has been properly cleaned and treated to remove any potential contaminants.
4. Engineered Wood
If you’re looking for a more cost-effective and versatile option, engineered wood is worth considering. Engineered wood is made by bonding layers of plywood or fiberboard together, topped with a thin veneer of real wood. This construction method allows for greater stability and resistance to moisture compared to solid wood.
Engineered wood comes in various styles and finishes, mimicking the appearance of hardwood or reclaimed wood. It is available in different plank sizes, enabling you to create various design patterns on your accent wall. Additionally, engineered wood is less susceptible to warping and shrinking, making it a suitable choice for areas with fluctuating humidity levels.
Factors to Consider
When selecting the right wood for your wall, there are several factors to consider:
- Color and Grain: Choose a wood species with a color and grain pattern that complements your overall design scheme.
- Durability: Consider the durability of the wood, especially if the wall will be in a high-traffic area.
- Finish: Decide whether you prefer a natural, stained, or painted finish for your wood wall.
- Budget: Determine your budget and look for wood options that fit within your price range.
- Maintenance: Consider the level of maintenance required for the wood you choose. Some woods may need regular sealing or refinishing.
In summary, choosing the right wood for your wall is a balance between aesthetics, durability, and budget. Whether you opt for hardwood, softwood, reclaimed wood, or engineered wood, each has its own unique characteristics that can enhance the overall look and feel of your space. Take the time to explore different wood options and consider the factors mentioned
Preparing the Wall Surface for Installation
Before proceeding with the installation of any wall covering, it is essential to properly prepare the wall surface. This ensures a smooth and durable finish, minimizing any potential issues that may arise later on. Whether you are planning to paint, wallpaper, or install tiles, the following steps will help you achieve a professional result.
1. Clean the Wall
The first step in preparing the wall surface is to clean it thoroughly. Remove any dust, dirt, and grease using a mild detergent mixed with water. Scrub the wall gently with a sponge or soft cloth, paying extra attention to areas that are prone to dirt buildup, such as kitchen walls.
2. Repair Damages
Inspect the wall for any damages, such as cracks, holes, or loose plaster. These imperfections should be repaired before proceeding with the installation. Use a putty knife to fill in cracks and holes with spackling compound or patching plaster. For larger damages, consider using a joint compound or plaster to achieve a smooth and even surface. Allow the repairs to dry thoroughly before moving on to the next step.
3. Sand the Surface
After the repairs have dried, sand the surface to ensure a smooth finish. Use a sanding block or sandpaper to gently sand the repaired areas, as well as any rough or uneven sections of the wall. This will help create an even surface for the wall covering and ensure better adhesion.
4. Prime the Wall
Priming the wall is an essential step before applying any wall covering. A primer creates a barrier between the wall surface and the covering, allowing for better adhesion and a more uniform finish. Choose a primer that is suitable for the type of wall covering you will be installing. Apply the primer using a brush or roller, following the manufacturer’s instructions. Allow the primer to dry completely before proceeding.
5. Check for Moisture
Moisture can cause damage to wall coverings, so it is crucial to ensure that the wall surface is dry before installation. Use a moisture meter to check for any signs of moisture. If there are high levels of moisture present, identify and fix the source of the moisture before proceeding. Allow the wall surface to dry completely before continuing with the installation.
6. Smooth the Surface
Once the wall surface is dry and primed, it is essential to ensure that it is smooth and free from imperfections. Run your hand over the surface to feel for any rough spots or bumps. If necessary, lightly sand those areas to achieve a smooth finish.
7. Dust Off the Surface
Before installing the wall covering, make sure to remove any dust or debris from the surface. Use a damp cloth or a vacuum cleaner with a brush attachment to gently clean the wall. This will help ensure proper adhesion and a clean, professional-looking finish.
Summary
Properly preparing the wall surface is crucial for achieving a professional and durable finish. By following these steps, including cleaning the wall, repairing damages, sanding the surface, priming the wall, checking for moisture, smoothing the surface, and removing dust, you can ensure that your wall covering installation will be successful. Take the time to prepare the wall surface correctly, and you will be rewarded with a beautiful and long-lasting result.
Step-by-Step Guide to Installing a Wood Wall
Adding a wood accent wall to your home can instantly transform the look and feel of any room. Whether you want to create a rustic farmhouse vibe or a modern and sleek aesthetic, a wood wall can add warmth and character to your space. If you’re ready to take on a DIY project and install a wood wall, follow this step-by-step guide for a successful installation.
1. Measure and Plan
The first step in installing a wood wall is to measure and plan your project. Determine the area of the wall you want to cover and calculate the amount of wood you’ll need. Don’t forget to account for any doors, windows, or other obstacles that may require additional cuts. Sketch out a layout for your wood wall, considering the pattern and direction of the wood planks.
2. Gather Materials and Tools
Next, gather all the materials and tools you’ll need for the installation. This typically includes wood planks, adhesive or nails, a saw, a level, a measuring tape, a pencil, a hammer, and a pry bar. Make sure you choose high-quality wood that is suitable for interior wall installation.
3. Prepare the Wall
Before installing the wood planks, prepare the wall by removing any existing trim, baseboards, or outlet covers. Clean the wall surface thoroughly and patch any holes or imperfections. Sand the wall lightly to create a smooth surface for the wood to adhere to.
4. Install the First Row
Start by installing the first row of wood planks at the bottom of the wall. Apply adhesive to the back of each plank or use nails to secure them to the wall. Use a level to ensure the planks are straight and even. Trim the last plank in the row, if necessary, to fit the space.
5. Continue Installing Rows
Working your way up the wall, continue installing rows of wood planks. Stagger the seams between planks to create a visually appealing pattern. Use a measuring tape and a saw to make precise cuts as needed. Always check the level of each row to maintain a straight and even installation.
6. Trim and Finish
Once you’ve reached the top of the wall, trim the planks to fit the space. Use a pry bar to remove any spacers or wedges that were used during the installation. Replace the trim and baseboards, if necessary, and touch up any paint or stain as needed. Stand back and admire your newly installed wood wall!
7. Maintenance and Care
To keep your wood wall looking its best, it’s important to properly maintain and care for it. Regularly dust the surface with a soft cloth or vacuum with a brush attachment. Avoid using harsh cleaning chemicals or abrasive materials that can damage the wood. If needed, you can apply a protective sealant or wax to enhance the durability and longevity of your wood wall.
With this step-by-step guide, you can confidently install a wood wall in your home. Remember to take your time, measure accurately, and follow proper safety precautions throughout the installation process. Enjoy the beauty and warmth that a wood wall brings to your living space!
Tips and Tricks for Proper Wood Wall Maintenance
Wood walls add warmth and beauty to any space, whether it’s a cozy living room or a rustic cabin in the woods. However, they require proper maintenance to keep them looking their best. In this section, we will discuss some useful tips and tricks for maintaining your wood walls and ensuring their longevity.
Regular Cleaning
Regular cleaning is essential for keeping your wood walls in top condition. Start by dusting the surface with a soft, lint-free cloth or a microfiber duster. Avoid using abrasive materials that can scratch the wood. For stubborn dirt or stains, use a mild wood cleaner and a soft cloth to gently wipe the surface. Be sure to follow the manufacturer’s instructions for cleaning products, as some may be too harsh for certain types of wood.
Avoid Excess Moisture
Excess moisture can damage wood walls, leading to warping, swelling, and even mold growth. To prevent moisture-related issues, avoid placing your wood walls in areas with high humidity or near water sources. Use dehumidifiers or fans to reduce humidity levels, especially in basements or bathrooms. Be cautious when hanging wet or damp items on your wood walls, as they can leave behind moisture that can seep into the wood.
Protect from Sunlight
Direct sunlight can cause wood walls to fade and lose their natural luster. To protect your wood walls from UV damage, consider applying a clear protective finish or using curtains or blinds to block out sunlight during peak hours. If possible, rearrange furniture or artwork periodically to ensure even exposure to sunlight and prevent uneven fading.
Prevent Scratches and Dents
Wood walls are susceptible to scratches and dents, especially in high-traffic areas. Place protective pads or felt glides on the bottom of furniture legs to prevent them from scratching the wood surface. Avoid dragging heavy or sharp objects directly on the wood walls. In case of minor scratches, you can use a touch-up kit or a wood marker that matches the color of your walls to conceal the imperfections.
Refinishing and Restoring
Over time, your wood walls may show signs of wear and tear. Refinishing and restoring the wood can bring back its original beauty. Start by sanding the surface to remove any existing finish or imperfections. Then, apply a wood stain or paint to achieve the desired look. Finish off with a protective coat of varnish or sealant to enhance durability and protect against future damage.
Regular Inspections
Regular inspections are crucial to identify any potential issues with your wood walls. Check for signs of water damage, mold growth, or pest infestations. If you notice any problems, address them promptly to prevent further damage. It’s also a good idea to inspect the caulking around windows and doors to ensure a proper seal, as leaks can lead to moisture buildup and damage the wood.
Proper Humidity Control
Wood is sensitive to changes in humidity, as it can cause the wood to expand or contract. To maintain stable humidity levels, consider using a humidifier in dry climates or a dehumidifier in humid environments. The ideal humidity range for wood walls is typically between 35% to 55%. Monitor humidity levels regularly using a hygrometer and make adjustments as needed.
In summary, proper maintenance is essential for preserving the beauty and longevity of your wood walls. Regular cleaning, avoiding excess moisture, protecting from sunlight, preventing scratches and dents, refinishing and restoring when needed, regular inspections, and maintaining proper humidity levels are all key factors in ensuring the optimal condition of your wood walls. By following these tips and tricks, you can enjoy the timeless elegance of your wood walls for years to come.
Frequently Asked Questions
1. How can I make a wood wall?
To make a wood wall, you will need to follow these steps:
– Measure and mark the area where you want to install the wood wall.
– Choose the type of wood and finish you want for your wall.
– Cut the wood panels to fit the measurements.
– Install a wooden framework on the wall for support.
– Attach the wood panels to the framework using nails or screws.
– Finish the wall by sanding and staining or painting the wood panels.
2. What tools and materials do I need to make a wood wall?
To make a wood wall, you will typically need the following tools and materials:
– Measuring tape
– Level
– Circular saw or miter saw
– Nails or screws
– Hammer or drill
– Wood panels
– Wood stain or paint
– Sandpaper
– Safety goggles and gloves
3. Can I install a wood wall myself, or do I need professional help?
Installing a wood wall can be a DIY project if you have basic woodworking skills and the necessary tools. However, if you are unsure or inexperienced, it is recommended to seek professional help to ensure a proper installation.
Conclusion
In conclusion, creating a wood wall can effortlessly transform the aesthetic appeal of any space, adding warmth and a touch of nature. By following the step-by-step instructions outlined in this guide, anyone can successfully build a wood wall. Remember to choose the right type of wood, measure accurately, and use the necessary tools for the job. Additionally, consider staining or painting the wood to further enhance its look and protect it from potential damage. Whether you are looking to enhance a room’s ambiance or add a rustic touch to your home, making a wood wall is a rewarding project that can elevate your interior design.
