If you’re looking to create concrete molds from wood, you’ve come to the right place. Crafting wood molds for concrete can be a cost-effective and customizable solution for various DIY projects. By following a few simple steps, you can create durable and reusable molds that will help you achieve professional-looking concrete shapes and designs. Whether you’re making stepping stones, planters, or decorative tiles, this guide will provide you with the necessary tips and techniques to successfully create concrete molds from wood.
First, you’ll need to gather the materials and tools required for the project. This includes high-quality wood, such as plywood or MDF, which can withstand the pressure and weight of the concrete. Additionally, you’ll need measuring tools, saws, sandpaper, and screws to assemble the mold structure.

Once you have your materials ready, you can start by designing the shape and size of your concrete mold. Consider the purpose of your project and the dimensions you want to achieve. Sketch out the mold design on paper and make any necessary adjustments before proceeding.
Next, you’ll need to cut the wooden pieces according to your design. Use a saw to accurately shape the mold walls and base. Ensure that the pieces fit together snugly, and make any adjustments as needed. Sand the edges and surfaces of the wood to achieve a smooth finish.
After preparing the wooden pieces, it’s time to assemble the mold. Use screws to secure
Building a Simple Wooden Frame for Concrete Mold
When it comes to constructing a concrete mold, one of the essential steps is building a sturdy wooden frame. The frame not only serves as a support structure but also determines the shape and size of the final concrete structure. In this section, we will guide you through the process of building a simple wooden frame for your concrete mold.
Before you begin, gather the necessary materials. You will need pressure-treated lumber, a circular saw or miter saw, a measuring tape, a drill, screws, and a level. Additionally, ensure you have a clear idea of the dimensions and shape of the concrete structure you want to create.
Step 1: Measure and Mark
Start by measuring the dimensions of your concrete mold. Take accurate measurements of both the length and width. If you plan to create a rectangular mold, ensure the corners are square by using the 3-4-5 triangle method.
Use a pencil or marker to mark the measurements directly onto the lumber. Make sure to label each piece for easy identification later on.
Step 2: Cut the Lumber
Using a circular saw or miter saw, carefully cut the lumber according to the marked measurements. Double-check your measurements before making any cuts to avoid any mistakes.
For a rectangular frame, you will need two long pieces for the sides and two shorter pieces for the ends. Ensure that the ends of the lumber are cut at 45-degree angles to create clean and tight joints.
Step 3: Assemble the Frame
Lay out the cut pieces of lumber on a flat surface and begin assembling the frame. Place the shorter end pieces between the longer side pieces to form a rectangular shape.
Use a drill to make pilot holes in the lumber, then secure the joints using screws. Make sure the frame is tightly secured and square by using a level to check the corners and sides.
Step 4: Add Support Braces
To reinforce the wooden frame, add support braces across the interior of the mold. Measure and cut additional pieces of lumber to fit across the width of the frame, positioning them at regular intervals.
Attach the support braces to the frame using screws. This will help prevent the frame from flexing when the weight of the concrete is poured into the mold.
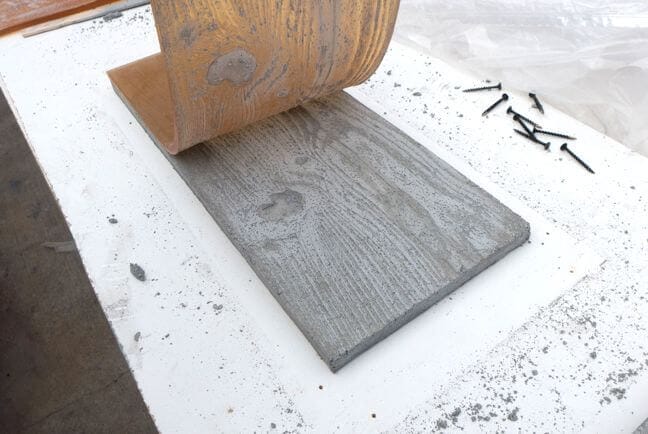
Step 5: Apply Release Agent
Before pouring the concrete into the mold, apply a release agent to the interior surfaces of the wooden frame. This will allow for easy removal of the concrete once it has cured.
There are various release agents available, such as petroleum jelly or specialized concrete form release agents. Apply the agent evenly to all interior surfaces, ensuring thorough coverage.
Step 6: Pour the Concrete
Once the frame is fully prepared, it’s time to pour the concrete. Follow the recommended mixing instructions for your concrete mix and pour it into the mold. Use a trowel to smooth the surface and remove any air pockets or voids.
Allow the concrete to cure for the recommended period, usually a minimum of 24 hours. Keep the mold damp during the curing process to ensure optimal strength and durability.
Step 7: Demold the Concrete
After the concrete has fully cured, carefully remove the wooden frame from the mold. Gently tap the sides of the frame with a rubber mallet or hammer to loosen it from the concrete.
If necessary, use a pry bar to help lift the frame away from the concrete. Take caution not to damage the edges or surface of the concrete structure.
Step 8: Finishing Touches
Once the concrete is demolded, you may choose to further enhance the appearance by sanding the edges or applying a sealer. These finishing touches can give your concrete structure a polished and professional look.
Remember to protect your hands and eyes by wearing appropriate safety gear throughout the entire process.
Summary
Building a simple wooden frame for a concrete mold is a crucial step in the construction process. By following the steps outlined above, you can create a sturdy and properly shaped mold for your concrete project. Remember to measure and mark accurately, cut the lumber precisely, assemble the frame securely, and reinforce it with support braces. Applying a release agent before pouring the concrete will aid in easy demolding, and allowing the concrete to cure sufficiently will ensure optimal strength. Finally, don’t forget the finishing touches to enhance the appearance
Sealing and Preparing the Wood for Concrete
Before pouring concrete onto wood surfaces, it is imperative to properly seal and prepare the wood to ensure a durable and long-lasting concrete surface. This step is crucial to prevent moisture from penetrating the wood, which can lead to rotting and weakening of the structure over time. In this section, we will discuss the importance of sealing and preparing the wood for concrete and the steps involved in achieving a solid foundation.
Why is Sealing and Preparing the Wood Important?
Sealing and preparing the wood is essential because it acts as a barrier between the wood and the concrete. Without proper sealing, moisture can seep into the wood, causing it to expand and contract with changes in temperature and humidity. This can result in cracks, warping, and ultimately compromise the integrity of the concrete surface. Additionally, unsealed wood can release natural oils and resins that can interfere with the bonding of the concrete, leading to poor adhesion.
Steps to Seal and Prepare the Wood for Concrete
1. Clean the Wood Surface: Begin by thoroughly cleaning the wood surface to remove any dirt, debris, or loose particles. Use a stiff bristle brush or power washer to scrub the wood, ensuring that it is free from any contaminants that could hinder the adhesion of the sealer.
2. Sand the Surface: After cleaning, sand the wood surface to smooth out any rough areas or splinters. This step helps create a uniform surface for the sealer to adhere to and ensures better adhesion between the wood and the concrete.
3. Apply a Wood Sealer: Once the wood is clean and sanded, apply a high-quality wood sealer. Choose a sealer that is specifically designed for outdoor use, as it will provide better protection against moisture and weathering. Follow the manufacturer’s instructions for application, ensuring even coverage on all surfaces.
4. Allow Drying Time: After applying the sealer, allow sufficient drying time as per the manufacturer’s guidelines. This drying period is necessary to ensure that the sealer fully penetrates the wood and creates a protective barrier against moisture.
5. Check for Adequate Sealer Coverage: Once the sealer has dried, inspect the wood surface to ensure adequate coverage. Look for any missed areas or spots where the sealer may have pooled. If necessary, apply an additional coat of sealer to achieve the desired level of protection.
6. Level the Surface: Before pouring the concrete, ensure that the sealed wood surface is level and free from any unevenness. Use a spirit level to check for any dips or bumps that could affect the final outcome of the concrete surface. Make any necessary adjustments to ensure a smooth and level base for the concrete.
7. Apply Release Agent: To facilitate the removal of the concrete once it has cured, apply a release agent to the sealed wood surface. This will prevent the concrete from sticking or adhering to the wood, making it easier to remove and reducing the risk of damage to the wood.
By following these steps to seal and prepare the wood for concrete, you can ensure that your concrete surface remains strong, durable, and resistant to moisture and other potential issues. Proper sealing and preparation play a vital role in the longevity and performance of your concrete project.
Pouring and Curing Concrete in a Wooden Mold
When it comes to pouring and curing concrete, using a wooden mold can offer several benefits. Not only does it provide a cost-effective alternative to traditional metal molds, but it also allows for greater customization and flexibility in shape and design. In this section, we will explore the process of pouring and curing concrete in a wooden mold, highlighting key steps and considerations.
1. Selecting the Right Wooden Mold
The first step in pouring and curing concrete in a wooden mold is selecting the right type of wood. It is important to choose a wood species that is strong, durable, and resistant to moisture. Some commonly used woods for concrete molds include plywood, melamine-coated particle board, and hardwoods such as maple or birch.
Additionally, consider the size and shape of the mold. Ensure that it is sturdy enough to hold the weight of the concrete and has sufficient support to prevent any bowing or warping during the pouring and curing process.
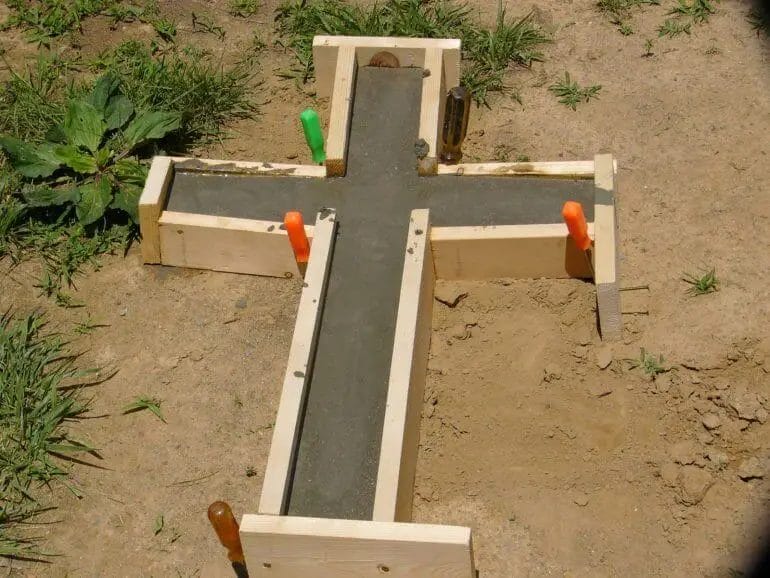
2. Preparing the Wooden Mold
Before pouring the concrete, it is essential to prepare the wooden mold properly. This includes applying a form release agent to the interior surface to prevent the concrete from sticking and facilitate easy removal once it has cured.
Furthermore, seal any gaps or seams in the mold to prevent leakage during the pouring process. This can be done using a silicone sealant or caulking compound.
3. Mixing and Pouring the Concrete
Once the mold is prepared, it is time to mix the concrete. Follow the manufacturer’s instructions to achieve the desired consistency. It is crucial to thoroughly mix the concrete to remove any air bubbles and ensure uniformity.
When pouring the concrete into the wooden mold, do it gradually and evenly to prevent any sudden shifts or displacements. Use a trowel or vibrating tool to remove any air voids and ensure proper compaction.
4. Curing and Drying the Concrete
After pouring, the concrete needs to cure and dry properly in the wooden mold. This process allows the concrete to reach its maximum strength and durability. Various curing methods can be employed, including air curing, moist curing, or using curing compounds.
During the curing period, it is important to protect the concrete from excessive moisture loss and temperature fluctuations. Cover the mold with a plastic sheet or use a curing blanket to retain moisture and maintain a consistent temperature.
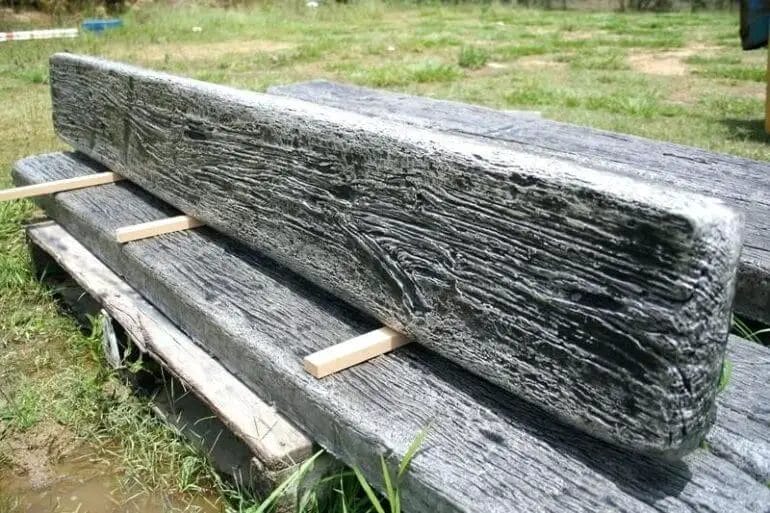
5. Demolding and Finishing
Once the concrete has cured, it is time to demold and finish the surface. Carefully remove the wooden mold, taking care not to damage the concrete. If there are any rough edges or imperfections, they can be smoothed out using sandpaper or a concrete grinder.
Additionally, consider applying a sealant or concrete finish to enhance the aesthetics and protect the surface from stains, moisture, and UV damage.
Summary
Pouring and curing concrete in a wooden mold offers versatility and cost-effectiveness. By following the steps mentioned above, you can successfully create custom concrete elements with the help of a wooden mold. Remember to select the right wooden mold, prepare it adequately, mix and pour the concrete carefully, and allow for proper curing and drying. With proper attention to detail, you can achieve excellent results and create stunning concrete pieces.
5. Removing the Concrete Mold and Finishing the Project
Once the concrete has fully cured, it is time to remove the mold and put the finishing touches on your project. This step is crucial to ensure the final outcome is smooth, clean, and visually appealing.
1. Prepare the work area:
Before removing the mold, make sure the surrounding area is clean and free from any debris or obstructions. This will prevent any unwanted particles from sticking to the freshly exposed concrete surface.
2. Loosen the mold:
Start by gently tapping on the sides of the mold using a rubber mallet or a similar tool. This will help loosen the mold and facilitate its removal. Work your way around the entire mold, ensuring that it detaches evenly from the concrete.
3. Carefully remove the mold:
Once the mold is loosened, carefully lift it off the concrete. Take your time and be cautious not to damage the edges or any intricate designs on the surface. If needed, ask for assistance to prevent any accidents or mishaps.
4. Clean the surface:
After removing the mold, examine the concrete surface for any residual mold release agents, stains, or imperfections. Use a stiff-bristled brush or a power washer to clean the surface thoroughly. This will help achieve a clean and polished finish.
5. Repair any imperfections:
If you notice any cracks, holes, or uneven areas on the concrete surface, now is the time to fix them. Use a concrete patching compound or epoxy resin to fill in any gaps and ensure a smooth and level finish. Follow the manufacturer’s instructions for the best results.
6. Apply a sealer:
To protect and enhance the appearance of your concrete project, consider applying a sealer. A concrete sealer helps to prevent moisture absorption, staining, and surface deterioration. Choose a sealer that is suitable for your project and follow the application instructions provided.
7. Add final touches:
Once the sealer has dried, you can add any final touches to your project. This could include applying a decorative finish, such as a stain or paint, to further enhance the appearance. Alternatively, you may choose to leave the concrete in its natural state for a minimalist and contemporary look.
8. Enjoy your finished project:
With the mold removed and the finishing touches complete, it’s time to step back and admire your work. Whether it’s a concrete countertop, a decorative vase, or a garden stepping stone, take pride in the craftsmanship and creativity you have put into the project.
In summary, removing the concrete mold and finishing the project is the final step in creating a polished and visually appealing concrete piece. By following the proper techniques and taking care during the removal process, you can ensure a smooth and professional finish. Remember to clean the surface, repair any imperfections, apply a sealer, and add any desired final touches. Once complete, sit back and enjoy the beauty and durability of your finished concrete project.
FAQs
1. How can I make concrete molds from wood?
To make concrete molds from wood, start by designing and measuring the desired shape. Then, cut and assemble the wooden boards to form the mold. Seal any gaps or joints with caulk or silicone. Finally, apply a release agent to the mold before pouring in the concrete mixture. Allow the concrete to cure, then remove the wooden mold carefully.
2. What type of wood is best for making concrete molds?
The type of wood best suited for making concrete molds is exterior-grade plywood or melamine-coated particle board. These materials are durable and have smooth surfaces that help create clean lines and finishes on the molded concrete.
3. Can I reuse wooden concrete molds?
Yes, wooden concrete molds can be reused multiple times if they are well-maintained. Clean them thoroughly after each use, remove any residual concrete, and apply a fresh coat of release agent before each new pour. Proper care and maintenance will extend the life of your wooden molds.
Conclusion
In conclusion, creating concrete molds from wood is a cost-effective and versatile method for DIY enthusiasts and professionals alike. By following the step-by-step process, you can easily customize molds to suit your specific needs and projects.
The durability and precision of wood molds ensure consistent and high-quality results, making them ideal for various applications such as building pathways, garden ornaments, and even large-scale construction projects.
Furthermore, the simplicity of constructing wooden molds allows for easy replication and experimentation, giving you the freedom to explore your creativity and bring your unique designs to life. So, why wait? Embrace the world of concrete molding with wood and unlock endless possibilities for your next project!