Looking to add a unique touch to your candle-making projects? Consider making your own wood wicks!
Wood wicks not only provide a rustic and natural aesthetic, but they also offer a slower and more crackling burn compared to traditional cotton wicks.

In this guide, we will walk you through the simple steps to create your own wood wicks, allowing you to enhance the ambiance of your candles and create a truly memorable experience for yourself or your customers.
Ready to get started? Let’s dive in and learn how to make wood wicks!
Steps to Prepare Wood Wicks: A Simple Guide to Prepping Your Homemade Wicks
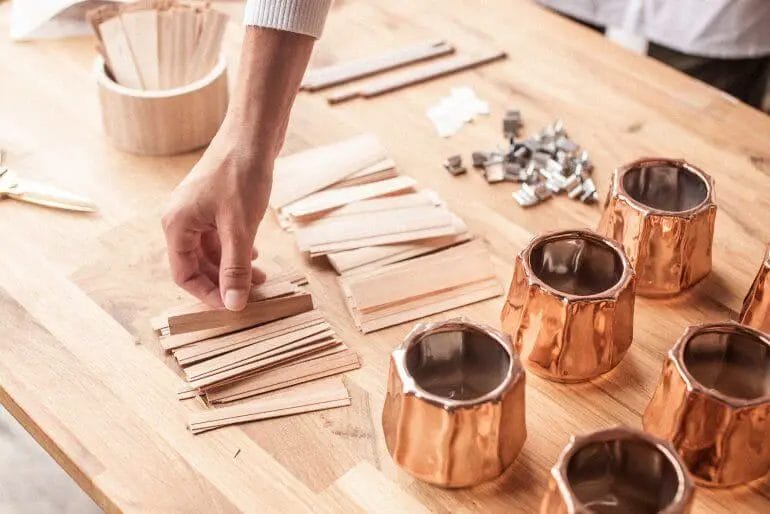
Wood wicks are a popular choice for homemade candles, offering a unique crackling sound and rustic aesthetic. Preparing your own wood wicks is a simple process that can be done at home. In this section, we will guide you through the steps to prepare wood wicks for your homemade candles.
Step 1: Gather the Materials
Before you begin preparing your wood wicks, make sure you have all the necessary materials. Here’s what you will need:
Step 2: Cut the Wooden Dowels
Start by cutting the wooden dowels or sticks to your desired length. The length of the wood wick will depend on the size of your candle. Use a saw or a sharp knife to cut the dowels to the desired length. Make sure the length is slightly longer than the height of your candle vessel.
Step 3: Sand the Wood Ends
Next, sand the ends of the wooden dowels to create a smooth and flat surface. This will help the wood wick adhere to the wick tab and prevent any rough edges from interfering with the candle-making process. Use sandpaper or a file to gently sand the ends until they are smooth.
Step 4: Attach the Wick Tabs
Take the candle wick tabs and apply a small amount of glue or adhesive to one side. Press the glued side of the tab onto the sanded end of the wooden dowel. Make sure it is centered and sticks securely. Allow the glue to dry completely before moving on to the next step.
Step 5: Trim the Wicks
Once the glue has dried, trim the wicks to the desired length. The length of the wick will depend on personal preference and the size of your candle. Use a pair of sharp scissors to trim the wicks to the desired length, leaving a small portion exposed above the candle’s surface.
Step 6: Test the Wood Wicks
Before using your wood wicks in a candle, it’s important to test them. Light the wood wick and observe how it burns. Ensure that the flame is steady and the wood wick burns evenly. If you notice any issues, such as excessive smoke or uneven burning, make adjustments as needed.
Step 7: Ready to Use
Once you have prepared your wood wicks and tested them, they are ready to use in your homemade candles. Place the wood wick in the center of your candle vessel, ensuring that it is secure and upright. Pour the melted wax into the vessel, allowing it to adhere to the wick tab and hold the wood wick in place.
In summary, preparing wood wicks for your homemade candles is a straightforward process that can be done with a few simple steps. By following this guide, you will be able to create your own unique wood wicks and add a charming touch to your homemade candles.

Benefits of Wood Wicks: Why Wood Wicks are Perfect for Your Candles
When it comes to creating the perfect ambiance in your home, candles play a significant role. They not only provide a warm and cozy atmosphere but also add a touch of elegance to any space. While there are various types of candle wicks available in the market, wood wicks have been gaining popularity for their unique and beneficial qualities. In this section, we will explore the benefits of wood wicks and why they are perfect for your candles.
1. Crackling Sound
One of the distinctive features of wood wicks is the soothing crackling sound they produce when lit. This crackling sound adds an extra layer of ambiance and creates a calming effect, reminiscent of a cozy fireplace. The crackling sound is not only pleasant to hear but also helps to create a serene and peaceful environment.
2. Longer Burn Time
Wood wicks are known for their longer burn time compared to traditional cotton wicks. The natural material of wood allows for a slower and more even burn, extending the life of your candle. This means you can enjoy your favorite candle for a longer duration, making wood wicks a cost-effective choice in the long run.
3. Cleaner Burn
Unlike cotton wicks, wood wicks produce less soot when burned. This means that your candles will emit less smoke and leave behind fewer residues, resulting in a cleaner and healthier burn. The clean burn of wood wicks is not only beneficial for your indoor air quality but also helps to maintain the overall cleanliness of your home.
4. Unique Aesthetic Appeal
Wood wicks add a touch of uniqueness and elegance to your candles. Their natural and rustic look enhances the visual appeal of the candle, making it a decorative piece in itself. Whether you’re using candles for relaxation, home decor, or special occasions, wood wicks can elevate the overall aesthetic and create a visually pleasing focal point.
5. Easy to Light and Maintain
Wood wicks are incredibly easy to light compared to cotton wicks. They typically light on the first try and don’t require excessive effort to maintain a steady flame. Additionally, wood wicks rarely require trimming as they naturally curl while burning, resulting in a self-trimming effect. This makes wood wicks convenient and hassle-free to use.
6. Versatile Scents
Wood wicks are compatible with a wide range of candle fragrances and essential oils. Their ability to enhance the scent throw of candles makes them a popular choice among candle enthusiasts. Whether you prefer floral, woody, or fruity scents, wood wicks can effectively disperse the fragrance throughout your space and create a pleasant aroma.
7. Eco-Friendly Choice
Wood wicks are considered an eco-friendly choice for candle enthusiasts. They are made from sustainable and renewable materials, such as FSC-certified wood, which ensures responsible sourcing. By choosing wood wicks for your candles, you contribute to reducing the carbon footprint and supporting sustainable practices.
8. Enhanced Candle Experience
Overall, using wood wicks in your candles enhances the entire candle experience. From the crackling sound to the longer burn time and cleaner burn, wood wicks elevate the ambiance and provide a more enjoyable and immersive experience. Whether you’re using candles for relaxation, meditation, or creating a cozy atmosphere, wood wicks are the perfect choice to enhance your candle experience.
In summary, wood wicks offer numerous benefits that make them ideal for your candles. From the soothing crackling sound and longer burn time to the cleaner burn and unique aesthetic appeal, wood wicks provide an enhanced candle experience. Additionally, they are easy to light and maintain, compatible with various scents, and considered an eco-friendly choice. By choosing wood wicks, you can create a warm and inviting atmosphere in your home while enjoying all the advantages they have to offer.

Troubleshooting Wood Wicks: Common Issues and How to Fix Them
Wood wicks have become a popular choice for candle makers due to their unique crackling sound and aesthetic appeal. However, like any other type of wick, wood wicks can sometimes pose challenges during the candle making process. In this section, we will discuss some common issues that may arise when working with wood wicks and provide solutions to fix them.
1. Wick Won’t Stay Lit
One common issue that candle makers may encounter is the wood wick not staying lit. The most likely cause for this problem is that the wick is not properly primed before lighting. Priming the wick involves soaking it in melted wax for several minutes to ensure a clean and consistent burn. To fix this issue, remove the candle from its container, trim the wick to the recommended length, and then re-prime the wick by soaking it in melted wax for at least 5 minutes. Once the wick is properly primed, it should stay lit.
2. Uneven Burn
If you notice that your wood wick candle is burning unevenly, with one side of the wick burning faster than the other, there are a few possible causes. First, make sure that the wick is centered in the candle container. If the wick is off-center, it may result in an uneven burn. Gently reposition the wick to the center if necessary. Another possible cause of an uneven burn is a drafty environment. If there is a breeze or air flow near the candle, it can cause the flame to flicker and burn unevenly. To fix this issue, move the candle to a draft-free location.
3. Excessive Soot
Sooting is another common issue that may occur with wood wicks. Excessive soot can be unsightly and may indicate an issue with the wick or the candle’s burn conditions. If you notice that your wood wick candle is producing excessive soot, try trimming the wick to a shorter length. A wick that is too long can lead to a smoky flame and produce more soot. Additionally, make sure that the candle is not placed near any drafts or flammable materials, as this can affect the burn conditions and contribute to sooting. Proper ventilation can also help prevent sooting.
4. Low Flame Height
If your wood wick candle has a low flame height, it may be due to a wick that is too short. Wood wicks typically require a slightly longer length compared to traditional cotton wicks. Check the manufacturer’s guidelines for the recommended wick length for your specific candle size and container. If the wick is too short, it may not be able to draw up enough fuel to sustain a proper flame. In this case, carefully remove the candle from the container and replace the wick with a longer one.
5. Wick Drowning
Occasionally, wood wicks may become drowned in the melted wax, resulting in a weak or nonexistent flame. This can happen if the wick is not properly trimmed or if the candle container is too small for the size of the wick. To fix this issue, carefully remove the candle from the container and trim the wick to a shorter length. Ensure that the wick is not submerged in the melted wax and that there is enough space for the flame to develop properly.
By addressing these common issues and following the recommended guidelines for wood wick candles, you can troubleshoot and overcome any challenges that may arise during the candle making process. Remember to always prioritize safety and consult the manufacturer’s instructions for specific guidance on working with wood wicks.
Decorating Wood Wicks: Creative Ideas to Enhance the Appearance of Your Homemade Candles
Wood wicks have gained immense popularity in the world of candle making. Not only do they add a unique touch to your homemade candles, but they also provide a soothing crackling sound reminiscent of a cozy fireplace. While wood wicks are beautiful on their own, there are several creative ways to enhance their appearance and make your candles even more eye-catching. In this section, we will explore some exciting ideas to decorate wood wicks and elevate the overall aesthetic of your homemade candles.
1. Dyeing the Wood Wicks
One simple yet effective way to bring more visual interest to your wood wicks is by dyeing them. You can use candle dye or even food coloring to add a pop of color to the wooden wick. Start by preparing a dye bath using your chosen coloring agent and warm water. Submerge the wood wicks into the dye bath and let them soak for a few minutes. Once you achieve the desired color intensity, remove the wicks from the dye bath and allow them to dry completely. The colorful wood wicks will add a vibrant and playful element to your homemade candles.
2. Adding Embellishments
Embellishing your wood wicks with small decorative elements can instantly elevate the look of your candles. Consider attaching charms, beads, or small pendants to the wood wick using a strong adhesive. You can choose embellishments that reflect the theme or scent of your candle. For example, for a beach-inspired candle, you can attach seashells or tiny starfish. The options are endless, and by adding embellishments, you can personalize your homemade candles and make them truly unique.
3. Wrapping the Wood Wicks
Another creative way to decorate wood wicks is by wrapping them with various materials. You can use natural fibers like twine or jute rope to add a rustic touch to your candles. Simply wrap the wood wick tightly with the chosen material, securing it with a small amount of glue at the end. Alternatively, you can use colorful ribbons or fabric strips to create a more whimsical and festive look. Experiment with different wrapping techniques and materials to achieve the desired aesthetic.
4. Carving Designs on the Wood Wicks
If you have a steady hand and a knack for carving, consider adding intricate designs to your wood wicks. Using a small carving tool, carefully carve patterns, symbols, or even names onto the wooden surface. This technique allows you to create personalized and visually striking wood wicks. Whether it’s a delicate floral design or a simple geometric pattern, the carved wood wick will undoubtedly add an element of sophistication to your homemade candles.
5. Using Natural Elements
Embrace the beauty of nature by incorporating natural elements into your wood wicks. For a rustic and earthy look, consider attaching small dried flowers, leaves, or herbs to the wood wick using a clear adhesive. This not only enhances the appearance of the wood wick but also infuses your homemade candles with a subtle botanical fragrance. The combination of the natural elements and the crackling sound of the wood wick creates a truly enchanting sensory experience.
In summary, decorating wood wicks offers a fantastic opportunity to unleash your creativity and enhance the appearance of your homemade candles. Whether you choose to dye the wood wicks, add embellishments, wrap them with various materials, carve designs, or incorporate natural elements, the possibilities are endless. By incorporating these creative ideas into your candle-making process, you can create visually stunning candles that are not only a delight to burn but also a feast for the eyes.
FAQs
1. How do I make wood wicks?
To make wood wicks for candles, you will need wooden dowels or pre-made wood wicks, a saw, and a drill. Start by cutting the dowels into the desired length and sanding the edges. Then, drill a hole in the base of the dowel. Finally, attach the wick to the dowel by inserting it into the drilled hole.
2. What type of wood is suitable for making wood wicks?
Generally, hardwoods like maple, oak, or cherry are suitable for making wood wicks. Avoid using softwoods like pine as they tend to burn too quickly. It’s essential to choose dry and untreated wood to prevent any harmful fumes when burning the candle.
3. Can I reuse wood wicks for multiple candles?
Wood wicks can be reused for multiple candles as long as they are in good condition. After burning a candle, trim the burnt part of the wick, and it will be ready for the next use. However, make sure to monitor the wick’s condition to ensure a safe and efficient burn.
Conclusion
In conclusion, learning how to make wood wicks for your candles can be a fun and rewarding DIY project. By following the step-by-step instructions and using the right materials, you can create unique and eco-friendly wicks that add a charming touch to your homemade candles.
Wood wicks not only offer a rustic aesthetic but also provide a clean and efficient burn. With their ability to crackle and create a cozy ambiance, they have become increasingly popular among candle enthusiasts. Plus, they are easily customizable, allowing you to experiment with different types of wood and sizes to suit your preferences.
So, why not give it a try? Start crafting your own wood wicks today and elevate your candle-making experience to a whole new level of creativity and charm.
