Staining maple wood can be a great way to enhance its natural beauty while adding depth and richness to the grain. It’s important to follow the correct process to ensure the stain adheres properly and achieves the desired result.
First, prepare the surface by sanding the wood to remove any imperfections and ensure a smooth finish. Next, apply a pre-stain conditioner to prevent blotching and ensure an even application of the stain. Then, carefully choose a stain color that complements the maple wood’s natural tone. Apply the stain evenly, using a brush or cloth, following the wood grain. Finally, allow the stain to dry completely before applying a protective finish.
By following these steps, you can achieve stunning results and transform your maple wood into a beautiful, richly stained masterpiece.

Preparing Maple Wood for Staining
Staining maple wood can be a great way to enhance its natural beauty and add warmth to your furniture, cabinets, or other woodworking projects. However, maple wood can be a bit tricky to stain due to its tight grain and dense nature. To achieve the best results, it’s important to properly prepare the maple wood before applying any stain. In this section, we will discuss the necessary steps to prepare maple wood for staining.
Clean the Wood
The first step in preparing maple wood for staining is to ensure that it is clean and free from any dirt, dust, or debris. Start by wiping the wood surface with a clean, damp cloth to remove any surface dirt. Avoid using excessive water, as maple wood can easily absorb moisture and become warped or damaged. Once the wood is clean, allow it to dry completely before proceeding to the next step.
Sand the Wood
Maple wood has a tendency to absorb stain unevenly, resulting in blotchy or inconsistent coloration. To minimize this issue, it’s important to sand the wood surface before staining. Start by using a medium-grit sandpaper (such as 120-grit) to remove any roughness or imperfections. Sand in the direction of the wood grain to avoid creating scratches. Once the surface is smooth, switch to a fine-grit sandpaper (such as 220-grit) to further refine the wood. This will help to create a smoother and more even surface for the stain to adhere to.
Apply a Pre-Stain Conditioner
As mentioned earlier, maple wood can absorb stain unevenly. To address this issue, it is recommended to apply a pre-stain conditioner to the wood before staining. A pre-stain conditioner helps to seal the wood and create a more uniform surface for the stain. Follow the manufacturer’s instructions for application, as the process may vary depending on the product used. Allow the conditioner to penetrate the wood for the recommended time and wipe off any excess conditioner before applying the stain.
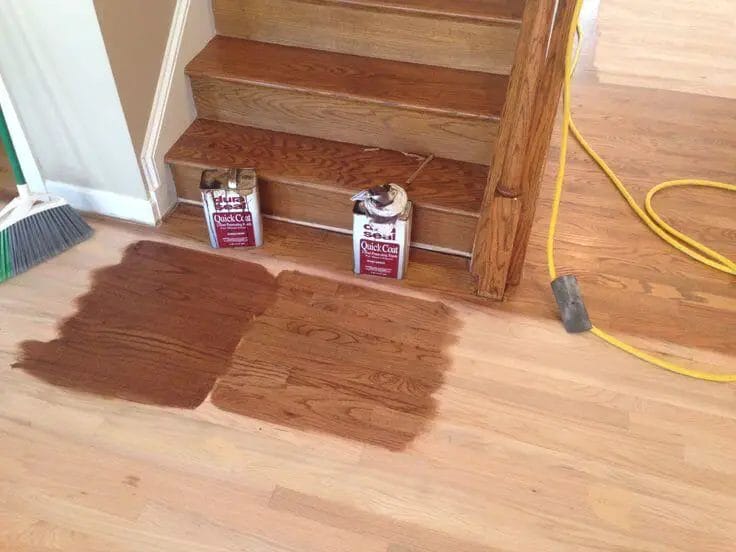
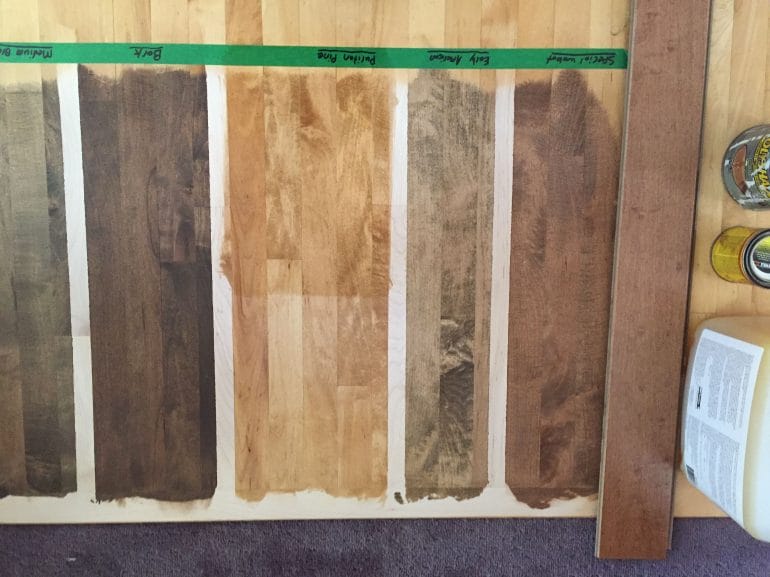
Test the Stain on Scrap Wood
Before applying the stain to your maple wood project, it’s always a good idea to test it on a scrap piece of maple wood. This will allow you to see how the stain will look on your specific type of maple wood and adjust the color if desired. Apply the stain following the manufacturer’s instructions and allow it to dry completely. Evaluate the color and make any necessary adjustments by adding more coats or choosing a different stain color.
Apply the Stain
Once you are satisfied with the color achieved from the test piece, it’s time to apply the stain to the maple wood. Using a clean, lint-free cloth or brush, apply the stain evenly and in the direction of the wood grain. Allow the stain to penetrate the wood for the manufacturer-recommended time. The longer the stain sits, the darker the color will become. To achieve a more even color, wipe off any excess stain with a clean cloth after the recommended time has passed. Allow the stain to dry completely before applying any protective finish.
In summary, preparing maple wood for staining involves cleaning the wood, sanding to create a smooth surface, applying a pre-stain conditioner, testing the stain on scrap wood, and finally applying the stain evenly and allowing it to dry. By following these steps, you can achieve a beautiful and consistent stain on your maple wood projects.

Applying Stain to Maple Wood: Tips and Techniques
Maple wood is a popular choice for furniture, flooring, and cabinetry due to its beautiful grain patterns and durability. When it comes to finishing maple wood, staining is a common technique used to enhance its natural beauty and add color. However, staining maple wood can be a bit challenging as it has a dense grain structure that can make it difficult for the stain to penetrate evenly. In this section, we will provide you with some useful tips and techniques to achieve a successful stain application on maple wood.
1. Preparing the Wood Surface
Before applying stain to maple wood, it is essential to properly prepare the surface. Start by sanding the wood using a fine-grit sandpaper to smooth out any imperfections or rough areas. Make sure to sand in the direction of the wood grain to avoid creating scratches. Once the sanding is complete, clean the wood surface thoroughly to remove any dust or debris using a tack cloth or a vacuum with a brush attachment.
2. Choosing the Right Stain
When selecting a stain for maple wood, it is important to consider the desired end result. Maple wood tends to have a lighter color, which means that lighter stains may not show up well. Opting for medium to dark stains can provide better results, as they can add depth and richness to the wood. It is always a good idea to test the stain on a small, inconspicuous area of the wood to ensure it achieves the desired color.
3. Applying the Stain
Before applying the stain, it is recommended to use a wood conditioner or pre-stain treatment specifically designed for maple wood. This will help the stain penetrate more evenly and reduce blotching. Follow the manufacturer’s instructions for the wood conditioner and allow it to dry completely before proceeding with the stain application.
When applying the stain, it is crucial to work in small sections to ensure even coverage. Use a brush, cloth, or foam applicator to apply the stain evenly along the wood grain. Avoid applying too much stain at once, as it can lead to blotching and uneven coloration. Allow the stain to sit on the wood surface for the recommended amount of time specified by the manufacturer.
4. Wiping off Excess Stain
After the recommended time has passed, use a clean cloth or rag to wipe off the excess stain. Wipe in the direction of the grain to avoid removing too much of the stain. Make sure to remove any pooling or drips to achieve an even finish. Be gentle while wiping to prevent any damage to the wood surface.
5. Adding Additional Coats
If a deeper color is desired, multiple coats of stain can be applied. Allow each coat to dry completely before applying the next one. Sand lightly between coats using a fine-grit sandpaper to ensure smoothness. Remember to wipe off any excess stain after each coat to maintain an even and consistent color.
6. Sealing the Stained Wood
Once the desired color is achieved, it is essential to seal the stained wood to protect it from moisture, scratches, and UV damage. Select a clear coat or topcoat that is compatible with the stain used. Apply the sealant according to the manufacturer’s instructions using a brush, roller, or sprayer. Allow the sealant to dry completely before handling or using the stained maple wood.
In summary, staining maple wood can be a rewarding process if done correctly. By preparing the wood surface, choosing the right stain, applying it evenly, wiping off excess stain, adding additional coats if desired, and sealing the stained wood, you can achieve a beautiful and durable finish that enhances the natural beauty of maple wood. Remember to follow the manufacturer’s instructions and take your time to ensure the best results.
Sealing and Finishing Maple Wood After Staining
Maple wood is known for its beautiful grain patterns and smooth texture, making it a popular choice for furniture and cabinets. When staining maple wood, it is important to properly seal and finish it to protect the wood and enhance its natural beauty. In this section, we will discuss the steps involved in sealing and finishing maple wood after staining.
1. Sanding
The first step in preparing maple wood for sealing and finishing is sanding. Start by using a fine-grit sandpaper (220 grit or higher) to smooth out any rough spots or imperfections on the wood surface. Sand in the direction of the wood grain to avoid scratching the wood. After sanding, make sure to remove any dust or debris from the surface before proceeding to the next step.
2. Applying a Pre-Stain Conditioner
Maple wood is known to absorb stain unevenly, resulting in a blotchy appearance. To prevent this, it is recommended to apply a pre-stain conditioner to the wood. The conditioner helps to seal the wood pores and create a more uniform surface for the stain to adhere to. Follow the manufacturer’s instructions for applying the conditioner and allow it to fully dry before applying the stain.
3. Staining the Wood
Once the pre-stain conditioner is dry, you can proceed to apply the stain. Choose a stain color that complements the natural color of the maple wood. Stir the stain thoroughly before applying and use a brush or cloth to evenly apply the stain to the wood surface. Work in small sections, following the direction of the wood grain. Allow the stain to penetrate the wood for the recommended time and then wipe off any excess stain with a clean cloth. Let the stain dry completely before moving on to the next step.
4. Applying a Sealant
After the stain has dried, it is important to apply a sealant to protect the wood and enhance its durability. There are various options for sealants, including polyurethane, lacquer, or shellac. Choose a sealant that is compatible with the type of stain used and follow the manufacturer’s instructions for application. Apply multiple thin coats of sealant, allowing each coat to dry completely before applying the next. Sand lightly between coats to ensure a smooth finish.
5. Finishing Touches
Once the final coat of sealant has dried, you can add some finishing touches to further enhance the appearance of the maple wood. Consider applying a topcoat, such as wax or polish, to add shine and depth to the finish. You can also lightly sand the surface with a fine-grit sandpaper to remove any imperfections or unevenness. Finally, buff the surface with a soft cloth to achieve a smooth and glossy finish.
In summary, sealing and finishing maple wood after staining is essential for protecting the wood and enhancing its beauty. By following the steps outlined in this section, you can achieve a professional-looking finish that will showcase the natural characteristics of the maple wood.
5. Maintaining and Caring for Stained Maple Wood Surfaces
Stained maple wood surfaces can add a beautiful and elegant touch to any home or office space. However, like any other type of wood, it requires regular maintenance and care to keep it looking its best and to prolong its lifespan. In this section, we will discuss some essential tips on how to properly maintain and care for stained maple wood surfaces.
Clean Regularly
Regular cleaning is essential to prevent dirt, dust, and grime from accumulating on the surface of the stained maple wood. Use a soft cloth or a microfiber cloth to gently wipe the surface, removing any surface debris. Avoid using abrasive cleaners or harsh chemicals, as they can damage the finish and stain of the wood. Instead, opt for mild soap or a wood-specific cleaner that is suitable for stained maple wood surfaces.
Protect from Moisture
Maple wood is sensitive to moisture and excessive humidity. To protect your stained maple wood surfaces, make sure to wipe up any spills immediately. Avoid placing hot or wet objects directly on the surface, as they can leave permanent marks or damages. Use coasters and trivets to protect the wood from heat and moisture. Additionally, ensure that the room is well-ventilated to prevent the buildup of humidity.
Avoid Direct Sunlight
Direct sunlight can cause the stained maple wood to fade and lose its original color. Whenever possible, position your stained maple wood furniture or surfaces away from direct sunlight. Use curtains, blinds, or window films to filter the sunlight and protect the wood from UV rays. Regularly rotate or move the furniture to ensure that all areas are exposed evenly to sunlight, preventing uneven fading.
Apply Protective Coating
To enhance the longevity of your stained maple wood surfaces, it is recommended to apply a protective coating. There are various options available, such as varnishes, lacquers, or polyurethane finishes. These coatings create a protective barrier that shields the wood from scratches, stains, and moisture. Follow the manufacturer’s instructions to ensure proper application and drying time.
Prevent Scratches and Dents
Protect the surface of your stained maple wood by using furniture pads or coasters underneath objects, particularly heavy ones. This will help prevent scratches and dents that can occur from regular use. Avoid dragging or sliding objects across the surface, as it can also cause damage. Regularly dust the wood surfaces to remove any abrasive particles that can scratch the finish.
Regularly Condition the Wood
To keep the stained maple wood looking its best, it is important to regularly condition the wood. Apply a wood conditioner or polish that is specifically designed for stained maple wood surfaces. This will help replenish the natural oils of the wood, restore its luster, and provide added protection against environmental factors.
Summary
Maintaining and caring for stained maple wood surfaces is essential to preserve their beauty and durability. Regular cleaning, protection from moisture and sunlight, applying protective coatings, preventing scratches and dents, and regular conditioning are all key aspects of proper maintenance. By following these tips, you can ensure that your stained maple wood surfaces remain in excellent condition for years to come.
FAQs
1. How to stain maple wood?
To stain maple wood, start by sanding the surface with progressively finer grit sandpaper. Apply a pre-stain wood conditioner to help even out the stain absorption. Choose a stain color and apply it evenly with a brush or cloth, following the direction of the wood grain. Wipe off any excess stain and allow it to dry before applying a clear finish.
2. Can maple wood be stained dark?
Yes, maple wood can be stained dark with the right technique. Since maple has a dense and tight grain, it may not absorb dark stains as easily as other woods. To achieve a darker color, consider using a gel stain or a combination of multiple coats of stain and a darker topcoat. Always test the stain on a scrap piece of maple before applying it to your project.
3. Should I use a wood conditioner before staining maple wood?
It is recommended to use a wood conditioner before staining maple wood. Maple has a tendency to absorb stain unevenly, resulting in blotchy or splotchy coloration. Applying a wood conditioner helps to partially seal the wood pores and create a more even stain absorption, resulting in a more uniform coloration.
Conclusion
In conclusion, staining maple wood can be achieved with proper preparation and technique. By following the steps outlined in this guide, you can transform the appearance of your maple wood furniture or flooring. Remember to start with a thorough sanding to ensure a smooth surface for the stain to penetrate. Use a pre-stain wood conditioner to prevent blotching and ensure even color absorption. When it comes to selecting a stain, opt for oil-based or gel stains that are specifically formulated for hardwoods like maple. Apply the stain with a brush or cloth, making sure to work in the direction of the grain. Lastly, apply a clear protective finish to enhance and preserve the stained maple wood for years to come. Now you’re ready to enjoy the rich and beautiful color of your stained maple wood!