If you’re looking to add vibrant and long-lasting designs to uncoated wood surfaces, sublimation is the way to go. Sublimation printing allows you to transfer full-color images and designs onto wood, creating stunning and personalized artworks, signage, and more. By using high heat and specialized sublimation inks, the ink particles turn into gas and penetrate the porous surface of the wood, resulting in a durable and fade-resistant finish. Whether you’re a DIY enthusiast or a professional, sublimating on uncoated wood opens up a world of creative possibilities.
Best Techniques for Sublimating on Uncoated Wood
Sublimation printing on uncoated wood is a popular method for creating vibrant and long-lasting designs. However, achieving the best results requires the use of specific techniques and considerations. In this section, we will discuss the top techniques for sublimating on uncoated wood to help you create stunning and professional-looking prints.
1. Choosing the Right Type of Wood
The first step in achieving excellent sublimation results on uncoated wood is selecting the right type of wood. Not all types of wood are suitable for sublimation printing, as the ink needs to be able to penetrate the surface to create a permanent bond. It is recommended to choose light-colored woods that have a smooth and even surface.

Some popular wood types for sublimation printing include maple, birch, and cherry. These woods have tight grains and uniform surfaces, allowing for optimal ink absorption and color vibrancy.
2. Preparing the Wood Surface
Before sublimating on wood, it is crucial to properly prepare the surface to ensure the best adhesion and print quality. Start by sanding the wood using fine-grit sandpaper to create a smooth and even surface. This helps the ink to adhere better and minimizes the risk of blotching or color bleeding.
After sanding, make sure to clean the wood surface thoroughly to remove any dust or debris. You can use a damp cloth or a mild wood cleaner to wipe the surface clean. This step is essential to prevent any particles from interfering with the sublimation process and affecting the final print.
3. Using the Right Sublimation Ink
Choosing the right sublimation ink is another crucial factor for achieving high-quality sublimation prints on uncoated wood. It is recommended to use sublimation inks that are specifically formulated for wood substrates. These inks are designed to penetrate the wood fibers, resulting in vibrant and long-lasting colors.
Ensure that the sublimation ink is compatible with your printer model and follow the manufacturer’s instructions for optimal printing settings. Using the correct ink formulation and settings will help you achieve accurate color reproduction and sharp details in your sublimated designs.
4. Applying Heat and Pressure
Sublimation printing involves the transfer of ink from a sublimation paper onto the wood surface through the application of heat and pressure. It is crucial to use the right combination of heat and pressure to achieve optimal results.
When sublimating on uncoated wood, it is recommended to use a heat press machine specifically designed for wood substrates. The heat press should have adjustable temperature and pressure settings to allow for precise control.
Set the heat press to the recommended temperature for sublimation on wood, typically around 375°F (190°C). Place the sublimation paper with the printed design facing down onto the wood surface and apply firm pressure for the recommended duration, which is usually around 45-60 seconds.
5. Finishing and Sealing the Print
After sublimation, it is essential to finish and seal the print on the wood surface to protect it from scratches, moisture, and fading. There are various finishing options available, depending on the desired look and level of protection.
One popular method is to apply a clear polyurethane or acrylic sealer to the sublimated print. This not only adds a protective layer but also enhances the colors and provides a glossy or satin finish. Make sure to follow the manufacturer’s instructions for applying and drying the sealer.
Alternatively, you can also use a heat-resistant adhesive spray to secure a layer of protective film onto the sublimated wood surface. This film provides an extra barrier against scratches and fading while maintaining the natural wood texture.
Sublimating on uncoated wood can yield stunning and vibrant prints when using the right techniques. Choosing the right type of wood, preparing the surface properly, using the right sublimation ink, applying heat and pressure correctly, and finishing and sealing the print are all essential steps for achieving professional results.
By following these best techniques for sublimating on uncoated wood, you can create unique and eye-catching prints that will impress your customers and stand the test of time.
Uncoated Wood Sublimation: Tips and Tricks
Sublimation printing on uncoated wood surfaces has gained popularity in recent years, thanks to its unique and natural look. It offers a fantastic way to showcase your creativity and bring out the beauty of wood grains in personalized items, such as photo frames, signs, and home decor. However, achieving the desired results on uncoated wood requires some special considerations and techniques. In this section, we will explore some valuable tips and tricks to help you master the art of uncoated wood sublimation.
1. Choose the Right Wood
The type of wood you use can greatly impact the quality of your sublimation prints. Opt for hardwoods with a smooth surface, such as birch, maple, or cherry. These woods provide better image transfer and produce vibrant, detailed prints. Avoid using softwoods like pine, as they tend to have more pronounced grain patterns and may interfere with the clarity of your sublimated images.
2. Prepare the Wood Surface
Before sublimating, it is crucial to prepare the wood surface properly. Start by sanding the wood to remove any rough spots or imperfections. Use a fine-grit sandpaper to achieve a smooth and even surface. After sanding, wipe away the dust with a clean cloth or compressed air.
3. Use a Pre-Coating
Since uncoated wood lacks the polymer coating found on other sublimation blanks, applying a pre-coating is essential. A pre-coating solution, such as a clear polyurethane spray or sublimation coating specifically designed for wood, helps seal the wood and create a smooth, receptive surface for the sublimation ink. Follow the manufacturer’s instructions for proper application and drying time.
4. Adjust Sublimation Times and Temperatures
Sublimation times and temperatures may need to be adjusted when working with uncoated wood. It is recommended to use slightly lower temperatures and longer dwell times compared to traditional sublimation on coated surfaces. Experiment with different settings to achieve optimal results that prevent scorching or burning the wood.
5. Test and Calibrate
Before diving into a full production run, it is crucial to test and calibrate your sublimation process on a small piece of wood. This allows you to fine-tune your settings, evaluate the color accuracy, and ensure proper ink absorption. Make sure to keep a record of successful settings for future reference.
6. Design with Wood Grain in Mind
Keep in mind that the natural wood grain will influence the final appearance of your sublimated design. Incorporate the wood grain into your design or artwork, allowing it to complement and enhance the overall aesthetic. Embrace the unique patterns and textures that wood provides, making each sublimated piece truly one-of-a-kind.
7. Finish and Protect the Sublimated Wood
After sublimation, it is essential to protect the wood surface and enhance its longevity. Consider applying a clear topcoat or sealer specifically formulated for wood to protect the sublimated image from scratches, fading, and moisture. This step adds a professional touch and ensures the sublimated wood item stands the test of time.
8. Market and Showcase Your Creations
Once you have mastered the art of uncoated wood sublimation, it’s time to showcase your creations and market them effectively. Take high-quality product photos that accurately capture the beauty of the sublimated wood. Utilize social media platforms, online marketplaces, and local craft fairs to reach your target audience and generate interest in your unique wood sublimation products.
In summary, uncoated wood sublimation is a wonderful technique for adding a natural and rustic touch to personalized items. By following these tips and tricks, you can achieve outstanding results and create stunning sublimated wood products that will surely impress your customers.
Achieving High-Quality Sublimation Results on Uncoated Wood
Sublimation is a popular printing technique that allows for transferring vibrant, long-lasting designs onto various materials. While sublimation is commonly used on fabrics and coated surfaces, achieving high-quality results on uncoated wood can be a challenge. In this section, we will explore the steps and techniques required to achieve exceptional sublimation results on uncoated wood.
1. Preparing the Wood Surface
The first step in achieving high-quality sublimation results on uncoated wood is to properly prepare the surface. Here are some key steps to follow:
- Sanding: Begin by sanding the wood surface using fine-grit sandpaper. This will help create a smooth and even surface for sublimation.
- Cleaning: After sanding, thoroughly clean the wood surface to remove any dust or debris. A damp cloth or mild cleaning solution can be used for this purpose.
- Coating: Apply a specialized sublimation coating to the wood surface. This coating helps to enhance the absorption of sublimation inks and improves the overall print quality.
2. Choosing the Right Sublimation Inks
When sublimating on uncoated wood, it is crucial to select the right sublimation inks that are specifically formulated for this material. These inks are designed to provide optimal color saturation and durability on uncoated surfaces. Ensure that the inks you choose are compatible with your sublimation printer and the wood surface.
3. Printing and Transferring the Design
Once you have prepared the wood surface and selected the appropriate sublimation inks, it’s time to print and transfer your design. Here are the steps to follow:
- Printing: Print your desired design onto sublimation paper using your sublimation printer. Make sure to mirror the image before printing to ensure the correct orientation on the wood surface.
- Positioning: Carefully position the sublimation paper with the printed design onto the prepared wood surface. Use heat-resistant tape to secure the paper in place, ensuring it does not move during the transfer process.
- Heat Transfer: Place the wood and attached sublimation paper into a heat press machine. Apply the appropriate temperature and pressure settings recommended by the sublimation ink manufacturer. The heat and pressure will cause the sublimation inks to transfer from the paper onto the wood surface.
- Cooling and Finishing: After the heat transfer process is complete, allow the wood to cool down before removing the sublimation paper. Once cooled, gently peel off the paper to reveal your vibrant, high-quality sublimated design on the wood.
4. Post-Treatment and Protection
To ensure the longevity and durability of your sublimated design on uncoated wood, it is essential to apply post-treatment and protection. Here are some recommended steps:
- Sealing: Apply a clear sealant or varnish over the sublimated design to protect it from scratches, moisture, and fading. This will also enhance the overall appearance of the wood.
- Maintenance: Regularly clean the sublimated wood surface with a mild, non-abrasive cleanser and a soft cloth. Avoid using harsh chemicals or abrasive materials that may damage the design.
5. Troubleshooting and Tips
While sublimating on uncoated wood can produce stunning results, it may sometimes require troubleshooting to overcome challenges. Here are a few tips to address common issues:
- Poor Ink Absorption: If the wood surface is not adequately absorbing the sublimation inks, try adjusting the coating application or using a different type of sublimation coating.
- Uneven Colors: Uneven colors may be the result of inconsistent heat or pressure during the transfer process. Ensure that your heat press machine is properly calibrated and apply even pressure throughout.
- Image Blurring or Fading: Blurring or fading of the sublimated design can occur due to excessive heat or prolonged exposure to sunlight. Maintain recommended temperature and exposure times, and consider using UV
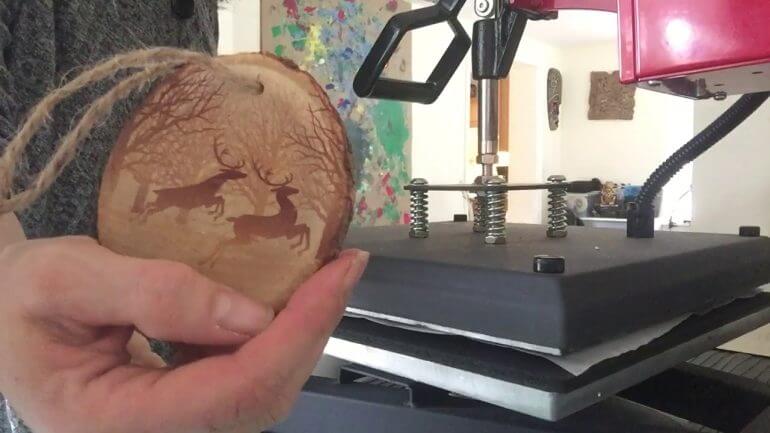
Step-by-Step Guide to Sublimating on Uncoated Wood
If you’re looking to add vibrant, durable designs to uncoated wood surfaces, sublimation is the perfect technique to achieve professional and long-lasting results. Sublimation allows you to transfer high-quality images onto the wood, creating personalized and eye-catching products. In this step-by-step guide, we will walk you through the process of sublimating on uncoated wood.
Step 1: Gather Your Materials
Before you begin the sublimation process, make sure you have all the necessary materials. Here’s what you’ll need:
- Uncoated wood substrate
- Sublimation printer and ink
- Heat press
- Sublimation paper
- Heat-resistant tape
- Protective gloves
- Lint roller
Step 2: Prepare the Wood Surface
Start by preparing the wood surface for sublimation. Use a lint roller to remove any dust or debris that may affect the transfer quality. Ensure that the wood is clean and dry before proceeding to the next step.
Step 3: Design and Print
Create or choose the design you want to transfer onto the wood. Use a sublimation printer and compatible ink to print the design onto sublimation paper. Remember to mirror the image, as it will be flipped during the transfer process.
Step 4: Secure the Sublimation Paper
Place the sublimation paper with the printed design facing down onto the wood surface. Use heat-resistant tape to secure the paper in place. Make sure the design is properly aligned and centered on the wood.
Step 5: Heat Press
Preheat your heat press to the recommended temperature for sublimation on wood. Once the press is ready, carefully place the wood with the secured sublimation paper onto the heat press bed. Close the press and apply even pressure for the specified time recommended by the sublimation paper manufacturer.
Step 6: Remove the Transfer
Once the pressing time is complete, carefully open the heat press and remove the wood. Be cautious as it will be hot. Remove the sublimation paper from the wood surface, peeling it off slowly and evenly.
Step 7: Final Touches
Your sublimated design should now be transferred onto the wood surface. Allow the wood to cool completely before handling it. Use a lint-free cloth to gently wipe away any residue or excess ink that may be present.
In summary, sublimating on uncoated wood is a straightforward process that allows you to personalize and enhance wood products with vibrant and long-lasting designs. By following this step-by-step guide, you can achieve professional results and create unique customized items that stand out.
Enhancing Durability in Sublimation Printing on Uncoated Wood
Sublimation printing on uncoated wood has gained popularity in recent years due to its unique and rustic aesthetic appeal. However, one challenge that arises with this printing method is the durability of the prints on the wood surface. Over time, the prints may start to fade or deteriorate, leading to a less visually appealing result.
In this section, we will explore various techniques and methods to enhance the durability of sublimation printing on uncoated wood, ensuring that the prints maintain their vibrant colors and sharpness for a longer period.
1. Proper Surface Preparation
One of the key factors in improving durability is proper surface preparation. Before printing, it is crucial to ensure that the wood surface is clean and free from any contaminants, such as dust, dirt, or oils. This can be achieved by gently sanding the wood to create a smooth and even surface. Additionally, using a lint-free cloth to wipe the surface clean can further enhance the adhesion of the sublimation ink.
2. High-Quality Sublimation Inks
The choice of sublimation inks plays a significant role in the durability of the prints. Opting for high-quality sublimation inks that are specifically designed for wood substrates can greatly enhance the longevity of the prints. These inks are formulated to withstand the natural aging process of wood, ensuring that the colors remain vibrant and fade-resistant over time.
3. Heat Press Techniques
The correct application of heat and pressure during the sublimation process is crucial for achieving durable prints on uncoated wood. It is essential to follow the manufacturer’s guidelines for the recommended temperature and pressure settings. Using a heat press machine with even heat distribution and consistent pressure can help in achieving optimal sublimation results. This ensures that the ink fully penetrates the wood fibers, resulting in a more durable and long-lasting print.
4. Protective Coatings
To further enhance the durability of sublimation prints on uncoated wood, applying a protective coating is highly recommended. There are various options available, such as clear polyurethane or clear epoxy resin coatings. These coatings create a protective barrier over the print, shielding it from external factors such as UV rays, moisture, and abrasion. It is crucial to choose a coating that is specifically designed for sublimation prints on wood to ensure compatibility and maximum durability.
5. Proper Handling and Care
Even with proper surface preparation, high-quality inks, and protective coatings, it is essential to handle and care for sublimation printed wood products properly. Avoid exposing the prints to direct sunlight for extended periods, as UV rays can cause fading. It is also advisable to avoid placing hot objects directly on the printed surface, as this can potentially damage the print. Regular cleaning with a soft, lint-free cloth and mild detergent can help maintain the print’s vibrancy and cleanliness.
Summary
Enhancing durability in sublimation printing on uncoated wood involves several crucial steps, including proper surface preparation, using high-quality sublimation inks, employing correct heat press techniques, applying protective coatings, and practicing proper handling and care. By following these guidelines, you can ensure that your sublimation prints on uncoated wood maintain their visual appeal and longevity, allowing you to create stunning and durable pieces of art.

FAQs
1. How can I sublimate on uncoated wood?
To sublimate on uncoated wood, you will need a special sublimation coating. Apply the coating onto the wood surface, allow it to dry, and then print your design using sublimation ink. Use a heat press to transfer the ink onto the wood. The heat and pressure will cause the ink to sublimate and permanently bond with the wood.
2. Can I use a regular inkjet printer for sublimation on uncoated wood?
No, you cannot use a regular inkjet printer for sublimation on uncoated wood. Sublimation requires special sublimation ink, which is different from regular inkjet ink. Sublimation ink is designed to turn from a solid to a gas when heated, allowing it to bond with the wood. Regular inkjet ink will not produce the same results.
3. What kind of wood works best for sublimation?
Hardwoods like birch or maple are ideal for sublimation as they provide a smooth and uniform surface. However, other types of wood can also be used as long as they have a smooth finish. Avoid using woods with heavy grain patterns or uneven surfaces, as they may affect the clarity and quality of the sublimated image.
Conclusion
In conclusion, sublimating on uncoated wood can be a unique and creative way to personalize and enhance wooden products. By leveraging the power of heat and pressure, sublimation allows vibrant and detailed designs to permeate the surface of the wood, resulting in a durable and long-lasting finish. Whether you’re looking to create custom signs, furniture accents, or decorative pieces, sublimation on uncoated wood offers endless possibilities for customization and personal expression. Remember to prepare the wood properly by sanding and cleaning it before applying the sublimation transfer, ensuring optimal adhesion and image clarity. With a little practice and experimentation, you can achieve stunning and professional-looking results on uncoated wood using the sublimation process.
