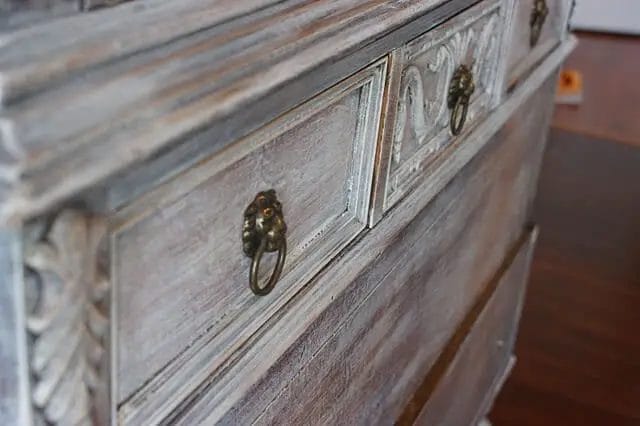
If you’re looking to transform your dark stained wood furniture into a fresh, light, and airy look, whitewashing is the perfect solution. Whitewashing creates a beautiful, washed-out effect that adds charm and character to any piece. It’s a simple and affordable DIY technique that can be done with just a few basic materials. Whether you want to update your old furniture or give a new piece a vintage feel, whitewashing is a versatile and trendy option to consider.
Whitewashing dark stained wood furniture involves diluting white paint with water to create a transparent wash. This technique allows the wood grain to show through while adding a soft, muted tone to the surface. It’s a great way to lighten up a room and create a rustic or coastal-inspired aesthetic. The process is easy to learn and doesn’t require any special skills or tools. With a little bit of patience and creativity, you can achieve a stunning whitewashed effect on your furniture.

Before you begin, make sure to properly prepare the surface by cleaning and sanding the wood. This will ensure that the whitewash adheres properly and creates an even finish. Once the surface is prepped, mix your desired ratio of paint and water in a container. Remember to start with a small amount of paint and gradually add more if needed. Test the mixture on a small, inconspicuous area to determine the desired opacity.
To apply the whitew

Choosing the Right Whitewash Stain for Dark Wood Furniture
Whitewashing is a popular technique that can give a fresh and rustic look to dark wood furniture. If you have dark wood furniture and want to lighten it up, whitewashing is a great option. However, choosing the right whitewash stain can be a bit overwhelming with so many options available in the market. In this section, we will guide you on how to choose the perfect whitewash stain for your dark wood furniture.
1. Consider the Wood Type
Before you begin the whitewashing process, it is essential to consider the type of wood you have. Different wood types react differently to whitewashing. For example, oak absorbs stain differently than pine. Therefore, it’s crucial to choose a whitewash stain that is compatible with the type of wood you have.
2. Decide on the Level of Coverage
Whitewash stains come in various opacities ranging from semi-transparent to solid. Decide whether you want to retain some of the wood grain or completely cover it up. If you prefer a more transparent look, opt for a semi-transparent stain. On the other hand, if you want to completely change the appearance of the furniture, a solid whitewash stain would be more suitable.
3. Consider the Desired Hue
The color of the whitewash stain is an important factor to consider. Whitewash stains are available in a range of hues, from cool whites to warm grays. Determine the color scheme or style of your room and choose a stain that complements it. Cool whites are ideal for creating a light and airy feel, while warm grays add a cozy and rustic touch.
4. Test the Stain
Before applying the whitewash stain to your entire piece of furniture, it’s essential to test it on a small, inconspicuous area. This will help you assess how the stain will look on your specific wood type and whether you are satisfied with the result. It’s always better to be safe than sorry and avoid any potential mishaps.
5. Consider the Maintenance
When choosing a whitewash stain, it’s important to consider the maintenance required. Some stains may require regular touch-ups or reapplication to maintain their appearance. If you prefer a low-maintenance option, look for a stain that is durable and long-lasting.
6. Seek Professional Advice
If you are unsure about which whitewash stain to choose or need further guidance, it’s always a good idea to seek advice from a professional. They can assess your wood type, understand your preferences, and recommend the best whitewash stain for your dark wood furniture.
In summary, selecting the right whitewash stain for your dark wood furniture involves considering the wood type, deciding on the level of coverage, choosing the desired hue, testing the stain, considering the maintenance required, and seeking professional advice if needed. By taking these factors into account, you can achieve the perfect whitewash look for your dark wood furniture and transform its appearance to suit your style and preferences.
Step-by-Step Guide to Whitewashing Dark Stained Wood Furniture
If you have dark stained wood furniture and you want to give it a fresh and light appearance, whitewashing is a great technique to consider. Whitewashing can transform your furniture, giving it a rustic and shabby-chic look. In this guide, we will walk you through the step-by-step process of whitewashing dark stained wood furniture.
Materials You Will Need
Before you begin the whitewashing process, make sure you have the following materials:
- Dark stained wood furniture
- Sandpaper
- Paintbrush
- White paint
- Water
- Cloth or rag
- Clear sealant (optional)
Step 1: Prep the Surface
The first step in whitewashing dark stained wood furniture is to prepare the surface. Start by sanding the furniture to remove any existing finish or rough spots. This will help the whitewash paint adhere better to the wood.
Step 2: Dilute the Paint
Next, dilute the white paint with water to create a whitewash solution. The ratio of paint to water will depend on the level of opacity you want. Start with equal parts paint and water, and adjust as needed. Mix the paint and water well until you achieve a smooth and consistent consistency.
Step 3: Apply the Whitewash
Using a paintbrush, apply the whitewash solution to the surface of the furniture. Make sure to work in small sections and apply the whitewash evenly. You can apply multiple coats if you want a more opaque finish, allowing each coat to dry completely before applying the next one.
Step 4: Wipe Off Excess
After applying the whitewash, take a cloth or rag and gently wipe off any excess paint. This will help create a distressed and weathered look. You can adjust the amount of paint you wipe off to achieve your desired effect.
Step 5: Let It Dry
Allow the furniture to dry completely before moving or using it. This will ensure that the whitewash paint sets properly and adheres to the wood surface. Depending on the climate and humidity, drying time may vary.
Step 6: Seal the Finish (Optional)
If you want to protect the whitewash finish and make it more durable, you can apply a clear sealant. This step is optional but recommended, especially if the furniture will be exposed to moisture or heavy wear.
Summary
Whitewashing dark stained wood furniture is a simple and effective way to give it a fresh and light appearance. By following this step-by-step guide, you can easily achieve a rustic and shabby-chic look for your furniture. Remember to prepare the surface, dilute the paint, apply the whitewash, wipe off excess paint, let it dry, and optionally seal the finish. Enjoy transforming your furniture with this charming whitewashing technique!

Tips for Achieving a Smooth and Even Whitewash Finish on Dark Wood Furniture
Transforming dark wood furniture into a fresh and airy whitewashed piece can breathe new life into your living space. The whitewash technique adds a rustic charm and a touch of elegance to any room. However, achieving a smooth and even whitewash finish requires careful preparation and execution. In this section, we will explore some helpful tips to help you achieve the desired look.
1. Prepare the Surface
Before you begin the whitewashing process, it is vital to prepare the surface of your dark wood furniture. Start by cleaning the piece thoroughly to remove any dirt, grease, or grime. You can use a mild detergent and water solution, or a wood cleaner specifically designed for the task. Ensure that the surface is completely dry before moving on to the next step.
2. Sand the Wood
Sanding the wood is an essential step to create a smooth and even surface for the whitewash. Use a fine-grit sandpaper to gently sand the furniture, following the grain of the wood. This will help remove any existing finish or rough spots, ensuring that the whitewash adheres properly. Be sure to wipe away any dust or debris after sanding.
3. Test the Whitewash
Before applying the whitewash to the entire piece, it is wise to do a test patch on an inconspicuous area. This will allow you to adjust the color or consistency if needed. Mix the whitewash solution according to the manufacturer’s instructions and apply it to the test area. Let it dry completely to assess the desired effect.
4. Apply the Whitewash
Once you are satisfied with the test patch, you can proceed to apply the whitewash to the entire piece of furniture. Use a brush or a lint-free cloth to apply the whitewash in long, even strokes, following the direction of the wood grain. Work in small sections, ensuring that the whitewash is applied evenly. If you prefer a more distressed look, you can gently rub the surface with a cloth or sandpaper to reveal some of the underlying wood.
5. Wipe off Excess Whitewash
After applying the whitewash, it is crucial to wipe off any excess before it dries. Use a clean, damp cloth to gently remove any buildup or drips. This will help achieve a smoother finish and prevent uneven patches. Be careful not to remove too much, as it can lighten the overall effect.
6. Allow for Drying and Cure Time
Once you have applied the whitewash and wiped off the excess, allow the furniture to dry completely. The drying time may vary depending on the product used, humidity levels, and ventilation. It is essential to follow the manufacturer’s instructions regarding drying and cure time to ensure a durable and long-lasting finish.
7. Seal the Whitewash
To protect the whitewash and enhance its longevity, it is advisable to seal the finish. Choose a clear sealant or a polyurethane varnish specifically designed for whitewashed surfaces. Apply the sealant according to the manufacturer’s instructions, using a brush or a sponge. This will help protect the furniture from daily wear and tear while preserving the whitewash effect.
8. Maintenance and Care
To maintain the beauty of your whitewashed furniture, it is important to follow proper maintenance and care practices. Avoid using harsh chemicals or abrasive cleaners that can damage the finish. Instead, use a soft cloth or a microfiber duster to remove dust and gentle soap and water for cleaning. Regularly inspect the furniture for any signs of wear or damage and address them promptly.
Summary
Transforming dark wood furniture with a smooth and even whitewash finish can revitalize your living space. By following these tips, you can achieve the desired effect and enjoy the beauty of your whitewashed furniture for years to come. Remember to prepare the surface, sand the wood, test the whitewash, apply it evenly, wipe off excess, allow for drying and cure time, seal the finish, and maintain the furniture properly. With these steps, you can create a stunning whitewashed piece that adds character and charm to any room.
Enhancing the Whitewashed Look: Adding Distressing or Antiquing to Dark Stained Wood Furniture
When it comes to furniture, the whitewashed look has become increasingly popular in recent years. The light, airy feel of whitewashed furniture can bring a fresh and modern touch to any space, while still maintaining a sense of timeless elegance. However, if you have a piece of dark stained wood furniture that you want to transform into a whitewashed masterpiece, don’t worry – there are ways to achieve that desired look!
1. Distressing the Wood
To give your dark stained wood furniture a more rustic and weathered appearance, distressing is the way to go. Distressing involves creating intentional marks and wear on the surface of the wood to mimic the natural aging process. Here’s how you can do it:
- Sand the surface of the furniture to remove any existing varnish or finish. This will help the paint adhere better.
- Use a medium-grit sandpaper to rough up the surface, focusing on areas that would naturally wear over time, such as edges, corners, and raised details.
- Take a hammer, chain, or other tools and gently tap or scrape the surface of the wood to create dents, scratches, and imperfections.
- Apply a paint primer to the furniture to ensure the paint adheres properly.
- Once the primer is dry, apply a thin coat of white paint, using a brush or a sponge. Allow it to dry completely.
- Use fine-grit sandpaper to lightly sand the painted surface, paying extra attention to the areas you distressed earlier. This will reveal the dark stain underneath and create a weathered look.
- Apply a clear protective finish, such as wax or polyurethane, to seal the paint and protect the surface.
2. Antiquing the Wood
If you want to achieve a more vintage and aged appearance for your dark stained wood furniture, antiquing is the technique for you. Antiquing involves applying a glaze or stain over the base coat of paint to give the piece a subtle, aged patina. Here’s how you can do it:
- Prepare the furniture by sanding and cleaning the surface, just like with distressing.
- Apply a coat of white or off-white paint as your base color. Let it dry completely.
- Mix a glaze using water-based glaze and a dark brown or black paint. Start with a small amount of paint and gradually add more until you achieve the desired tint.
- Using a brush, apply the glaze mixture to the painted surface, working in small sections at a time.
- Immediately wipe off the excess glaze with a clean cloth or sponge, leaving behind a subtle aged effect in the crevices and details of the furniture.
- Continue applying and wiping off the glaze until you’ve covered the entire piece. Allow it to dry.
- Apply a clear protective finish to seal the glaze and protect the surface.
With these techniques, you can easily transform your dark stained wood furniture into beautiful whitewashed pieces that add character and charm to your home. Whether you prefer the rustic look of distressed furniture or the vintage appeal of antiqued pieces, both methods allow you to achieve the whitewashed look you desire. So roll up your sleeves, get creative, and give your furniture a fresh new look!
FAQs
1. How can I whitewash dark stained wood furniture?
To whitewash dark stained wood furniture, start by sanding the surface to remove the existing finish. Then, apply a mixture of equal parts water and white latex paint using a brush. Allow it to soak into the wood for a few minutes before wiping off the excess with a clean cloth. Repeat the process if a stronger whitewash effect is desired.
2. Can I whitewash furniture without sanding?
While sanding is recommended for best results, you can try using a deglosser or a liquid sanding product to prepare the surface before whitewashing. These products help remove the gloss and roughen the surface, allowing the whitewash to adhere better. However, keep in mind that sanding generally provides a more durable and long-lasting finish.
3. How do I maintain whitewashed furniture?
To maintain whitewashed furniture, avoid using abrasive cleaners or harsh chemicals that can strip away the finish. Instead, clean the surface regularly with a damp cloth or mild soapy water. You can also periodically apply a clear topcoat or furniture wax to protect the whitewash and enhance its longevity.
Conclusion
In conclusion, if you want to transform your dark stained wood furniture into a bright and fresh look, whitewashing is the perfect technique to consider. This method not only adds a touch of rustic charm but also retains the natural beauty of the wood grain. By following the step-by-step process of preparing the surface, applying the whitewash, and then sealing it, you can achieve stunning results. Keep in mind that whitewashing allows the wood’s natural colors to shine through, creating a unique and personalized look. So, grab your brushes, embrace creativity, and give your dark stained furniture a new lease of life with a beautiful whitewash finish.
