Yes, you can use HTV (Heat Transfer Vinyl) on wood to create unique and personalized designs. With HTV, you can easily transfer designs onto wooden surfaces like signs, plaques, and furniture. It offers a durable and long-lasting result and allows you to customize your wooden items with various colors, patterns, and textures. Whether you want to add a quote, a logo, or a decorative element, using HTV on wood is a great way to showcase your creativity and enhance the look of your wooden projects.
Step-by-Step Tutorial: Applying HTV on Wood Surfaces
Applying heat transfer vinyl (HTV) on wood surfaces is a fun and creative way to customize your wooden projects. Whether you want to add a personalized design to a wooden sign or embellish a wooden box, HTV can help you achieve a professional and long-lasting result. In this tutorial, we will guide you through the step-by-step process of applying HTV on wood surfaces.

Materials Needed
- Wooden surface (sign, box, etc.)
- Heat transfer vinyl (in your preferred color and design)
- Heat press or iron
- Teflon or parchment paper
- Weeding tools (e.g., tweezers, weeding hook)
- Scissors or cutting machine (e.g., Cricut, Silhouette)
- Measuring tape or ruler
Step 1: Prepare Your Design
The first step is to create or choose the design you want to apply to your wood surface. You can either create a custom design using graphic design software or choose a pre-made design from a HTV supplier. Make sure to size your design according to the dimensions of your wooden surface.
Step 2: Cut the HTV
Once you have your design ready, it’s time to cut the HTV. If you have a cutting machine like Cricut or Silhouette, follow the instructions provided by the manufacturer to cut the HTV. If you don’t have a cutting machine, you can still cut the HTV by hand using scissors. Remember to mirror your design before cutting so that it appears correctly when applied to the wood surface.
Step 3: Weed the HTV
Weeding is the process of removing the excess vinyl from your design. Use weeding tools like tweezers or a weeding hook to carefully remove the unwanted vinyl parts. Take your time and be patient to avoid damaging the design.
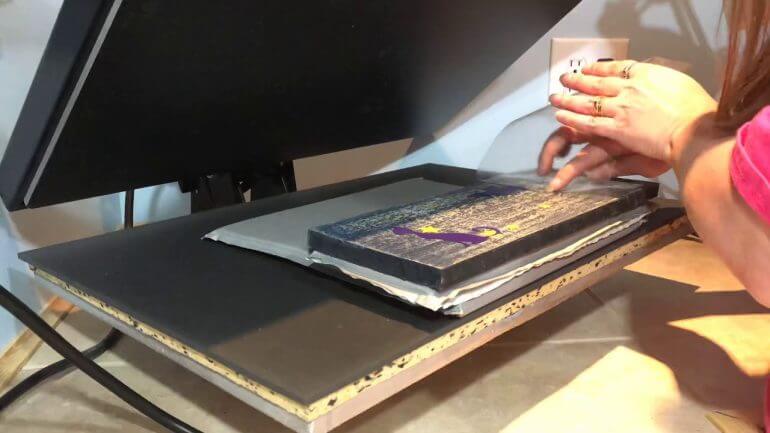
Step 4: Preheat the Wood Surface
Before applying the HTV, preheat the wood surface using a heat press or iron. This will help remove any moisture and ensure better adhesion of the vinyl. Set the heat press or iron to the appropriate temperature for the type of HTV you are using (refer to the manufacturer’s instructions).
Step 5: Position and Secure the HTV
Once the wood surface is preheated, position the cut HTV on the desired location. Use a measuring tape or ruler to ensure the design is centered and aligned correctly. Place a Teflon or parchment paper on top of the HTV to protect it from direct heat.
If you are using a heat press, follow the recommended time and pressure settings for applying HTV on wood surfaces. Close the heat press and let it do its job. If you are using an iron, use firm pressure and move it in a circular motion over the design for about 20-30 seconds.
Step 6: Remove the Transfer Paper
After applying heat and pressure, carefully peel off the transfer paper while it is still warm. Start from one corner and slowly peel back at a 180-degree angle. If any part of the vinyl lifts with the transfer paper, stop peeling and press it back down with the Teflon or parchment paper. Once the transfer paper is removed, the HTV should be securely attached to the wood surface.
Step 7: Final Touches
Take a moment to inspect the applied HTV for any loose edges or bubbles. Use the Teflon or parchment paper and apply pressure to any areas that need reinforcement. Allow the wood surface to cool down completely before handling or displaying your customized project.
Summary
Applying HTV on wood surfaces is a creative way to customize and personalize your wooden projects. By following this step-by-step tutorial, you can achieve professional-looking results. Remember to take your time, follow the manufacturer’s instructions, and practice proper safety precautions when working with heat transfer vinyl and heat presses. Get ready to showcase your creativity and make stunning designs on wood surfaces!
Recommended Types of HTV for Wood Projects
When it comes to creating wood projects with heat transfer vinyl (HTV), choosing the right type of HTV is crucial for achieving the desired results. HTV, also known as iron-on vinyl, is a popular choice for adding personalized designs, logos, and graphics to wood surfaces. However, not all HTV types are suitable for wood projects. In this section, we will explore the recommended types of HTV that work best for wood projects.
1. EasyWeed HTV
EasyWeed HTV is a top choice for wood projects due to its versatility and ease of use. It is a heat transfer vinyl that adheres well to wood surfaces and provides excellent durability. EasyWeed HTV is available in a wide range of colors and finishes, including matte, glossy, and metallic. It is compatible with various cutting machines, making it ideal for both beginners and experienced crafters.
One of the key features of EasyWeed HTV is its ability to adhere to rough surfaces, such as unfinished wood or wood with a textured finish. It applies smoothly, ensuring that the design stays in place without peeling or fading over time. The application process is straightforward, requiring only a heat press or an iron and some pressure.
When using EasyWeed HTV for wood projects, it is important to consider the wood’s surface temperature and texture. Preheating the wood surface can enhance the adhesion of the vinyl. Additionally, sanding the wood lightly to create a smoother surface can improve the overall transfer results.
2. Glitter HTV
If you’re looking to add some sparkle and shine to your wood projects, Glitter HTV is an excellent choice. Glitter HTV is a type of heat transfer vinyl that contains glitter particles embedded within its adhesive layer. It creates a dazzling effect when applied to wood, making it perfect for adding a touch of glamour to signs, plaques, and other wooden crafts.
Glitter HTV adheres well to wood surfaces, providing a long-lasting and vibrant finish. It is available in a wide array of colors, giving you the freedom to create eye-catching designs. Whether you want to make a statement with bold glittery designs or add subtle accents, Glitter HTV offers endless creative possibilities.
When working with Glitter HTV for wood projects, it is recommended to use a heat press for application. The heat press ensures even heat distribution and firm adhesion, resulting in a professional-looking finish. Remember to follow the manufacturer’s instructions for temperature and time settings to achieve the best results.
3. Patterned HTV
If you want to add unique patterns and designs to your wood projects, Patterned HTV is the way to go. Patterned HTV comes in various patterns and prints, allowing you to customize your wood crafts with vibrant and eye-catching visuals. Whether you prefer florals, geometrics, or even animal prints, there’s a patterned HTV that suits your style.
Patterned HTV is designed to adhere well to wood surfaces, offering excellent durability and longevity. It is ideal for creating personalized signs, decorative accents, and other wood crafts that require a touch of creativity. The application process for patterned HTV is similar to other types of HTV, requiring heat and pressure for proper adhesion.
When using patterned HTV for wood projects, it is important to consider the scale and placement of the pattern. Larger patterns may work best for larger wood surfaces, while smaller patterns can be used for more intricate designs. Experiment with different patterns and color combinations to achieve the desired aesthetic for your wood projects.
In summary, choosing the right type of HTV is crucial for successful wood projects. EasyWeed HTV offers versatility and durability, making it a top choice for various wood surfaces. Glitter HTV adds sparkle and shine to wood crafts, creating a glamorous effect. Patterned HTV allows for unique and personalized designs on wood projects. Consider the specific requirements of your project and select the appropriate type of HTV to achieve the best results.
Tips and Tricks for Achieving the Best Results with HTV on Wood
Using heat transfer vinyl (HTV) on wood can create beautiful and personalized designs that can add a unique touch to any project. Whether you’re working on signs, home decor, or gifts, here are some tips and tricks to help you achieve the best results with HTV on wood:
1. Choose the Right Type of Wood
Not all types of wood are suitable for heat transfer vinyl. It is important to choose a smooth and flat surface for better adherence. Woods like pine, birch, and poplar work well with HTV. Avoid rough or textured wood surfaces, as they may cause the vinyl to peel or not stick properly.
2. Prepare the Wood Surface
Before applying the HTV, make sure to prepare the wood surface properly. Sand the wood to create a smooth and even surface. Remove any dust or debris using a tack cloth or lint-free cloth. This will ensure that the vinyl adheres well and prevents any imperfections on the final design.
3. Measure and Align the Design
Measure and mark the desired placement of your design on the wood surface. Use a ruler or measuring tape to ensure accurate placement. Consider the dimensions of the wood and the size of the design to achieve a balanced and visually pleasing result. Use masking tape or transfer tape to temporarily secure the vinyl in place and align it correctly.
4. Apply Heat Evenly
Heat is essential for the HTV to adhere to the wood. Use a heat press or an iron set at the recommended temperature for the specific type of HTV you are using. Apply heat evenly and with gentle pressure across the entire design. Be careful not to overheat or scorch the wood, as this can affect the quality of the vinyl and the wood surface.
5. Peel with Caution
After applying heat, allow the vinyl to cool down before peeling off the carrier sheet. Peel the carrier sheet slowly and at a slight angle to ensure that the vinyl stays in place on the wood surface. If any part of the vinyl is not adhering properly, place the carrier sheet back and apply more heat and pressure in that area.
6. Seal the Design (Optional)
To protect the HTV design and prolong its durability, consider sealing it with a clear sealant or topcoat. This is especially important if the wood project will be exposed to moisture or outdoor elements. Choose a sealant that is compatible with HTV and follow the manufacturer’s instructions for application.
7. Test and Practice
Before working on your final project, it is always recommended to test and practice on a scrap piece of wood. This will allow you to familiarize yourself with the process and make any necessary adjustments before working on the actual project. It is better to make mistakes and learn from them on a practice piece, rather than ruining your final project.
8. Store Properly
Once your HTV on wood project is complete, store it properly to ensure its longevity. Avoid exposing the wood to extreme temperatures or direct sunlight, as this can cause the vinyl to fade or peel over time. Store the project in a cool and dry place to maintain the quality of the vinyl and the wood.
In summary, achieving the best results with HTV on wood requires careful preparation, proper application of heat, and attention to detail. By choosing the right type of wood, preparing the surface, measuring and aligning the design accurately, applying heat evenly, peeling with caution, and optionally sealing the design, you can create stunning and long-lasting HTV projects on wood.
Creative Ideas for Using HTV on Wood: Home Decor, Signs, and More
Heat Transfer Vinyl (HTV) is a versatile material that allows you to personalize and customize various items. While it is commonly used on fabrics, it can also be applied to wood surfaces, opening up a world of creative possibilities. In this section, we will explore some innovative ideas for using HTV on wood to create beautiful home decor, signs, and more.
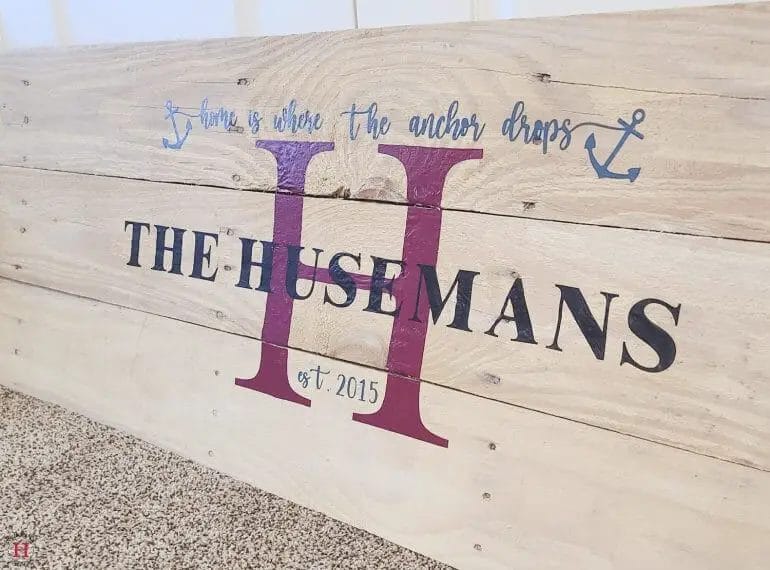
1. Custom Wooden Signs
One of the most popular applications of HTV on wood is creating custom wooden signs. With HTV, you can easily transfer intricate designs, quotes, or personalized messages onto a wooden surface. Whether you want to create a rustic farmhouse sign, a motivational quote board, or a personalized family name plaque, HTV allows you to bring your vision to life.
To create a custom wooden sign using HTV, start by selecting a suitable wooden board or plaque. Smooth and sanded surfaces work best for HTV application. Next, design your desired artwork or text using a graphic design software or by hand. Remember to mirror your design before cutting it on the HTV material.
Once your design is ready, use a heat press or an iron set to the appropriate temperature to transfer the HTV onto the wood. Apply even pressure for the recommended time, and peel off the carrier sheet once the vinyl has cooled down. Your custom wooden sign is now ready to be displayed!
2. Personalized Cutting Boards
HTV can also be used to create personalized cutting boards, making them not only practical but also aesthetically pleasing. Whether you want to gift a cutting board for a housewarming or create a unique addition to your own kitchen, HTV can help you achieve a personalized touch.
To create a personalized cutting board, start by selecting a high-quality wooden cutting board. Design your desired artwork or text, ensuring it fits within the dimensions of the cutting board. Mirror your design and cut it out on the HTV material.
Preheat the cutting board slightly to remove any moisture and improve the adhesion of the HTV. Place the cut HTV design onto the cutting board, applying even pressure and heat to adhere it properly. Once cooled, gently peel off the carrier sheet, leaving behind your personalized design on the cutting board.
3. Home Decor Accents
HTV can be used to add a personal touch to various home decor accents made of wood. From decorative wooden trays to wooden coasters and wall hangings, the possibilities are endless.
Consider adding HTV designs to wooden trays to create a unique serving piece for your next gathering. Personalize wooden coasters with monograms or intricate designs to protect your furniture in style. You can also create eye-catching wall hangings by transferring HTV designs onto wooden plaques or slices.
Remember to consider the size and shape of the wood surface when designing your HTV artwork. Experiment with different colors and patterns to create visually appealing home decor accents that reflect your style and personality.
4. Wooden Furniture Upgrades
If you have old or plain wooden furniture that needs a makeover, HTV can be a game-changer. With HTV, you can transform the look of your furniture by adding patterns, designs, or even a faux woodgrain effect.
Choose a suitable HTV material for furniture applications, such as a stretchable or adhesive vinyl that can handle the wear and tear of daily use. Clean and prepare the furniture surface before applying the HTV. Cut your desired design on the HTV material and carefully transfer it onto the furniture using a heat press or iron.
From upgrading the look of a plain wooden dresser with patterned drawer fronts to adding a unique design to a wooden headboard, HTV can breathe new life into your furniture pieces.
5. Wooden Gift Items
Using HTV on wooden gift items can take your presents to the next level. Whether you are crafting a personalized wooden photo frame, a customized wine box, or a sentimental keepsake, HTV can help you create heartfelt gifts.
Choose a wooden item that is suitable for the occasion, such as a photo frame for birthdays or anniversaries, a wine box for weddings or housewarmings, or a small wooden box for keepsakes. Design your HTV artwork accordingly and transfer it onto the wooden surface.
Personalized wooden gift items created with HTV show thoughtfulness and add a special touch to any occasion. Your recipients will appreciate the effort and uniqueness of their customized gift.
FAQs
Can I use HTV on wood?
Yes, you can use HTV (Heat Transfer Vinyl) on wood. However, it is important to note that the surface of the wood should be smooth and free of any imperfections for the best results. Additionally, make sure to use a heat press machine or iron with the correct temperature and pressure for the type of HTV you are using.
Conclusion
In conclusion, using HTV (heat transfer vinyl) on wood can be a creative and unique way to personalize and customize wooden items. HTV allows for a wide range of designs, colors, and patterns to be applied onto wood surfaces, making it suitable for various DIY projects and crafts. Whether you want to add a personal touch to wooden signs, decorations, or furniture, HTV can provide a durable and long-lasting solution. However, it is important to ensure that the wood is properly prepared and heat-resistant to avoid any potential damage during the application process. With careful preparation and proper techniques, HTV can be successfully used on wood to create stunning and personalized creations.
