If you’re dealing with water damaged wood, don’t worry – there are solutions to restore it. Whether your wooden furniture, flooring, or structural elements have been affected, professional repair services can help salvage and repair the damage.
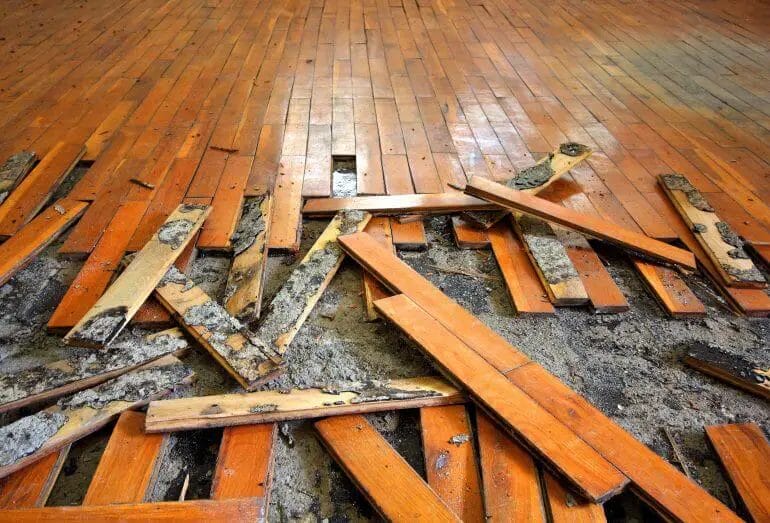
Water damage can cause warping, rotting, and discoloration, compromising the integrity and aesthetics of the wood. Specialized techniques, such as drying, sanding, refinishing, and even replacing affected parts, can bring your water damaged wood back to life.

By addressing water damage promptly and enlisting the expertise of professionals, you can restore the beauty and functionality of your wood, saving you time and money in the long run. Don’t let water damage diminish the value of your prized wooden possessions – take action and restore them to their former glory.
Repairing Water Damaged Wood: A Step-by-Step Guide
Water damage can wreak havoc on wood surfaces, causing them to warp, rot, or become discolored. Whether it’s a leaky roof, a burst pipe, or a flood, it’s important to address water damage on wood promptly to prevent further deterioration. In this guide, we will walk you through the steps of repairing water damaged wood.
Step 1: Assess the Damage
The first step in repairing water damaged wood is to assess the extent of the damage. Look for signs of warping, discoloration, or soft spots in the wood. It’s important to identify the cause of the water damage and fix it before proceeding with repairs.
Step 2: Remove the Damaged Wood
If the water damage is severe, you may need to remove the damaged wood entirely. Use a saw or chisel to carefully cut out the damaged sections of wood. Be sure to wear protective gloves and eyewear during this process.
Step 3: Dry the Area
Before repairing the wood, it’s crucial to ensure that the area is completely dry. Use fans, dehumidifiers, or a heat source to speed up the drying process. You may also need to use a moisture meter to test the moisture levels in the wood.
Step 4: Treat the Wood
Once the area is dry, it’s important to treat the wood to prevent further damage. Apply a wood preservative or a water repellent to protect the wood from future water damage. Follow the manufacturer’s instructions for application and drying times.
Step 5: Repair or Replace
Depending on the extent of the damage, you may either repair the wood or replace it entirely. For minor damage, you can use wood filler to fill in any cracks or holes. Sand the repaired area to smooth it out and blend it with the surrounding wood. For more severe damage, you may need to replace the entire piece of wood.
Step 6: Sand and Refinish
After the repairs are complete, sand the area to smooth out any rough patches or imperfections. Use a fine-grit sandpaper and work in the direction of the wood grain. Once the surface is smooth, apply a wood stain or paint to match the color of the surrounding wood. Finish with a protective sealant to enhance durability.
Step 7: Prevent Future Water Damage
To prevent future water damage, it’s essential to address the underlying cause of the issue. Repair any leaks, improve ventilation in moisture-prone areas, and consider applying a water-resistant coating to vulnerable wood surfaces.
In summary, water damage can wreak havoc on wood surfaces, but by following these step-by-step guidelines, you can effectively repair and restore water damaged wood. Remember to assess the damage, remove and dry the affected area, treat the wood, and repair or replace as needed. Finish by sanding and refinishing the wood to restore its appearance. Taking preventative measures can also help protect wood surfaces from future water damage. By following these steps, you can successfully repair water damaged wood and prolong its lifespan.
Effective Techniques for Fixing Water Damaged Wood
Water damage can wreak havoc on wooden surfaces, causing warping, discoloration, and even structural damage. Whether it’s due to a leaky roof, a burst pipe, or flooding, addressing water damage as soon as possible is crucial to prevent further deterioration. In this section, we will explore some effective techniques for fixing water damaged wood and restoring its original condition.
1. Assess the Damage
The first step in fixing water damaged wood is to assess the extent of the damage. Carefully inspect the affected area, looking for signs of warping, mold growth, or discoloration. Determine if the damage is superficial or if it has affected the structural integrity of the wood. This assessment will help you decide which repair technique to use.
2. Dry the Wood
Before you can begin repairing the water damaged wood, it’s crucial to ensure that it is completely dry. Use a dehumidifier, fans, or natural ventilation to promote air circulation and accelerate the drying process. Remember that moisture trapped within the wood can lead to further damage, such as mold growth or wood rot.
3. Sand and Refinish
If the water damage is minor and hasn’t compromised the structure of the wood, sanding and refinishing the surface may be sufficient. Start by sanding the affected area with medium-grit sandpaper to remove any roughness or discoloration. Gradually progress to finer grits until the surface is smooth and even. After sanding, apply a wood stain or sealant to match the surrounding wood, followed by a protective finish for added durability.
4. Replace Damaged Sections
In cases of extensive water damage or when the wood’s structural integrity is compromised, it may be necessary to replace the damaged sections. Start by carefully removing the affected portion using a saw or chisel. Cut a replacement piece of wood to fit the area and secure it in place using wood glue and nails or screws. Sand and finish the repaired section to ensure a seamless blend with the surrounding wood.
5. Treat for Mold and Mildew
Water damage often creates a favorable environment for mold and mildew growth. Even if you can’t see visible signs, it’s essential to treat the wood to prevent future infestations. Use a mixture of water and bleach or a commercial mold and mildew remover to clean the affected area thoroughly. Ensure proper ventilation during this process and follow the manufacturer’s instructions for safety.
6. Prevent Future Water Damage
Once you have repaired the water damaged wood, it’s important to take steps to prevent future incidents. Regularly inspect your home for leaks or sources of moisture and address them promptly. Ensure proper ventilation in areas prone to high humidity, such as bathrooms and basements. Consider applying a water-resistant sealant or paint to protect vulnerable wood surfaces.
In summary, fixing water damaged wood requires assessing the damage, drying the wood thoroughly, and using appropriate repair techniques. Minor damage can be addressed through sanding and refinishing, while extensive damage may call for replacing damaged sections. Remember to treat the wood for mold and mildew and take preventive measures to avoid future water damage. By following these effective techniques, you can restore water damaged wood and maintain its longevity.
DIY Solutions to Restore Water Damaged Wooden Surfaces
Water damage can be a nightmare for wooden surfaces, causing warping, discoloration, and even rot. Whether it’s a hardwood floor, furniture, or a wooden countertop, restoring it to its former glory can seem like a daunting task. However, with a few DIY solutions, you can tackle water damage and bring your wooden surfaces back to life. In this section, we will explore some effective DIY methods to restore water damaged wooden surfaces.
1. Identify the Extent of the Damage
The first step in restoring water damaged wooden surfaces is to assess the extent of the damage. Determine if the wood is simply discolored or if it has developed mold or rot. If the damage is minor, you may be able to address it with surface-level treatments. However, if the damage is severe, you may need to replace the affected areas.
2. Dry Out the Wood
Before you can begin the restoration process, it’s crucial to ensure that the wood is completely dry. Use a dehumidifier or fans to remove any moisture from the area. You can also use a moisture meter to check the moisture content of the wood. It’s important to note that attempting to restore water damaged wood while it’s still wet can lead to further damage and the growth of mold.
3. Sand the Surface
Once the wood is dry, you’ll need to sand the surface to remove any discoloration, roughness, or mold. Use a medium-grit sandpaper to gently sand the affected areas in the direction of the wood grain. Be careful not to sand too aggressively, as this can damage the wood further.
4. Apply Wood Bleach
If the water damage has caused the wood to become stained or discolored, you can use wood bleach to lighten the affected areas. Follow the instructions on the wood bleach product carefully, as different types of wood bleach may have different application methods. Apply the wood bleach evenly to the stained areas and allow it to sit for the recommended amount of time. Then, rinse off the bleach with water and allow the wood to dry completely.
5. Repair or Replace Damaged Areas
If the water damage has caused structural issues, such as warping or rot, you may need to repair or replace the damaged areas. For minor warping, you can use clamps or weights to apply pressure and encourage the wood to return to its original shape. If the damage is more significant, consider consulting a professional woodworker or carpenter for assistance.
6. Apply Wood Stain and Sealant
After the wood is repaired and restored, you can apply wood stain to enhance its appearance and protect it from future damage. Choose a stain that matches the color of the rest of the wood and apply it in thin, even coats. Once the stain has dried, apply a coat of sealant to protect the wood from moisture and UV damage. Be sure to follow the manufacturer’s instructions for drying time and reapplication if necessary.
7. Maintain Regular Care
Prevention is key to avoiding future water damage on wooden surfaces. Make sure to clean up spills promptly, use coasters or placemats to protect surfaces, and avoid placing hot or wet items directly on the wood. Additionally, regular cleaning and maintenance, such as dusting and polishing, can help keep your wooden surfaces looking their best.
In summary, restoring water damaged wooden surfaces is a task that can be accomplished with a bit of DIY know-how. By assessing the extent of the damage, drying out the wood, sanding the surface, applying wood bleach, repairing or replacing damaged areas, and applying wood stain and sealant, you can bring your water damaged wood back to life. Remember to maintain regular care to prevent future damage and enjoy the beauty of your restored wooden surfaces.
Professional Tips for Repairing Water Damaged Wood
Wood is a beautiful and versatile material used in many homes and furniture pieces. However, when exposed to water, it can suffer from damage that compromises its strength and appearance. Whether it’s a leaky roof, a burst pipe, or a flood, dealing with water damage to wood can be a daunting task. In this section, we will provide you with some professional tips on how to effectively repair water-damaged wood.
1. Assess the Damage
The first step in repairing water-damaged wood is to assess the extent of the damage. Carefully inspect the affected area to determine if the wood is warped, cracked, or rotted. Look for signs of mold or mildew as well. This will help you determine the best course of action for repairing the wood.
2. Remove the Water Source
Before you can begin the repair process, it’s essential to address the source of the water damage. Fix any leaks, replace damaged pipes, or eliminate the cause of the water infiltration. This will prevent further damage and ensure that your repairs are effective in the long term.
3. Dry the Wood
To prevent the growth of mold and mildew, it’s crucial to completely dry the water-damaged wood. Use fans, dehumidifiers, and open windows to increase air circulation and facilitate the drying process. Make sure that the wood is thoroughly dry before proceeding with any repairs.
4. Remove Damaged Sections
If the wood is severely damaged or rotted, it may be necessary to remove the affected sections. Use a chisel or a saw to carefully cut out the damaged parts of the wood. Take care to make clean and precise cuts to ensure a seamless repair.
5. Treat for Mold and Mildew
If you notice any signs of mold or mildew on the wood, it’s important to address this issue before proceeding with repairs. Use a mixture of bleach and water or a commercial mold removal product to treat the affected areas. Allow the solution to sit for a few minutes, then wipe it away with a clean cloth. This will help prevent further growth of mold and ensure a clean surface for repair.
6. Apply Wood Hardener
For wood that is structurally compromised, such as rotted or soft areas, it’s recommended to apply a wood hardener. This product penetrates the wood fibers and strengthens them, providing a solid base for repairs. Follow the manufacturer’s instructions for application and allow the hardener to dry completely.
7. Fill and Sand
After the wood hardener has dried, you can proceed to fill any cracks, holes, or gaps in the wood. Use a wood filler that matches the color of the surrounding wood and apply it with a putty knife. Allow the filler to dry, then sand it down until it is smooth and level with the surface of the wood.
8. Stain or Paint
Once the repairs are complete and the wood surface is smooth, you can choose to stain or paint the wood to match the rest of the piece or the surrounding area. Select a stain or paint that is specifically formulated for wood and apply it according to the manufacturer’s instructions. Allow the stain or paint to dry completely before using or sealing the wood.
9. Seal the Wood
To protect the repaired wood from future water damage, it’s important to apply a sealant. Select a waterproof or water-resistant sealant and apply it evenly to the wood surface. This will help prevent water infiltration and maintain the integrity of the repairs.
10. Monitor for Future Damage
After repairing water-damaged wood, it’s essential to monitor the area for any signs of further damage or water infiltration. Regularly check for leaks, inspect the wood for any changes or deterioration, and promptly address any issues that arise. This proactive approach will help ensure the longevity and durability of the repaired wood.
In summary, repairing water-damaged wood requires careful assessment, drying, and repair techniques. By following these professional tips, you can effectively restore the strength and beauty of water-damaged wood, ensuring its longevity and preserving the appearance of your home or furniture.
Preventing Future Water Damage to Wood: Essential Maintenance Tips
Wood adds warmth and beauty to any space, whether it’s used for furniture, flooring, or decking. However, wood is also susceptible to water damage, which can lead to warping, rotting, and costly repairs. To protect your wood surfaces and prevent future water damage, consider implementing these essential maintenance tips.
1. Seal and Protect
One of the most effective ways to prevent water damage to wood is by sealing and protecting it. Apply a high-quality waterproof sealant or finish to your wood surfaces, such as furniture, floors, or outdoor decking. This will create a protective barrier that repels water and prevents it from penetrating the wood.
2. Regular Cleaning
Regular cleaning is essential to remove dirt, debris, and moisture that can accumulate on wood surfaces. Use a mild detergent and warm water to gently clean your wood furniture or floors. Avoid using excessive water or harsh cleaning chemicals, as these can damage the wood.
3. Maintain Proper Moisture Levels
Wood is sensitive to changes in moisture levels. High humidity or excessive dryness can cause the wood to warp or crack. To prevent this, maintain proper moisture levels in your home by using a humidifier or dehumidifier as needed. Additionally, avoid placing wood furniture or flooring in areas with direct exposure to moisture, such as bathrooms or kitchens.
4. Address Plumbing Leaks Promptly
Plumbing leaks can quickly lead to water damage if left unattended. Regularly inspect your plumbing system for any leaks or signs of water damage. If you notice any issues, such as dripping faucets or water stains, address them promptly to prevent further damage to your wood surfaces.
5. Use Coasters and Mats
To protect wood furniture from water rings or stains, use coasters or mats on surfaces where drinks or wet items are placed. This simple precaution can help prevent moisture from seeping into the wood and causing damage.
6. Maintain Gutters and Downspouts
Proper water drainage is crucial for preventing water damage to the exterior wood surfaces of your home. Regularly clean and maintain your gutters and downspouts to ensure proper water flow away from your house. This will help prevent water from pooling around your home’s foundation and potentially causing damage to wood structures.
7. Inspection and Maintenance
Regular inspection and maintenance of your wood surfaces is key to preventing future water damage. Check for any signs of deterioration, such as peeling paint, discoloration, or soft spots. Address any issues promptly by repairing or replacing damaged wood to prevent further damage.
8. Avoid Excessive Sun Exposure
Direct sunlight can cause wood to fade, dry out, and become more prone to water damage. Protect your wood surfaces from excessive sun exposure by using curtains, blinds, or UV-protective coatings. This will help preserve the beauty and integrity of the wood.
9. Elevate Wood in Flood-Prone Areas
If you live in a flood-prone area, consider elevating your wood furniture or flooring to minimize the risk of water damage during floods or heavy rains. Using risers or platforms can provide added protection to keep your wood surfaces safe.
10. Professional Restoration
In the event of significant water damage to your wood surfaces, it’s essential to seek professional restoration services. Water damage restoration experts have the knowledge, tools, and experience to effectively assess and repair the damage, preventing further deterioration and ensuring the longevity of your wood.
In summary, protecting your wood surfaces from water damage requires proactive maintenance and care. By following these essential tips, you can prevent future water damage, prolong the life of your wood, and enjoy its natural beauty for years to come.
FAQs
Can you fix water-damaged wood?
Yes, water-damaged wood can be fixed depending on the severity of the damage. It is important to address the issue promptly to prevent further damage and mold growth. You can hire a professional restoration service to assess the damage and employ techniques such as drying, sanding, and refinishing to restore the wood.
How can I prevent water damage to wood?
To prevent water damage to wood, you can take several precautions, such as ensuring proper drainage around your home’s foundation, fixing leaky pipes or faucets promptly, and using a dehumidifier in humid areas. Applying a water-resistant sealant or coating to the wood surface can also provide some protection.
What should I do if I discover water damage to wood?
If you discover water damage to wood, it is important to act quickly. Start by identifying and fixing the source of the water to prevent further damage. Then, assess the extent of the damage and consider hiring a professional restoration service to properly dry and repair the affected wood.
Conclusion
In conclusion, if you are wondering whether it is possible to fix water damaged wood, the answer is yes. However, the extent of the damage and the type of wood will impact the success of the restoration process. It is crucial to act quickly and address the issue to prevent further deterioration.
While minor water damage can be fixed by drying and refinishing the wood, more significant damage may require professional help. Assessing the extent of the damage, using appropriate techniques and products, and ensuring proper drying are vital for successful wood damage restoration. Remember, prevention is always better than cure, so take necessary precautions to avoid water damage in the first place.
