Yes, you can remove polyurethane from wood surfaces by sanding. Sanding is a common and effective method to strip away the thick layer of polyurethane and prepare the wood for refinishing or painting. By using sandpaper or a power sander, you can gradually remove the old polyurethane coating, revealing the natural beauty of the wood underneath. However, it is essential to take proper safety precautions and follow the correct sanding techniques to achieve the desired results without damaging the wood surface.
Removing Polyurethane Coating from Wood: A Step-by-Step Guide
Wood surfaces coated with polyurethane can be beautiful and durable, but over time, they may start to show signs of wear and tear. In such cases, removing the polyurethane coating becomes necessary to restore the wood’s natural beauty or prepare it for a new finish. While the process may seem daunting at first, with the right tools and techniques, you can successfully remove the polyurethane coating from wood. This step-by-step guide will walk you through the process.

Step 1: Gather the Necessary Tools
Before you begin, it’s important to gather all the necessary tools and materials. Here’s what you’ll need:
- Protective gear (goggles, gloves, mask)
- Chemical stripper or paint remover
- Scraper or putty knife
- Sandpaper (coarse and fine-grit)
- Mineral spirits or denatured alcohol
- Clean rags
- Safety equipment (such as ventilation mask)
Step 2: Prepare the Work Area
Removing the polyurethane coating can be a messy process, so it’s important to prepare your work area properly. Lay down a drop cloth or old newspapers to protect the surrounding surfaces from any drips or spills. Ensure proper ventilation by opening windows or using fans.
Step 3: Apply the Chemical Stripper
Wearing protective gear, apply a generous amount of chemical stripper or paint remover to the wood surface using a brush or sprayer. Make sure to follow the manufacturer’s instructions and guidelines. Allow the stripper to sit on the wood for the recommended period of time to soften and loosen the polyurethane coating.
Step 4: Scrape off the Polyurethane
Once the chemical stripper has had time to work, use a scraper or putty knife to gently scrape off the softened polyurethane. Be careful not to gouge or damage the wood surface. Work in small sections and remove as much of the coating as possible.
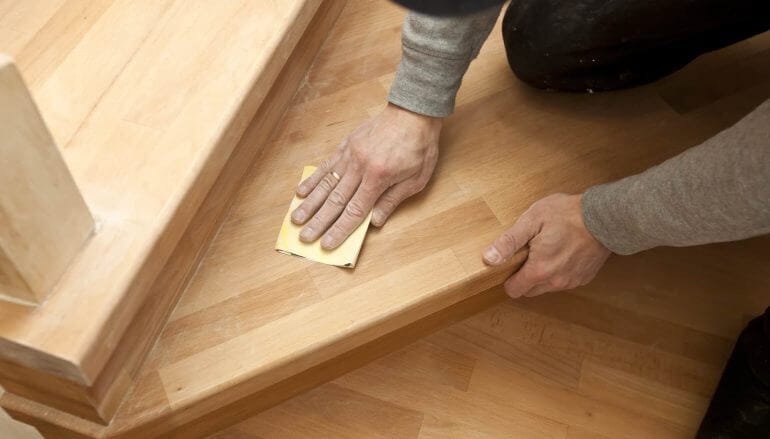
Step 5: Sand the Wood Surface
After scraping off the majority of the polyurethane coating, use coarse-grit sandpaper to sand the wood surface. This will help remove any remaining residue and smooth out the wood. Follow up with fine-grit sandpaper to achieve a smooth finish.
Step 6: Clean the Surface
Once the sanding is complete, use mineral spirits or denatured alcohol and a clean rag to wipe away any dust, residue, or chemicals from the wood surface. This will prepare the wood for a new finish or additional treatment.
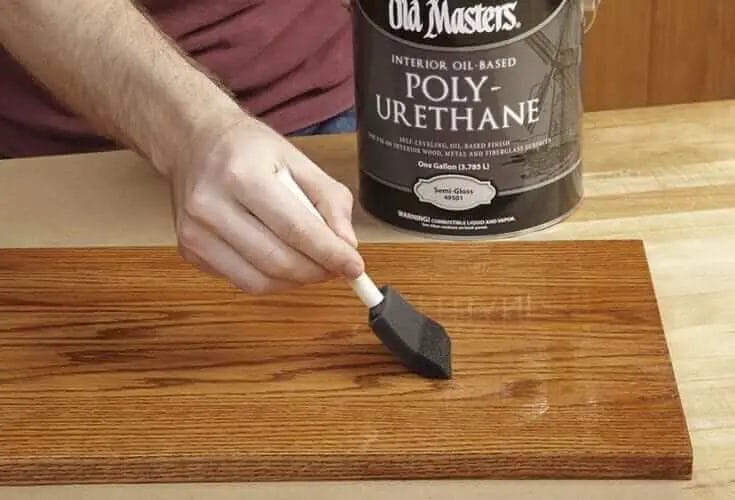
Step 7: Apply a New Finish (Optional)
If you wish to enhance the appearance of the wood or protect it from further damage, you can apply a new finish after removing the polyurethane coating. Options include staining, varnishing, or applying a fresh coat of polyurethane. Follow the instructions for the chosen finish and allow it to dry completely before using or handling the wood.
Step 8: Clean Up
After completing the removal process, ensure that you properly dispose of any used chemical stripper, rags, or other materials according to local regulations. Clean your tools and store them safely for future use.
Summary
Removing polyurethane coating from wood is a task that requires patience, caution, and the right tools. By following this step-by-step guide, you can successfully remove the polyurethane and restore the natural beauty of your wood surfaces. Remember to wear protective gear, prepare your work area, and follow the manufacturer’s instructions for any chemical products used. With careful attention to detail, your wood surfaces will be ready for a fresh new finish or additional treatments.
Sanding Techniques for Polyurethane Removal on Wood Surfaces
If you’re looking to remove polyurethane from wood surfaces, sanding is the most effective technique to achieve a smooth and bare finish. Polyurethane is a durable and protective coating commonly used on furniture, floors, and other wooden objects. However, over time, it can wear out or become damaged, requiring removal and refinishing.
Before you begin the sanding process, it’s important to gather the necessary tools and materials. You’ll need a power sander (orbital or belt sander), sandpaper (grit ranging from coarse to fine), a dust mask, safety goggles, and a vacuum cleaner or dust collection system to remove the sanding debris.
Selecting the Right Grit Sandpaper
The first step in the sanding process is choosing the appropriate sandpaper grit. The grit refers to the roughness or coarseness of the sandpaper and determines the level of abrasiveness. For polyurethane removal, you’ll typically start with a coarse-grit sandpaper and gradually move to finer grits for a smoother finish.
Begin with a medium to coarse-grit sandpaper, such as 60 or 80 grit, to effectively remove the polyurethane layer. This initial sanding will help to strip away the top layer and expose the bare wood beneath. As you progress, switch to a finer grit sandpaper, such as 120 or 150, for a smoother surface.
Preparing the Wood Surface
Before you start sanding, it’s essential to prepare the wood surface. Remove any furniture or objects from the area and cover nearby surfaces to protect them from dust and debris. Additionally, ensure that the wood surface is clean and free from any dirt or loose particles that could interfere with the sanding process.
If there are any protruding nails or staples, use pliers or a hammer to flatten them or remove them entirely. This will prevent damage to the sandpaper and make the sanding process more efficient.
Sanding Technique
When sanding polyurethane, it’s important to follow the grain of the wood to achieve an even and consistent result. Sanding against the grain may cause scratches or unevenness on the surface.
Start with the coarse-grit sandpaper and move the power sander in smooth, even strokes along the wood surface. Avoid applying excessive pressure, as this can result in uneven sanding or damage to the wood. Let the sander do the work and guide it steadily across the surface.
Once you’ve completed the initial sanding, switch to a finer grit sandpaper and repeat the process. This will help to smooth out any remaining imperfections and prepare the wood surface for refinishing.
Dust Control
Sanding can create a significant amount of dust, which can be harmful to your health if inhaled. To protect yourself, wear a dust mask and safety goggles throughout the sanding process.
Additionally, use a vacuum cleaner or dust collection system to remove the sanding debris as you work. This will improve visibility and prevent the dust from settling back onto the wood surface.
Clean-up and Finishing
After completing the sanding process, thoroughly clean the wood surface to remove any remaining dust or debris. Use a damp cloth or vacuum cleaner to ensure a clean and smooth surface for refinishing.
At this stage, you can choose to apply a new coat of polyurethane or explore other finishing options, such as staining or painting, depending on your desired outcome.
Summary
When it comes to removing polyurethane from wood surfaces, sanding is the most effective technique. By selecting the right grit sandpaper, preparing the wood surface, and using proper sanding techniques, you can achieve a smooth and bare finish. Remember to prioritize dust control and clean the wood surface thoroughly before applying any new finishes. With these sanding techniques, you’ll be on your way to restoring the natural beauty of your wooden objects.
Choosing the Right Sandpaper Grit for Polyurethane Removal
When it comes to removing polyurethane from a surface, choosing the right sandpaper grit is essential for achieving the best results. Sanding is a common method used to strip away the top layer of polyurethane, allowing for refinishing or repainting. However, using the wrong grit can lead to ineffective or uneven removal, resulting in a poor finish. In this section, we will explore the different sandpaper grits available and guide you in selecting the most suitable option for your polyurethane removal project.
Understanding Sandpaper Grit Numbers
Sandpaper grit numbers represent the coarseness or fineness of the abrasive particles on the sandpaper surface. The higher the grit number, the finer the particles will be, resulting in a smoother and more polished finish. Conversely, lower grit numbers indicate coarser particles that are ideal for aggressive material removal.
Common sandpaper grits range from 40 to 2000, with each grit serving a specific purpose. The choice of grit depends on the thickness of the polyurethane layer, the desired level of removal, and the condition of the surface.
Choosing the Right Grit for Polyurethane Removal
1. Coarse Grits (40-80):
- Coarse grit sandpapers, such as 40 or 80, are suitable for heavy-duty polyurethane removal on rough surfaces.
- These grits are effective in removing thick layers of polyurethane or stripping multiple layers of old finishes.
- Use coarse grits cautiously, as they can leave deep scratches on the surface if not handled properly.
2. Medium Grits (100-150):
- Medium grit sandpapers, such as 100 or 150, are versatile options that strike a balance between removal efficiency and surface smoothness.
- These grits work well for removing moderate levels of polyurethane on various surfaces.
- Medium grits are often used for initial stripping and leveling of the polyurethane layer.
3. Fine Grits (180-220):
- Fine grit sandpapers, in the range of 180 to 220, are ideal for light removal or refinishing projects.
- These grits are effective in smoothing the surface after initial stripping or to prepare it for painting or staining.
- Fine grits can also be used for final sanding to achieve a polished finish.
4. Extra Fine Grits (240+):
- Extra fine grit sandpapers, typically above 240, are used for ultra-smooth finishing touches.
- These grits are suitable for removing fine scratches, imperfections, or residue left after using coarser grits.
- Extra fine grits are commonly used in the final stages of polyurethane removal or for achieving a mirror-like finish.
Additional Tips for Sanding Polyurethane
1. Begin with a coarser grit and gradually work your way up to finer grits for optimal results.
2. Use proper sanding techniques, such as using light pressure and making smooth, even strokes.
3. Keep the sandpaper clean by periodically tapping it or using a sandpaper cleaning tool to prevent clogging.
4. Wear protective gear, including goggles and a dust mask, to protect yourself from sanding dust.
5. After sanding, make sure to remove all sanding residue before applying new finishes.
Summary
Choosing the right sandpaper grit is crucial for successful polyurethane removal. Coarse grits like 40 or 80 are suitable for heavy-duty removal, while medium grits around 100 or 150 offer a balance between efficiency and surface smoothness. Fine grits (180-220) are ideal for light removal and preparation for refinishing, while extra fine grits (240+) are used for fine finishing touches. Remember to follow proper sanding techniques and wear protective gear to ensure a smooth and safe polyurethane removal process.
Alternative Methods to Sanding for Removing Polyurethane from Wood
When it comes to refinishing wood surfaces, removing the old polyurethane coating is often the first step. While sanding is the most commonly used method for this task, there are alternative methods available that can be just as effective, if not more so. In this section, we will explore some of these alternative methods for removing polyurethane from wood.
1. Chemical Stripping
One effective alternative to sanding is chemical stripping. Chemical strippers are products specifically designed to break down and dissolve polyurethane and other finishes. They are usually available in liquid or gel form and can be applied to the wood surface using a brush or a spray bottle.
To use a chemical stripper, start by applying a thick layer of the product onto the polyurethane coating. Make sure to follow the instructions provided by the manufacturer, as each product may have specific application guidelines. Leave the stripper on the wood surface for the recommended amount of time, allowing it to penetrate and dissolve the polyurethane.
After the specified time, use a scraper or a putty knife to gently remove the softened polyurethane. Be careful not to damage the wood surface underneath. You may need to repeat this process multiple times to completely remove the polyurethane, depending on the thickness of the coating.
2. Heat Gun
Another alternative method for removing polyurethane is using a heat gun. A heat gun produces high levels of heat that can soften and loosen the polyurethane coating, making it easier to scrape off.
To use a heat gun, set it to a moderate temperature and hold it a few inches away from the polyurethane surface. Move the heat gun back and forth over the coating, heating it evenly. As the polyurethane softens, use a scraper or a putty knife to gently lift and remove it from the wood.
While using a heat gun, it is important to take safety precautions. Wear protective gloves and goggles, as the heat gun can cause burns if not used carefully. Additionally, make sure to work in a well-ventilated area to avoid inhaling any fumes.
3. Citrus-based Strippers
A less harsh alternative to chemical strippers is citrus-based strippers. These strippers are made from natural ingredients and are safe to use indoors without the need for extensive ventilation.
Citrus-based strippers work by breaking down the polyurethane coating using the natural solvents found in citrus fruits. They are applied in a similar manner to chemical strippers, allowing them to penetrate the polyurethane and soften it. Once softened, the polyurethane can be easily scraped off using a scraper or putty knife.
4. Abrasive Blasting
If you are dealing with a large wooden surface or have access to specialized equipment, abrasive blasting can be an effective method for removing polyurethane. Abrasive blasting involves using a high-pressure stream of abrasive material, such as sand or walnut shells, to remove the coating.
This method should only be attempted by experienced individuals, as it requires proper safety equipment and training. It is important to take precautions to protect yourself from inhaling the abrasive material and to prevent damage to the wood surface.
In summary, while sanding is a common method for removing polyurethane from wood, there are alternative methods available that can be equally effective. Chemical stripping, heat gun, citrus-based strippers, and abrasive blasting are all viable options depending on your specific needs and preferences. Remember to always follow safety guidelines and instructions provided by manufacturers when using any of these methods.
Precautions and Tips for Safe Polyurethane Removal on Wood
Removing polyurethane from wood can be a challenging task, especially if you are not familiar with the proper techniques and precautions. Whether you are refinishing furniture or restoring wooden surfaces, it is essential to follow certain guidelines to ensure a safe and effective removal process. In this section, we will discuss some precautions and tips that will help you remove polyurethane from wood without causing any damage.
1. Safety First
Before you begin the polyurethane removal process, it is crucial to prioritize your safety. Make sure to wear protective gear such as gloves, safety goggles, and a dust mask to avoid any contact with the chemical substances or inhaling harmful fumes. Additionally, work in a well-ventilated area to minimize exposure to any potentially hazardous chemicals.
2. Test in an inconspicuous area
Prior to applying any polyurethane remover or stripping agent, it is advisable to perform a patch test in an inconspicuous area of the wood surface. This will help you determine the compatibility of the stripping agent with the wood and ensure that it does not cause any discoloration or damage.
3. Choose the right polyurethane remover
There are various types of polyurethane removers available in the market, ranging from solvent-based to water-based formulas. It is essential to choose the appropriate remover based on the type of polyurethane coating on your wood surface. Read the labels carefully and select a remover that is specifically designed for the type of polyurethane you are trying to remove.
4. Apply the remover properly
Once you have selected the suitable polyurethane remover, it is crucial to follow the manufacturer’s instructions for application. Make sure to apply the remover evenly on the wood surface using a brush or a cloth, ensuring complete coverage. Avoid applying excessive pressure, as it may damage the wood.
5. Allow sufficient dwell time
After applying the polyurethane remover, it is important to allow sufficient dwell time for the product to penetrate and dissolve the polyurethane coating. Follow the manufacturer’s instructions regarding the recommended dwell time. Avoid using excessive force or scraping too soon, as it may result in incomplete removal or damage to the wood surface.
6. Use the right tools for removal
When it comes to removing the softened polyurethane, it is essential to use the appropriate tools. A plastic scraper or a putty knife can be effective in gently lifting the softened polyurethane without causing scratches or gouges on the wood surface. Avoid using metal scrapers or abrasive tools, as they can damage the wood.
7. Clean and prepare the wood
Once you have successfully removed the polyurethane coating, it is important to clean the wood surface thoroughly. Use a mild detergent and water solution to remove any residue from the stripping agent. Rinse the surface with clean water and allow it to dry completely. Sanding the wood lightly can help smoothen any rough areas and prepare it for refinishing.
8. Dispose of the waste properly
When dealing with polyurethane removers, it is crucial to dispose of the waste materials properly. Follow local regulations for hazardous waste disposal or consult with your local waste management authorities for guidance. Avoid pouring the stripping agent or its residue down the drain or in regular trash bins.
9. Take necessary precautions with flammable removers
If you are using a solvent-based polyurethane remover, it is important to take extra precautions due to its flammable nature. Keep the remover away from any open flames, sparks, or sources of ignition. Work in a well-ventilated area and avoid smoking or using any electrical equipment that may generate sparks.
10. Seek professional assistance if needed
If you are unsure about the polyurethane removal process or if you encounter any difficulties, it is always advisable to seek professional assistance. Professional wood refinishers or restoration experts have the necessary skills and expertise to handle the task safely and effectively.
In summary, removing polyurethane from wood requires careful consideration of safety guidelines and proper techniques. By following these precautions and tips, you can ensure a safe and successful polyurethane removal process without damaging the wood surface.
Frequently Asked Questions
Can you sand polyurethane off wood?
Yes, you can sand polyurethane off wood. Start by using coarse-grit sandpaper to remove the bulk of the polyurethane, then switch to finer-grit sandpaper for a smoother finish. Be sure to wear protective gear and take proper precautions for dust control.
How often should I seal my deck?
It is recommended to seal your deck every 1-3 years, depending on the type of sealant used and the weather conditions in your area. Regular sealing helps protect the wood from moisture, UV rays, and other elements, prolonging its life and maintaining its appearance.
How long does it take for paint to dry?
The drying time of paint depends on various factors such as the type of paint, humidity, and temperature. Generally, latex paint takes about 1-2 hours to dry to the touch and 24 hours to fully cure. Oil-based paint takes longer, usually 6-8 hours to dry and 7-14 days to cure.
Conclusion:
In conclusion, removing polyurethane from wood can be done through the process of sanding. Sanding is an effective method for restoring the natural beauty of wood as it helps to remove the old finish and reveal a fresh surface. However, it is important to note that sanding requires caution and the use of proper safety measures. It is advisable to wear protective gear such as goggles and a mask to avoid inhaling dust particles. Additionally, using different grits of sandpaper gradually can help achieve a smooth and even result. Overall, with the right technique and care, sanding can successfully remove polyurethane from wood surfaces.