If you’re looking to enhance the appearance and durability of your wood floors, vinyl flooring can be a great option. With its versatility and easy installation process, you can easily transform your space without the need for extensive renovations. Vinyl flooring offers a wide range of styles, colors, and designs to suit any decor preference. Whether you want a modern, rustic, or traditional look, vinyl flooring can be installed directly over your existing wood floors, making it a cost-effective and efficient solution for your flooring needs.
Pros and Cons of Installing Vinyl Flooring Over Wood Floors
When it comes to renovating your home or office space, one of the most significant decisions you have to make is choosing the right type of flooring. Vinyl flooring has gained immense popularity in recent years due to its durability, versatility, and cost-effectiveness. However, if you already have wood floors in place, you may be wondering if it’s a good idea to install vinyl flooring over them. In this section, we will discuss the pros and cons of installing vinyl flooring over wood floors, helping you make an informed decision.

Pros of Installing Vinyl Flooring Over Wood Floors
1. Cost-Effective: Vinyl flooring is generally more affordable than replacing the existing wood floors. By installing vinyl flooring over the wood, you can save money on the cost of new flooring materials and installation.
2. Durability: Vinyl is known for its durability and resistance to wear and tear. By installing vinyl flooring over wood floors, you can protect the underlying wood from scratches, dents, and other damages, extending its lifespan.
3. Easy Maintenance: Vinyl flooring requires minimal maintenance compared to wood floors. It is resistant to stains, water, and moisture, making it easy to clean and maintain. With vinyl flooring, you can enjoy a hassle-free flooring option.
4. Versatility: Vinyl flooring comes in a wide variety of colors, patterns, and styles, allowing you to achieve the desired look for your space. By installing vinyl over wood floors, you can easily update the aesthetic appeal of your room without the need for extensive renovations.
5. Comfortable and Quiet: Vinyl flooring offers a softer and more comfortable surface compared to hardwood floors. It also helps to dampen sound, making it an ideal choice for areas where noise reduction is desired.
Cons of Installing Vinyl Flooring Over Wood Floors
1. Height Increase: Installing vinyl flooring over wood floors will result in a slight increase in the overall floor height. This may require adjustments to door frames, baseboards, and transitions to adjoining rooms.
2. Subfloor Preparation: To ensure a smooth and even surface for vinyl flooring, the wood floors may require preparation work such as sanding, leveling, or filling any gaps or uneven areas. This additional step adds time and labor to the installation process.
3. Removal Difficulty: If you decide to remove the vinyl flooring in the future, it may be more challenging to remove compared to if it was installed directly on the subfloor. Adhesive residue and potential damage to the wood floors may occur during the removal process.
4. Potential Moisture Issues: If the wood floors underneath are prone to moisture-related problems, such as warping or mold growth, installing vinyl flooring over them may not be the best solution. It is essential to address any underlying moisture issues before installation.
5. Visual Imperfections: Wood floors may have imperfections such as knots, cracks, or uneven surfaces. Installing vinyl flooring over these imperfections may not create a completely smooth and flawless appearance.
In summary, installing vinyl flooring over wood floors has its advantages and disadvantages. It can be a cost-effective and durable solution while providing a fresh and updated look to your space. However, it is crucial to consider the potential height increase, subfloor preparation, and the condition of the underlying wood floors before making a decision. Consulting with a professional flooring installer can help you weigh the pros and cons and determine if this option is suitable for your specific needs.
Preparing Wood Floors for Vinyl Flooring Installation
When it comes to installing vinyl flooring over wood floors, proper preparation is key to ensure a smooth and long-lasting result. Whether you are updating the look of your home or want to replace worn-out flooring, following these steps will help you prepare your wood floors for vinyl flooring installation.
1. Inspect the Wood Floors
Before starting the installation process, it is essential to inspect the condition of your wood floors. Look for any signs of damage such as warping, rotting, or loose boards. Addressing these issues beforehand will prevent any further damage or complications during the installation process. If you notice any significant damage, it may be necessary to repair or replace the affected areas before proceeding.
2. Clean the Wood Floors
Next, thoroughly clean the wood floors to remove any dirt, dust, or debris. Start by sweeping the entire area with a broom or vacuum cleaner. Pay extra attention to the corners and edges of the room. Afterward, use a damp mop or cloth to wipe the surface clean. Avoid using excessive water, as it can seep into the wood and cause damage. Allow the floors to dry completely before moving on to the next step.
3. Sand the Wood Floors
If your wood floors have an existing finish or coating, it is necessary to sand them to create a smooth and even surface for the vinyl flooring. Use a floor sander or sandpaper to remove the top layer of the wood. Start with a coarse grit sandpaper and gradually move to finer grits to achieve the desired smoothness. Ensure that the entire surface is sanded evenly, paying attention to any rough patches or imperfections.
4. Fill in Gaps and Holes
Inspect the wood floors for any gaps or holes and fill them in with a suitable wood filler. Apply the filler using a putty knife and smooth it out to level with the surrounding surface. Allow the filler to dry completely before proceeding.
5. Check for Levelness
Before laying the vinyl flooring, it is crucial to check the levelness of the wood floors. Uneven surfaces can cause issues with the installation and affect the longevity of the vinyl flooring. Use a leveling tool to identify any high or low spots. If necessary, level the surface by adding or removing layers of underlayment or plywood.
6. Apply Primer (If Needed)
In some cases, applying a primer may be necessary before installing vinyl flooring over wood. This is especially true if the wood has been stained or treated with certain finishes. Check the manufacturer’s instructions to determine if a primer is recommended. Apply a thin, even coat of primer to the wood floors and allow it to dry completely before moving on.
7. Acclimate the Vinyl Flooring
Prior to installation, acclimate the vinyl flooring to the room where it will be installed. Follow the manufacturer’s recommendations for acclimation time, which typically involves allowing the flooring to sit in the room for a certain period to adjust to its environment. This step helps minimize the risk of the vinyl flooring expanding or contracting after installation.
8. Install Underlayment
Consider installing an underlayment before laying the vinyl flooring. Underlayment provides additional cushioning, sound insulation, and moisture protection. Follow the manufacturer’s instructions for the specific underlayment you choose, ensuring it is compatible with both the wood floors and the vinyl flooring.
9. Begin Vinyl Flooring Installation
Once all the necessary preparations are complete, you are ready to start installing the vinyl flooring. Follow the manufacturer’s instructions for your specific vinyl flooring product, as installation methods may vary. Take your time to ensure that each plank or tile is properly aligned and securely attached to the underlayment.
10. Finishing Touches
After installing the vinyl flooring, perform any necessary finishing touches such as trimming excess material, installing baseboards, or adding transition strips between rooms. These final touches will give your flooring a polished and professional look.
In summary, preparing wood floors for vinyl flooring installation involves inspecting the floors, cleaning, sanding, filling gaps, checking for levelness, applying primer if necessary, acclimating the vinyl flooring, installing underlayment, and finally, installing the vinyl flooring. By following these steps, you can ensure a successful and durable installation of vinyl flooring over your wood floors.
Steps to Successfully Install Vinyl Flooring Over Wood Floors
Vinyl flooring is a popular choice for homeowners due to its durability, easy maintenance, and wide range of design options. If you have existing wood floors and want to install vinyl flooring over them, you’re in luck! Vinyl flooring can be installed directly over wood floors with the right preparation and steps. In this section, we will outline the necessary steps to successfully install vinyl flooring over wood floors.
1. Prepare the Wood Floors
The first step in installing vinyl flooring over wood floors is to properly prepare the surface. Start by thoroughly cleaning the wood floors to remove any dirt, dust, or debris. Sweep or vacuum the floor to ensure it’s free from any loose particles that could interfere with the installation process.
Next, inspect the wood floors for any damages, such as cracks, chips, or uneven areas. Repair any damages and ensure that the surface is smooth and level. Fill in any gaps or holes with a wood filler and sand down any high spots to create a uniform surface for the vinyl flooring.
2. Test for Moisture
Before installing vinyl flooring over wood floors, it’s important to test the moisture levels in the wood. Excess moisture can cause issues with the vinyl adhesive and lead to problems down the line. Use a moisture meter to test the moisture content of the wood floors. Ideally, the moisture content should be below 4%.
If the moisture content is too high, you will need to address the issue before proceeding with the installation. Allow the wood floors to dry out naturally or use a dehumidifier to reduce moisture levels. Once the moisture content is within the acceptable range, you can move on to the next step.
3. Install a Subfloor
In some cases, it may be necessary to install a subfloor over the wood floors before laying the vinyl flooring. This is especially true if the wood floors are uneven or have significant imperfections. A subfloor can provide a smooth and level surface for the vinyl flooring installation.
If you decide to install a subfloor, start by measuring the area and cutting the plywood to fit. Lay the plywood sheets over the wood floors, ensuring they are flush against each other. Use screws or nails to secure the plywood to the wood floors, creating a stable base for the vinyl flooring.
4. Acclimate the Vinyl Flooring
Before installing the vinyl flooring, it’s important to acclimate it to the room’s temperature and humidity. Vinyl flooring can expand or contract with changes in temperature and humidity, so allowing it to adjust to the environment will help prevent issues later on.
Unbox the vinyl flooring and let it sit in the room for at least 48 hours before installation. This will allow the vinyl to reach room temperature and acclimate to the moisture levels in the space.
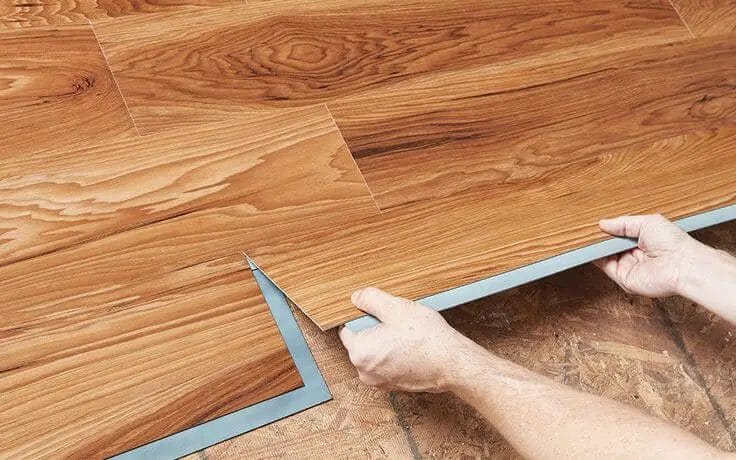
5. Install the Vinyl Flooring
Once the wood floors are prepared, moisture levels are within the acceptable range, and the vinyl flooring is acclimated, it’s time to start the installation process.
Start by measuring and cutting the vinyl flooring to fit the room. Leave a small gap around the edges to allow for expansion. Apply a vinyl flooring adhesive to the prepared wood floors or subfloor, following the manufacturer’s instructions.
Carefully lay the vinyl flooring onto the adhesive, starting from one end of the room and working your way towards the other end. Use a roller or hand press to firmly secure the vinyl to the adhesive, ensuring good contact and eliminating any air bubbles.
6. Trim and Finish
After the vinyl flooring is installed, trim any excess material around the edges using a utility knife. Be careful not to damage the walls or baseboards while trimming.
Finally, add finishing touches to complete the installation. Install baseboards or shoe moldings to cover the gaps around the edges and give the flooring a polished look. Clean the vinyl flooring with a recommended cleaner and enjoy your newly installed vinyl floors!
In summary, installing vinyl flooring over wood floors is a manageable project with the right preparation and steps. By following these outlined steps, you can achieve a successful installation and enjoy the benefits of vinyl flooring in your home.
Common Mistakes to Avoid When Installing Vinyl Flooring Over Wood Floors
Installing vinyl flooring over wood floors can be a cost-effective and convenient way to update the look of your space. However, there are some common mistakes that people often make during this installation process. By avoiding these mistakes, you can ensure a smooth and successful installation. Here are some key mistakes to steer clear of:
1. Failure to Properly Prepare the Subfloor
One of the most important steps in installing vinyl flooring over wood floors is to properly prepare the subfloor. This means ensuring that the wood floor is clean, dry, and free from any debris or imperfections. Any bumps or unevenness in the wood floor can affect the integrity of the vinyl installation. Take the time to thoroughly clean and level the subfloor before proceeding.
2. Skipping the Moisture Testing
Moisture can be a significant issue when installing vinyl flooring over wood floors. If there is excessive moisture present in the wood, it can lead to warping, buckling, or other damage to the vinyl flooring. Before installation, perform a moisture test on the wood floor to determine if it is within the acceptable range. If the moisture levels are too high, you may need to address the underlying issue before proceeding.
3. Using the Wrong Type of Adhesive
Choosing the right adhesive is crucial to a successful vinyl flooring installation. There are different types of adhesives available, so it’s important to select the one that is specifically designed for vinyl flooring installation over wood floors. Using the wrong adhesive can result in improper bonding, which can cause the vinyl to lift or peel over time. Consult with a flooring professional to determine the appropriate adhesive for your specific installation.
4. Neglecting Expansion Gaps
Vinyl flooring, like any other type of flooring material, expands and contracts with changes in temperature and humidity. It’s important to leave expansion gaps along the perimeter of the room and around any fixed objects, such as cabinets or columns. Neglecting to include these gaps can lead to buckling or warping of the vinyl flooring as it expands. Be sure to follow the manufacturer’s guidelines for the recommended size and placement of expansion gaps.
5. Failing to Acclimate the Vinyl Flooring
Acclimation is a crucial step in the vinyl flooring installation process. Vinyl flooring should be allowed to acclimate to the temperature and humidity of the room where it will be installed. This helps to minimize any potential expansion or contraction during installation. Failing to acclimate the flooring can lead to issues such as gaps or buckling. Follow the manufacturer’s instructions for acclimation time and conditions.
6. Poor Cutting and Measuring
Proper cutting and measuring are essential for a seamless vinyl flooring installation. It’s important to take accurate measurements and carefully cut the vinyl pieces to fit the space. Failing to do so can result in gaps, uneven seams, or a poor overall appearance. Use proper tools and techniques to ensure precise cuts and measurements.
7. Rushing the Installation Process
Installing vinyl flooring over wood floors requires patience and attention to detail. Rushing the installation process can lead to mistakes or oversights that can affect the longevity and appearance of the flooring. Take the time to carefully follow the installation instructions, allowing for proper drying and curing times for adhesives. A well-executed installation will result in a beautiful and durable vinyl flooring.
In summary, by avoiding these common mistakes, you can ensure a successful installation when installing vinyl flooring over wood floors. Properly preparing the subfloor, performing moisture testing, using the correct adhesive, leaving expansion gaps, acclimating the flooring, practicing precise cutting and measuring, and taking your time during the installation process are all key factors in achieving a professional-looking and long-lasting vinyl floor.
Tips for Maintaining and Caring for Vinyl Flooring Installed Over Wood Floors
Vinyl flooring has become a popular choice for homeowners due to its durability, affordability, and easy maintenance. When installed over wood floors, vinyl flooring can provide a beautiful and long-lasting solution. However, it is essential to properly care for and maintain vinyl flooring to ensure its longevity. Here are some tips to help you maintain and care for vinyl flooring installed over wood floors:
1. Clean Regularly
To keep your vinyl flooring looking its best, it is important to clean it regularly. Sweeping or vacuuming the floors on a daily basis will help remove dirt, dust, and debris that can scratch the surface. You can also mop the floors using a mild detergent and warm water to remove stains and spills. Avoid using abrasive cleaners or scrub brushes, as they can damage the vinyl flooring’s surface.
2. Use Doormats
Prevention is key when it comes to maintaining vinyl flooring. Placing doormats at entryways and high-traffic areas can help trap dirt and prevent it from being tracked onto the vinyl floors. This will reduce the amount of cleaning required and protect the flooring from scratches and wear.
3. Protect from Furniture
When moving or rearranging furniture, it is important to protect your vinyl flooring from scratches and dents. Use furniture pads or felt protectors under the legs of chairs, tables, and other heavy furniture to prevent them from directly contacting the floor. This will help distribute the weight evenly and avoid any damage.
4. Avoid Excessive Moisture
While vinyl flooring is moisture-resistant, excessive moisture can still cause damage over time. Clean up spills immediately to prevent the liquid from seeping into the floor seams or underneath the vinyl. Use a damp cloth or mop to wipe up spills and dry the area thoroughly. Avoid using excessive water or wet mopping techniques that can lead to water damage.
5. Protect from Sunlight
Extended exposure to direct sunlight can cause fading and discoloration of vinyl flooring. To protect your floors from sunlight, consider using blinds, curtains, or UV-blocking window films to prevent direct sunlight from reaching the floors. Rearranging furniture or using rugs can also help shield the flooring from the sun’s rays.
6. Maintain Proper Humidity Levels
Wood floors can expand and contract with changes in humidity levels, which can affect the vinyl flooring installed over them. To prevent issues such as buckling or warping, it is important to maintain proper humidity levels in your home. Use a humidifier or dehumidifier as needed to keep the humidity within the recommended range.
7. Trim Pet’s Nails
If you have pets, it is essential to keep their nails trimmed to prevent scratches on the vinyl flooring. Regularly check their nails and trim them as needed to minimize any potential damage. Additionally, it is advisable to place rugs or mats in areas where pets tend to spend more time to provide extra protection.
8. Avoid Harsh Chemicals
When cleaning vinyl flooring, it is important to avoid using harsh chemicals or abrasive cleaners as they can damage the surface. Instead, opt for mild detergents or specially formulated vinyl floor cleaners. Always follow the manufacturer’s instructions for cleaning products to ensure safe and effective use.
In summary, maintaining and caring for vinyl flooring installed over wood floors involves regular cleaning, using doormats, protecting it from furniture, avoiding excessive moisture, protecting from sunlight, maintaining proper humidity levels, trimming pets’ nails, and using gentle cleaning products. By following these tips, you can help ensure the longevity and beauty of your vinyl flooring for years to come.

FAQs
Can you put vinyl flooring over wood floors?
Yes, you can install vinyl flooring over wood floors. Ensure that the wood floor is even, clean, and free of any moisture or damage. Use a suitable adhesive or underlayment to create a smooth surface for the vinyl flooring. It is also recommended to remove any old carpet or padding before installation for better results.
Conclusion
In conclusion, vinyl flooring can be a great option for covering existing wood floors. Its versatility and durability make it a popular choice for homeowners looking to update their floor without the hassle of removing the existing wood. Vinyl flooring offers a wide range of styles, colors, and patterns to suit any design preference. Additionally, it is easy to install and requires minimal maintenance, making it a cost-effective and long-lasting flooring solution.
By choosing vinyl flooring, you can achieve a fresh and updated look for your space while preserving the integrity of your wood floors underneath. Whether you want to enhance the aesthetic appeal of your home or protect your wood floors from wear and tear, vinyl flooring proves to be a reliable and practical choice. Consider vinyl flooring as a viable option for transforming your wood floors into a stylish and functional surface.