If you’re looking to secure chicken wire to wood, we can help you with the process. Whether it’s for a chicken coop, garden fence, or DIY project, attaching chicken wire is simple and effective. With a few basic tools and the right technique, you’ll have your chicken wire securely fastened in no time. Let’s dive in and learn how to attach chicken wire to wood.
First, gather your materials – chicken wire, wooden posts or panels, screws or staples, and a power drill or staple gun. Measure and cut the chicken wire to the desired length, leaving some excess for an easy installation process.

Next, position the chicken wire against the wood, ensuring that it is aligned properly. Use clamps or another person to hold the wire in place, making the attachment process easier.
If you’re using screws, pre-drill holes through the chicken wire and into the wood at regular intervals. Then, insert the screws into the holes and tighten them until the wire is securely attached. If you prefer staples, use a staple gun to fasten the wire to the wood, ensuring that the staples are placed close together for maximum stability.
Once you’ve attached the chicken wire along one side, continue the process along the remaining sides until it is completely secured to the wood. Take care to maintain proper tension as you go, ensuring that the wire is taut and free from any sagging or gaps.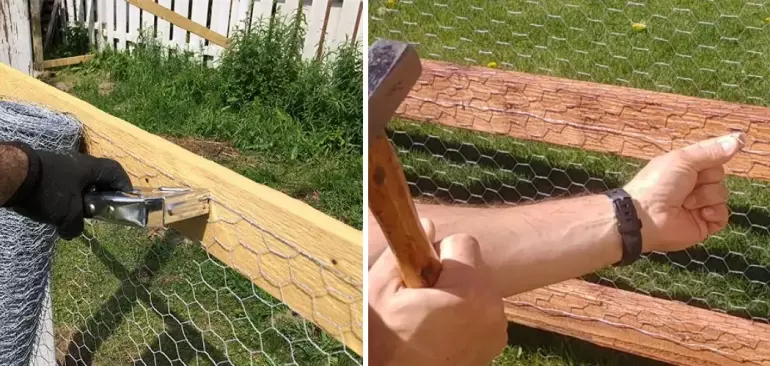
Step-by-step guide for attaching chicken wire to wood
Chicken wire is a versatile material that is commonly used to create enclosures for poultry or small animals. It is also used in various DIY projects like building fences, garden trellises, or even crafting projects. Attaching chicken wire to wood is a fairly straightforward process that can be done with a few simple tools. In this section, we will provide a step-by-step guide on how to attach chicken wire to wood.
Materials needed:
- Chicken wire
- Wooden frame or structure
- Staple gun
- Staples
- Wire cutters
- Gloves (optional)
Step 1: Prepare the wood surface
Before attaching the chicken wire, make sure that the wood surface is clean and free from any debris or rough edges. Sand down any rough spots or splinters to ensure a smooth and even surface.
Step 2: Cut the chicken wire
Measure the length and width of the area where you want to attach the chicken wire. Use wire cutters to carefully cut the chicken wire to the required size. It is recommended to wear gloves while handling the chicken wire to protect your hands from sharp edges.
Step 3: Position the chicken wire
Place the cut chicken wire onto the wood surface, ensuring that it covers the desired area. Secure it in place using clamps or ask a friend to hold it while you work.
Step 4: Attach the chicken wire
Starting at one corner, use a staple gun to attach the chicken wire to the wood. Begin by placing a staple approximately 2 inches from the edge of the chicken wire and into the wood. Be careful not to staple too close to the edge to prevent the wire from tearing. Continue stapling along the edge, spacing the staples about 6-8 inches apart.
Once the first side is secure, move to the opposite side and repeat the process. Make sure to pull the chicken wire tight while stapling to prevent sagging or gaps. Repeat this process for the remaining sides, ensuring that the chicken wire is evenly taut.
Step 5: Trim any excess wire
After attaching the chicken wire on all sides, use wire cutters to trim any excess wire that extends beyond the wood frame. This will give your project a clean and finished look.
Step 6: Inspect and reinforce if needed
Once you have attached the chicken wire, inspect the entire structure to ensure that it is securely fastened to the wood. If you notice any loose or weak areas, use additional staples to reinforce the attachment.
Step 7: Clean up
Finally, remove any clamps or release the hold on the chicken wire if necessary. Clean up the area by removing any leftover debris or excess wire clippings.
And there you have it – a step-by-step guide for attaching chicken wire to wood. This method can be applied to various projects, from building chicken coops to creating garden enclosures. Remember to prioritize safety by wearing gloves and using caution when handling sharp edges. With a little bit of effort, you can easily secure chicken wire to wood and complete your desired project.
Tips for a Secure and Long-lasting Attachment of Chicken Wire to Wood
Chicken wire is a versatile and widely used fencing material for keeping chickens and other small animals secure. When installing chicken wire, it is important to ensure a secure and long-lasting attachment to wood. Here are some useful tips to help you achieve a strong and durable connection:
- Choose the right type of fasteners: When attaching chicken wire to wood, it is crucial to select the appropriate fasteners. Galvanized staples or u-shaped nails are commonly used for this purpose. These fasteners are resistant to rust and corrosion, ensuring a sturdy attachment.
- Use the correct size of fasteners: To ensure a secure attachment, it is essential to use the correct size of fasteners. The length of the staples or nails should be long enough to penetrate the wood and securely hold the chicken wire in place. Using fasteners that are too short may result in a weak and easily detachable connection.
- Pre-drill pilot holes: Before attaching the chicken wire, consider pre-drilling pilot holes in the wood. This will prevent the wood from splitting when inserting the fasteners. Pilot holes also ensure a neater and more professional-looking installation.
- Space the fasteners appropriately: To create a secure and evenly distributed attachment, space the fasteners appropriately along the chicken wire and wood. Depending on the size of the project, placing fasteners every 6 to 12 inches is generally recommended. This prevents the chicken wire from sagging or becoming loose over time.
- Ensure a tight fit: When attaching the chicken wire, make sure to pull it tightly against the wood surface. This eliminates any slack or gaps, minimizing the chances of animals squeezing through or damaging the fence. A tight fit also contributes to the overall stability and longevity of the attachment.
- Consider using additional reinforcement: For added strength and durability, you may consider reinforcing the attachment points with extra fasteners or wire ties. This is particularly beneficial in areas with high winds or where animals may exert pressure on the fence. Reinforcing key spots helps to maintain the integrity of the chicken wire.
- Regular maintenance: To ensure the longevity of the attachment, regular maintenance is essential. Periodically inspect the chicken wire and fasteners for any signs of wear, rust, or damage. Replace any deteriorated or loose fasteners promptly to prevent the chicken wire from becoming loose or compromised.
By following these tips, you can achieve a secure and long-lasting attachment of chicken wire to wood. Remember to use the right type and size of fasteners, pre-drill pilot holes, space the fasteners appropriately, ensure a tight fit, consider additional reinforcement if necessary, and perform regular maintenance. With proper installation and care, your chicken wire fence will provide an effective barrier and keep your chickens or other small animals safe and secure.

Alternative Methods for Attaching Chicken Wire to Wood
Chicken wire is a versatile and useful material that is commonly used to create enclosures or fencing for poultry or small animals. When working with wood, it is important to secure the chicken wire properly to ensure its stability and durability. While staples or nails are commonly used, there are alternative methods that can also be employed. In this section, we will explore some of these alternative methods for attaching chicken wire to wood.
1. Zip Ties
Zip ties are a popular and convenient alternative to staples or nails when attaching chicken wire to wood. These small plastic ties can be easily threaded through the wire and secured tightly around the wood. They provide a strong hold and are quick to install. Additionally, zip ties can be easily adjusted or removed if needed, making them a versatile option.
2. U-Nails or Fence Staples
U-nails or fence staples are another effective method for attaching chicken wire to wood. These nails have a U-shaped design that allows them to hold the wire firmly in place. They can be hammered into the wood, securing the wire tightly without the risk of it coming loose. U-nails or fence staples are durable and provide a reliable attachment method.
3. Wire Clips or Hog Rings
Wire clips or hog rings are small metal fasteners that can be used to secure chicken wire to wood. They are typically applied using special pliers or a hog ring tool. These clips grip the wire and the wood together, creating a strong and secure bond. Wire clips or hog rings are commonly used in construction and are known for their durability and longevity.
4. Adhesive
For a non-invasive method of attaching chicken wire to wood, adhesive can be used. There are specific adhesives available that are designed for bonding wire to wood surfaces. These adhesives provide a strong hold and are resistant to weathering and temperature changes. However, it is important to ensure that the wood surface is clean and free from any dust or debris before applying the adhesive.
5. Wire Ties
Wire ties, also known as twist ties, can be a simple yet effective way to secure chicken wire to wood. These ties are made of flexible wire and can be twisted tightly around the wire and wood, creating a secure attachment. Wire ties are easy to use and can be adjusted or removed as needed.
6. Clamps or Brackets
Clamps or brackets can be used to hold chicken wire in place on wood surfaces. These devices are typically made of metal or plastic and can be easily attached to the wood using screws or nails. The chicken wire is then secured between the clamps or brackets, providing a stable and secure attachment.
7. Velcro Straps
Velcro straps offer a convenient and reusable method for attaching chicken wire to wood. These straps have a hook and loop design that allows for easy adjustment and removal. Velcro straps provide a secure hold and can be used multiple times without damaging the wire or the wood.
When choosing an alternative method for attaching chicken wire to wood, consider factors such as the intended use, durability, and ease of installation. Each method has its own advantages and limitations, so it is important to select the method that best suits your specific needs. By using these alternative methods, you can securely attach chicken wire to wood and create reliable enclosures for your animals or projects.
Common Mistakes to Avoid When Attaching Chicken Wire to Wood
Chicken wire is a versatile material that is commonly used to create enclosures or fences for poultry or small animals. When attaching chicken wire to wood, it is important to ensure a secure and durable connection. However, there are some common mistakes that people often make when working with chicken wire and wood. In this section, we will discuss these mistakes and provide tips on how to avoid them.
1. Not using the right type of fasteners
One of the most common mistakes is using the wrong type of fasteners to attach chicken wire to wood. Using regular nails or staples may not provide enough strength and can lead to the wire becoming loose over time. It is important to use galvanized staples or fencing staples specifically designed for attaching chicken wire. These staples are strong and rust-resistant, ensuring a long-lasting connection.
2. Not stretching the chicken wire properly
Another mistake is not properly stretching the chicken wire when attaching it to wood. If the wire is too loose, it can sag or become distorted, compromising its integrity. It is important to pull the wire taut and secure it tightly to the wood. This can be done by using a stretching tool or by using pliers to manually tighten and secure the wire.
3. Overlapping the chicken wire incorrectly
Improperly overlapping chicken wire can also be a common mistake. When joining two sections of wire together, it is important to overlap them properly to ensure a secure connection. The overlap should be at least 2 to 3 inches and should be tightly secured with staples or zip ties. This will prevent any gaps or openings in the wire, which can allow animals to escape or predators to enter.
4. Neglecting to wear protective gear
Attaching chicken wire to wood can be a physically demanding task, and it is important to prioritize safety. One common mistake is neglecting to wear protective gear such as gloves and safety glasses. The wire can be sharp and may cause injuries if not handled with care. Wearing protective gear will help prevent cuts, scratches, and eye injuries.
5. Failing to secure the corners and edges
Securing the corners and edges of the chicken wire is crucial to ensure a sturdy and durable attachment. Neglecting to secure these areas can result in loose wire and compromised fencing. It is recommended to fold the wire over at the corners and edges and secure it tightly with staples or zip ties. This will provide extra reinforcement and prevent any potential weak points in the attachment.
In summary, when attaching chicken wire to wood, it is important to use the right type of fasteners, properly stretch the wire, overlap it correctly, wear protective gear, and secure the corners and edges. By avoiding these common mistakes, you can ensure a strong and reliable connection between the chicken wire and wood, creating a secure enclosure for your poultry or small animals.
FAQs
1. How can I attach chicken wire to wood?
To attach chicken wire to wood, you can use staples, nails, or screws. Start by aligning the chicken wire with the wood surface and then use a staple gun, hammer, or drill to secure it in place. Make sure to evenly space the fasteners along the edges to ensure a secure attachment.
2. Which type of fastener is best for attaching chicken wire to wood?
Staples are often the easiest and most common choice for attaching chicken wire to wood. They provide a strong hold and are quick to install. However, nails or screws may be preferred for heavier-duty applications or when a more permanent attachment is desired.
3. Are there any tips to make attaching chicken wire to wood easier?
One helpful tip is to use a pair of pliers to hold the chicken wire in place while attaching it to wood. This will keep your fingers safe and allow for better control. Additionally, pre-drilling small pilot holes in the wood can make it easier to insert nails or screws and prevent the wood from splitting.
Conclusion
In conclusion, knowing how to attach chicken wire to wood can be a valuable skill for any DIY enthusiast or homeowner. By following the right steps, you can securely fasten the chicken wire to the wood surface, ensuring the safety of your pets, plants, or property.
Remember to gather the necessary tools such as staple guns or U-shaped nails to firmly secure the chicken wire. Additionally, make sure to measure and cut the wire to the appropriate size before attaching it to the wood.
Whether you are building a chicken coop, a garden fence, or protecting your flower beds, the proper attachment of chicken wire to wood can provide the necessary security and peace of mind. Now, go ahead and confidently tackle your next project!