If you’re looking to bring together the durability of ceramic tiles and the warmth of wood, you may be wondering how to effectively glue ceramic tiles to wood. By using the right adhesive and following a few key steps, you can achieve a secure bond that will stand the test of time. In this guide, we will walk you through the process, from preparing the surface to applying the adhesive and ensuring proper adhesion. So let’s dive in and get your ceramic tiles securely glued to wood!
Choosing the Right Adhesive for Ceramic Tile and Wood
When it comes to installing ceramic tile on wood surfaces, choosing the right adhesive is crucial. The wrong adhesive can lead to a variety of issues such as tiles coming loose, uneven surfaces, and even damage to the underlying wood. In this section, we will discuss the factors to consider when selecting the appropriate adhesive for ceramic tile and wood installations.

1. Surface Preparation
Before diving into adhesive options, it is important to properly prepare the surface. Both the ceramic tile and wood need to be clean, dry, and free from any debris or contaminants. Any existing adhesive or paint should be removed, and the surface should be sanded to ensure a smooth and level base for the tile.
2. Compatibility
One of the most important factors to consider when choosing an adhesive is compatibility. The adhesive must be suitable for bonding ceramic tile to wood. Some adhesives may not adhere well to wood surfaces or may cause damage over time. It is crucial to select an adhesive specifically designed for this type of installation.
3. Type of Tile
The type of ceramic tile being installed also plays a role in adhesive selection. Porcelain tiles, for example, are denser and heavier than other types of ceramic tiles. They require a stronger adhesive to ensure proper bonding. On the other hand, lighter ceramic tiles may require a different type of adhesive that provides flexibility and allows for slight movement.
4. Moisture Resistance
If the ceramic tile installation will be in an area prone to moisture, such as a bathroom or kitchen, it is important to choose an adhesive with good moisture resistance. Moisture can seep into the wood and cause it to expand or warp. A waterproof or moisture-resistant adhesive will help prevent any damage to the wood surface.
5. Application Method
Consider the application method when selecting an adhesive. Some adhesives come in pre-mixed paste form, while others are available as powders that need to be mixed with water. Choose an application method that you are comfortable with and that suits the specific requirements of your project.
6. Drying Time
The drying time of the adhesive is another factor to consider. Some adhesives require longer drying times, which may not be ideal if you are working on a tight schedule. On the other hand, quick-drying adhesives may not provide enough working time, especially for larger tile installations.
7. Adhesive Strength
The strength of the adhesive is crucial for a long-lasting and durable installation. Look for adhesives that provide high bond strength and are specifically designed for ceramic tile and wood applications. It is important to follow the manufacturer’s instructions regarding adhesive coverage and thickness for optimal strength.
8. Flexibility
Certain wood surfaces may have slight movement or expansion and contraction due to changes in temperature and humidity. It is important to choose an adhesive that allows for this movement to prevent the tiles from cracking. Flexible adhesives are designed to accommodate such movements and ensure a stable installation.
9. Warranty and Technical Support
Lastly, consider the warranty and technical support offered by the adhesive manufacturer. A reputable brand will provide a warranty for their products and offer technical support to assist with any installation questions or concerns. This can be invaluable if any issues arise during or after the installation.
In summary, choosing the right adhesive for ceramic tile and wood installations is crucial for a successful and long-lasting result. Consider factors such as surface preparation, compatibility, tile type, moisture resistance, application method, drying time, adhesive strength, flexibility, and warranty when making your selection. By choosing the appropriate adhesive, you can ensure a strong bond between the ceramic tile and wood surface, creating a beautiful and durable installation.
Preparing the Surface for Bonding: Wood and Ceramic Tile
When it comes to installing ceramic tiles on wood surfaces, proper surface preparation is crucial to ensure a strong and durable bond. The process involves a few essential steps that must be followed to achieve the best results. In this section, we will discuss the necessary preparations for bonding wood and ceramic tile.
Gather the Materials
Before you begin, gather all the materials you will need for the surface preparation process. This includes:
- Measuring tape or ruler
- Pencil or marker
- Level
- Wood screws
- Drill
- Primer
- Thinset mortar
- Notched trowel
- Tile spacers
- Tile adhesive
Inspect the Wood Surface
Start by thoroughly inspecting the wood surface to ensure it is in good condition and suitable for tile installation. Look for signs of damage, such as cracks, rot, or warping. If any issues are found, they should be addressed and repaired before proceeding.
Measure and Mark the Layout
Using a measuring tape or ruler, determine the layout of the ceramic tiles on the wood surface. Mark the starting point and establish the desired tile pattern. This step will help you visualize the final result and ensure that the tiles are evenly distributed.
Secure the Wood Surface
To strengthen the wood surface and prevent flexing or movement, it is recommended to secure it with wood screws. Use a drill to insert wood screws at regular intervals, ensuring they penetrate the subfloor beneath. This will provide a sturdy and stable base for the ceramic tiles.
Apply Primer
Before applying the thinset mortar, it is essential to prime the wood surface. The primer will create a barrier between the wood and the mortar, improving adhesion and preventing moisture damage. Follow the manufacturer’s instructions to apply the primer evenly across the entire surface.
Spread Thinset Mortar
Using a notched trowel, spread a layer of thinset mortar over the primed wood surface. Work in small sections to ensure the mortar remains workable. The notches in the trowel create ridges in the mortar, enhancing the bond between the wood and the ceramic tiles.
Place and Set the Ceramic Tiles
Carefully place the ceramic tiles onto the thinset mortar, pressing them firmly and evenly into place. Ensure each tile is properly aligned with the layout markings and use tile spacers to maintain consistent spacing between tiles. Once all the tiles are in position, gently tap them with a rubber mallet to set them securely in the mortar.
Allow the Thinset Mortar to Cure
After the tiles are set, allow the thinset mortar to cure for the recommended period. This typically takes 24 to 48 hours, but refer to the manufacturer’s instructions for specific drying times. Avoid walking on the freshly installed tiles until the mortar has fully cured.
Grout the Tile Joints
Once the thinset mortar is fully cured, it’s time to grout the tile joints. Apply the grout using a grout float, pressing it into the gaps between the tiles at a 45-degree angle. Remove any excess grout using a damp sponge, taking care not to wipe away too much from the joints. Allow the grout to cure according to the manufacturer’s instructions.
Apply Tile Adhesive (Optional)
If desired, you can further enhance the bond between the wood and ceramic tiles by applying a tile adhesive. This adhesive is applied to the backside of each tile before placing it onto the cured grout. Follow the manufacturer’s instructions for the specific adhesive product you choose.
Summary
Preparing the surface for bonding wood and ceramic tile is a critical step in ensuring a successful and long-lasting installation. By inspecting the wood surface, measuring and marking the layout, securing the wood, applying primer, spreading thinset mortar, setting the tiles, allowing the mortar to cure, grouting the tile joints, and applying tile adhesive if desired, you can achieve a strong bond and beautiful finish. Follow the manufacturer’s instructions for all materials and tools used, and enjoy your newly installed ceramic tile floor on wood!
Step-by-Step Guide to Glue Ceramic Tile to Wood
Gluing ceramic tile to wood may seem like a daunting task, but with the right tools and techniques, it can be a relatively simple DIY project. Whether you want to install ceramic tile on a wooden floor, countertop, or backsplash, this step-by-step guide will walk you through the process from start to finish.
Materials You Will Need:
- Ceramic tiles
- Wood surface
- Tile adhesive
- Trowel
- Spacers
- Tile cutter or saw
- Grout
- Grout float
- Grout sealer
- Clean cloth
Step 1: Prepare the Wood Surface
The first step is to ensure that the wood surface is clean and free from any debris or dust. Use a vacuum cleaner or a damp cloth to remove any dirt. Also, make sure that the wood is smooth and level. Sand down any rough patches or uneven areas.
Step 2: Choose the Right Tile Adhesive
There are different types of tile adhesives available in the market, so it’s important to choose one that is suitable for bonding ceramic tile to wood. Follow the manufacturer’s instructions and mix the adhesive as per the recommended ratio.
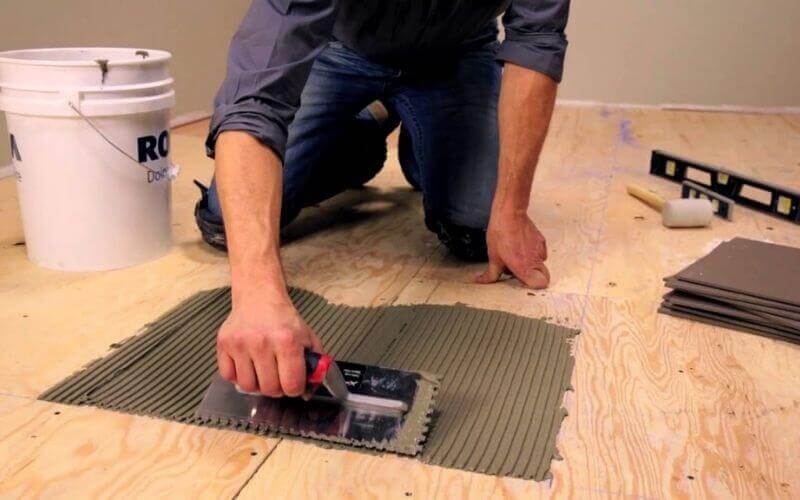
Step 3: Apply the Tile Adhesive
Using a trowel, spread a thin layer of tile adhesive onto the wood surface. Make sure to cover the entire area evenly. Use the notched side of the trowel to create grooves in the adhesive. This will help to create a stronger bond between the wood and the tile.
Step 4: Place the Ceramic Tiles
Carefully place the ceramic tiles onto the adhesive, starting from one corner and working your way across the surface. Use spacers to maintain an even gap between the tiles. Press down firmly on each tile to ensure good adhesion.
Step 5: Cut Tiles to Fit
If you come across any areas where a full tile won’t fit, you will need to cut the tile to the desired size. Use a tile cutter or saw to make precise cuts. Measure the area carefully and mark the tile before cutting.
Step 6: Allow the Adhesive to Cure
Once all the tiles are in place, allow the adhesive to cure as per the manufacturer’s instructions. This usually takes around 24 to 48 hours. Avoid walking on or putting any weight on the tiles during this time.
Step 7: Apply Grout
Once the adhesive has fully cured, it’s time to apply grout. Mix the grout according to the manufacturer’s instructions. Use a grout float to spread the grout over the tile surface, ensuring that all the gaps between the tiles are filled.
Step 8: Clean and Seal
Wipe off any excess grout from the tile surface using a clean cloth. Allow the grout to dry for a few minutes, then clean the tiles with a damp sponge to remove any haze. Once the grout is completely dry, apply a grout sealer to protect the grout and make it easier to clean in the future.
Step 9: Enjoy Your New Ceramic Tiled Surface
After following these steps, you can now enjoy your newly tiled wood surface. Whether it’s a tiled floor, countertop, or backsplash, the ceramic tiles will add a touch of elegance and durability to your space.
In summary, gluing ceramic tile to wood is a manageable DIY project if you have the right materials and follow the proper steps. By preparing the wood surface, choosing the correct adhesive, placing the tiles carefully, cutting tiles to fit, allowing the adhesive to cure, applying grout, and sealing the grout, you can achieve a beautiful and long-lasting ceramic tiled surface on wood. Now you can confidently take on this project and transform your space with ceramic tile.
Tips for a Strong and Durable Bond: Ceramic Tile and Wood
When it comes to home flooring options, ceramic tile and wood are two popular choices that offer durability and aesthetic appeal. While these materials have their own unique characteristics, combining them can create a stunning and versatile flooring design. However, achieving a strong and durable bond between ceramic tile and wood requires careful planning and proper installation techniques. In this section, we will discuss some essential tips to ensure a successful and long-lasting bond between these two materials.
1. Choose the Right Adhesive
One of the most critical factors in creating a strong bond between ceramic tile and wood is selecting the appropriate adhesive. The adhesive you choose should be specifically designed for bonding these two materials together. It is crucial to read the manufacturer’s instructions and ensure compatibility with both the ceramic tile and wood surfaces. Using the wrong adhesive can lead to weak bond strength and potential damage to the flooring.
2. Prepare the Surfaces
Before installing the ceramic tile and wood, it is essential to prepare the surfaces properly. Both the ceramic tile and wood need to be clean, dry, and free from any debris or contaminants. Start by thoroughly cleaning the surfaces and removing any existing finishes or adhesives. If necessary, sand down the wood surface to create a smooth and even substrate.
3. Use a Suitable Underlayment
An underlayment is an important component when installing ceramic tile and wood together. It provides stability and helps prevent movement, which can lead to cracks or separation between the materials. Select an underlayment material that is suitable for both ceramic tile and wood installations, such as cement backer board. Follow the manufacturer’s instructions for proper installation and ensure that it is securely attached to the subfloor.
4. Allow for Expansion and Contraction
Both ceramic tile and wood are susceptible to expansion and contraction due to changes in temperature and humidity. To prevent potential issues, it is crucial to leave a small gap between the ceramic tile and wood. This gap allows for natural movement and helps prevent the materials from buckling or warping. Use spacers to ensure a consistent gap throughout the installation.
5. Follow Proper Installation Techniques
Proper installation techniques are essential for achieving a strong and durable bond between ceramic tile and wood. Follow the manufacturer’s instructions for laying ceramic tile, including proper adhesive application, trowel size, and tile placement. For the wood installation, ensure that the planks are securely fastened and properly acclimated to the environment.
6. Seal the Grout Lines
After the ceramic tile installation is complete, it is crucial to seal the grout lines. Grout sealer helps protect the grout from staining and moisture damage, ensuring its longevity. Additionally, sealing the grout lines enhances the overall appearance of the floor and makes it easier to clean and maintain.
7. Regular Maintenance
Maintaining a strong and durable bond between ceramic tile and wood requires regular maintenance. Follow the manufacturer’s instructions for cleaning and maintaining both materials. Use appropriate cleaning products and techniques to avoid damaging the finish or adhesive. Regularly inspect for any signs of wear or damage and address them promptly to prevent further issues.
In summary, creating a strong and durable bond between ceramic tile and wood requires careful planning, proper surface preparation, and correct installation techniques. By choosing the right adhesive, using suitable underlayment, allowing for expansion and contraction, and following proper installation methods, you can ensure a successful and long-lasting bond. Regular maintenance and sealing of the grout lines will help preserve the beauty and functionality of your ceramic tile and wood flooring. By following these tips, you can enjoy a stunning and resilient floor that combines the best of both materials.
Troubleshooting Common Issues when Gluing Ceramic Tile to Wood
Gluing ceramic tile to wood can be a great way to add a unique and durable touch to your flooring or walls. However, there are some common issues that can arise during the process. In this section, we will explore these issues and provide troubleshooting tips to help you achieve a successful tile installation.
1. Insufficient Adhesion
One of the most common issues when gluing ceramic tile to wood is insufficient adhesion. This can cause the tiles to come loose or crack over time. To ensure proper adhesion, follow these troubleshooting tips:
- Make sure the wood surface is clean and free from any dirt, dust, or grease. Use a mild detergent and water to clean the surface and let it dry completely before applying the adhesive.
- Choose the right adhesive for the job. There are different types of adhesives available, such as epoxy, latex, or urethane-based adhesives. Consult the manufacturer’s instructions and choose the adhesive that is suitable for bonding ceramic tile to wood.
- Apply the adhesive evenly and in the recommended thickness. Use a notched trowel to create ridges in the adhesive, which will help improve adhesion.
- Press the tiles firmly into the adhesive, making sure they are properly aligned. Use a rubber mallet or a wooden block to tap the tiles gently into place.
- Allow the adhesive to cure for the recommended time before grouting. This will ensure that the tiles are securely bonded to the wood surface.
2. Tile Movement
Another common issue when gluing ceramic tile to wood is tile movement. This can occur if the adhesive does not provide enough flexibility or if the wood substrate expands or contracts. To address this issue, consider the following troubleshooting tips:
- Choose an adhesive that offers flexibility and is designed to bond ceramic tile to wood. This will help accommodate any movement or expansion in the wood substrate.
- Ensure that the wood substrate is properly installed and stable. If there are any signs of movement or instability, address the underlying issue before proceeding with the tile installation.
- Provide expansion joints between the tiles to allow for movement. These joints can be filled with a flexible grout or caulk that will accommodate any expansion or contraction.
- Consider using uncoupling membranes or underlayment systems specifically designed to prevent tile movement on wood substrates.
3. Uneven Tile Installation
Uneven tile installation can occur if the adhesive is not applied evenly or if the wood substrate is not level. Here are some troubleshooting tips to achieve a smooth and level tile installation:
- Ensure that the wood substrate is level and free from any bumps or depressions. Use a leveling compound or sand down any uneven areas to create a smooth surface.
- Apply the adhesive evenly and in the recommended thickness. Use a notched trowel to create ridges that will help level the tiles during installation.
- Check the level of each tile as you go along. Use a level or straight edge to ensure that the tiles are flush with each other and the surrounding area.
- Make adjustments as needed by adding or removing adhesive to achieve a level installation.
In summary, gluing ceramic tile to wood can be a successful and long-lasting installation when done correctly. By troubleshooting common issues such as insufficient adhesion, tile movement, and uneven installation, you can achieve a professional-looking result. Follow these tips and consult with a professional if needed to ensure a successful tile installation.
FAQs
1. How can I glue ceramic tile to wood?
To glue ceramic tile to wood, you’ll need a strong adhesive designed for this specific purpose, such as a polyurethane construction adhesive. Clean and sand the wood surface, then apply the adhesive evenly using a trowel. Press the ceramic tile firmly into place and allow sufficient drying time before handling or grouting.
2. Can I use regular glue to adhere ceramic tile to wood?
No, regular glue is not suitable for bonding ceramic tile to wood. It lacks the necessary strength and durability required for this task. Using a specialized adhesive, like a polyurethane construction adhesive, will provide a stronger and longer-lasting bond between the tile and wood surface.
3. Are there any additional steps I need to take when gluing ceramic tile to wood?
Yes, it is recommended to reinforce the bond between the ceramic tile and wood surface by applying screws or nails in addition to using adhesive. This will provide extra stability and ensure a secure attachment. Additionally, avoid using excessive force or weight on the tile until the adhesive has fully cured.
Conclusion:
In conclusion, gluing ceramic tile to wood can be a practical solution for various projects. By following the right steps and using the appropriate adhesive, you can achieve a strong and durable bond. It is important to prepare the wood surface properly, ensuring it is clean, dry, and free from any bumps or imperfections. Select a high-quality adhesive specifically designed for bonding ceramic tile to wood, and apply it evenly with a notched trowel to ensure proper coverage. Press the tiles firmly into place, allowing for sufficient drying time. Remember to grout the tiles afterward to complete the installation.
Gluing ceramic tile to wood offers a versatile and aesthetically pleasing option for flooring, backsplashes, and other decorative projects. It provides a durable and long-lasting finish, resistant to moisture and wear. Furthermore, it allows for creativity and customization, as ceramic tiles come in a variety of sizes, shapes, colors, and patterns. Whether you are a DIY enthusiast or a professional contractor, mastering the technique of gluing ceramic tile to wood can open up a world of possibilities for enhancing the beauty and functionality of your space.