Yes, you can install tile on wood surfaces with proper preparation. This process involves ensuring a sturdy and level base, using a waterproofing membrane, and using a modified thin-set mortar to adhere the tiles. However, it is important to note that this method adds significant weight to the wood subfloor and may require additional support. Additionally, it is recommended to consult with a professional to assess the feasibility and potential risks before proceeding with tile installation on wood.

Transforming Wood Surfaces: How to Successfully Install Tiles on Wood
Are you looking to give your wood surfaces a fresh new look? Installing tiles on wood can be a great way to transform the appearance of your floors or walls. However, it’s important to approach this task with the right knowledge and techniques to ensure a successful installation. In this section, we will guide you through the step-by-step process of installing tiles on wood surfaces.

1. Preparing the Wood Surface
Before you begin installing tiles on wood, it’s crucial to properly prepare the surface. Follow these steps to ensure a secure and long-lasting installation:
- Start by inspecting the wood surface for any damage or loose boards. Replace or repair any areas that are in poor condition.
- Thoroughly clean the wood surface, removing any dirt, dust, or debris. Make sure the surface is dry before proceeding.
- If the wood surface has a glossy finish or is sealed, you will need to roughen it up to create a better bonding surface for the tiles. Use a sander or sandpaper to lightly sand the surface, creating a slightly rough texture.
- Apply a primer to the wood surface. This will help improve the adhesive bond between the wood and the tiles.
- Allow the primer to dry completely before moving on to the next step.
2. Choosing the Right Tiles
When selecting tiles for wood surfaces, it’s important to choose the right type of tiles that can withstand the natural movement and potential moisture of wood. Here are some factors to consider:
- Opt for tiles that are specifically designed for wood installations. These tiles are more flexible and less prone to cracking or popping off.
- Choose tiles with a lower absorption rating to reduce the risk of moisture damage. Look for tiles with a rating of less than 0.5%.
- Consider the size and thickness of the tiles. Thicker tiles are generally more suitable for wood surfaces as they provide better stability.
- Take into account the style and design of the tiles to ensure they complement your overall aesthetic.
3. Installing the Tiles
Now that you have prepared the wood surface and selected the right tiles, it’s time to install them. Follow these steps for a successful installation:
- Start by applying a thin layer of tile adhesive to the prepared wood surface using a notched trowel.
- Place the first tile onto the adhesive, pressing it firmly into place. Use tile spacers to ensure even spacing between tiles.
- Continue applying adhesive and placing tiles, working in small sections at a time.
- Use a tile cutter or wet saw to cut tiles as needed to fit around edges or obstacles.
- Once all the tiles are in place, allow the adhesive to dry completely according to the manufacturer’s instructions.
4. Sealing the Tiles
After the tile adhesive has dried, it’s important to seal the tiles to protect them from stains and moisture. Follow these steps to seal the tiles:
- Clean the tiles thoroughly to remove any dust or debris.
- Apply a penetrating sealer to the tiles using a soft brush or roller. Make sure to cover the entire surface evenly.
- Allow the sealer to dry completely before walking or placing any objects on the tiled surface.
In summary, transforming wood surfaces by installing tiles can be a rewarding project that gives your space a fresh new look. By properly preparing the wood surface, choosing the right tiles, and following the correct installation and sealing techniques, you can achieve a successful and long-lasting result. Enjoy your newly transformed space!
The Pros and Cons of Tiling over Wood: What You Need to Know
If you’re considering a home renovation project and want to give your floors a fresh look, tiling over wood might be a tempting option. However, before you make a decision, it’s important to weigh the pros and cons of this approach. In this section, we’ll explore the advantages and disadvantages of tiling over wood, so you can make an informed choice for your home.
Pros of Tiling over Wood
There are several benefits to tiling over wood, which may make it an attractive option for your flooring project.
- Durability: Tile is known for its durability, and when installed properly, it can withstand heavy foot traffic, moisture, and wear and tear. By tiling over wood, you can enhance the longevity of your floors.
- Versatility: Tiles come in a wide variety of colors, patterns, and finishes, allowing you to choose a style that suits your taste and complements your home decor. Whether you prefer a classic, rustic, or modern look, tiling over wood can offer you endless design possibilities.
- Easy Maintenance: Unlike wood, which requires regular refinishing and sealing to maintain its appearance, tile is relatively low-maintenance. It can be easily cleaned with regular sweeping and mopping, making it an ideal choice for busy households.
- Moisture Resistance: Wood is susceptible to moisture damage, especially in areas such as bathrooms and kitchens. Tiling over wood provides a protective layer that helps prevent water penetration, reducing the risk of warping or rotting.
- Allergy-Friendly: Unlike carpet, which can trap dust, allergens, and pet dander, tiled floors are hypoallergenic and easy to keep clean. This makes them a great option for individuals with allergies or respiratory sensitivities.
Cons of Tiling over Wood
While tiling over wood has its advantages, there are also some drawbacks to consider.
- Height Increase: Tiling over wood can result in a higher floor level, especially if the existing wood floor is not already at the same height as the adjacent rooms or hallways. This may require adjustments to door frames or transitions between rooms.
- Installation Challenges: Properly tiling over wood requires careful preparation to ensure the surface is flat, stable, and free of any cracks or defects. If the wood is not in good condition, it may need to be repaired or replaced before the tiles can be installed.
- Cold Underfoot: Unlike wood, which tends to feel warmer underfoot, tiled floors can be colder, especially during the winter months. Consider using area rugs or installing radiant floor heating to mitigate this issue.
- Noise: Tiled floors can be noisier compared to wood, especially if there is no underlayment or soundproofing material used during installation. Adding an underlayment can help reduce noise transmission.
- Cost: Tiling over wood may require additional materials and labor, which can increase the overall cost of your flooring project. It’s important to budget accordingly and consider the long-term value and durability of tile when making your decision.
In summary, tiling over wood has its advantages and disadvantages. It offers durability, versatility, easy maintenance, moisture resistance, and allergy-friendly properties. However, it may result in a higher floor level, require careful preparation and installation, feel colder underfoot, produce more noise, and come with additional costs. Ultimately, the decision to tile over wood should be based on your specific needs, preferences, and budget. It’s always recommended to consult with a professional flooring installer to ensure the best outcome for your project.
Step-by-Step Guide: Installing Tiles on Wood Floors for a Stunning Makeover
Are you tired of your old wood floors and looking to give your space a stunning makeover? Installing tiles on wood floors can be a great way to add a new look and durability to your space. In this section, we will provide you with a step-by-step guide on how to install tiles on wood floors to achieve a stunning transformation.
Materials Needed
Before we begin, let’s gather all the materials you will need for this project:
- Tile adhesive
- Tile spacers
- Grout
- Tile cutter or wet saw
- Notched trowel
- Level
- Sponge
- Bucket
- Measuring tape
- Pencil
- Safety goggles
- Knee pads
Step 1: Prepare the Wood Floor
The first step is to prepare the wood floor for tiling. Start by cleaning the floor thoroughly to remove any dirt or debris. If there are any loose or damaged floorboards, repair or replace them before proceeding. It is important to have a smooth and stable surface for the tiles to adhere to.
Step 2: Measure and Plan
Measure the dimensions of the room and plan the layout of the tiles. Start from the center of the room and work your way out. Mark the center point on the floor using a pencil. This will serve as a reference point for laying the tiles.
Step 3: Apply Tile Adhesive
Using a notched trowel, spread tile adhesive on a small section of the wood floor, starting from the center point. Make sure to follow the manufacturer’s instructions for the adhesive. Create ridges in the adhesive with the notched side of the trowel.
Step 4: Lay the Tiles
Place the first tile on the adhesive, aligning it with the reference point. Press the tile firmly into the adhesive, ensuring it is level. Insert tile spacers between the tiles to maintain even spacing. Continue laying tiles in a straight line, working your way out from the center point.
Step 5: Cut Tiles to Fit
As you reach the edges or corners of the room, you may need to cut tiles to fit. Measure the space and mark the tile accordingly. Use a tile cutter or wet saw to make the necessary cuts. Always wear safety goggles when cutting tiles.
Step 6: Allow Tiles to Set
Once all the tiles are laid, allow them to set according to the adhesive manufacturer’s instructions. This usually takes 24 to 48 hours. Avoid walking on the tiles during this time to prevent any movement or displacement.
Step 7: Apply Grout
Once the tiles have set, it’s time to apply grout. Mix the grout according to the manufacturer’s instructions and apply it to the tile joints using a grout float. Remove any excess grout with a damp sponge, being careful not to remove too much from the joints.
Step 8: Clean and Seal
After the grout has dried, clean the tiles with a damp sponge to remove any haze. Once the tiles are dry, you can apply a tile sealer to protect them and enhance their longevity.
Step 9: Enjoy Your Stunning Tile Floor
Once the sealer has dried, your installation is complete! Step back and admire your stunning tile floor on top of your wood floors. This transformation will not only add beauty but also durability to your space.
In summary, installing tiles on wood floors is a fantastic way to give your space a stunning makeover. By following this step-by-step guide, you can achieve a professional-looking installation that will enhance the aesthetic appeal and functionality of your floor. Enjoy your new tile floor and the transformation it brings to your space!
Best Practices for Preparing Wood Subfloors for Tile Installation
When it comes to installing tiles on wood subfloors, proper preparation is key to ensuring a successful and long-lasting installation. Wood subfloors can pose unique challenges and require specific steps to create a stable and suitable surface for tiling. Here are some best practices to follow when preparing wood subfloors for tile installation:
1. Assess the Condition of the Wood Subfloor
Before you begin any preparation work, it’s important to thoroughly inspect the condition of the wood subfloor. Look for any signs of damage, such as warping, rotting, or loose boards. Address any underlying issues and make necessary repairs before proceeding with the tile installation.
2. Ensure Sufficient Subfloor Thickness
Wood subfloors should meet minimum thickness requirements to support the weight of the tile. Generally, a minimum thickness of 1¼ inches is recommended for subfloors. Check the subfloor thickness and reinforce it if necessary to prevent flexing and movement that could lead to tile cracking or popping.
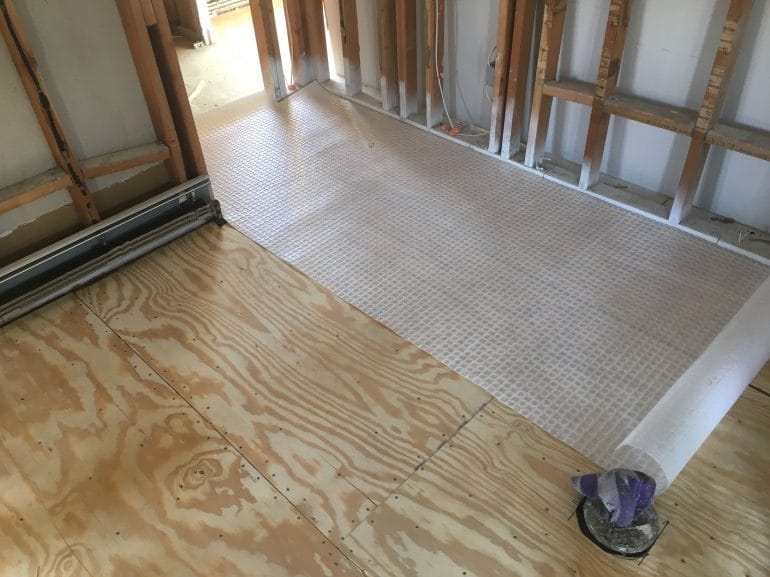
3. Install a Sturdy Subfloor Underlayment
In some cases, it may be necessary to install an additional layer of underlayment over the wood subfloor to provide extra stability and prevent tile movement. Cement backer board or an uncoupling membrane are commonly used underlayment options for wood subfloors. Follow the manufacturer’s instructions for proper installation.
4. Address Subfloor Moisture Issues
Wood subfloors are susceptible to moisture penetration, which can cause warping, mold growth, and adhesive failure. Test the moisture content of the subfloor using a moisture meter before proceeding with tile installation. If moisture levels are high, take necessary steps to address the issue, such as improving ventilation or using a moisture barrier product.
5. Clean and Level the Subfloor Surface
Prior to tile installation, ensure that the subfloor surface is clean and free of debris. Remove any dust, dirt, or loose particles that could affect the adhesion of the tile. Additionally, check for any uneven areas or dips in the subfloor and address them by leveling the surface with a suitable floor leveling compound.
6. Apply a Primer or Sealer
Applying a primer or sealer to the wood subfloor before tiling can help improve adhesion and prevent moisture penetration. Choose a primer or sealer specifically designed for wood subfloors and follow the manufacturer’s instructions for application.
7. Allow Sufficient Drying Time
After completing the necessary preparation steps, allow the subfloor to thoroughly dry before proceeding with tile installation. This will ensure proper bonding and prevent any moisture-related issues in the future. Follow the manufacturer’s recommended drying time.
8. Follow Tile Installation Guidelines
Finally, when installing the tiles on the prepared wood subfloor, make sure to follow the specific guidelines provided by the tile manufacturer. Use the recommended adhesive, grout, and installation techniques to achieve the best results and ensure the longevity of the tiled surface.
By following these best practices for preparing wood subfloors for tile installation, you can avoid potential problems and create a solid foundation for your tile project. Proper preparation will not only improve the aesthetics of the finished installation but also increase its durability and lifespan.
Maintaining and Protecting Wood-look Tiles for Long-lasting Beauty
Wood-look tiles have become a popular choice for flooring in many homes and businesses. They offer the warmth and natural beauty of wood, but with the durability and easy maintenance of tiles. However, like any other flooring material, wood-look tiles require proper care to ensure their long-lasting beauty. In this section, we will discuss some essential tips for maintaining and protecting your wood-look tiles.
1. Regular Cleaning
Regular cleaning is crucial to keep your wood-look tiles looking their best. Sweep or vacuum the floor regularly to remove dirt and debris that can cause scratches. Use a soft-bristle broom or a vacuum cleaner with a brush attachment to avoid any damage to the tile surface.
For deeper cleaning, you can mop the tiles with warm water and a mild detergent. Avoid using harsh cleaning chemicals or abrasive scrubbers, as they can dull the tile finish. Instead, opt for pH-neutral cleaners specifically designed for tile floors. Be sure to rinse the floor thoroughly after cleaning to remove any residue.
2. Preventing Scratches
Preventing scratches on wood-look tiles is essential to maintain their beauty. Place doormats at entryways to trap dirt and grit, which can act as abrasive agents and scratch the tile surface. Consider using felt pads or glides on the bottom of furniture legs to prevent them from scratching the tiles when moved.
Avoid dragging heavy objects or furniture across the floor, as this can leave marks or indentations. Instead, lift and carry them to their desired location. Additionally, trim your pets’ nails regularly to prevent any accidental scratches on the tile surface.
3. Protecting from Moisture
While wood-look tiles are more moisture-resistant than traditional hardwood floors, it is still essential to protect them from excessive moisture. Wipe up any spills immediately to prevent water from seeping into the grout lines or underneath the tiles. Use a clean, damp cloth to blot the spill, followed by a dry cloth to absorb any excess moisture.
Consider using rugs or mats in areas prone to moisture, such as near sinks or entryways. This will help protect the tiles from water damage and reduce the risk of slipping. Use caution when mopping the floor to avoid saturating the tiles with water. Instead, wring out the mop well and use minimal water during the cleaning process.
4. Sealing the Grout
Grout lines are an essential part of wood-look tile installations. They not only provide a finished look but also help prevent moisture penetration. To maintain the integrity of the grout and protect it from stains, it is recommended to seal the grout lines regularly.
Choose a high-quality grout sealer that is compatible with your tiles and follow the manufacturer’s instructions for application. Generally, the sealer should be applied with a small brush or roller and allowed to dry completely. This process helps to keep the grout lines clean and prolong their lifespan.
5. Professional Maintenance
While regular cleaning and preventive measures go a long way in maintaining wood-look tiles, professional maintenance is also vital. Consider scheduling annual or bi-annual maintenance with a professional tile cleaning service. They have the expertise and equipment to deep clean the tiles, remove stubborn stains, and restore their original beauty.
In summary, maintaining and protecting your wood-look tiles is essential to ensure their long-lasting beauty. Regular cleaning, preventing scratches, protecting from moisture, sealing the grout, and professional maintenance are key factors in preserving the appearance and durability of your wood-look tiles. By following these tips, you can enjoy the natural beauty of wood without compromising on the durability and easy maintenance of tiles.
FAQs
Can you put tile on wood?
It is generally not recommended to install tile directly on wood. The movement and flexing of wood can cause the tiles to crack. It is recommended to install a cement backer board over the wood subfloor before laying tile to provide a stable surface.
Conclusion:
In conclusion, the question of whether you can put tile on wood has been addressed. While it is technically possible to install tile on top of wood, it is not recommended. Wood is a porous material that can expand and contract with changes in temperature and humidity. This movement can cause the tile to crack or become loose over time. Additionally, the flexibility of wood can lead to an uneven surface, making it difficult to achieve a flat and stable base for the tile. It is best to remove the wood and install a suitable subfloor before tiling to ensure a long-lasting and durable result.
Overall, proper preparation and adherence to manufacturer’s guidelines are essential for successful tile installation. Consider consulting a professional to assess your specific situation and determine the most appropriate course of action. Remember, a well-executed tile installation will not only enhance the aesthetics of your space but also provide functional durability for years to come.
