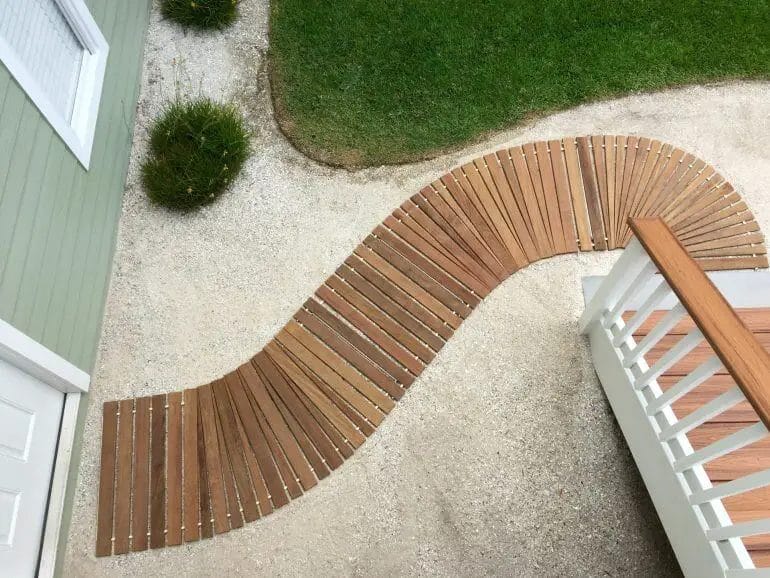
Looking to add a touch of elegance and functionality to your outdoor space? A curved wooden walkway can be the perfect solution. Whether you want to enhance the aesthetics of your garden or create a unique pathway through your backyard, building a curved wooden walkway is easier than you might think. With the right tools and materials, you can create a picturesque and inviting pathway that adds charm and character to your outdoor area.
When it comes to building a curved wooden walkway, the first step is to carefully plan your design. Consider the length, width, and curve of the walkway, as well as the type of wood you want to use. Cedar and redwood are popular choices due to their durability and natural resistance to rot and insects. It’s also important to ensure that the walkway is level and properly secured to prevent any tripping hazards.

Once you have your design and materials in place, it’s time to start the construction process. Begin by marking the path of the walkway using stakes and string. Dig a trench along the marked path, making sure it is wide enough and deep enough to accommodate the wooden boards. Next, lay a layer of landscape fabric to prevent weed growth, and then start installing the wooden boards, following the curve of the walkway.
As you progress, make sure to use a level to ensure the boards are properly aligned. Secure each board with screws or nails, ensuring they are firmly attached.

Designing a Functional and Aesthetic Curved Wooden Walkway
When it comes to creating a beautiful and functional outdoor space, a curved wooden walkway can be an excellent addition. Not only does it provide a way to navigate through your garden or yard, but it also adds a touch of elegance and charm to the overall design. In this section, we will explore the key aspects of designing a curved wooden walkway that is both functional and aesthetically pleasing.
1. Planning and Layout
The first step in designing a curved wooden walkway is careful planning and layout. Consider the purpose of the walkway and its intended use. Are you looking for a simple path from point A to point B, or do you want to create a more meandering pathway that encourages exploration? By defining the purpose, you can determine the ideal length, width, and curves of the walkway.
Take into account the existing landscape and any natural elements you want to highlight or work around. Consider the slope and terrain of the area to ensure that the walkway follows a smooth and comfortable path. Use stakes and string to outline the shape of the walkway and make any necessary adjustments before moving on to the next step.
2. Material Selection
The choice of materials for your curved wooden walkway is crucial for both functionality and aesthetics. Opt for a durable and rot-resistant wood species such as cedar, redwood, or teak. These woods are not only sturdy but also possess natural beauty that will enhance the overall appeal of the walkway.
Consider the width and thickness of the planks based on the expected foot traffic. Thicker planks offer more stability, while wider planks allow for a more prominent visual impact. Additionally, choose a wood stain or finish that complements the surrounding landscape and protects the wood from weathering.
3. Construction and Installation
Constructing a curved wooden walkway requires careful craftsmanship and attention to detail. Start by preparing the ground beneath the walkway. Remove any vegetation, level the soil, and create a solid base using gravel or sand. This will help prevent uneven settling and ensure a stable foundation.
Next, construct the framework for the walkway using pressure-treated lumber or a rot-resistant alternative. Create support beams and joists, ensuring they are properly anchored and level. Attach the wooden planks perpendicular to the support beams, leaving a small gap between each plank to allow for expansion and drainage.
When it comes to installing the curved sections of the walkway, use flexible wooden planks or cut the planks into smaller segments to accommodate the desired shape. Connect the curved sections seamlessly to maintain a smooth and continuous flow.
4. Enhancements and Maintenance
After the construction is complete, you can enhance the functionality and aesthetics of your curved wooden walkway through various additions. Install low-voltage lighting along the sides of the walkway to create a magical ambiance in the evenings. Add handrails or balusters for increased safety and visual appeal.
Regular maintenance is essential to keep your curved wooden walkway in top condition. Sweep away debris regularly and remove any moss or algae that may accumulate on the surface. Depending on the wood species and finish used, you may need to periodically reapply a sealant or stain to protect against weathering and maintain the desired appearance.
Summary
A curved wooden walkway can elevate the overall design and functionality of your outdoor space. By carefully planning the layout, selecting quality materials, and ensuring proper construction and installation, you can create a walkway that is both functional and aesthetically pleasing. Regular maintenance and enhancements such as lighting and handrails will further enhance its appeal and ensure its longevity. With a well-designed curved wooden walkway, you can enjoy a beautiful and inviting pathway through your garden or yard.

Steps to Constructing a Curved Wooden Walkway
If you want to enhance the charm and functionality of your outdoor space, a curved wooden walkway can be a perfect addition. Whether you want to connect different areas of your garden or create a focal point, constructing a curved wooden walkway can be a rewarding DIY project. Follow these steps to create a beautiful curved wooden walkway in your garden:
1. Plan and Design
The first step in constructing a curved wooden walkway is to plan and design your project. Consider the purpose of the walkway and the layout of your garden. Determine the desired length and width of the walkway, as well as the desired curve. Use stakes and string to outline the path and visualize the design.
2. Gather Materials and Tools
Once you have a clear plan and design in mind, gather all the necessary materials and tools. You will need pressure-treated lumber for the walkway’s frame and decking boards. Other materials include galvanized screws, landscape fabric, gravel, and concrete. Tools required for this project include a circular saw, drill, shovel, level, and measuring tape.
3. Prepare the Site
Clear the area where you plan to build the curved wooden walkway. Remove any rocks, debris, or vegetation. Level the ground using a shovel and ensure that the area is properly graded to allow for proper drainage.
4. Build the Frame
The frame of the walkway provides the structural support. Start by marking the outer edges of the walkway on the ground using stakes and string. Cut pressure-treated lumber to the desired length and shape to create the curved frame. Connect the pieces using galvanized screws, ensuring that the frame is level and secure.
5. Install the Decking Boards
Next, install the decking boards on top of the frame. Use pressure-treated lumber or composite decking boards, as they are durable and weather-resistant. Secure the boards to the frame using galvanized screws, spacing them evenly to create a smooth and even surface.
6. Add Landscape Fabric and Gravel
To prevent weed growth, lay landscape fabric over the prepared ground. This will help maintain the cleanliness and long-term durability of the curved walkway. On top of the fabric, spread a layer of gravel, making sure it is evenly distributed and compacted.
7. Secure and Finish
To ensure the longevity of your curved wooden walkway, secure it further by adding concrete footers at regular intervals along the frame. This will provide additional stability and prevent any movement. Finally, apply a protective finish to the wood to protect it from the elements and enhance its appearance.
In summary, constructing a curved wooden walkway can be a fulfilling project that adds both functionality and beauty to your outdoor space. By carefully planning, gathering the necessary materials, and following the step-by-step process, you can create a stunning curved walkway that complements your garden and provides a delightful pathway for years to come.
Tips for Maintaining and Preserving Your Curved Wooden Walkway
A curved wooden walkway can add a touch of charm and elegance to your outdoor space. However, like any other wooden structure, it requires regular maintenance and care to ensure its longevity. Here are some tips to help you maintain and preserve your curved wooden walkway:
1. Regular Cleaning
Regular cleaning is essential to keep your curved wooden walkway in good condition. Sweep off any debris, dirt, or leaves from the surface using a broom or a leaf blower. You can also use a pressure washer on a low setting to remove stubborn dirt or stains. Avoid using harsh chemicals as they can damage the wood.
2. Apply Sealant
To protect your curved wooden walkway from moisture, UV rays, and other environmental factors, it is important to apply a sealant regularly. Choose a high-quality sealant that is suitable for outdoor use and follow the manufacturer’s instructions for application. Apply the sealant evenly using a brush or a roller, ensuring that all surfaces are covered.
3. Prevent Water Damage
Water is one of the biggest enemies of wooden structures. To prevent water damage, make sure the water drains properly from the walkway. Avoid allowing water to pool or accumulate on the surface. If necessary, adjust the slope or add drainage channels to redirect water away from the walkway.
4. Inspect for Rot or Decay
Regularly inspect your curved wooden walkway for any signs of rot or decay. Check for soft spots, discoloration, or cracks in the wood. If you notice any issues, address them immediately to prevent further damage. Replace any rotten or decayed sections of the walkway and treat the surrounding areas with a wood preservative.
5. Protect from Sun Damage
Excessive exposure to sunlight can cause the wood to fade, crack, or warp. To protect your curved wooden walkway from sun damage, consider applying a UV-resistant coating or using a stain with built-in UV protection. This will help preserve the natural color and integrity of the wood.
6. Avoid Heavy Traffic
While curved wooden walkways are designed to withstand regular foot traffic, it is advisable to avoid heavy loads or excessive weight on the structure. Heavy furniture, vehicles, or equipment can cause stress on the wood and lead to damage or bending. Use caution when moving heavy objects across the walkway.
7. Regular Maintenance
Lastly, regular maintenance is key to ensuring the longevity of your curved wooden walkway. Periodically inspect the structure for any signs of wear and tear. Touch up any areas where the sealant has worn off. Keep an eye out for loose nails or screws and tighten them as needed. By staying proactive and addressing any issues promptly, you can extend the lifespan of your walkway.
In summary, maintaining and preserving your curved wooden walkway requires regular cleaning, applying sealant, preventing water damage, inspecting for rot or decay, protecting from sun damage, avoiding heavy traffic, and performing regular maintenance. By following these tips, you can enjoy your beautiful curved wooden walkway for years to come.
Enhancing the Visual Appeal of Your Curved Wooden Walkway
Curved wooden walkways can add a touch of elegance and charm to your outdoor space. Whether you have a garden, a backyard, or a park, a curved wooden walkway can create a beautiful and inviting pathway for you and your guests. However, to truly enhance the visual appeal of your curved wooden walkway, there are a few key factors to consider.
1. Choose the Right Wood
The type of wood you choose for your curved walkway can greatly impact its overall appearance. Opt for high-quality, durable wood that can withstand the elements and maintain its beauty over time. Hardwoods like redwood, cedar, and teak are excellent choices as they are naturally resistant to decay and provide a rich, warm color.
2. Incorporate Interesting Patterns
One way to enhance the visual appeal of your curved wooden walkway is to incorporate interesting patterns. Instead of a traditional straight pathway, consider adding curves, bends, or even a spiral design to create a captivating visual effect. This can add a sense of intrigue and uniqueness to your walkway, making it stand out.
3. Add Decorative Accents
To further enhance the visual appeal of your curved wooden walkway, consider adding decorative accents along the path. This could include installing post lights, lanterns, or solar-powered pathway lights to create a warm and inviting atmosphere. Additionally, you can incorporate potted plants, flower beds, or even a small water feature to add pops of color and natural beauty.
4. Play with Colors and Finishes
Don’t be afraid to play with colors and finishes to enhance the visual appeal of your curved wooden walkway. Stain or paint your walkway in a color that complements the surrounding landscape or matches the style of your home. You can also experiment with different finishes, such as glossy or matte, to achieve the desired look.
5. Maintain Proper Maintenance
Lastly, maintaining proper maintenance is essential for preserving the visual appeal of your curved wooden walkway. Regularly clean the walkway to remove dirt, debris, and moss that can dull its appearance. Apply a protective sealant or finish every few years to protect the wood from weathering and keep it looking fresh and vibrant.
In summary, a curved wooden walkway can be a stunning addition to your outdoor space. By choosing the right wood, incorporating interesting patterns, adding decorative accents, playing with colors and finishes, and maintaining proper maintenance, you can enhance its visual appeal and create a captivating pathway that will impress your guests and elevate the overall aesthetic of your outdoor area.
Frequently Asked Questions
1. How can I build a curved wooden walkway?
To build a curved wooden walkway, start by determining the desired curve and marking it on the ground. Then, use pressure-treated lumber to create the frame of the walkway, ensuring the boards are securely fastened and aligned with the marked curve. Next, install the wooden planks on top of the frame, cutting them to fit the curve if necessary. Lastly, add any finishing touches, such as sanding and staining, to enhance the appearance and durability of the walkway.
2. What materials do I need to build a curved wooden walkway?
To build a curved wooden walkway, you will need the following materials:
– Pressure-treated lumber for the frame
– Wooden planks for the walkway surface
– Galvanized screws or nails
– Measuring tape and marking tools
– Circular saw or jigsaw for cutting the wood
– Drill or hammer for fastening the boards
– Sandpaper for finishing
– Stain or sealant (optional)
3. Are there any specific considerations for building a curved wooden walkway?
Yes, when building a curved wooden walkway, it is important to:
– Use pressure-treated lumber to prevent rot and decay
– Ensure the frame and planks are securely fastened to prevent any movement or instability
– Make accurate measurements and markings to achieve the desired curve
– Consider the overall design and aesthetics of the walkway to complement your landscape
Conclusion
In conclusion, building a curved wooden walkway can add a stunning and unique feature to any outdoor space. By following the steps outlined in this guide, you can create a durable and visually appealing walkway that will withstand the test of time.
Remember to carefully plan the design of your walkway, taking into account the curves, dimensions, and materials you will use. Use quality wood that is suitable for outdoor use and ensure proper installation for stability and longevity.
With patience, precision, and the right tools, you can create a curved wooden walkway that will enhance the beauty and functionality of your garden or backyard. So, get started on your project today and enjoy the benefits of a stunning curved wooden walkway.