If you’re looking to add some charm and functionality to your outdoor space, building a wood awning could be the perfect solution. A wood awning not only provides shade and protection from the elements but also adds a touch of elegance to your home’s exterior. Whether you want to create a cozy outdoor seating area or protect your windows from harsh sunlight, this DIY project is worth considering. With the right materials, tools, and a little bit of know-how, you can easily build a wood awning that blends seamlessly with your home’s aesthetics.
Before you start the construction process, it’s essential to plan your wood awning carefully. Begin by measuring the area where you want to install the awning and determining the ideal size and shape. Next, consider the type of wood you want to use for your project. Pressure-treated lumber or cedar are popular choices due to their durability and resistance to rot and pests.

Once you have your plan in place, gather all the necessary materials and tools, including lumber, screws, galvanized nails, a saw, drill, and measuring tape. It’s also important to have a level, a ladder, and personal protective equipment (PPE) like safety glasses and gloves.
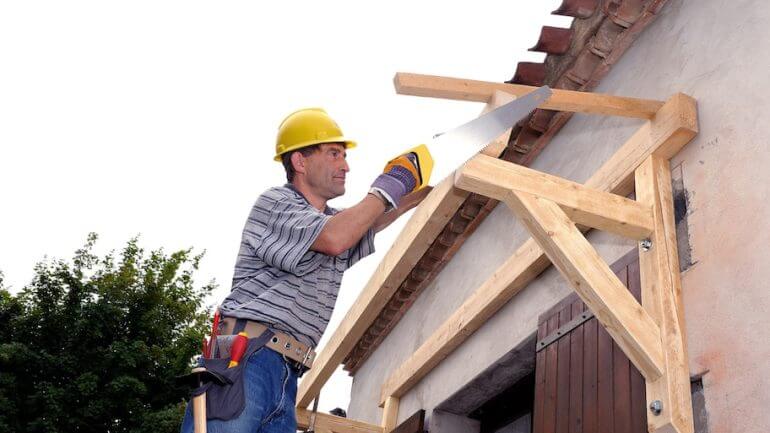
Start by constructing the frame for your wood awning, ensuring it is sturdy and level. Next, attach the awning boards to the frame, taking care to space them evenly for proper coverage. To add a finishing touch,
Step-by-Step Guide to Constructing a Wood Awning
Adding a wood awning to your home not only provides protection from the elements but also enhances the aesthetic appeal of your outdoor space. Constructing a wood awning may seem like a complex task, but with the right tools and materials, it can be a rewarding DIY project. In this section, we will provide you with a step-by-step guide to help you successfully build your own wood awning.
1. Gather the necessary materials and tools
Before you begin construction, gather all the materials and tools you will need for the project. This includes pressure-treated lumber, screws, drill, circular saw, measuring tape, level, and a ladder. Make sure you have all the necessary equipment on hand to avoid interruptions during the construction process.
2. Measure and mark the area
Identify the area where you want to install the wood awning and measure the space. Use a measuring tape to determine the dimensions and mark the area accordingly. This will serve as a guide during the construction process and ensure accurate placement of the structure.
3. Prepare the lumber
Take the pressure-treated lumber and cut it to the desired dimensions using a circular saw. Make sure to wear safety goggles and use a steady hand when cutting the lumber. Sand down any rough edges to create a smooth finish.
4. Build the frame
Start by constructing the frame of the wood awning. Use the cut lumber pieces to create the vertical posts, horizontal beams, and diagonal supports. Secure them together using screws and a drill, ensuring that the frame is sturdy and level. Double-check all measurements to ensure accuracy.
5. Attach the awning beams
Once the frame is complete, attach the awning beams to the horizontal beams of the frame. These beams will support the roof of the awning. Use screws to secure them in place, making sure they are evenly spaced and properly aligned.
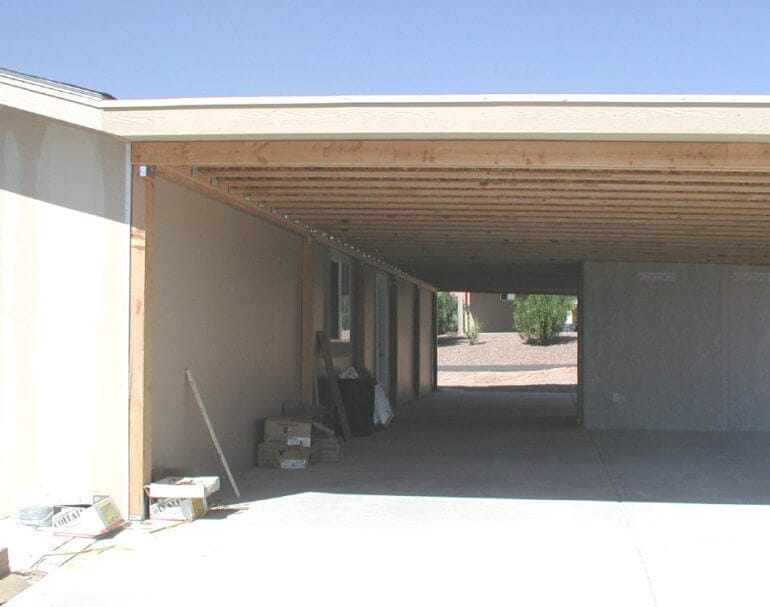
6. Install the roof
Next, it’s time to install the roof of the wood awning. Cut the pressure-treated lumber to create the roof panels. Attach them to the awning beams using screws, ensuring they are securely fastened. Make sure the roof panels have a slight slope to allow water to drain properly.
7. Add finishing touches
Once the main structure is complete, add any desired finishing touches to your wood awning. This can include staining or painting the wood, adding decorative trim, or even installing outdoor lighting for added ambiance. Take your time to ensure a polished and professional-looking final product.
8. Secure the wood awning
Finally, secure the wood awning to your home or the designated area. Use sturdy brackets or bolts to ensure it is securely attached and can withstand various weather conditions. Check for any loose screws or unstable parts, and make adjustments as needed.
In summary, constructing a wood awning involves gathering the necessary materials and tools, measuring and marking the area, preparing the lumber, building the frame, attaching the awning beams, installing the roof, adding finishing touches, and securing the awning. By following this step-by-step guide, you can create a beautiful and functional wood awning that will enhance the look and value of your home.
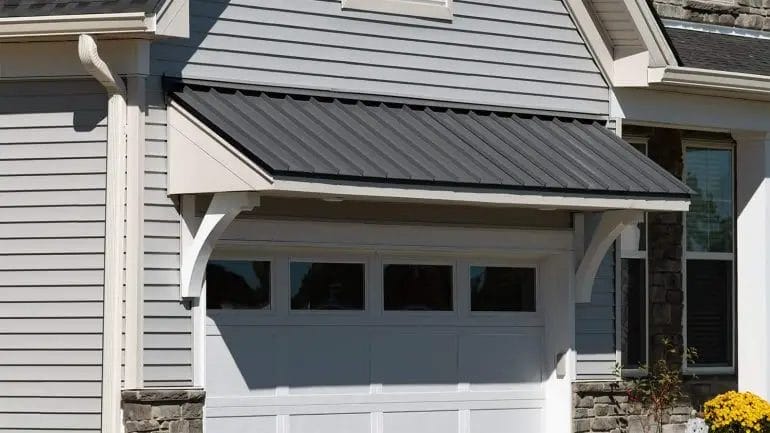
Choosing the Right Design for Your Wood Awning
When it comes to enhancing the aesthetic appeal and functionality of your outdoor space, a wood awning can be a great addition. Not only does it provide shade and protection from the elements, but it also adds a touch of elegance and charm to your home. However, with so many design options available, choosing the right one can be a daunting task. In this section, we will discuss the key factors to consider when selecting the design for your wood awning.
1. Functionality and Purpose
Before diving into the design options, it is important to determine the functionality and purpose of your wood awning. Ask yourself questions like:
- Do you want the awning to cover a specific area, such as a patio or deck?
- Will it be used primarily for shade or protection from rain?
- Do you want it to be retractable or permanently fixed?
By understanding the intended use of the awning, you will be able to narrow down the design choices and make a more informed decision.
2. Architectural Compatibility
Another important factor to consider is the architectural style of your home. You want to choose a wood awning design that complements the existing structure and enhances its overall aesthetics. For example, if you have a traditional or Victorian-style home, a design with decorative trim and intricate details would be more suitable. On the other hand, if your home has a modern or minimalist design, a sleek and simple awning design would be a better fit.
Additionally, consider the color and finish of the wood. Opt for a stain or paint color that coordinates with your home’s exterior to achieve a cohesive look.
3. Size and Scale
The size and scale of your wood awning should be proportionate to the space it will cover. Take accurate measurements of the area to determine the appropriate dimensions for the awning. Consider the height, width, and depth to ensure that it provides adequate coverage and does not overpower the surrounding elements.
Keep in mind that the size of the awning will also impact its functionality. A larger awning will provide more shade and protection, while a smaller one may be more suitable for a compact space.
4. Material Selection
Wood awnings are available in various types of wood, each with its unique characteristics. Common wood choices include cedar, redwood, and cypress, all known for their durability and resistance to rot and insects. Consider the maintenance requirements, longevity, and cost of each wood type before making a decision.
Additionally, decide whether you want a solid wood design or a combination of wood and fabric. A fabric element can add versatility to the awning, allowing you to adjust the amount of shade or sunlight as desired.
5. Local Regulations and Building Codes
Before finalizing your wood awning design, it is essential to check local regulations and building codes. Some areas may have restrictions on the height, size, or style of awnings. Ensure that your chosen design complies with these regulations to avoid any legal issues or complications down the line.
In summary, choosing the right design for your wood awning involves considering its functionality, architectural compatibility, size and scale, material selection, and local regulations. By carefully evaluating these factors and making an informed decision, you can create a wood awning that not only enhances your outdoor space but also adds value to your home.
Tips for Properly Maintaining Your Wood Awning
Wood awnings are a beautiful addition to any home, providing shade and enhancing the overall aesthetic appeal. However, like any outdoor structure, wood awnings require regular maintenance to ensure their longevity and keep them looking their best. Here are some tips to help you properly maintain your wood awning:
1. Regular Cleaning
Regular cleaning is essential to prevent dirt, dust, and debris from accumulating on your wood awning. Use a soft-bristle brush or a broom to gently sweep away any loose dirt or leaves. Avoid using harsh chemicals or abrasive cleaners, as they can damage the wood. Instead, use a mild soap solution and a soft cloth to gently wipe down the surface of your awning.
2. Inspect for Damage
Regularly inspect your wood awning for any signs of damage, such as cracks, splintering, or rot. Pay close attention to areas that are constantly exposed to moisture, as they are more prone to damage. If you notice any issues, address them promptly to prevent further deterioration. Depending on the extent of the damage, you may need to repair or replace certain parts of your awning.
3. Apply Protective Coating
To protect your wood awning from moisture, UV rays, and other outdoor elements, consider applying a protective coating. There are various sealants and finishes available specifically designed for wood surfaces. Before applying any product, make sure to clean and dry the awning thoroughly. Follow the manufacturer’s instructions for application, and reapply the protective coating as needed.
4. Trim Nearby Trees and Plants
If there are trees or plants near your wood awning, regularly trim them to prevent branches, leaves, or other debris from falling onto the awning. Overhanging branches can also rub against the wood, causing damage over time. By keeping the surrounding area well-maintained, you can reduce the risk of your awning getting dirty or sustaining unnecessary damage.
5. Protect from Rain and Sun
While wood awnings are designed to withstand the elements, excessive exposure to rain and direct sunlight can still cause damage. Consider installing an awning cover or retractable awning to provide additional protection during heavy rain or extreme heat. This will help prolong the lifespan of your wood awning and minimize the need for repairs.
6. Schedule Professional Inspections
Even with regular maintenance, it’s still beneficial to have your wood awning professionally inspected every few years. A professional can identify any underlying issues that may not be visible to the untrained eye and provide recommendations for repairs or improvements. This proactive approach can help you avoid costly repairs down the line and ensure the longevity of your wood awning.
In summary, proper maintenance is key to keeping your wood awning in excellent condition. Regular cleaning, inspecting for damage, applying a protective coating, trimming nearby trees and plants, protecting from rain and sun, and scheduling professional inspections are all essential steps to maintain the beauty and functionality of your wood awning for years to come.
Cost-effective Alternatives to Building a Wood Awning
If you’re looking to enhance the exterior of your home or create a shaded outdoor space, an awning can be a fantastic addition. While wood awnings can provide a rustic and charming look, they can also be costly and require frequent maintenance. Fortunately, there are several cost-effective alternatives to building a wood awning that can give you the same functionality and aesthetic appeal without breaking the bank.
1. Metal Awnings
Metal awnings are a popular alternative to wood awnings because they are durable, low-maintenance, and cost-effective. They come in various styles and finishes, allowing you to find the perfect match for your home’s exterior. Metal awnings are typically made from aluminum or steel, both of which are highly resistant to corrosion and can withstand harsh weather conditions. Additionally, metal awnings are easy to install and require minimal upkeep, making them an excellent choice for homeowners on a budget.
2. Fabric Awnings
Fabric awnings are another affordable alternative to wood awnings that offer versatility and style. These awnings are made from a durable fabric material such as canvas or acrylic and are available in a wide range of colors and patterns. Fabric awnings are known for their excellent UV protection and ability to block out sunlight, making them ideal for creating a shaded outdoor space. They are also lightweight and easy to install, allowing for quick and hassle-free setup. Additionally, fabric awnings can be retracted or extended as needed, providing flexibility and convenience.
3. Retractable Awnings
If you’re looking for a versatile awning option that can be adjusted based on your needs, a retractable awning is a great choice. These awnings can be extended or retracted with ease, allowing you to control the amount of shade or sunlight you prefer. Retractable awnings are typically made with a durable fabric material and supported by an aluminum or steel frame. They are available in various sizes and styles, making it easy to find one that suits your home’s architecture and your personal taste. While retractable awnings may have a slightly higher upfront cost compared to other alternatives, their functionality and convenience make them a cost-effective choice in the long run.
4. Shade Sails
If you’re looking to create a unique and modern outdoor space, shade sails are an excellent alternative to traditional wood awnings. These triangular or rectangular fabric canopies are suspended between posts or anchored to existing structures, providing a stylish and cost-effective shade solution. Shade sails come in various colors and sizes, allowing you to customize the look and coverage to suit your needs. They offer excellent UV protection and are resistant to mildew and fading. Additionally, shade sails are easy to install and can be easily removed or adjusted as desired.
5. Pergolas or Arbors
Pergolas or arbors can provide a similar aesthetic appeal to wood awnings while offering a more cost-effective solution. These structures are typically made from metal or vinyl and feature an open lattice design that allows for partial shade. Pergolas and arbors can be adorned with climbing plants or draped with fabric to enhance their shade-providing capabilities. They are versatile and can be customized to fit any outdoor space, making them an excellent alternative to traditional wood awnings.
Summary
While wood awnings can be a beautiful addition to any home, they can also be expensive and require regular maintenance. Fortunately, there are several cost-effective alternatives available that offer the same functionality and aesthetic appeal. Metal awnings, fabric awnings, retractable awnings, shade sails, and pergolas or arbors can provide shade, protection, and style without the high cost and upkeep of a wood awning. Consider these alternatives when looking to enhance your outdoor space while staying within your budget.
FAQs
1. How do I build a wood awning?
To build a wood awning, you will need to first determine the dimensions and design of your awning. Then, gather the necessary materials, such as wood beams, screws, and brackets. Next, construct the frame and attach it to your house or structure. Finally, install the awning cover and any additional features, such as gutters or lighting.
2. What tools do I need to build a wood awning?
To build a wood awning, you will typically need a measuring tape, circular saw or miter saw, drill with screwdriver bits, level, ladder, and safety equipment such as goggles and gloves. Additionally, depending on the complexity of your design, you may need additional tools like a jigsaw or router.
3. Are there any special considerations to keep in mind when building a wood awning?
When building a wood awning, it is important to consider factors such as the weight of the awning and its load-bearing capacity, the pitch or slope of the awning for proper drainage, and any local building codes or regulations that may apply. Additionally, it is crucial to use weather-resistant and treated wood to ensure the longevity and durability of your awning.
Conclusion
In conclusion, building a wood awning can be a rewarding DIY project that adds both style and functionality to your outdoor space. By following the steps outlined in this guide, you can create a beautiful and durable awning that provides shade and protection from the elements.
Remember to choose the right type of wood for your awning, ensure proper measurements and structural support, and apply a protective finish to prolong its lifespan. Whether you’re looking to enhance your patio, deck, or entryway, a wood awning can significantly improve the aesthetics and usability of your outdoor area.
With some basic woodworking skills and the right materials, you can create a stunning wood awning that will not only enhance the beauty of your home but also provide much-needed protection and shade for years to come.