When it comes to removing staples from wood, there are a few simple techniques that can make the process easier and hassle-free. Whether you’re working on a DIY project or refurbishing furniture, knowing how to safely and effectively remove staples is essential. In this guide, we’ll walk you through step-by-step methods for removing staples from wood without damaging the surface. From using pliers to staple removers, we’ve got you covered with the best techniques to get those stubborn staples out quickly.

Step-by-Step Guide: Easy and Effective Methods to Remove Staples from Wood
Staples are commonly used in various woodworking projects to hold materials together. However, when it comes to removing these staples from wood, it can sometimes be a challenging and time-consuming task. In this section, we will guide you through some easy and effective methods to safely remove staples from wood, ensuring minimal damage to the wood surface.

Materials Needed
- Needle-nose pliers or staple remover
- Flathead screwdriver
- Wooden block or scrap piece of wood
- Sandpaper or sanding block
Step 1: Assess the Staples
Before you begin removing the staples, it is essential to assess the condition of the staples and the wood surface. Check if the staples are corroded, bent, or firmly embedded in the wood. This will help you determine the best method to remove them without causing any damage.
Step 2: Gather the Necessary Tools
Gather the needle-nose pliers or staple remover, flathead screwdriver, wooden block or scrap piece of wood, and sandpaper or sanding block. Having these tools readily available will make the staple removal process more efficient.
Step 3: Position the Wooden Block
Place the wooden block or scrap piece of wood underneath the area where the staples are located. This will serve as a support to prevent the wood from splitting or getting damaged during the staple removal process.
Step 4: Remove the Staples with Needle-Nose Pliers
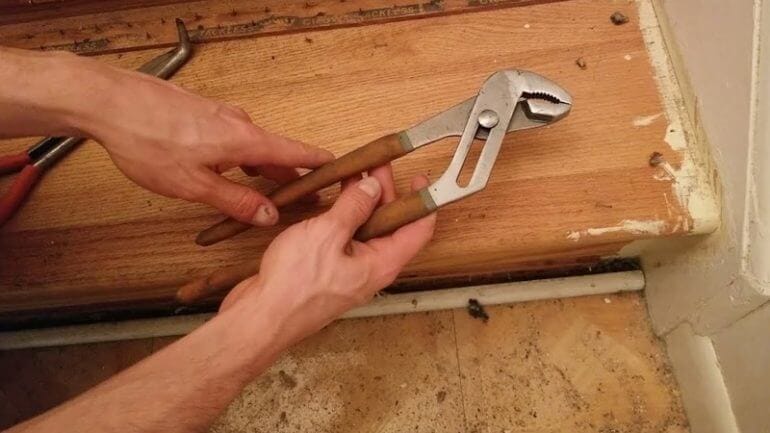
If the staples are not deeply embedded in the wood and are easily accessible, you can use needle-nose pliers to grip and pull them out. Position the pliers around the base of the staple and apply gentle pressure while pulling the staple out in the direction it was inserted. Repeat this step for each staple until they are completely removed.
Step 5: Remove the Staples with a Flathead Screwdriver
If the staples are firmly embedded or rusty, you can use a flathead screwdriver as an alternative method. Position the screwdriver underneath the staple and gently pry it upwards, leveraging against the wooden block for stability. Be cautious not to apply excessive force to avoid damaging the wood.
Step 6: Sand the Wood Surface
After removing all the staples, you may notice small holes or indentations on the wood surface. To restore the smoothness of the wood, use sandpaper or a sanding block to gently sand the affected area. Start with a coarse-grit sandpaper and gradually move to finer grits until the surface is even and free from any imperfections.
Step 7: Clean Up
After completing the staple removal process, it is important to clean up any leftover debris or small metal fragments on the wood surface. Use a soft cloth or vacuum cleaner to remove any residual staples or dust particles.
Summary
Removing staples from wood can be a straightforward task if you follow the proper techniques. By assessing the condition of the staples, gathering the necessary tools, and using either needle-nose pliers or a flathead screwdriver, you can easily remove staples without causing damage to the wood. Remember to use a wooden block for support and sand the wood surface afterward to restore its smoothness. With these step-by-step methods, you can efficiently remove staples from wood and prepare it for your next woodworking project.
Safety Measures: Precautions to Take While Removing Staples from Wood
Removing staples from wood can be a challenging task, especially if you are not careful. It requires a certain level of caution to avoid any potential injuries or damage to the wood surface. In this section, we will discuss some essential safety measures and precautions to take while removing staples from wood.
1. Wear Protective Gear
Before starting the staple removal process, it is crucial to wear appropriate protective gear such as safety goggles and gloves. Safety goggles will protect your eyes from any flying staples or wood chips, while gloves will provide protection to your hands and fingers.
2. Use the Right Tools
Using the right tools is essential to ensure a safe and effective staple removal process. A pair of needle-nose pliers or a staple remover tool can be used to grip and pull out the staples from the wood surface. Avoid using tools that might damage the wood, such as sharp objects or screwdrivers.
3. Check for Hidden Staples
Before you start removing the visible staples, it is important to carefully inspect the wood surface for any hidden or embedded staples. Run your fingers along the wood to feel for any protruding staples. Removing these hidden staples will prevent any mishaps or injuries when working on the wood.
4. Work in a Well-Lit Area
Working in a well-lit area is important as it helps you clearly see the staples and avoid any accidental slips or injuries. Ensure that there is sufficient lighting in the work area to have a clear view of the wood surface and the staples you are removing.
5. Secure the Wood Properly
Before removing the staples, it is essential to secure the wood properly. Place the wood on a stable surface or use clamps to hold it securely in place. This will prevent any unnecessary movements or slips while removing the staples and ensure your safety.
6. Pull Staples Straight Out
When removing the staples, make sure to pull them straight out from the wood. Avoid twisting or bending the staples, as this can cause them to break and leave behind sharp ends. Pulling them straight out will reduce the risk of injury and minimize damage to the wood surface.
7. Dispose of Staples Properly
After removing the staples, it is important to dispose of them properly. Collect the removed staples in a container or a small bag to prevent them from scattering or causing injuries to others. Dispose of them in a designated sharps container or a sealed bag to ensure safe disposal.
8. Clean and Inspect the Wood Surface
Once you have removed all the staples, it is necessary to clean and inspect the wood surface. Use a soft cloth or a brush to remove any debris or dust left behind by the staple removal process. Inspect the wood for any remaining staples or damages that may need further attention.
In summary, when removing staples from wood, it is important to prioritize safety. By following these safety measures and precautions, you can ensure a safe and successful staple removal process without any injuries or damage to the wood surface.

Common Mistakes to Avoid: Tips to Prevent Damaging the Wood Surface
Wood surfaces can add a touch of elegance and warmth to any space. However, they require proper care and maintenance to ensure their longevity and beauty. Unfortunately, many people unknowingly make mistakes that can damage the wood surface and compromise its appearance. To help you avoid these pitfalls, we have compiled a list of common mistakes and tips to prevent damaging the wood surface.
Using Harsh Cleaning Products
One of the most common mistakes people make is using harsh cleaning products on wood surfaces. Products that contain bleach, ammonia, or other strong chemicals can strip away the protective finish, leaving the wood vulnerable to stains, scratches, and discoloration. Instead, opt for gentle, pH-neutral cleaners specifically designed for wood surfaces. These cleaners will effectively remove dirt and grime without harming the wood.
Using Abrasive Tools
When cleaning or removing stains from wood surfaces, it’s important to avoid using abrasive tools such as steel wool or rough scrub brushes. These tools can scratch the wood and create unsightly marks. Instead, use a soft cloth or sponge to gently clean the surface. If you encounter stubborn stains, try using a mild solvent or specialized wood cleaner recommended by the manufacturer.
Skipping Regular Maintenance
Wood surfaces require regular maintenance to keep them looking their best. Skipping routine cleaning, polishing, or waxing can allow dirt, grime, and moisture to accumulate on the surface, leading to damage over time. It’s essential to follow a maintenance schedule recommended by the manufacturer or a professional. This may include dusting regularly, wiping spills immediately, and applying a protective coat of wax or polish as needed.
Exposing Wood to Excessive Moisture
One of the biggest enemies of wood is excessive moisture. When wood is exposed to prolonged or excessive moisture, it can warp, swell, or even develop mold and rot. Avoid placing wood furniture or surfaces near windows, doors, or areas prone to moisture, such as bathrooms or kitchens. If spills occur, immediately wipe them dry to prevent moisture from seeping into the wood. Additionally, consider using coasters or protective mats to prevent water rings and stains.
Neglecting Temperature and Humidity Control
Wood is sensitive to changes in temperature and humidity. Fluctuations in these conditions can cause the wood to expand or contract, leading to cracks or splits. It’s important to maintain a stable environment for wood surfaces. Keep the room temperature and humidity within the recommended range specified by the manufacturer. Consider using a humidifier or dehumidifier to maintain optimal conditions, especially during extreme weather seasons.
Dragging or Sliding Objects
When moving objects on a wood surface, avoid dragging or sliding them directly. This can leave scratches and scuff marks on the wood. Instead, lift the objects and place them gently on the surface, or use protective pads or sliders to minimize friction. This simple step can prevent unnecessary damage and preserve the beauty of the wood.
Neglecting Sun Protection
Exposure to sunlight can cause wood surfaces to fade and lose their original color. Over time, prolonged exposure can result in uneven discoloration and irreparable damage. To protect your wood surfaces from the harmful effects of the sun, use curtains, blinds, or window films to filter or block out UV rays. If possible, move furniture or objects periodically to ensure even sun exposure and prevent localized fading.
Not Using Protective Mats or Rugs
High-traffic areas, such as entryways and dining areas, are more prone to scratches and wear on wood surfaces. To minimize damage in these areas, use protective mats or rugs. These not only add an aesthetic touch to the space but also act as a barrier between the wood and potential scratches from shoes or furniture. Regularly clean and vacuum the mats to prevent dirt and debris buildup that can scratch the wood.
Ignoring Professional Help
If your wood surfaces have suffered significant damage or you are unsure how to properly care for them, it’s best to seek professional help. Wood restoration experts can assess the condition of the wood, recommend appropriate treatments, and perform necessary repairs. They have the knowledge and experience to handle different types of wood surfaces and ensure they are restored to their former glory.
Summary
By avoiding these common mistakes and following the tips provided, you can prevent damage to your precious wood surfaces and keep them looking beautiful for years to come. Remember to use gentle cleaning products, avoid abrasive tools, and follow a regular maintenance routine.
Additional Tips and Tricks: Expert Advice for Efficiently Removing Staples from Wood
Staples are commonly used in various woodworking projects, but removing them can be a tedious and challenging task. However, with the right techniques and tools, you can efficiently remove staples from wood without causing any damage. In this section, we will provide you with some expert advice and valuable tips to make this process easier and more efficient.
1. Prepare the Necessary Tools
Before you start removing staples from wood, it is essential to gather the right tools. Here are some tools you should have on hand:
- A pair of pliers: Pliers with a flat or needle nose are ideal for gripping and pulling out staples.
- A staple remover: A staple remover tool specifically designed for staples can make the process quicker and easier.
- A flathead screwdriver: A flathead screwdriver can be used as an alternative to pliers for levering out stubborn staples.
- A putty knife: A putty knife can help you lift the edges of the staple for easy removal.
- Sandpaper: Sandpaper can be used to smooth out any rough areas left by the staples.
2. Assess the Staple Type
It is essential to identify the type of staples you are dealing with before attempting to remove them. Staples can come in different sizes and shapes, such as flat or round. Understanding the staple type will help you determine the best approach for removal.
3. Find the Best Starting Point
Identify the edge of the staple that is easiest to access. This will be your starting point for removal. Use your pliers, staple remover, or screwdriver to grip the staple firmly.
4. Grip and Pull
If you are using pliers or a staple remover, grip the staple as close to the wood surface as possible. Apply steady pressure and pull the staple out in the same direction it was inserted. Be careful not to twist or pry the staple, as this can cause damage to the wood.
5. Leverage with a Screwdriver
If the staple is difficult to remove with pliers or a staple remover, you can use a flathead screwdriver for leverage. Insert the screwdriver’s tip under the staple and gently pry it up. Once the staple is lifted, use pliers or a staple remover to finish removing it.
6. Lift with a Putty Knife
If the staples are embedded deeply in the wood, you can use a putty knife to lift the edges of the staple. Slide the putty knife under the staple and apply pressure to raise it. This will make it easier to grip and remove with pliers or a staple remover.
7. Sand and Finish
After removing all the staples, check the wood surface for any rough spots. Use sandpaper to smooth out these areas and prepare the surface for refinishing or further woodworking.
8. Safety Precautions
When removing staples from wood, it is important to take certain safety precautions:
- Wear protective gloves to protect your hands from potential injury.
- Work in a well-ventilated area to avoid inhaling any dust or debris generated during the process.
- Be cautious when using sharp tools like screwdrivers and knives to prevent accidental injuries.
In summary, removing staples from wood can be made easier and more efficient with the right tools and techniques. Prepare the necessary tools, assess the staple type, find the best starting point, and grip the staple firmly before pulling it out. If needed, leverage with a screwdriver or lift the staple with a putty knife. Once all staples are removed, sand the wood surface and take safety precautions throughout the process. By following these expert tips and tricks, you can successfully remove staples from wood without causing any damage.
FAQs
1. How can I easily remove staples from wood?
You can use a pair of needle-nose pliers to grip the staple and gently pull it out in the same direction it was inserted. Alternatively, you can use a flathead screwdriver to pry the staple out by placing the tip under the staple and leveraging it upwards.
2. Are there any specific tools I can use to remove staples from wood?
Yes, there are special staple removers available that are designed to make the task easier. These tools have a flat, fork-like end that can be slipped underneath the staple, allowing you to lift it out with minimal effort.
3. What precautions should I take when removing staples from wood?
When removing staples from wood, it’s important to wear protective gloves to avoid any injuries. Additionally, be cautious not to damage the wood surface while removing the staples. Take your time and work carefully to ensure a clean removal without causing any harm to the wood.
Conclusion
In conclusion, removing staples from wood can be a relatively simple process with the right tools and techniques. By following these steps, you can safely and effectively remove staples from your wooden surfaces:
1. Identify the staples and ensure you have the necessary tools for removal.
2. Use pliers or a staple remover to grip and pull out the staples.
3. If the staples are stubborn, gently tap them with a hammer to loosen them before removing.
4. Once all the staples are removed, inspect the wood for any damage or holes.
Remember to exercise caution and be patient throughout the process to prevent any harm to yourself or the wood. With a little effort, you can restore your wooden surfaces to their former glory.
