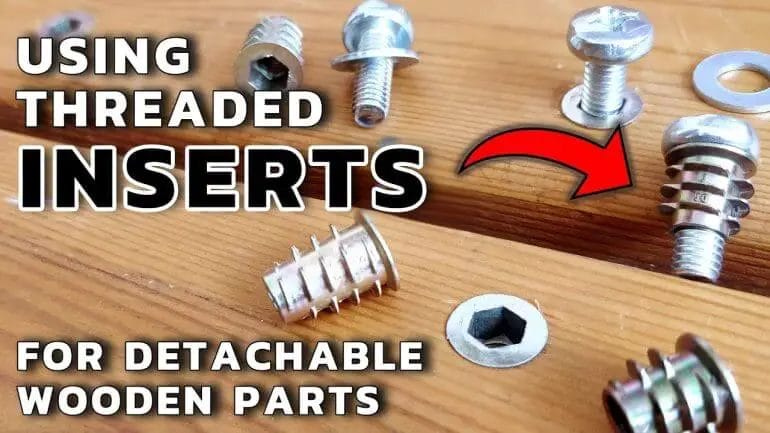
Looking for a reliable and efficient way to strengthen wood connections? Installing threaded inserts for wood is the perfect solution. These small but mighty inserts provide a secure anchor point for screws and bolts, making them ideal for furniture assembly, cabinetry, and other woodworking projects.
With their internal threads, threaded inserts create a strong connection in wood, ensuring durability and stability. Whether you’re a professional woodworker or a DIY enthusiast, learning how to properly install threaded inserts will enhance your projects and save you time and effort in the long run.

In this guide, we will walk you through the step-by-step process of installing threaded inserts for wood, including the necessary tools and techniques. Get ready to take your woodworking skills to the next level!
Before diving into the installation process, it’s essential to choose the right type and size of threaded inserts for your project. From brass to stainless steel, threaded inserts come in various materials to suit your specific needs. Additionally, considering the diameter and length of the insert is crucial for a secure fit.
Once you have selected the appropriate inserts, the installation process involves drilling a hole in the wood, threading the insert into the hole, and then using a dedicated tool or a simple bolt and nut method to secure it in place. It’s a straightforward process that can greatly enhance the strength and functionality of your wooden creations.
So, whether you’re looking to reinforce a joint, prevent
Preparing the Wood for Threaded Inserts
Before installing threaded inserts into wood, it is important to properly prepare the wood to ensure a secure and durable connection. This step-by-step guide will walk you through the process of preparing the wood for threaded inserts.
1. Select the Right Wood
Start by selecting the right type of wood for your project. Choose a hardwood that is dense and strong, such as oak or maple. Avoid using softwoods like pine, as they may not provide sufficient support for threaded inserts.
2. Measure and Mark
Next, measure and mark the exact location where you want to install the threaded insert. Use a ruler or tape measure to ensure accurate measurements.
3. Drill a Pilot Hole
Using a drill and the appropriate size drill bit, drill a pilot hole at the marked location. The diameter of the pilot hole should match the outer diameter of the threaded insert. It is important to choose the correct drill bit size to avoid damaging the wood or the threaded insert.
4. Counterbore the Hole
After drilling the pilot hole, use a counterbore bit to create a recessed area around the hole. This will allow the threaded insert to sit flush with the surface of the wood. The depth of the counterbore hole should match the length of the threaded insert.
5. Clean and Sand
Once the counterbore hole is complete, clean out any wood chips or debris from the hole. Use a sandpaper or sanding block to smooth the surface of the wood around the hole. This will ensure a clean, tight fit for the threaded insert.
6. Apply Wood Glue (Optional)
In some cases, it may be beneficial to apply a small amount of wood glue to the walls of the pilot hole before installing the threaded insert. This will provide extra strength and stability to the connection.
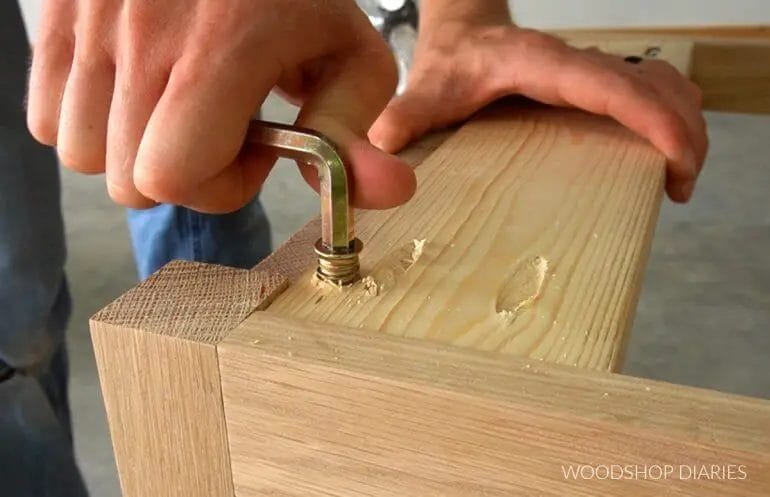
7. Install the Threaded Insert
Finally, carefully insert the threaded insert into the prepared hole. Use a wrench or pliers to turn the insert clockwise until it is fully seated in the wood. Make sure the insert is flush with the surface of the wood.
8. Test and Secure
Once the threaded insert is installed, test the connection by gently turning a screw into the insert. If it feels secure and holds the screw firmly, the installation is successful. If not, remove the insert and repeat the process, ensuring that the hole and insert are properly aligned.
In summary, preparing the wood for threaded inserts requires careful measurement, drilling, counterboring, cleaning, and testing. By following these steps, you can ensure a strong and reliable connection for your woodworking projects.
Step-by-Step Guide to Installing Threaded Inserts in Wood
Threaded inserts are commonly used in woodworking projects to provide a strong and durable connection between two pieces of wood. These inserts allow you to easily attach hardware such as screws or bolts, making it easier to assemble and disassemble your woodworking creations. In this section, we will provide you with a step-by-step guide on how to install threaded inserts in wood.
Materials Needed
Before you begin the installation process, ensure that you have the following materials:
- Threaded inserts
- Drill
- Drill bits
- Screwdriver or Allen wrench
- Hammer
- Wood glue (optional)
Step 1: Choose the Right Insert
The first step in installing threaded inserts is to select the right insert for your project. Consider the size and type of insert that will best suit your needs. Threaded inserts come in various sizes and materials, such as brass or stainless steel, so choose the one that matches the specifications of your project.
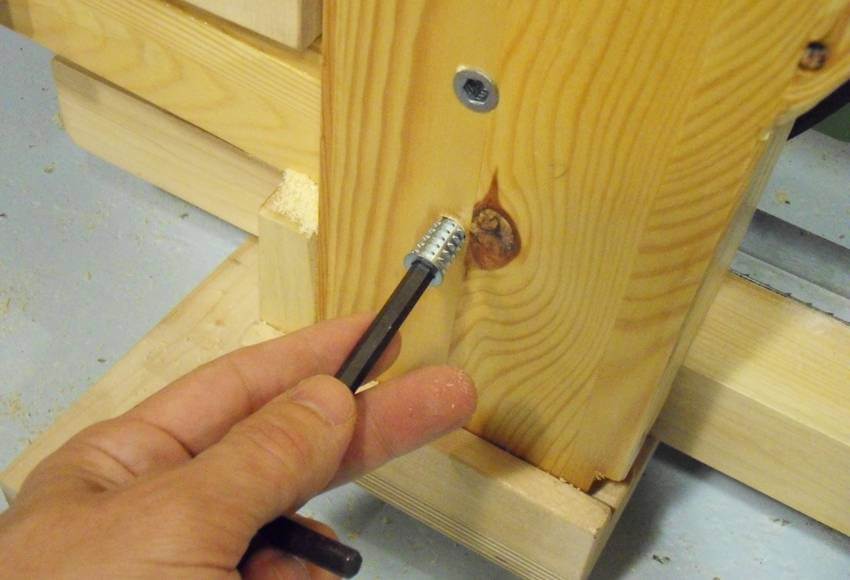
Step 2: Mark the Insert Placement
Once you have chosen the appropriate insert, mark the exact locations where you want to install them on your wood pieces. Use a pencil or a marking tool to create clear and visible markings.
Step 3: Prepare the Drill Bit
Next, select a drill bit that matches the outer diameter of the threaded insert. The drill bit should be slightly smaller in diameter than the insert to ensure a snug fit. Attach the drill bit to your drill, making sure it is securely fastened.
Step 4: Drill Pilot Holes
Now it’s time to drill pilot holes at the marked locations. Start by positioning the drill bit perpendicular to the wood surface and apply gentle pressure to create the pilot holes. Take care not to drill too deep or go beyond the desired depth.
Step 5: Screw in the Inserts
After drilling the pilot holes, you can now insert the threaded inserts into the holes. Place the insert over the pilot hole and apply downward pressure while turning it clockwise. You can use a screwdriver or Allen wrench to provide additional leverage if needed. Make sure to screw the insert all the way in until it is flush with the wood surface.
Step 6: Secure the Inserts
To ensure a firm and secure attachment, you can apply a small amount of wood glue to the threads of the insert before screwing it in. This will provide extra strength and stability to the connection.
Step 7: Test the Inserts
Once all the inserts are installed, it’s a good idea to test them by inserting screws or bolts into the threaded holes. Make sure the hardware fits snugly and securely, without any wobbling or looseness.
Step 8: Finish the Project
With the threaded inserts securely in place, you can continue with your woodworking project as planned. Whether you are building furniture, cabinets, or other wooden structures, the threaded inserts will provide a reliable and long-lasting connection.
In summary, installing threaded inserts in wood is a straightforward process that requires careful planning and execution. By following this step-by-step guide, you can confidently install threaded inserts and enhance the stability and functionality of your woodworking projects.
Tips and Tricks for Successful Installation of Threaded Inserts
Threaded inserts are small cylindrical metal fasteners that are designed to create a durable and reliable threaded hole in various materials. They are commonly used to provide strong threads in materials like wood, plastic, and metal, and can be installed using a variety of methods. However, to ensure a successful installation and maximize the effectiveness of threaded inserts, there are some important tips and tricks to keep in mind.
1. Choose the Right Insert
Before installation, it’s crucial to select the appropriate threaded insert for your specific application. Consider the material you will be working with, the load requirements, and the type of thread needed. Threaded inserts come in various sizes, materials, and thread types, so be sure to choose the one that best suits your needs.
2. Prepare the Hole
Prior to installation, it’s essential to prepare the hole where the threaded insert will be installed. This involves drilling a hole with the correct diameter and depth to accommodate the insert. The hole should be clean and free from any debris or obstructions that could hinder the installation process.
3. Use the Right Installation Method
There are several methods to install threaded inserts, including manual, heat, ultrasonic, and press-fit methods. The method you choose will depend on the type of insert and the material being used. It’s important to follow the manufacturer’s instructions and use the correct installation method to ensure a secure and reliable installation.
4. Apply Proper Torque
When installing a threaded insert, it’s crucial to apply the proper torque to secure the insert in place. Using too much torque can cause the insert to strip or become damaged, while using too little torque may result in an insecure installation. Follow the recommended torque specifications provided by the manufacturer to ensure a tight and secure fit.
5. Consider Using Thread Locking Compounds
In applications where vibration or loosening may be a concern, consider using thread locking compounds. These compounds help to prevent the threaded insert from backing out over time. Choose a thread locking compound that is compatible with the material being used and follow the manufacturer’s instructions for application.
6. Test the Inserted Thread
Once the threaded insert is installed, it’s important to test the inserted thread to ensure it is secure and functioning properly. Use a threaded fastener to check the thread’s integrity and confirm that it engages smoothly and securely. If any issues are detected, reevaluate the installation and make any necessary adjustments.
7. Seek Professional Assistance if Needed
If you are unsure about the installation process or encounter any difficulties, it’s always best to seek professional assistance. Improper installation of threaded inserts can lead to weakened threads, damage to the material, or other issues. Consulting with an expert can help ensure a successful installation and prevent any potential problems.
In Summary
Successful installation of threaded inserts is crucial for creating secure and reliable threaded holes in various materials. By following these tips and tricks, you can maximize the effectiveness of threaded inserts and ensure a successful installation. Remember to choose the right insert, prepare the hole properly, use the correct installation method, apply proper torque, consider thread locking compounds, test the inserted thread, and seek professional assistance if needed. With these guidelines, you can confidently install threaded inserts and achieve strong and durable threaded connections.
Common Mistakes to Avoid When Installing Threaded Inserts in Wood
Threaded inserts are commonly used in woodworking projects to provide a strong and secure connection between different parts of a piece. These inserts are used to create a threaded hole in wood, allowing for the attachment of screws, bolts, or other fasteners. While installing threaded inserts in wood may seem like a simple task, there are several common mistakes that can compromise the integrity of the connection. In this section, we will discuss these mistakes and provide tips on how to avoid them.
1. Using the Wrong Size Insert
One of the most common mistakes when installing threaded inserts in wood is using the wrong size insert. It is important to choose an insert that matches the size and type of the fastener you plan to use. Using an insert that is too small can result in a weak connection that may fail under load, while using an insert that is too large can cause splitting or other damage to the wood.
To avoid this mistake, it is essential to carefully measure the diameter and depth of the hole before selecting an insert. Additionally, consider the material of the wood and the weight or stress that will be placed on the connection.
2. Incorrect Hole Preparation
Another common mistake is not properly preparing the hole before installing the threaded insert. The hole should be drilled to the correct diameter and depth to ensure a snug fit for the insert. If the hole is too small, it can be difficult to thread the insert into the wood. On the other hand, if the hole is too large, the insert may not provide a secure connection.
Before drilling the hole, it is recommended to use a center punch to create a small indentation in the wood. This will help guide the drill bit and prevent it from wandering off course. Additionally, use a drill bit that matches the diameter of the insert to ensure a proper fit.
3. Over-Tightening the Insert
Over-tightening the threaded insert is another mistake that can lead to problems. When installing the insert, it is important to tighten it just enough to create a secure connection without forcing it. Over-tightening can strip the threads or cause the insert to become embedded too deeply into the wood, compromising its strength.
To avoid over-tightening, use a torque driver or wrench to apply the appropriate amount of force. Follow the manufacturer’s guidelines for the specific insert you are using, as different types and sizes may require different levels of torque.
4. Not Aligning the Insert Correctly
Improper alignment of the threaded insert can result in a connection that is off-centered or crooked. This can affect the overall stability and strength of the joint. It is crucial to ensure that the insert is aligned properly before tightening it into place.
To achieve accurate alignment, use a drill press or a centering jig to create a perpendicular hole. This will help to ensure that the insert is installed straight and level. Additionally, double-check the alignment before fully tightening the insert.
5. Neglecting to Test the Connection
After installing the threaded insert, it is important to test the connection to ensure that it is secure and properly aligned. Neglecting to test the connection can result in future issues, such as loose or weakened joints.
To test the connection, insert the fastener into the threaded hole and apply gentle pressure. If the connection feels loose or unstable, it may be necessary to reinstall the insert or make adjustments to improve the alignment.
In summary, avoiding these common mistakes when installing threaded inserts in wood is crucial for ensuring strong and secure connections in woodworking projects. By selecting the correct size insert, properly preparing the hole, avoiding over-tightening, aligning the insert correctly, and testing the connection, you can achieve reliable and durable joints in your woodwork.
FAQs
1. How do I install threaded inserts for wood?
To install threaded inserts in wood, drill a pilot hole slightly smaller than the diameter of the insert. Use a threaded insert installation tool or a bolt and two nuts to drive the insert into the hole. Once the insert is flush with the wood surface, remove the installation tool or nuts.
2. What are threaded inserts used for in woodworking?
Threaded inserts are used in woodworking to create strong and durable threads in wood, allowing for the attachment of bolts, screws, or other fasteners. They provide a more secure and reliable connection compared to driving screws directly into the wood, especially in materials with low density or prone to splitting.
3. Can I remove threaded inserts from wood?
Yes, threaded inserts can be removed from wood. To remove an insert, use a screwdriver or a dedicated insert removal tool. Insert the tool into the insert and twist counterclockwise to loosen and remove it. If the insert is stuck or has been glued in place, applying heat to the surrounding area can help loosen it for easier removal.
Conclusion
In conclusion, installing threaded inserts for wood is a simple and effective way to enhance the strength and durability of wood joints. By following the step-by-step instructions, you can easily achieve a secure and long-lasting connection. Whether it’s for furniture assembly, cabinetry, or other woodworking projects, threaded inserts provide a reliable solution for adding strength to your woodwork.
Additionally, the versatility of threaded inserts allows for easy disassembly and reassembly, making them ideal for applications that require frequent adjustments or repairs. With the right tools and techniques, you can confidently integrate threaded inserts into your woodworking projects, ensuring a professional finish and added stability.
So whether you’re a DIY enthusiast or a professional woodworker, be sure to consider using threaded inserts to enhance the integrity of your wood joints and create sturdy and reliable structures.