Joining two pieces of wood is a fundamental skill in woodworking and can be done in various ways to create strong and durable connections. From traditional techniques like mortise and tenon joints to modern options like pocket hole screws, there are several methods available to suit your project and skill level. Whether you’re a beginner or an experienced woodworker, understanding the different joining techniques can help you create sturdy and visually pleasing woodwork. Explore the various methods and choose the one that best fits your needs and preferences.
Using Screws for Joining Wood
When it comes to joining pieces of wood together, one of the most common and versatile methods is using screws. Screws provide a strong and secure connection and can be easily disassembled if needed. In this section, we will explore the different types of screws and their uses, as well as the proper techniques for using screws to join wood.

Types of Screws
There are various types of screws available, each designed for specific applications. Here are some commonly used wood screws:
- Wood Screws: These are general-purpose screws that are designed for use in wood. They have a sharp, pointed tip and a threaded shank that allows them to grip the wood securely.
- Deck Screws: Deck screws are specially designed for outdoor applications, such as building decks. They are made of corrosion-resistant materials, such as stainless steel or coated steel, to withstand exposure to moisture and harsh weather conditions.
- Particle Board Screws: Particle board screws have a coarse thread and a flat head. They are specifically designed for use with particle board, which is a type of engineered wood.
- Cabinet Screws: Cabinet screws are often used in cabinetry and furniture construction. They have a larger diameter and a coarse thread, providing extra strength and grip.
Choosing the Right Screw
When selecting screws for joining wood, it is essential to choose the right screw size and type for the specific application. Here are some factors to consider:
- Length: The length of the screw should be chosen based on the thickness of the wood being joined. It is important to select a screw that is long enough to provide sufficient engagement without protruding out.
- Gauge: The gauge of the screw refers to its diameter. Thicker screws provide more strength and stability. It is crucial to match the screw gauge to the thickness of the wood.
- Type of Wood: Different types of wood have different characteristics, such as hardness and density. It is important to choose a screw that is suitable for the specific type of wood to ensure a secure connection.
Techniques for Using Screws
Proper technique is crucial to ensure a strong and secure joint when using screws to join wood. Here are some tips:
- Pre-drilling: It is recommended to pre-drill pilot holes before inserting screws, especially when working with hardwoods or near the edge of the wood. This helps prevent splitting and ensures the screw goes in straight.
- Countersinking: If you want the screw head to be flush with the wood surface, you can use a countersink bit to create a tapered hole for the screw head.
- Using a Screwdriver: When tightening screws, it is essential to use the right-sized screwdriver or drill bit. Using the wrong size can strip the screw head or result in an uneven joint.
- Applying Adequate Pressure: Apply steady pressure while driving the screw to ensure it goes in straight and tight.
Summary
Screws are a versatile and reliable method for joining pieces of wood together. By choosing the right type and size of screws and following proper techniques, you can create strong and secure wood joints. Whether you are building furniture, constructing cabinets, or working on DIY projects, screws are an essential tool for woodworking.
Joining Wood with Nails
When it comes to woodworking, one of the most common and effective ways to join wood pieces together is by using nails. Nails offer a strong and secure bond, making them a popular choice for various woodworking projects. In this section, we will explore the process of joining wood with nails and discuss some important factors to consider.
1. Choosing the Right Nails
The first step in joining wood with nails is selecting the right type and size of nails for your project. The choice of nails depends on the thickness and type of wood, as well as the specific application. There are several types of nails available, including common nails, finishing nails, brad nails, and more. Common nails are suitable for heavy-duty projects, while finishing nails are ideal for more delicate and decorative work. Brad nails, on the other hand, are smaller and thinner, making them suitable for lightweight applications.
It’s also important to consider the length of the nails. The length should be sufficient to penetrate both pieces of wood and provide a secure grip. A general rule of thumb is to use nails that are about three times the thickness of the wood being joined. However, if you are joining two thick pieces of wood, you may need longer nails for a stronger bond.
2. Preparing the Wood
Before driving nails into the wood, it’s crucial to prepare the surfaces properly. This ensures a clean and secure connection. Start by aligning the wood pieces in the desired position and use clamps or other tools to hold them in place. This prevents any movement during the nailing process.
Next, mark the spots where you plan to place the nails. It’s recommended to space the nails evenly along the joint for better stability. To avoid splitting the wood, pre-drill pilot holes slightly smaller than the diameter of the nails. This step is especially important when working with hardwood or thinner pieces of wood.
3. Driving the Nails
Once the wood is prepared, it’s time to drive the nails. Hold the nail at a slight angle and position it over the marked spot. Use a hammer or a nail gun to drive the nail into the wood. Be careful not to strike the surface forcefully, as this can cause the wood to split. Instead, apply steady and controlled force until the nail is fully inserted.
If you are using a nail gun, make sure to follow the manufacturer’s instructions for safe and proper use. Nail guns can be efficient and save time, but they require proper handling to avoid accidents.
4. Finishing Touches
After driving the nails, you may need to sink them slightly below the surface of the wood. This can be done using a nail set or a punch. Gently tap the nail set or punch over the nail head until it is flush with the wood surface. This step ensures a smooth and finished look.
In summary, joining wood with nails is a simple and effective method in woodworking. By choosing the right nails, preparing the wood properly, driving the nails with care, and adding finishing touches, you can create strong and durable connections between wood pieces. Remember to always prioritize safety and accuracy when working with nails and follow the recommended guidelines for each project.
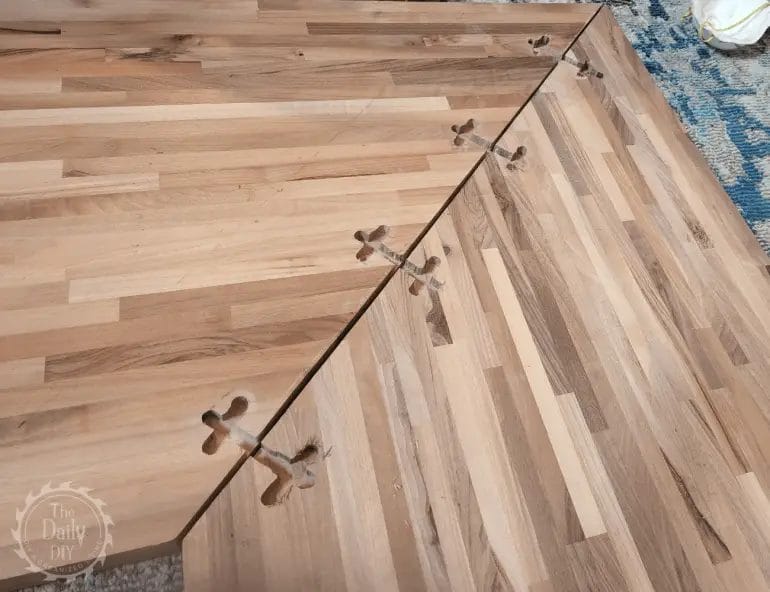
Joining Wood with Dowels
Joining wood with dowels is a common and effective method in woodworking. It provides a strong and durable connection between two pieces of wood without the need for screws or nails. Dowels are cylindrical wooden rods that are inserted into pre-drilled holes in the wood pieces to be joined. The dowels create friction and mechanical strength to hold the pieces together.
Advantages of Joining Wood with Dowels
There are several advantages to using dowels for joining wood:
The Process of Joining Wood with Dowels
The process of joining wood with dowels involves the following steps:
Step 1: Marking and Drilling
First, mark the location of the dowel holes on both wood pieces to be joined. Use a doweling jig to ensure accurate and consistent hole placement. Next, drill holes into the marked locations using a drill bit that matches the diameter of the dowels.
Step 2: Applying Glue
Apply wood glue to the holes and the dowels. The glue will help strengthen the joint and create a tight bond between the dowels and the wood.
Step 3: Inserting the Dowels
Insert the dowels into the pre-drilled holes, ensuring they fit snugly. Use a mallet or hammer to gently tap the dowels into place, if necessary.
Step 4: Clamping and Drying
Clamp the wood pieces together, aligning them properly. The clamps will help exert pressure on the joint, ensuring a strong bond. Allow the glue to dry completely as per the manufacturer’s instructions.
Step 5: Finishing
Once the glue is dry, remove the clamps and sand down any excess glue or rough edges. You can then finish the wood as desired, such as applying paint, stain, or varnish.
Tips for Joining Wood with Dowels
Here are some tips to keep in mind when joining wood with dowels:
Joining wood with dowels is a reliable and versatile method in woodworking. It offers several advantages, including durability, strength, and an aesthetically pleasing appearance. By following the proper process and considering the tips mentioned, you can achieve strong and visually appealing dowel joints in your woodworking projects.
Joining Wood with Adhesive
Woodworking projects often require joining pieces of wood together to create a finished product. While there are several methods to accomplish this, one popular and effective technique is joining wood with adhesive. This method involves using a strong adhesive to bond the wood pieces together, creating a durable and seamless joint.
When it comes to choosing the right adhesive for joining wood, there are a few factors to consider. The type of wood being used, the desired strength of the joint, and the specific woodworking project all play a role in determining the most suitable adhesive. Let’s explore some common types of adhesives used in woodworking:
Epoxy
Epoxy is a versatile adhesive that is known for its exceptional strength and durability. It consists of two components – a resin and a hardener – that must be mixed together before use. Once mixed, epoxy forms a strong bond that can withstand heavy loads and resist moisture. It is commonly used for bonding wood joints that will be exposed to harsh conditions or require extra strength.
Polyurethane
Polyurethane adhesive is another popular choice for joining wood. It is a versatile adhesive that can bond a variety of materials, including wood, metal, and plastic. Polyurethane adhesive cures by reacting with moisture in the air, creating a strong and durable bond. It is particularly useful for joining wood pieces that may be subjected to stress or movement, as it has good flexibility and can withstand expansion and contraction.
Wood Glue
Wood glue, also known as carpenter’s glue, is a popular adhesive specifically formulated for woodworking projects. It is easy to use, dries clear, and offers a strong bond. Wood glue can be used for a wide range of woodworking applications, including joining boards, laminating veneers, and assembling furniture. It is important to select a high-quality wood glue that is designed to provide a strong bond and withstand the test of time.
Cyanoacrylate
Cyanoacrylate, commonly known as super glue, is a fast-setting adhesive that bonds quickly and securely. It is commonly used for small woodworking projects or repairs that require an instant bond. However, it is important to note that cyanoacrylate may not be suitable for larger or load-bearing joints, as it lacks the strength and durability of other adhesives.
When joining wood with adhesive, it is essential to prepare the wood surfaces properly for optimal bonding. The surfaces should be clean, dry, and free from any dust or debris. Applying a thin, even layer of adhesive to both surfaces and then pressing them firmly together will ensure a strong bond.
In summary, joining wood with adhesive is a popular and effective method in woodworking. Different types of adhesives, such as epoxy, polyurethane, wood glue, and cyanoacrylate, offer various strengths and properties to suit different woodworking projects. Proper surface preparation and careful application of adhesive are crucial for achieving strong and durable wood joints.
FAQs
1. How can I join two pieces of wood?
There are several methods to join two pieces of wood, such as using screws, nails, dowels, or wood glue. You can also use joinery techniques like mortise and tenon, dovetail, or pocket hole joints. The choice of method depends on the strength and appearance you desire for your project.
2. Which method is the strongest for joining wood?
The strongest method for joining wood depends on the application. However, techniques like mortise and tenon joints, dovetail joints, or using wood glue along with mechanical fasteners like screws or dowels are known for providing strong and durable connections.
3. Can I join wood without using any tools?
While some methods of joining wood may require tools, there are options for joining wood without tools. One option is using wood glue and clamps to create a bond between the two pieces. Another option is using specialized joinery techniques like interlocking joints or tongue and groove joints that don’t require tools.
Conclusion
In conclusion, joining two pieces of wood is a fundamental skill for woodworking enthusiasts and professionals alike. Whether you are embarking on a DIY project or building intricate furniture, knowing how to create strong and durable wood joints is crucial.
By using techniques such as butt joints, dovetail joints, or mortise and tenon joints, you can ensure a secure and seamless connection between the pieces of wood. Each method has its advantages and uses, allowing you to choose the most suitable one for your project.
Remember to carefully plan and measure your cuts and use reliable tools to achieve precise and clean results. With practice and patience, you can master the art of joining wood and create stunning pieces that will stand the test of time.
