Looking to add a touch of rustic charm to your home decor? Learn how to make a stunning wooden star that will instantly elevate any space. Crafting a star with wood is a fun and creative DIY project that allows you to showcase your woodworking skills. With just a few simple materials and a bit of patience, you can create a beautiful wooden star that will become a focal point in any room. Read on to discover the step-by-step process of making a star with wood.
Firstly, gather all the necessary materials, such as reclaimed wood or plywood, a saw, sandpaper, a pencil, and wood glue. Choose the type of wood that best suits your aesthetic and budget.

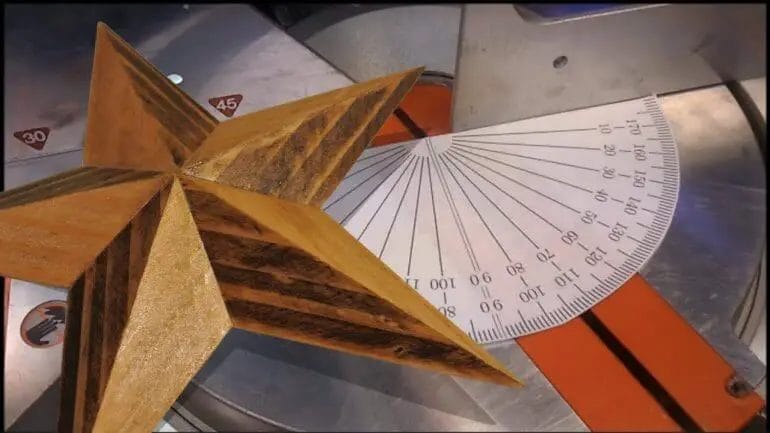
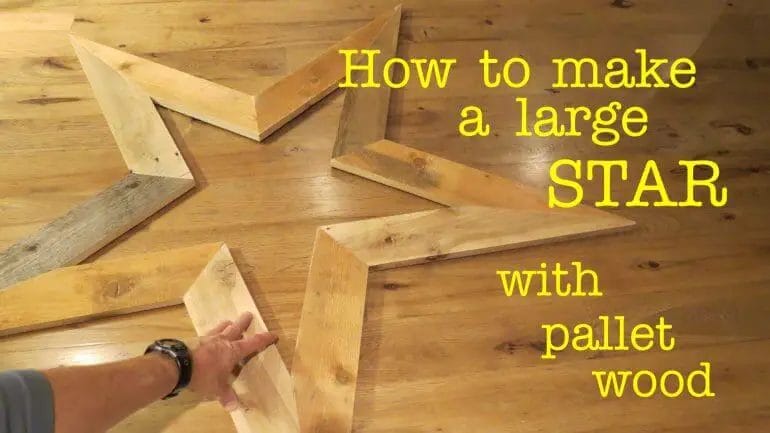
Next, use the saw to cut out five identical wooden triangles. Ensure that each triangle has the same measurements and angles to ensure a symmetrical star shape. Sand the edges of the triangles to create a smooth and polished finish.
Once the triangles are ready, arrange them in a star shape, with the points meeting at the center. Use a pencil to mark the joining points for accurate assembly.
Apply wood glue to the marked points and carefully press the triangles together to form the star shape. Allow the glue to dry completely to ensure a strong bond.
Once the star is fully dried, you can paint or stain it according to your personal preference. Consider using a weathered finish for a more rustic look or opt for

Tools and Materials Needed for Crafting a Wooden Star
When it comes to crafting a wooden star, you’ll need a few essential tools and materials to get started. Whether you’re a beginner or an experienced woodworker, having the right equipment at your disposal will help you achieve the desired results. Here’s a list of the tools and materials you’ll need:
Tools:
- Saw: A handsaw or a miter saw will be needed to cut the wooden pieces to the desired length.
- Sander: An electric sander or sandpaper will be required to smooth out the edges and surfaces of the wooden star.
- Drill: A drill with different drill bits will be necessary to create holes for attaching the wooden pieces.
- Clamps: Clamps will help hold the wooden pieces in place while you work on assembling the star.
- Measuring Tape: You’ll need a measuring tape to ensure accurate measurements for cutting the wood.
- Pencil: A pencil will be handy for marking the measurements and guidelines on the wood.
- Safety Equipment: Don’t forget to wear safety goggles and gloves to protect yourself while working with wood.
Materials:
- Wood: Select a suitable type of wood for your project, such as pine, cedar, or birch. Make sure the wood is of good quality and free from any defects.
- Screws or Nails: Depending on your preference, choose screws or nails to secure the wooden pieces together.
- Wood Glue: Wood glue will help reinforce the joints and make the star more sturdy.
- Sandpaper: You’ll need sandpaper of different grits to smooth out the wood and achieve a polished finish.
- Paint or Stain: If you wish to add color to your wooden star, consider using paint or stain to enhance its appearance.
- Brushes: Brushes will be necessary for applying paint or stain to the wooden surface.
- Finishing Spray: A finishing spray will provide an extra layer of protection and preserve the longevity of the wooden star.
Having these tools and materials on hand will make your woodworking project more enjoyable and efficient. It’s important to always prioritize safety while working with tools and follow proper techniques to avoid accidents. Now that you have everything you need, you’re ready to dive into the exciting world of crafting a wooden star!
Step-by-step guide to carving and shaping a wooden star
If you are interested in woodworking and want to create a unique decorative piece, carving and shaping a wooden star can be a rewarding project. With some basic tools and materials, you can create a beautiful wooden star to display in your home or give as a thoughtful gift. In this section, we will provide you with a step-by-step guide on how to carve and shape a wooden star.
Materials you will need:
- Wood block
- Pencil
- Ruler
- Carving knife
- Sandpaper (different grits)
- Wood stain (optional)
- Wood sealant (optional)
Step 1: Design your star
Start by designing your star on a piece of paper. Decide on the size and shape you want your star to be. Use a ruler to draw straight lines and create symmetrical angles. This will serve as your guide when carving the wooden star.
Step 2: Transfer the design onto the wood
Place your design on top of the wood block and secure it with tape. Trace the outline of the star onto the wood using a pencil. Make sure to press firmly to leave a visible mark.
Step 3: Carve the basic shape
Using a carving knife, carefully begin removing the excess wood around the outline of the star. Start by carving along the edges, gradually working your way towards the center. Take your time and make sure to carve away from your body to avoid any accidents.
Step 4: Refine the details
Once you have the basic shape carved out, use the carving knife to refine the details of the star. Pay attention to the angles and curves, ensuring they are symmetrical. Take small, controlled cuts to avoid removing too much wood at once.
Step 5: Sand and smooth the surface
After carving the star, use sandpaper to smooth out the surface. Start with a coarse grit sandpaper and gradually move to finer grits for a polished finish. Sand in the direction of the wood grain to avoid scratches. Remove any rough edges or imperfections until the surface feels smooth to the touch.
Step 6: Optional finishing touches
If desired, you can apply a wood stain or sealant to enhance the appearance and protect the wood. Follow the instructions on the product and allow proper drying time before handling or displaying your wooden star.
Step 7: Display your wooden star
Once your wooden star is complete, find a suitable place to display it. You can hang it on a wall, prop it on a shelf, or incorporate it into a decorative centerpiece. Admire your handiwork, and enjoy the unique beauty of the wooden star you have created.
In summary, carving and shaping a wooden star is a rewarding woodworking project. By following this step-by-step guide, you can create a beautiful decorative piece that showcases your creativity and craftsmanship. Remember to take your time, work carefully, and prioritize safety throughout the carving process. Happy woodworking!
Adding finishing touches to enhance the wooden star’s appearance
Once you have assembled the wooden star and sanded it to a smooth finish, it’s time to add some final touches to enhance its appearance. These finishing touches will add depth, texture, and visual interest to your wooden star, making it a stunning centerpiece or decoration. Here are some ideas to consider:
1. Staining or painting
One way to enhance the wooden star’s appearance is to apply a stain or paint to it. Staining the wood will bring out its natural grain and color, while painting it allows you to add a pop of color or create a more whimsical look. Choose a stain or paint color that complements your overall design aesthetic.
2. Adding decorative elements
To make your wooden star truly stand out, consider adding some decorative elements. You can attach small embellishments such as beads, buttons, or sequins to the surface of the star using glue or small nails. Alternatively, you can carve or engrave patterns or designs into the wood for a more intricate look.
3. Applying a protective finish
To protect your wooden star and give it a polished look, apply a protective finish such as varnish or polyurethane. This will not only add a layer of durability but also enhance the natural beauty of the wood. Make sure to follow the instructions on the finish product for the best results.
4. Adding a hanging mechanism
If you plan to hang your wooden star, don’t forget to add a hanging mechanism. You can attach a small eyelet screw or a piece of twine to the top point of the star, allowing you to easily hang it on a nail or hook. Make sure the hanging mechanism is secure and aligned properly.
5. Incorporating lighting
To create a magical ambiance, consider incorporating lighting into your wooden star. You can drill small holes into the wood and insert LED fairy lights or string lights. These lights will add a warm glow and make your star shine brightly, especially in dimly lit spaces.
6. Adding a ribbon or bow
For a festive touch, tie a ribbon or bow around the center of your wooden star. Choose a ribbon that complements the overall color scheme or theme of your decoration. This simple addition can instantly transform your star into a holiday or celebratory centerpiece.
7. Displaying the wooden star
Finally, think about how you want to display your wooden star. You can place it on a mantel, hang it on a wall, or even incorporate it into a wreath or garland. Consider the size and weight of the star when determining the best way to showcase it.
In summary, adding finishing touches to enhance the wooden star’s appearance is a crucial step in creating a visually stunning decoration. Whether it’s staining or painting, adding decorative elements, applying a protective finish, incorporating lighting, adding a ribbon or bow, or finding the perfect way to display it, these final touches will elevate your wooden star and make it a standout piece. Let your creativity shine and enjoy the process of making your wooden star truly unique.
Creative Ideas for Using and Displaying Wooden Stars at Home or as Gifts
If you’re looking to add a touch of rustic charm to your home decor or find a unique gift option, wooden stars can be an excellent choice. These versatile decorative pieces can be used in various ways to enhance the aesthetic appeal of your space. From wall hangings to centerpieces, let’s explore a few creative ideas for using and displaying wooden stars.
1. Wall Art
Wooden stars make for stunning wall art pieces. Arrange different sizes and colors of wooden stars on a blank wall to create an eye-catching focal point. You can either hang them symmetrically or create an abstract arrangement for a more eclectic look. The natural wooden texture will add warmth and visual interest to any room.
2. Wreaths
Add a touch of elegance to your front door or any interior wall by incorporating wooden stars into a wreath. Use a wire wreath frame as a base and attach wooden stars of various sizes and shapes with floral wire. You can leave the stars unpainted for a rustic feel or paint them in colors that complement your existing decor.
3. Table Centerpieces
Wooden stars can be the perfect centerpiece for your dining table or coffee table. Place a cluster of stars in different sizes on a decorative tray or in a bowl filled with faux foliage or potpourri. This arrangement will add a touch of charm and a cozy ambiance to your space.
4. Christmas Decorations
Wooden stars are ideal for adding a rustic touch to your Christmas decorations. Hang them on your Christmas tree, string them together to create a festive garland, or attach them to gift boxes as a unique gift tag. The natural wood tones will beautifully complement the traditional red and green color scheme.
5. Bookends
Get creative with your bookshelf by using wooden stars as bookends. Choose large, sturdy stars and paint them in colors that match your overall decor. Place them on either end of a row of books to keep them upright while adding a touch of whimsy and character to your shelf.
6. Kids’ Room Decor
Wooden stars can also be a fantastic addition to a child’s room. Paint them in vibrant colors and hang them from the ceiling or attach them to the walls using adhesive hooks. This will create a playful and imaginative atmosphere that your little ones will love.
7. Gift Toppers
Make your gifts stand out with unique wooden star gift toppers. Attach a small wooden star to the ribbon or twine on top of your gift wrap. This simple addition will elevate the overall presentation and make your gift extra special.
8. Outdoor Accents
Enhance your outdoor living space by incorporating wooden stars into your patio or garden decor. Hang them from tree branches to create a whimsical atmosphere or attach them to a fence to add visual interest. Ensure that the wooden stars are treated or sealed to protect them from the elements.
In summary, wooden stars offer a myriad of creative possibilities when it comes to adding charm and character to your home decor or gifting options. Whether used as wall art, wreaths, centerpieces, or even as kids’ room decor, wooden stars bring a touch of rustic elegance to any space.
FAQs
Q: How can I make a star with wood?
To make a star with wood, you can follow these steps:
1. Start by cutting five equal-sized wooden boards. 2. Arrange the boards to form a star shape, overlapping them at the corners. 3. Secure the boards together using wood glue or screws. 4. Sand the edges and surfaces of the star to smooth out any roughness. 5. Apply a finish of your choice, such as paint or varnish, to protect the wood and enhance its appearance.With these steps, you can create a wooden star for various decorative purposes.
Conclusion
In conclusion, creating a wooden star is a wonderful woodworking project that allows you to showcase your craftsmanship and artistic skills. By following the steps outlined in this guide, you can transform a simple piece of wood into a stunning decorative piece. Whether you choose to use it as a wall hanging, a Christmas ornament, or a centerpiece, a wooden star will add a touch of natural beauty to any space.
Remember to select the right type of wood, use precise measurements, and employ proper woodworking techniques to ensure the success of your project. Experiment with different finishes, stains, or paints to customize the look of your wooden star and make it uniquely yours. Enjoy the process and let your creativity shine!
