Looking for a unique way to display your patriotism? Learn how to make a waving wooden flag that will add a touch of rustic charm to your home. This DIY project is not only a fun and creative way to show your love for your country, but it also allows you to personalize your flag with different colors and designs. Whether you’re a beginner or an experienced woodworker, we’ll guide you through the step-by-step process of creating your own stunning wooden flag.

Step-by-Step Guide to Designing and Carving Your Wooden Flag
Designing and carving a wooden flag can be a rewarding and creative project that allows you to showcase your patriotism and woodworking skills. Whether you’re a beginner or an experienced woodworker, this step-by-step guide will help you create a beautiful wooden flag that you can proudly display in your home or give as a thoughtful gift.
Materials and Tools
Before you begin, gather the following materials and tools:
- Wood board (preferably solid wood)
- Measuring tape
- Pencil
- Ruler
- Table saw
- Bandsaw (optional, but recommended for intricate designs)
- Sanding block or sandpaper
- Wood stain or paint
- Paintbrushes
- Clear coat or sealant
- Screws or hanging hardware (if you plan to hang the flag)
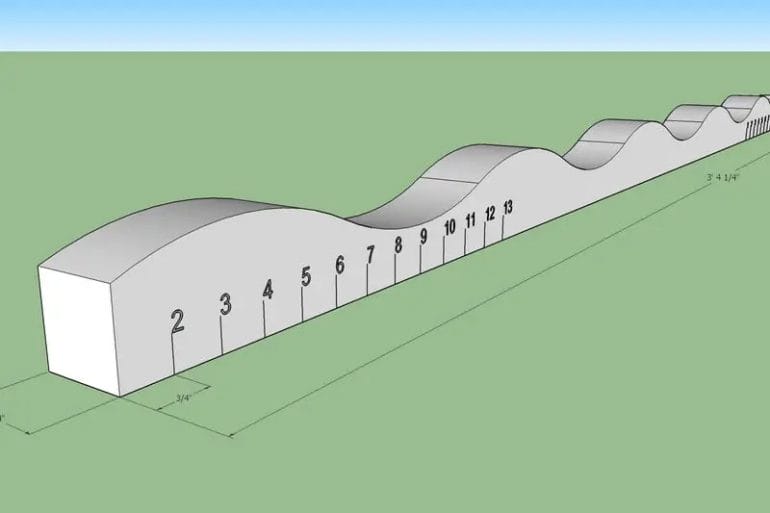
Step 1: Design Your Flag
Start by deciding on the design of your wooden flag. You can choose a traditional American flag design or get creative with different colors and patterns. Use a pencil and ruler to sketch out the dimensions and layout of your flag on the wood board.
Step 2: Cut the Wood
Using a table saw, carefully cut the wood board according to the dimensions of your flag design. Take your time and ensure that the cuts are straight and accurate. If your design includes intricate details, consider using a bandsaw for more precise cuts.
Step 3: Sand the Surface
Once the wood has been cut, use a sanding block or sandpaper to smooth the surface and edges of the flag. Start with a coarse grit sandpaper and gradually work your way up to a finer grit for a smooth finish. Be sure to sand in the direction of the wood grain to avoid scratches.
Step 4: Apply Stain or Paint
Now it’s time to add color to your wooden flag. You can choose to stain the wood for a natural and rustic look, or paint it with bold and vibrant colors. Apply the stain or paint using a brush, making sure to cover the entire surface evenly. Allow the stain or paint to dry completely before moving on to the next step.
Step 5: Add Details
If desired, you can add additional details to your wooden flag. This could include stars, stripes, or any other decorative elements. Use a smaller brush and a steady hand to carefully add these details to your flag.
Step 6: Seal the Surface
To protect the wood and enhance the finish of your wooden flag, apply a clear coat or sealant. This will help to preserve the colors and prevent damage from moisture or sunlight. Follow the manufacturer’s instructions for the specific product you are using.
Step 7: Mount or Hang Your Flag
Finally, decide how you would like to display your wooden flag. You can mount it directly onto a wall, attach it to a wooden backing, or add hanging hardware for easy hanging. Use screws or appropriate hanging hardware to securely attach the flag to your chosen display method.
Step 8: Enjoy Your Handcrafted Wooden Flag
Once your wooden flag is complete, step back and admire your handiwork. Display it proudly in your home, office, or outdoor space. Your handcrafted wooden flag is not only a symbol of patriotism but also a testament to your creativity and woodworking skills.
Summary
Designing and carving your own wooden flag is a fun and rewarding woodworking project. By following this step-by-step guide, you can create a unique and beautiful wooden flag that showcases your patriotism. From designing the flag to cutting the wood, adding color and details, and finally displaying your creation, each step is crucial to achieving a stunning end result. So gather your materials and tools, let your creativity soar, and enjoy the process of crafting your very own wooden flag.
Sanding and Finishing Techniques for a Polished Look
When it comes to woodworking projects, sanding and finishing play a crucial role in achieving a polished and professional look. These techniques not only smooth out the surface but also enhance the natural beauty of the wood. In this section, we will explore some effective sanding and finishing techniques that will help you achieve the desired results.
1. Choosing the Right Sandpaper Grit
The first step in the sanding process is to select the appropriate grit of sandpaper. The grit refers to the coarseness of the sandpaper and determines how much material it removes. For initial sanding, start with a lower grit such as 80 or 100 to remove any rough surfaces, scratches, or imperfections. As you progress, gradually move to higher grits like 150, 220, and even 400 for a smoother finish.
2. Proper Sanding Technique
Once you have chosen the right grit, it’s important to use the proper sanding technique. Begin by sanding in the direction of the wood grain, applying even pressure. Avoid applying excessive pressure as it may result in uneven sanding or damage the wood. Sand with long, smooth strokes, moving the sandpaper in a back-and-forth motion or in a circular pattern. Be sure to sand the entire surface evenly to achieve a uniform finish.
3. Sanding Tools
While sandpaper is the most common tool for sanding, there are other tools that can make the process more efficient and effective. A sanding block or sanding sponge can provide a more stable and even surface for sanding. They also allow you to apply consistent pressure, reducing the risk of over-sanding or creating uneven surfaces. Additionally, power sanders like orbital sanders or belt sanders can be used for larger projects or to save time on repetitive sanding tasks.
4. Preparing the Surface for Finishing
Once the sanding process is complete, it’s essential to prepare the surface for finishing. Start by removing any dust or debris using a vacuum cleaner or a tack cloth. This step is crucial as any particles left on the surface can affect the finish. Next, apply a pre-stain conditioner if you plan on using a stain or dye. This helps the wood absorb the stain evenly and prevents blotchiness. Finally, ensure the surface is clean and smooth before proceeding to the finishing stage.
5. Applying the Finish
When it comes to applying the finish, there are several options to choose from, including varnish, lacquer, shellac, or oil-based finishes. Each type of finish has its own characteristics and application methods, so it’s important to follow the manufacturer’s instructions. Using a brush, roller, or cloth, apply the finish in thin, even coats, allowing sufficient drying time between each coat. This will help to build up a durable and smooth finish. Sand lightly between coats to remove any imperfections and ensure proper adhesion.
6. Final Touches
After applying the final coat of finish and allowing it to dry completely, you can give your project some final touches. Lightly sand the surface with a high grit sandpaper, such as 400 or 600, to achieve a smooth and silky feel. You can also use steel wool to further refine the surface. Be sure to remove any dust or particles before applying the final protective layer, such as a wax or polyurethane coat. These added layers will provide additional protection and enhance the beauty of the wood.
In summary, sanding and finishing are essential steps in achieving a polished and professional look for your woodworking projects. By following the right sanding technique, using appropriate tools, and applying the finish correctly, you can transform your project into a work of art. Remember to take your time, be patient, and enjoy the process as you watch the natural beauty of the wood come to life.

4. Adding the Waving Effect: Tips and Tricks
Adding a waving effect to your website can bring a dynamic and eye-catching element to your design. Whether you want to create a playful and whimsical look or add a subtle movement to your page, implementing a waving effect can enhance the overall visual appeal. In this section, we will explore some tips and tricks to help you achieve the desired waving effect for your website.
1. CSS Animations:
CSS animations provide a simple and effective way to create waving effects for your website elements. By defining keyframes and applying them to your elements, you can control the movement and timing of the wave. Here are some tips to get you started:
- Use the
@keyframesrule to define the animation, specifying the desired steps and properties at different stages. - Apply the animation to the element using the
animationproperty, specifying the name of the animation and the desired duration and timing function. - Experiment with different values for properties such as
transformandopacityto create variations in the waving effect.
2. SVG Animations:
Scalable Vector Graphics (SVG) animations provide another option for creating waving effects. SVG allows you to create complex and interactive animations that can be applied to elements on your website. Here are some tips for using SVG animations to create a waving effect:
- Create an SVG element and define the desired shape or path for the waving animation.
- Use SVG animation elements such as
<animateTransform>or<animateMotion>to control the movement of the shape or path. - Experiment with different values for attributes such as
keyTimesandvaluesto create variations in the waving effect.
3. JavaScript Libraries:
If you prefer a more advanced waving effect or want a quicker implementation, you can explore JavaScript libraries that provide pre-built waving animations. These libraries often offer additional customization options and can save you time and effort. Here are a few popular JavaScript libraries for adding waving effects:
- GSAP: GSAP (GreenSock Animation Platform) is a powerful JavaScript animation library that allows you to create complex waving effects with ease.
- SpinKit: SpinKit is a collection of CSS spinners and loaders that can be used to create waving effects for your website.
- Anime.js: Anime.js is a lightweight JavaScript animation library that provides a wide range of animations, including waving effects.
4. Fine-tuning and Optimization:
After implementing the waving effect, it’s important to fine-tune and optimize it to ensure smooth performance and compatibility across different devices and browsers. Here are some tips for fine-tuning and optimizing your waving effect:
- Test your waving effect on different devices and browsers to ensure compatibility and smooth performance.
- Optimize the animation by reducing unnecessary keyframes or complex shapes.
- Consider using CSS hardware acceleration techniques, such as the
translate3dproperty, to improve performance. - Adjust the duration and timing of the animation to achieve the desired waving effect without overwhelming the user.
In summary, adding a waving effect to your website can bring a touch of liveliness and visual interest. Whether you choose to implement it using CSS animations, SVG animations, or JavaScript libraries, experimenting with different techniques and fine-tuning the effect will help you achieve the desired result. By following these tips and tricks, you can create an engaging waving effect that enhances the overall user experience of your website.
Displaying and Preserving Your Waving Wooden Flag for Years to Come
After purchasing a beautiful waving wooden flag, you want to make sure it remains in pristine condition for years to come. Proper display and preservation techniques are essential to maintain its appearance and longevity. In this section, we will explore the best practices to showcase and protect your wooden flag.
Selecting the Right Location
Choosing the right location to display your waving wooden flag is crucial. Avoid placing it where it is exposed to direct sunlight for extended periods as this can cause fading and damage over time. Instead, opt for a location that offers indirect or diffused light.
Additionally, it is important to consider the environmental conditions of the chosen area. High humidity or extreme temperature variations can adversely affect the wooden flag. Aim for a spot with stable humidity and temperature levels to ensure its preservation.
Mounting the Wooden Flag
When it comes to mounting your wooden flag, there are a few options to consider. The method you choose should depend on the size and weight of the flag, as well as your personal preference.
One popular option is to use a flagpole bracket or a wall-mounted display case. This allows the flag to be securely attached and showcased on a prominent wall. Another option is to purchase a wooden flag stand or a display case specifically designed for waving flags.
Regardless of the method you choose, ensure that the flag is mounted securely and that the display allows for proper air circulation around the flag. This will help prevent any moisture buildup that may lead to mold or decay.
Regular Cleaning and Dusting
To maintain the pristine appearance of your wooden flag, regular cleaning and dusting are essential. Use a soft, lint-free cloth or a feather duster to gently remove any dust or debris that may accumulate on the surface of the flag.
Avoid using harsh chemicals or abrasive cleaners as they can damage the wood and its finish. Instead, opt for a mild solution of warm water and a gentle soap if necessary. Always test the cleaning solution on a small, inconspicuous area of the flag before applying it to the entire surface.
Applying Protective Finishes
To ensure the longevity of your waving wooden flag, consider applying a protective finish. This will help shield the wood from moisture, UV rays, and other potential damage. Before applying any finish, make sure the flag is thoroughly cleaned and dried.
There are various options for protective finishes, such as clear varnish, polyurethane, or a specialized wood sealer. Choose a finish that is compatible with the type of wood used in your flag and follow the manufacturer’s instructions for application.
Periodic Inspections and Maintenance
Regular inspections are crucial to identify any signs of damage or deterioration. Check for any loose screws or fittings in the mounting hardware and ensure that the flag is securely attached. Look out for any cracks, warping, or discoloration on the wooden surface.
If you notice any issues, take immediate action to address them. Tighten loose screws, repair any damages, or consult a professional if necessary. By promptly addressing any problems, you can prevent further damage and extend the lifespan of your waving wooden flag.
Summary
Displaying and preserving your waving wooden flag requires thoughtful consideration and care. Choose a suitable location, mount it securely, and regularly clean and inspect the flag. By following these guidelines, your wooden flag will continue to wave proudly for years to come.
FAQs
1. How do I make a waving wooden flag?
To make a waving wooden flag, you will need wooden boards, a saw, sandpaper, paint or stain, a drill, and screws. Cut the boards into the desired flag shape, sand them smooth, and paint or stain them. Then, attach the boards together using screws and drill holes at the top for the flagpole. Finally, attach the flag to a pole, and your waving wooden flag is ready!
2. What type of wood should I use to make a waving wooden flag?
For making a waving wooden flag, you can use different types of wood such as pine, cedar, or oak. Pine is an affordable option, while cedar and oak are more durable and weather-resistant. Choose a wood that suits your budget and desired level of longevity for your wooden flag.
3. Can I add designs or decorations to my waving wooden flag?
Yes, you can add designs or decorations to your waving wooden flag. You can paint or stain the flag in different colors or add stenciled designs. Additionally, you can attach decorative elements like stars or stripes. Personalize your flag to make it unique and meaningful to you.
Conclusion
In conclusion, making a waving wooden flag can be a fun and creative DIY project that adds a touch of patriotism to any space. By following the step-by-step instructions, you can create a unique and eye-catching wooden flag that is sure to impress. Whether you display it for special occasions or as a permanent decor piece, this handmade flag will be a conversation starter. Let your creativity flow as you choose the colors and design that best represent your style and personality. So, gather your materials, unleash your inner artist, and enjoy the satisfaction of creating your very own waving wooden flag.
Remember, practice makes perfect, so don’t be discouraged if your first attempt isn’t exactly as you envisioned. Keep refining your techniques and experimenting with different finishes and distressing methods to achieve the desired effect. With patience and persistence, you’ll soon have a stunning waving wooden flag that will make a statement wherever it’s displayed. So, pick up your tools and get started on this exciting woodworking project today!