Looking for a cost-effective and practical solution to feed your horses? Consider making a wooden hay feeder! This DIY project allows you to provide your equine companions with a dedicated feeding area, ensuring their hay stays clean and accessible. By constructing a sturdy wooden hay feeder, you can reduce hay wastage and keep your horses happy and healthy. Read on to discover the step-by-step process of creating a wooden hay feeder for your beloved horses.
First, gather the necessary materials such as pressure-treated lumber, screws, and a saw. Measure and cut the wood according to the desired dimensions of your hay feeder. It’s important to create a sturdy frame that can withstand the weight of the hay.

Next, assemble the wooden pieces by screwing them together. Make sure the corners are reinforced for added stability. Consider adding a removable top or hinged panels for easy cleaning and refilling.
Once the structure is complete, test its stability by applying pressure and ensuring it can support the weight of the hay. Place the hay feeder in a suitable location, preferably away from mud or damp areas.
Finally, fill the hay feeder with fresh, quality hay for your horses to enjoy. Monitor the hay levels regularly and refill as needed to ensure your horses have a continuous supply of food.
Making a wooden hay feeder for your horses not only provides a convenient feeding solution but also promotes efficient hay usage. With this DIY project
Design and Measurements
When it comes to designing a product, careful consideration of measurements is essential. The design and measurements of a product go hand in hand, determining its functionality, aesthetics, and overall user experience. In this section, we will explore the importance of design and measurements in detail.
Design
The design of a product involves the visual appearance, structure, and arrangement of its components. It encompasses various aspects such as shape, color, texture, and material selection. A well-designed product not only looks appealing but also enhances its usability and user satisfaction.
There are several key factors to consider when designing a product:
- Functionality: The design should prioritize the functionality of the product. It should be intuitive and easy to use, allowing users to achieve their desired tasks efficiently.
- Aesthetics: The visual appeal of a product plays a crucial role in attracting potential customers. A visually pleasing design can create a positive impression and increase the perceived value of the product.
- Ergonomics: The design should take into account the comfort and ease of use for the end-users. Ergonomic considerations ensure that the product fits well with the human body and minimizes discomfort or strain during use.
- Brand identity: The design should align with the brand image and values. Consistency in design elements helps to establish a strong brand identity and fosters brand recognition.
- Manufacturability: The design should be feasible to manufacture considering cost, resources, and production processes. It is important to strike a balance between the design vision and practicality.
Measurements
Measurements are crucial in ensuring the accuracy and precision of a product. They provide quantitative information about the dimensions, proportions, and tolerances required for manufacturing and assembly. Accurate measurements help in achieving the desired functionality and fit of the product.
Here are some important considerations regarding measurements:
- Dimensions: Measurements determine the physical size and shape of the product. They are critical for ensuring that the product fits its intended purpose and user requirements.
- Tolerances: Tolerances define the allowable deviations from the specified dimensions. They ensure that the product can be manufactured within acceptable limits and that the components fit together correctly.
- Unit of measurement: The choice of unit of measurement, whether it is inches, centimeters, or millimeters, depends on the application and industry standards. Consistency in units is important for clear communication and accurate reproduction of the design.
- Testing and validation: Measurements play a crucial role in the testing and validation of a product. They are used to verify that the product meets the required specifications and quality standards.
- Documentation: Accurate measurements need to be documented properly to ensure that the design can be reproduced or modified in the future. Detailed drawings, specifications, and measurement records are essential for effective communication between designers, manufacturers, and stakeholders.
Overall, the design and measurements of a product are integral to its success in terms of functionality, aesthetics, and user satisfaction. A well-designed product with accurate measurements not only meets the intended purpose but also creates a positive user experience, enhances brand value, and increases customer satisfaction.
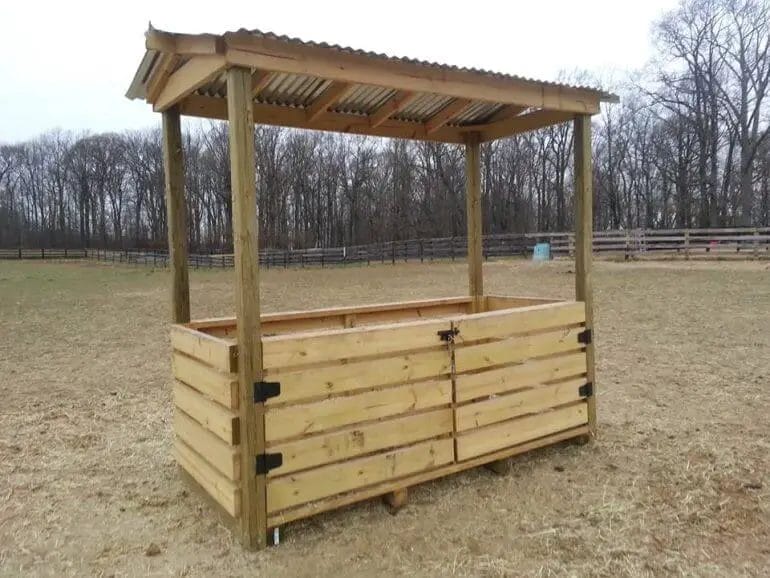
Building the Frame
Once you have gathered all the necessary materials and tools, it’s time to start building the frame of your project. The frame provides the structure and support for the rest of the construction process. Here are the steps to follow:
1. Measure and Mark
Start by measuring and marking the dimensions for your frame on the selected material. Use a measuring tape and a pencil to ensure accuracy. Double-check your measurements before proceeding to the next step.
2. Cut the Material
Next, use a saw or another suitable cutting tool to cut the material according to your measurements. Make sure to follow the marked lines precisely to maintain the desired shape and size of the frame.
3. Sand the Edges
After cutting the material, it’s important to smooth out any rough edges. Use sandpaper to sand down the edges of the frame pieces. This will not only enhance the appearance of the frame but also reduce the risk of splinters.
4. Assemble the Frame
Now it’s time to assemble the frame. Depending on your project, you can use various methods such as screws, nails, or glue to join the frame pieces together. Make sure to align the pieces properly and secure them tightly for a sturdy frame.
5. Reinforce if Needed
If your project requires additional support, consider reinforcing the frame. This can be done by adding extra bracing or using thicker materials. Reinforcing the frame will ensure its durability and stability.
6. Check for Squareness
Before proceeding further, it’s essential to check if the frame is square. Measure the diagonals of the frame and ensure that they are equal in length. Adjust the frame if needed to achieve perfect squareness.
7. Paint or Finish
Once the frame is complete and square, you can paint or finish it according to your preference. This step not only adds aesthetic value but also protects the frame from weathering and prolongs its lifespan.
8. Allow for Drying Time
If you have applied paint or finish to the frame, allow sufficient drying time as per the instructions provided by the manufacturer. This will ensure that the frame is fully cured and ready for the next steps of your project.
By following these steps, you can successfully build the frame for your project. Remember to take accurate measurements, use appropriate cutting tools, and reinforce the frame if necessary. With a sturdy and well-constructed frame, you are now ready to move on to the next phase of your project.
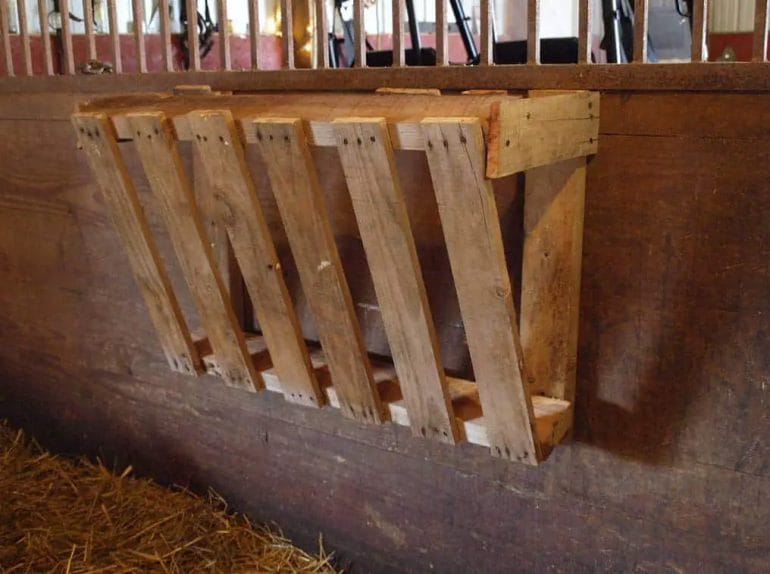
Adding the Hay Rack
Adding a hay rack to your livestock area is an important step in ensuring that your animals have access to fresh hay at all times. A hay rack helps to keep the hay off the ground, preventing it from becoming soiled and wasted. It also promotes better hygiene and reduces the risk of disease transmission among your animals.
Here are the steps to add a hay rack:
- Choose the location: Select a suitable location for the hay rack. It should be easily accessible for both you and your animals. Consider placing it near a feeding area or water source for convenience.
- Measure and cut: Measure the length and height of the desired hay rack. Use a saw or other appropriate tool to cut the necessary pieces of lumber or metal.
- Construct the frame: Assemble the cut pieces of lumber or metal to create the frame of the hay rack. Use nails, screws, or other appropriate fasteners to secure the joints.
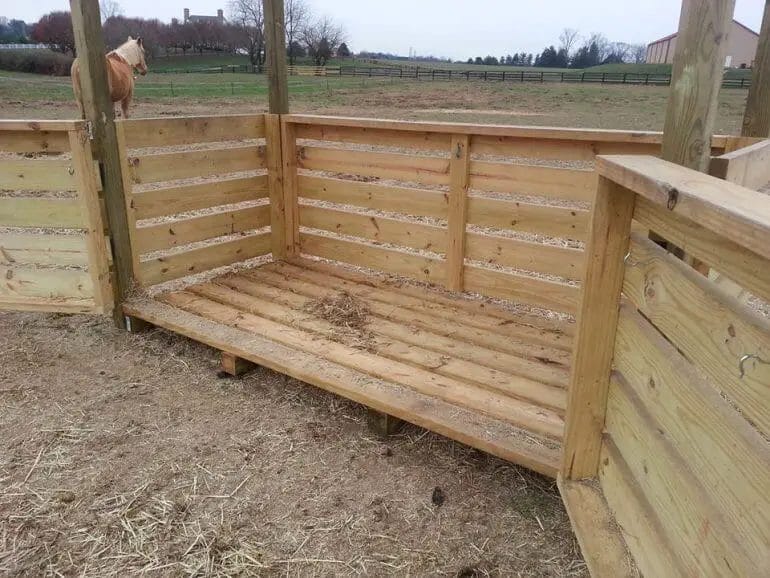
- Add the bottom: Attach a solid piece of material, such as plywood or metal sheet, to the bottom of the frame. This will serve as the base for holding the hay.
- Install brackets: Use brackets or hooks to attach the hay rack to the wall or fence. Make sure the brackets are sturdy and securely fastened to prevent accidents or damage.
- Add a divider (optional): If you have multiple animals sharing the hay rack, consider adding a divider to separate their feeding spaces. This can help reduce competition and promote a more peaceful feeding environment.
- Test and adjust: Once the hay rack is installed, test it by placing hay inside and observing how the animals interact with it. Make any necessary adjustments to ensure that all animals can easily access the hay.
Remember to regularly clean and refill the hay rack to maintain hygiene and provide a constant supply of fresh hay for your animals. By adding a hay rack, you are taking a proactive step towards promoting the well-being and health of your livestock.
Finishing Touches
Once you have completed the main sections of your project, it’s time to add those finishing touches that will elevate it to the next level. These final touches may seem small, but they can make a big difference in the overall presentation and impact of your work. Here are some key areas to focus on:
1. Proofreading and Editing
Before finalizing your project, it’s essential to carefully proofread and edit your work. This includes checking for spelling and grammar errors, as well as ensuring that your content flows smoothly and makes sense. Take the time to read through your project multiple times, or consider enlisting the help of a fresh set of eyes to catch any mistakes you may have missed.
2. Formatting and Design
Formatting and design play a crucial role in enhancing the visual appeal of your project. Make sure your layout is clean and organized, with consistent fonts, colors, and spacing. Pay attention to headings, subheadings, and bullet points to make your content more scannable and easy to navigate. Use images, charts, or graphs where appropriate to illustrate your points and break up text-heavy sections.
3. Citations and References
If you have used external sources or references in your project, make sure to properly cite them. This not only gives credit to the original authors but also adds credibility to your work. Check the citation style required by your institution or project guidelines, such as APA or MLA, and ensure that all citations are correctly formatted and included in a separate reference section at the end of your project.
4. Cross-Check and Verify Data
If your project involves data or statistics, it’s crucial to cross-check and verify the accuracy of your information. Ensure that all numbers and figures are correctly cited and referenced, and that they align with your research objectives and findings. Double-check any calculations or formulas to avoid errors that may undermine the validity of your project.
5. Final Review and Feedback
Before submitting your project, take the time to review it one last time. Pay attention to the overall structure, coherence, and relevance of your content. Consider seeking feedback from peers, mentors, or instructors to gain valuable insights and perspectives. Incorporate any constructive feedback and make necessary revisions to further improve your work.
6. Quality Assurance
Ensure that your project meets the required standards of quality. This includes adhering to any specific guidelines or requirements provided by your institution or project brief. Check for consistency in formatting, style, and tone throughout your project, ensuring a cohesive and professional presentation.
7. Presentation and Delivery
If your project involves a presentation or delivery, make sure to prepare adequately. Practice your presentation skills, create engaging slides or visual aids, and anticipate any potential questions or challenges that may arise. Consider rehearsing in front of a small audience to gain confidence and receive feedback.
8. Final Check and Submission
Before submitting your project, perform a final check to ensure that all components are in order. Confirm that you have included all necessary sections, attachments, or appendices. Verify the submission deadline and any specific requirements for submission, such as digital formats or file sizes. Finally, submit your project within the designated timeframe, following all instructions provided by your institution or project guidelines.
In summary, the finishing touches are the final steps in completing your project. By paying attention to proofreading, formatting, citations, data accuracy, feedback, quality assurance, and presentation, you can ensure that your work is polished, professional, and impactful. Don’t overlook these small details, as they can greatly enhance the overall impression and effectiveness of your project.
FAQs
1. How can I make a wooden hay feeder for horses?
To make a wooden hay feeder for horses, you will need wood boards, screws, a saw, and a drill. Measure and cut the boards to the desired size for the feeder. Then, assemble the boards using screws and a drill. Make sure to create openings for the horses to access the hay. Hang the feeder securely in the horse’s stall or pasture.
2. What are the benefits of using a wooden hay feeder for horses?
Using a wooden hay feeder for horses can help reduce hay wastage, prevent contamination, and promote healthier eating habits. It can also provide a physical barrier to prevent horses from trampling or defecating on the hay. Additionally, a well-designed hay feeder can help minimize the risk of respiratory issues and digestive disorders in horses.
3. Are there any safety considerations when making a wooden hay feeder for horses?
When making a wooden hay feeder for horses, ensure that all edges are smooth and free of splinters to prevent any injuries. Use non-toxic materials and avoid using pressure-treated wood or any other potentially harmful substances. Additionally, securely fasten the feeder to prevent tipping or collapsing, which could pose a safety hazard to the horses.
Conclusion
In conclusion, building a wooden hay feeder for horses is a practical and cost-effective solution to ensure proper feeding and reduce wastage. By following the step-by-step instructions provided, you can create a durable and safe feeder that will keep hay off the ground and minimize contamination. Not only does this improve the cleanliness of the feeding area, but it also helps prolong the lifespan of the hay. With a well-built wooden hay feeder, you can promote the health and well-being of your horses by providing them with a clean and accessible source of forage.
Remember to regularly inspect and maintain the feeder to ensure its structural integrity and prevent any potential hazards. By taking the time to construct a wooden hay feeder for your horses, you are investing in their long-term health and happiness. So, why wait? Start building your hay feeder today and enjoy the benefits of efficient and organized feeding for your equine companions.
