Looking to add comfort and style to your wooden chairs? Learn how to make seat cushions for wooden chairs with these simple steps. A seat cushion not only provides a cozy seating experience but also protects your chair from wear and tear. Whether you’re a beginner or an experienced DIY enthusiast, making seat cushions is a fun and rewarding project that allows you to customize your chairs to match your decor and personal taste.
To make seat cushions for wooden chairs, start by measuring the dimensions of your chair seat. This will ensure the perfect fit for your cushions. Next, select the fabric of your choice, considering durability and design. Cut the fabric according to your measurements and sew the edges for a clean finish. Fill the cushion with foam or batting to add comfort and support. Finally, attach ties or Velcro to secure the cushion to your wooden chair.
Not only do seat cushions provide a comfortable seating experience, but they can also enhance the overall aesthetic of your wooden chairs. Choose fabrics that complement your existing decor or go for a bold, statement-making design. With a few simple materials and a little bit of creativity, you can transform your wooden chairs into stylish and cozy seating options.
Whether you’re hosting a dinner party or enjoying a cup of coffee in the morning, seat cushions add an extra layer of comfort to your wooden chairs. They also offer a practical solution for prolonging the life of your chairs by protecting them from spills, stains, and general

Measuring and Cutting the Cushion Fabric
When it comes to reupholstering or making new cushions for your furniture, measuring and cutting the fabric is a crucial step to ensure a perfect fit. In this section, we will guide you through the process of measuring and cutting the cushion fabric, so you can achieve professional-looking results.
1. Measure the Cushion
The first step is to accurately measure the dimensions of your cushion. Using a measuring tape, measure the length, width, and thickness of the cushion. Write down these measurements as they will serve as your guide for cutting the fabric.
If you have a rectangular or square-shaped cushion, measure each side and record the measurements. For irregularly shaped cushions, it’s best to measure the widest and longest points to ensure a proper fit.
2. Add Seam Allowance
Once you have the measurements, it’s important to add a seam allowance to ensure that the fabric will cover the cushion properly. Adding an extra 1 inch to each side is a common practice, but you can adjust this measurement based on your preference or the thickness of the cushion.
For example, if your cushion measures 18 inches by 18 inches, you would add 1 inch to each side, making your fabric dimensions 20 inches by 20 inches.
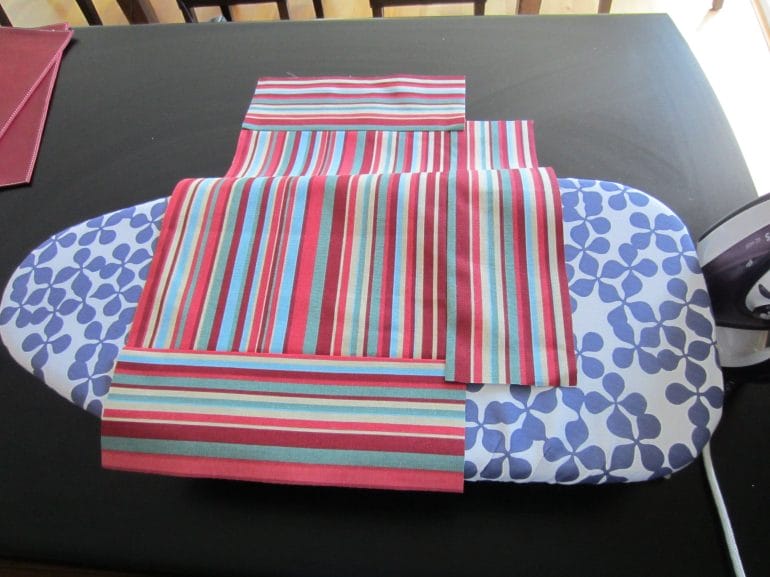
3. Mark the Fabric
Now that you have calculated the fabric dimensions, it’s time to mark the fabric for cutting. Using a fabric marker or chalk, lay the fabric on a flat surface and mark the dimensions based on the measurements you took earlier.
For rectangular or square-shaped cushions, use a ruler or straight edge to draw straight lines. For irregularly shaped cushions, use the widest and longest measurements to create a template on the fabric.
4. Cut the Fabric
With the fabric marked, it’s time to cut it according to the dimensions you’ve marked. Using fabric scissors or a rotary cutter, carefully cut along the marked lines, ensuring clean and straight edges.
Take your time while cutting and follow the lines precisely to ensure the fabric pieces are cut accurately.
5. Double Check the Fit
Once you have cut the fabric pieces, it’s a good idea to double-check the fit by placing them over the cushion. Make sure all edges are properly aligned and that the fabric covers the cushion completely. Adjustments can be made if necessary.
If the fabric is too loose, you can trim the edges slightly. If it’s too tight, you may need to recut the fabric pieces with slightly larger dimensions.
6. Label and Store
Finally, it’s important to label the fabric pieces and store them in a safe place until you’re ready to proceed with the next steps of the cushion-making process. Use labels or sticky notes to indicate which piece corresponds to each part of the cushion.
Storing the fabric pieces properly will prevent any confusion or mix-ups during the later stages of the project.
In summary, measuring and cutting the cushion fabric accurately is key to achieving a professional-looking result. Take your time, follow the steps outlined above, and adjust as needed to ensure a perfect fit for your cushions.
Sewing the Cushion Cover
Now that you have your fabric cut and prepared, it’s time to sew the cushion cover. Follow these step-by-step instructions to create a beautiful and professional-looking cover for your cushion:
- Place the fabric pieces right sides together: Take the two main fabric pieces and place them on top of each other with the right sides facing inwards. Make sure the edges align perfectly.
- Pin the fabric together: Use straight pins to secure the fabric in place. Start by pinning the corners and then work your way along the sides, pinning every few inches. This will prevent the fabric from shifting while you sew.
- Sew along the edges: Set up your sewing machine with a straight stitch and select the appropriate stitch length. Sew along the edges of the fabric, leaving a 1/2 inch seam allowance. Backstitch at the beginning and end to secure the stitches.
- Trim the corners: Once you’ve sewn around all four sides, trim the corners diagonally. This will help create crisp corners when you turn the cover right side out.
- Turn the cover right side out: Carefully reach inside the cover and pull it through the opening. Use a blunt tool, such as a chopstick or knitting needle, to push out the corners and edges for a clean finish.
- Press the cover: Use an iron on a low heat setting to press the cover, removing any wrinkles and ensuring a smooth finish.
- Insert the cushion: Insert your cushion or pillow form into the cover through the opening. Adjust it as needed to ensure a snug fit.
- Hand stitch the opening: To close the opening, you can either use a slip stitch or a ladder stitch. Thread a needle with matching thread and sew the opening closed, making sure your stitches are neat and invisible.
- Optional: Add decorative elements: If desired, you can add decorative elements to your cushion cover, such as buttons, trim, or embroidery. Get creative and personalize your cover to match your style.
In summary, sewing a cushion cover involves placing the fabric pieces right sides together, pinning, sewing along the edges, trimming the corners, turning the cover right side out, pressing, inserting the cushion, hand stitching the opening, and adding optional decorative elements. Follow these instructions carefully for a professional-looking result. Happy sewing!
Adding Foam or Filling to the Cushion
When it comes to upgrading the comfort and appearance of your cushions, adding foam or filling can make a significant difference. Whether you have worn-out or flat cushions that need a boost or you simply want to enhance the comfort level of your seating, adding foam or filling is a great solution. In this section, we will explore the steps involved in adding foam or filling to your cushions.
1. Assessing the Cushion
The first step in adding foam or filling to your cushion is to assess its current condition. Examine the cushion to determine if it is in good shape overall or if it needs any repairs. Look for any tears, rips, or other damages that may need to be fixed before proceeding with adding foam or filling.
2. Choosing the Right Foam or Filling
Once you have assessed the cushion, the next step is to choose the right foam or filling for your needs. There are various types of foam and filling options available, each with its own advantages and limitations. Consider factors such as density, firmness, and durability when selecting the foam or filling for your cushion.
If you prefer a firm and supportive cushion, high-density foam would be a suitable choice. On the other hand, if you prefer a softer and plush feel, down or down alternative filling would be a better option. It’s important to choose a foam or filling that aligns with your comfort preferences and usage requirements.
3. Removing the Cushion Cover
Before adding foam or filling, you will need to remove the cushion cover. Most cushion covers have a zipper closure, making it relatively easy to take off. Carefully unzip the cover and remove it from the cushion, ensuring not to damage the fabric or any seams.
4. Measuring and Cutting the Foam or Filling
Once the cushion cover is removed, it’s time to measure and cut the foam or filling. Take precise measurements of the cushion’s dimensions, including length, width, and thickness. Using these measurements, cut the foam or filling to the appropriate size using a sharp utility knife or scissors.
5. Inserting the Foam or Filling
Now it’s time to insert the foam or filling into the cushion cover. Start by placing the foam or filling into the cover, ensuring that all corners and edges are filled properly. Gently push and adjust the foam or filling to achieve an even distribution and a smooth appearance.
6. Closing the Cushion Cover
After inserting the foam or filling, carefully close the cushion cover. Align the zipper tracks and zip up the cover, ensuring that it is securely fastened. Take a moment to check for any gaps or areas where the foam or filling may be unevenly distributed. Adjust as necessary to achieve a uniform and comfortable cushion.
7. Fluffing and Testing the Cushion
Once the cushion cover is closed, give the cushion a few gentle shakes to fluff up the foam or filling. This will help the cushion regain its plumpness and ensure optimal comfort. Place the cushion back on the seating and test it out to ensure that it meets your desired comfort level.
In summary, adding foam or filling to your cushions can be a simple yet effective way to enhance their comfort and appearance. By assessing the cushion, choosing the right foam or filling, measuring and cutting it to size, inserting it into the cushion cover, closing the cover, and fluffing and testing the cushion, you can enjoy a renewed seating experience. Whether you are reviving worn-out cushions or simply looking for a comfort upgrade, this process will help you achieve the desired results.
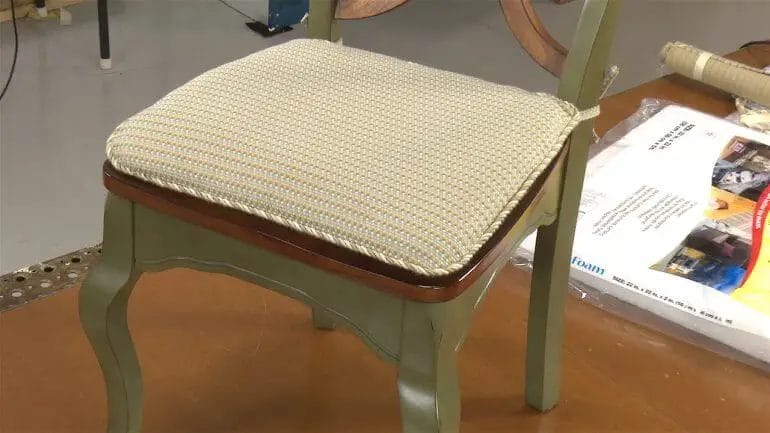
Attaching the Cushion to the Wooden Chair
Now that you have successfully built your wooden chair, it’s time to add the finishing touch – the cushion. Attaching a cushion not only enhances the comfort of the chair but also adds a touch of style. In this section, we will guide you through the process of attaching the cushion to the wooden chair.
1. Choose the Right Cushion
The first step is to select the perfect cushion for your wooden chair. Consider the size, shape, and thickness of the cushion that best suits your chair’s design and your personal preference. Measure the seat dimensions of your chair to ensure the cushion fits properly.
When choosing a cushion, opt for a durable and high-quality fabric that can withstand regular use. Additionally, select a cushion with sufficient padding to provide maximum comfort.
2. Position the Cushion
Before attaching the cushion, place it on the seat of the wooden chair to determine the desired position. Ensure it is centered and aligns perfectly with the chair’s edges.
3. Prepare the Chair
Prior to attaching the cushion, ensure that the wooden chair is clean and free from any debris or dust. Wipe down the seat surface using a damp cloth to create a clean and smooth surface for the cushion to adhere to.
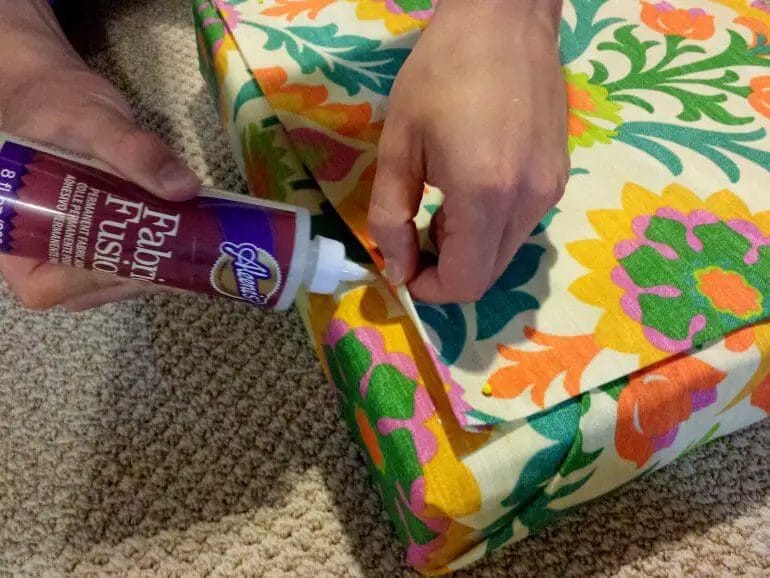
4. Apply Adhesive
Apply a suitable adhesive to the underside of the cushion. It is recommended to use a fabric or upholstery adhesive that is designed to bond fabric to wood. Follow the manufacturer’s instructions for the specific adhesive you are using.
5. Press and Secure
Once the adhesive is applied, carefully position the cushion onto the seat of the wooden chair. Apply even pressure to the cushion, ensuring it adheres firmly to the chair’s surface. Press down on all areas of the cushion, paying extra attention to the edges and corners.
To provide additional security, you can use upholstery tacks or staples to further secure the cushion to the wooden chair. Place the tacks or staples along the edges of the cushion, ensuring they penetrate through both the cushion and the wooden seat.
6. Allow to Dry
After attaching the cushion to the wooden chair, allow sufficient time for the adhesive to dry. Refer to the adhesive manufacturer’s instructions for the recommended drying time. Avoid sitting on the chair or putting any weight on the cushion until the adhesive is completely dry.
Once the adhesive is fully dried, your cushion will be securely attached to the wooden chair. Take a moment to admire your handiwork and enjoy the enhanced comfort your cushioned wooden chair now provides.
In summary, attaching a cushion to a wooden chair is a simple process that adds both comfort and style to your furniture. By following these steps, you can easily attach a cushion to your wooden chair and transform it into a cozy seating option.
FAQs
1. How can I make seat cushions for wooden chairs?
To make seat cushions for wooden chairs, you will need foam padding, fabric, scissors, a sewing machine or needle and thread, and a staple gun. Measure and cut the foam padding to fit the chair seat, then wrap it with the fabric, securing it with staples. Trim any excess fabric and attach the cushion to the chair.
2. What type of fabric should I use for seat cushions?
For seat cushions, it is best to use a durable and easy-to-clean fabric such as cotton or polyester blends. These fabrics are resistant to stains and wear, making them ideal for high-traffic areas like dining chairs.
3. Can I use pre-made foam cushions for my wooden chairs?
Yes, you can use pre-made foam cushions for your wooden chairs. Look for cushions that are the right size and thickness for your chairs. Simply attach the cushions to the chair seats using a staple gun or adhesive, or consider attaching fabric covers to match your decor.
Conclusion
In conclusion, learning how to make seat cushions for wooden chairs is a practical skill that can greatly enhance the comfort and aesthetics of your seating. By following the step-by-step process and using the right materials, you can create custom-made cushions that perfectly fit your chairs and reflect your personal style. Whether you choose to sew your own cushions or opt for a no-sew alternative, the end result will provide a soft and supportive seat that invites relaxation and enjoyment. Don’t let uncomfortable chairs be a deterrent to spending time in your favorite spaces. Take the initiative and create your own seat cushions today!
