Do you want to learn how to make beautiful and unique wooden beads? Crafting your own wooden beads is a satisfying and creative way to add a personal touch to your jewelry and craft projects.
With the right tools and techniques, you can create a variety of shapes, sizes, and designs that will make your creations stand out.

In this guide, we will take you through the step-by-step process of making wooden beads, from selecting the right type of wood to shaping, sanding, and finishing them to perfection.
Whether you’re a beginner or an experienced crafter, making wooden beads is a rewarding DIY project that will allow you to unleash your creativity and create stunning jewelry and decorative pieces.
So, let’s get started and learn how to make your own wooden beads!
Tools and Materials Needed for Crafting Wooden Beads
If you are passionate about crafts and enjoy working with wood, crafting wooden beads can be a fun and rewarding activity. Whether you want to make your own jewelry or create unique home decor items, wooden beads can add a natural and rustic touch to your creations. To get started, you will need a few essential tools and materials. Here is a list of what you’ll need:
1. Wood
The first thing you’ll need is a good quality wood. Choose a type of wood that is suitable for crafting beads, such as hardwood or softwood. Some popular choices include maple, birch, walnut, and pine. Make sure the wood is smooth and free from any defects or cracks.
2. Saw
A saw is an essential tool for cutting the wood into small, bead-sized pieces. You can use a hand saw or a powered saw, depending on your preference and the amount of woodworking you plan to do. It’s important to have a sharp and fine-toothed saw to ensure clean and precise cuts.
3. Drill
A drill will be needed to create the hole in the center of each wooden bead. You can use a hand drill or a power drill, depending on your comfort and the volume of beads you’re planning to make. Make sure to use a drill bit that matches the size of the hole you want to create.
4. Sandpaper
Sanding the wooden beads is essential to achieve a smooth and polished finish. Start with a coarse-grit sandpaper to remove any rough edges or imperfections. Then, gradually move to finer-grit sandpaper to achieve a smooth surface. Sanding will also help in shaping the beads and creating unique designs.
5. Varnish or Sealant
Applying a varnish or sealant to the wooden beads will not only protect them from moisture and wear but also enhance their natural beauty. Choose a varnish or sealant that is suitable for wood and easy to apply. You can opt for a glossy, matte, or satin finish, depending on your preference.
6. Thread or Cord
To string the wooden beads and create your desired jewelry or decor items, you will need a sturdy thread or cord. There are various options available, such as nylon cord, leather cord, or waxed cotton thread. Choose a material that complements the overall aesthetic of your project.
7. Pliers
Pliers can be handy for various tasks during the bead-making process, such as holding the wood pieces securely while drilling, shaping wire loops for connectors, or closing jump rings. Choose pliers with a comfortable grip and different types of jaws to handle different tasks effectively.
8. Paints or Stains (Optional)
If you want to add color or a unique finish to your wooden beads, you can use paints or stains. Acrylic paints are a popular choice for adding vibrant colors, while wood stains can enhance the natural wood grain. Use a small brush or sponge to apply the paint or stain evenly.
Crafting wooden beads can be a relaxing and creative hobby. With the right tools and materials, you can create beautiful and personalized beads to incorporate into your crafts. Remember to always prioritize safety and enjoy the process of bringing your ideas to life.
Step-by-Step Guide to Shaping and Sanding Wooden Beads
Wooden beads are a popular crafting material that can be used in various DIY projects, jewelry making, and home decor. Whether you’re a beginner or an experienced woodworker, shaping and sanding wooden beads is a fun and satisfying process. In this section, we’ll provide you with a step-by-step guide on how to shape and sand wooden beads.
Materials Needed:
- Wooden beads
- Sandpaper (various grits – coarse, medium, fine)
- Wood rasp or file
- Drill with a small drill bit
- Masking tape
- Optional: Rotary tool with sanding attachments
Step 1: Prepare Your Workspace
Before you begin shaping and sanding your wooden beads, it’s important to set up a clean and organized workspace. Clear any clutter and protect your work surface with a tablecloth or newspaper. This will prevent any damage to your furniture and make it easier to clean up afterwards.
Step 2: Mark the Center Point
Using a small drill bit, carefully drill a hole through the center of each wooden bead. This will allow you to later thread the beads onto a string or wire. You can use a piece of masking tape to mark the center point on each bead before drilling.
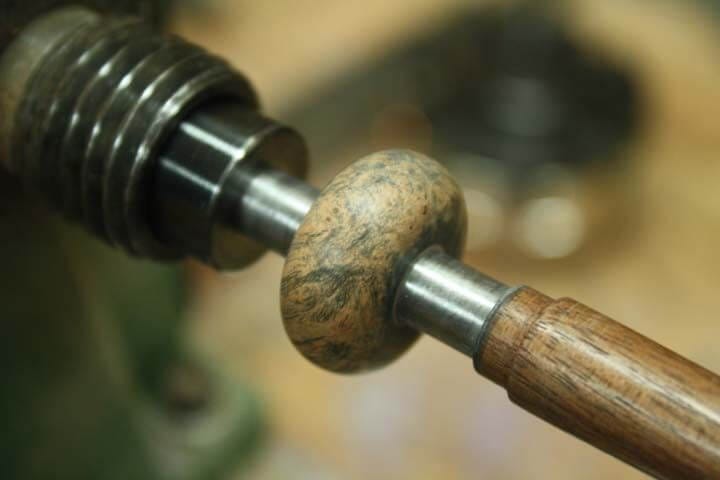
Step 3: Shape the Beads
Now it’s time to shape your wooden beads. Start by using a wood rasp or file to remove any rough edges or imperfections. Gently rotate the bead while applying light pressure to shape it into your desired form. Take your time and be mindful of the bead’s symmetry.
Step 4: Sand the Beads
Once you’re satisfied with the shape of the beads, it’s time to sand them to a smooth finish. Begin with a coarse sandpaper (around 80-120 grit) to remove any remaining roughness. Use circular motions and apply even pressure to sand the entire surface of the bead.
Gradually progress to a medium-grit sandpaper (around 180-220 grit) and then to a fine-grit sandpaper (around 320-400 grit) for a smoother finish. This will help to remove any visible scratches and create a polished appearance.
If you have a rotary tool with sanding attachments, you can use it to further refine the shape and smoothness of the beads. However, be cautious not to remove too much material or create any unevenness.
Step 5: Clean and Finish
After sanding the beads, it’s important to clean off any dust or debris before applying a finish. Use a soft cloth or brush to remove any particles from the surface of the beads.
If you prefer a natural look, you can leave the beads unfinished. However, if you want to protect the wood and enhance its appearance, you can apply a wood finish or varnish. Follow the manufacturer’s instructions for the specific product you’re using and allow the beads to dry completely before handling.
Step 6: String or Display
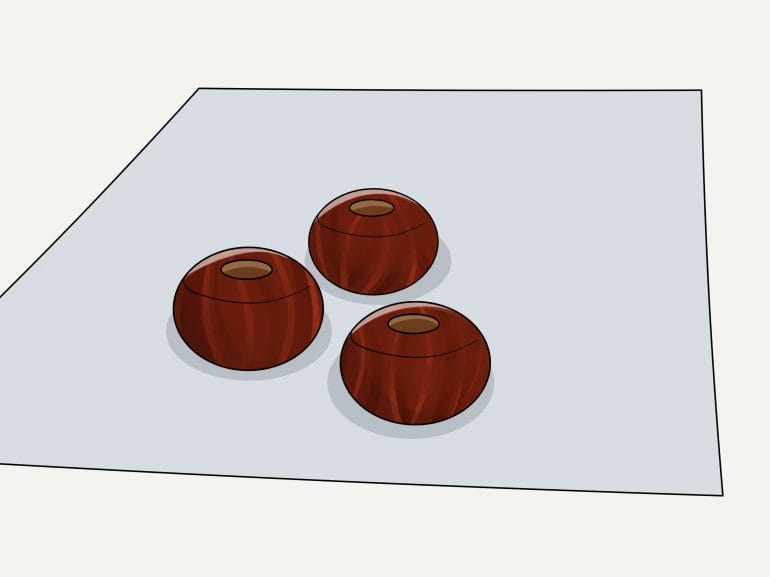
Now that your wooden beads are shaped, sanded, and finished, you can thread them onto a string, wire, or cord to create bracelets, necklaces, or other jewelry pieces. Alternatively, you can use them as decorative accents in home decor projects.
Remember to be creative and experiment with different shapes, sizes, and finishes to achieve unique and personalized wooden beads. With practice, you’ll be able to create beautiful handmade beads that can be cherished for years to come.
In summary, shaping and sanding wooden beads requires patience, attention to detail, and the right tools. By following this step-by-step guide, you’ll be able to transform simple wooden beads into beautiful and polished creations for your crafting projects.
Adding Color and Finishing Touches to Your Wooden Beads
Wooden beads are a versatile and popular crafting material that can be used to create a wide range of projects. Whether you’re making jewelry, home décor items, or kids’ crafts, adding color and finishing touches to your wooden beads can elevate your creations to the next level. In this section, we will explore different techniques and tools that you can use to add color and give a polished finish to your wooden beads.
1. Paint
Painting wooden beads is one of the easiest and most popular ways to add color to them. You can use acrylic paints, watercolors, or even spray paints, depending on the effect you want to achieve. Here’s how you can paint your wooden beads:
- Clean the beads: Before painting, make sure your wooden beads are clean and free from any dirt or debris. You can wipe them with a damp cloth or use a mild soap solution.
- Prepare your workspace: Lay down a protective surface or use a craft mat to avoid any spills or stains. It’s also a good idea to wear gloves to protect your hands.
- Choose your paint: Select the type and color of paint that you want to use. If you’re using acrylic paints, you can mix different colors to create unique shades.
- Apply the paint: Use a small paintbrush or a foam brush to apply the paint evenly on the surface of the wooden bead. You may need to apply multiple coats for a more opaque finish.
- Let it dry: Allow the painted beads to dry completely before handling or using them in your projects. Follow the instructions on the paint bottle for the recommended drying time.
2. Staining
Staining wooden beads can give them a natural and rustic look. It enhances the grain and texture of the wood while adding a touch of color. Follow these steps to stain your wooden beads:
- Prepare the beads: Clean the wooden beads and sand them lightly to create a smooth surface. Remove any dust or debris using a tack cloth or a soft brush.
- Choose your stain: Select a wood stain color that complements your project. There are various shades available, ranging from light to dark.
- Apply the stain: Use a clean cloth or a brush to apply the stain evenly on the wooden bead. Make sure to cover the entire surface and let the stain penetrate the wood.
- Remove excess stain: After a few minutes, wipe off any excess stain with a clean cloth. This step helps to prevent drips and uneven coloring.
- Let it dry: Allow the stained beads to dry completely. Depending on the type of stain used, it may take a few hours or overnight for the beads to dry and cure.
3. Decoupage
Decoupage is a technique that involves layering paper or fabric on the surface of an object and sealing it with a clear adhesive. It’s a great way to add patterns, designs, and images to your wooden beads. Follow these steps to decoupage your wooden beads:
- Prepare the beads: Clean and sand the wooden beads to prepare them for decoupage. Smooth any rough edges or surfaces.
- Select your decoupage medium: Choose a decoupage medium that works well with wood, such as Mod Podge or a similar adhesive. You can also use diluted white glue.
- Cut or tear your paper/fabric: Cut or tear your chosen paper or fabric into small pieces that will fit on the surface of the beads.
- Apply the decoupage medium: Using a small brush, apply a thin layer of decoupage medium on the wooden bead. Place a piece of paper or fabric on top and smooth it down with your fingers or a clean brush.
- Repeat the process: Continue applying decoupage medium and layering the paper or fabric until the entire bead is covered. Make sure to overlap the pieces slightly for a seamless look.
- Seal the beads: Once the decoupage is dry, seal the beads with another layer of decoupage medium, making sure to cover the entire surface. This step will protect the design and give a glossy finish.
4. Varnishing
Varnishing your wooden beads can give them a glossy and protective finish. It enhances the natural beauty
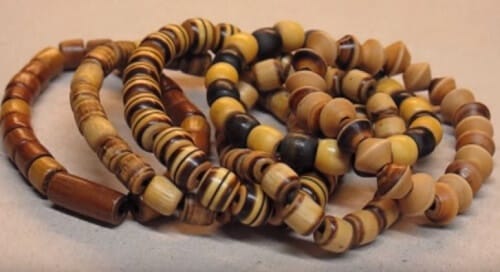
Creative Ideas for Using Handmade Wooden Beads in Jewelry and Crafts
Handmade wooden beads are versatile and can add a unique touch to your jewelry and craft projects. They are available in various shapes, sizes, and colors, making them a favorite among DIY enthusiasts. Whether you are a jewelry maker or enjoy crafting, here are some creative ideas to inspire you:
1. Bracelets
Wooden beads can be used to create stunning and boho-inspired bracelets. Mix and match different sizes and shapes of beads to create a beautiful pattern. You can use stretchy cord or beading wire to string the beads, and add a clasp for easy wear. Experiment with different color combinations and bead arrangements to make your bracelets stand out.
2. Necklaces
Wooden beads can be the focal point of a statement necklace. Combine them with other materials such as glass beads, metal charms, or gemstones to create a unique design. You can use different techniques like knotting or wire wrapping to give your necklace an artistic flair. Play with different lengths and layering to achieve a trendy and eye-catching look.
3. Earrings
Add a touch of nature to your earrings by using wooden beads. Whether you prefer dangles or studs, wooden beads can be incorporated into various earring designs. Create simple drop earrings by attaching a single wooden bead to an earring hook, or experiment with more intricate designs by combining different types of beads and charms.
4. Keychains
For a functional and stylish accessory, use wooden beads to make keychains. String a few beads onto a sturdy cord or chain, and attach a keyring at the end. You can personalize the keychain by adding additional charms or pendants. It’s a great way to showcase your creativity while keeping your keys organized.
5. Home Decor
Wooden beads can also be incorporated into home decor projects. String them onto a twine or wire to create a unique garland that can be hung on walls, mantels, or draped over furniture. You can also use them to embellish curtains, lampshades, or tassels. Paint or stain the beads to match your decor theme or leave them in their natural state for a rustic look.
6. Macrame
Combine the beauty of macrame with the natural charm of wooden beads. Use the beads as accents within your macrame wall hangings, plant hangers, or bracelets. The beads can be incorporated into the knots or used as decorative elements. Experiment with different bead sizes and colors to achieve the desired effect.
7. Children’s Crafts
Wooden beads are safe and suitable for children’s crafts. Let your little ones unleash their creativity by stringing beads to make colorful bracelets, necklaces, or even cute keychains. It’s a fun and engaging activity that helps develop fine motor skills and encourages imaginative play. Ensure adult supervision when working with small beads to prevent choking hazards.
8. Mixed Media Art
Wooden beads can add an interesting dimension to mixed media art projects. Incorporate them into collages, paintings, or sculpture to create texture and visual interest. Combine them with other materials such as fabric, paper, or metal for a truly unique art piece.
In summary, handmade wooden beads offer endless possibilities for creativity in jewelry making and crafts. Whether you are creating stunning bracelets, statement necklaces, or adding a touch of nature to your home decor, wooden beads can elevate your projects with their natural beauty and versatility. So, let your imagination run wild and explore the world of possibilities with handmade wooden beads.
FAQs
1. How can I make wooden beads?
To make wooden beads, start by selecting a suitable type of wood and cutting it into small cylindrical shapes. Then, use a drill with a small bit to create a hole through the center of each wooden piece. Next, sand the beads to smooth out any rough edges. Finally, apply a sealant or varnish to protect the wood and enhance its appearance.
2. What tools do I need to make wooden beads?
To make wooden beads, you will need a few basic tools including a saw or a chisel to shape the wood, a drill with a small bit to create holes, sandpaper or a sanding block to smooth the beads, and a sealant or varnish to protect the finished beads. Additionally, you may need pliers or tweezers to hold the beads while working on them.
3. Are there any safety precautions to consider when making wooden beads?
Yes, when making wooden beads, it is important to wear protective gear such as safety goggles and gloves to prevent injuries. Additionally, make sure to work in a well-ventilated area to avoid inhaling sawdust or fumes from the sealant or varnish. Take breaks as needed to avoid strain or fatigue, and always follow the manufacturer’s instructions for any tools or materials used.
Conclusion:
In conclusion, learning how to make wooden beads is a rewarding and creative craft. By following the step-by-step process, you can create unique and personalized beads to use in various DIY projects. Making wooden beads allows you to unleash your creativity and explore different designs, shapes, and finishes. Whether you are a beginner or an experienced crafter, this versatile technique offers endless possibilities for jewelry making, home decor, and gift giving. With a little practice and experimentation, you can master the art of making beautiful wooden beads that truly reflect your personal style and artistic flair.