If you’re looking to add a unique touch to your wooden crafts, stenciling is a fantastic technique to explore. By using stencils, you can easily create beautiful designs on wood surfaces, whether it’s a sign, furniture piece, or decorative item.
Painting with stencils on wood is a fun and straightforward process that allows you to achieve precise and professional-looking results. With the right materials and a few simple steps, you’ll be able to transform your wooden projects into stunning works of art.

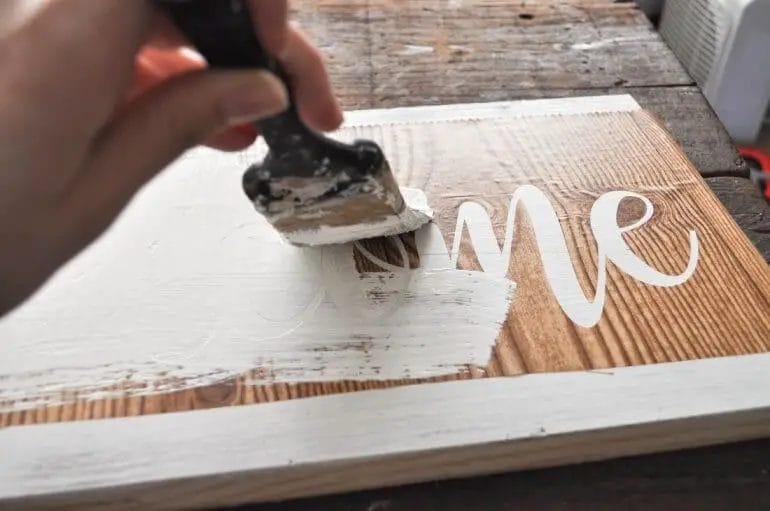
First, choose the stencil design that suits your vision and secure it firmly onto the wood surface with masking tape or adhesive. Next, carefully apply your chosen paint color using a stencil brush or foam brush, making sure to dab the paint onto the stencil to avoid bleed-through. Repeat this process until you achieve the desired coverage and let the paint dry completely.
Once the paint is dry, gently remove the stencil to reveal your masterpiece. You can add additional details or embellishments if desired, and protect the finished piece with a varnish or sealer for durability. With a little practice and creativity, stenciling on wood can bring your crafts to life and showcase your personal style.
Whether you’re a beginner or an experienced crafter, painting with stencils on wood offers endless possibilities for customization and design. So grab your stencils, gather your paints, and let your creativity shine on your next
Outline:
- Introduction to Content Optimization
- Importance of SEO optimization
- Understanding the target audience
- Keyword research and selection
- Structuring the content
- Optimizing title tags and meta descriptions
- Using header tags
- Optimizing images and media
- Creating high-quality and engaging content
- Monitoring and analyzing performance
Content optimization plays a crucial role in improving the visibility and search engine rankings of a website. In this section, we will explore the importance of SEO optimization and delve into various strategies for optimizing your content.
Importance of SEO Optimization
In today’s digital age, having a strong online presence is vital for businesses. With billions of websites competing for attention, it is essential to optimize your content to stand out from the crowd. SEO optimization helps search engines understand your content better and rank it higher in search results.
By optimizing your content, you increase the chances of attracting organic traffic to your website. This means that when users search for relevant keywords or phrases, your website has a higher chance of appearing on the first page of search results.
Understanding the Target Audience
Before embarking on any content optimization strategy, it is crucial to understand your target audience. Knowing their preferences, needs, and search behavior will help you create content that resonates with them and ultimately drives more engagement and conversions.
Conducting thorough market research and using tools like Google Analytics can provide valuable insights into your target audience’s demographics, interests, and browsing habits.
Keyword Research and Selection
Keywords are the foundation of SEO optimization. They are the terms or phrases that users enter into search engines to find information. Conducting keyword research allows you to identify relevant keywords for your content and optimize it accordingly.
Use keyword research tools like Google Keyword Planner or SEMrush to discover popular keywords in your industry. Aim for a mix of high-volume and long-tail keywords to target a wider range of search queries.
Structuring the Content
Properly structuring your content improves its readability and SEO performance. Break your content into headings, subheadings, and paragraphs to make it easier for readers to navigate and skim through. It also helps search engines understand the hierarchy and context of your content.
Optimizing Title Tags and Meta Descriptions
Title tags and meta descriptions are HTML elements that provide concise summaries of your content. Optimizing them with relevant keywords and compelling descriptions can significantly impact click-through rates and improve search engine rankings.
Create unique, descriptive, and keyword-rich title tags and meta descriptions for each page of your website. Keep them concise, within the recommended character limits, and compelling enough to attract users’ attention in search results.
Using Header Tags
Header tags (H1, H2, H3, etc.) help structure and organize your content. They also provide additional context to search engines about the main topics and subtopics discussed in your content.
Use header tags strategically by incorporating relevant keywords and ensuring a logical hierarchy. The H1 tag should only be used for the main heading of the page, while the H2 to H6 tags can be used for subheadings.
Optimizing Images and Media
Images and media can enhance the visual appeal and engagement of your content. However, they can also impact page load times, which can negatively affect SEO. Therefore, it is important to optimize images and media files for faster loading speeds.
Compress images without compromising their quality, use descriptive filenames, and include alt text that describes the image’s content. Also, consider hosting media files on reliable servers or using content delivery networks (CDNs) to improve loading times.
Creating High-Quality and Engaging Content
Creating high-quality, valuable, and engaging content should be the core focus of your SEO optimization efforts. Search engines prioritize content that satisfies users’ search intent and provides relevant and comprehensive information.
Write in-depth articles, include relevant statistics, examples, and actionable tips. Use a conversational tone and engage with your readers. Incorporate semantically related keywords naturally throughout your content to further enhance its relevancy.
Monitoring and Analyzing Performance
After implementing content optimization strategies, it is essential
Choosing the Right Stencil Design
When it comes to stenciling, one of the most important aspects is selecting the right stencil design. The design you choose will determine the overall look and feel of your project, so it’s essential to choose wisely. Here are some factors to consider when selecting a stencil design:
1. Project Type
The first thing you should consider is the type of project you will be working on. Are you planning to stencil a wall, furniture, or fabric? The design you choose should be suitable for the surface you’ll be stenciling on. For example, if you’re stenciling a wall, you might want to choose a larger, more intricate design. On the other hand, if you’re stenciling a small piece of furniture, a smaller and simpler design might be more appropriate.
2. Style and Theme
Think about the overall style and theme of your space or project. Are you going for a modern, minimalist look, or do you prefer something more traditional or whimsical? The stencil design you choose should align with the aesthetic you’re trying to achieve. Consider the motifs, patterns, and shapes that will complement your existing decor or desired theme.
3. Size and Scale
Consider the size and scale of the area you’ll be stenciling. A large design may overwhelm a small space, while a small design might get lost in a larger area. Take measurements and visualize how the stencil design will look in proportion to the surface. You can also use masking tape to mock up the design and assess its suitability before committing to it.
4. Complexity
Think about the level of complexity you’re comfortable working with. Some stencil designs are more intricate and require precise cutting and placement, while others are simpler and more forgiving. If you’re a beginner or don’t have much experience with stenciling, it might be best to start with a simpler design and gradually work your way up to more complex patterns.
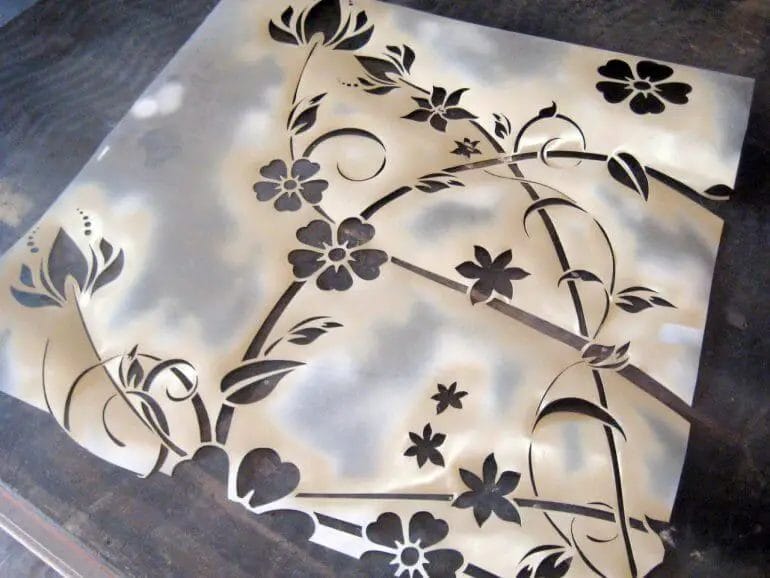
5. Versatility and Reusability
Consider the versatility and reusability of the stencil design. Some stencils are designed for single-use only, while others can be used multiple times. If you anticipate using the same design for future projects or touch-ups, opt for a stencil made from durable or reusable material like mylar or plastic. This will save you money in the long run and allow you to experiment with different colors and techniques.
6. Personal Preference
Ultimately, trust your instincts and choose a stencil design that resonates with you. Consider your personal preferences, tastes, and the message or mood you want to convey through your stenciled project. Remember, stenciling is a creative endeavor, so don’t be afraid to express your individuality and have fun with the design selection process.
By taking these factors into account, you’ll be able to choose the right stencil design for your project, ensuring a visually appealing and successful stenciling experience.
Preparing the Wood Surface for Painting
Before starting any painting project on wood, it is essential to properly prepare the surface to ensure a smooth and long-lasting finish. Preparing the wood surface involves several steps, such as cleaning, sanding, and priming, that help to create an ideal canvas for the paint.
Cleaning the Wood Surface
The first step in preparing the wood surface for painting is to ensure that it is clean and free from any dirt, dust, or grease. This can be done by using a mild detergent mixed with water and a soft cloth or sponge. Gently scrub the surface in circular motions to remove any grime or residue. Rinse with clean water and allow the wood to dry completely before proceeding to the next step.
Sanding the Wood Surface
Sanding the wood surface is crucial to create a smooth texture and to remove any imperfections. Start by using a medium-grit sandpaper (around 120-150 grit) to gently sand the entire surface in the direction of the wood grain. This will help to remove any rough areas, splinters, or old paint. Be sure to sand evenly and avoid applying too much pressure, as it may damage the wood. Once you have achieved a smooth surface, switch to a fine-grit sandpaper (around 220 grit) for a final sanding to create a polished finish.
Repairing Damaged Areas
Inspect the wood surface for any cracks, holes, or dents. Use a wood filler or putty to fill in these imperfections. Apply the filler using a putty knife and smooth it out to create an even surface. Allow the filler to dry according to the manufacturer’s instructions, and then sand it gently to blend it with the rest of the wood surface.
Priming the Wood Surface
Applying a coat of primer is essential to ensure proper adhesion of the paint and to seal the wood surface. Choose a primer that is suitable for wood and follow the manufacturer’s instructions for application. Use a brush or a roller to apply a thin and even coat of primer on the entire surface. Allow the primer to dry completely before proceeding to the next step.
Final Inspection and Cleaning
After the primer has dried, inspect the wood surface for any remaining imperfections. If needed, repeat the repair and sanding process to ensure a smooth and flawless surface. Once the surface is ready, clean it again with a soft cloth or sponge to remove any dust or debris that may have accumulated during the preparation process.
Summary
Properly preparing the wood surface for painting is essential for achieving a professional-looking and long-lasting finish. The process involves cleaning the surface, sanding to create a smooth texture, repairing any damaged areas, applying a coat of primer, and conducting a final inspection and cleaning. By following these steps, you can ensure that your painted wood projects will turn out beautifully and withstand the test of time.
Applying Paint with Stencils on Wood
In this section, we will explore the process of applying paint with stencils on wood. Stenciling is a popular technique that allows you to create beautiful and intricate designs on various surfaces, including wood. Whether you are looking to add a decorative element to your wooden furniture or create personalized signs, stenciling can help you achieve stunning results.
Materials Needed
Before we dive into the step-by-step process, let’s gather the materials you will need for this project:
- Wooden surface (furniture, sign, or any other wooden item)
- Stencil of your choice
- Painter’s tape
- Paintbrush or foam brush
- Acrylic paint
- Paper towels or cloth
Step 1: Prepare the Wood Surface
Start by preparing the wood surface you plan to stencil on. Ensure that it is clean, smooth, and free from any dust or debris. If necessary, sand the surface to create a smooth and even texture. Wipe away any excess dust with a cloth or paper towel.
Step 2: Position the Stencil
Once your wood surface is ready, position the stencil onto the desired area. Use painter’s tape to secure the stencil in place, ensuring it doesn’t move during the painting process. Take your time to align the stencil properly for a neat and precise design.
Step 3: Prepare the Paint
Pour a small amount of acrylic paint onto a palette or a disposable plate. Choose the color that complements your wood surface and the overall aesthetic you want to achieve. Dip your paintbrush or foam brush into the paint and remove any excess by dabbing it on a paper towel.
Step 4: Apply the Paint
With your brush loaded with paint, gently dab or stipple the color onto the stencil. Be careful not to apply too much pressure, as it can cause the paint to bleed under the stencil. Gradually build up the color by applying multiple thin layers, rather than one heavy coat.
Step 5: Remove the Stencil
Once you have covered the entire stencil with paint, carefully remove the stencil from the wood surface. Peel off the painter’s tape gently to avoid smudging the design. Take a moment to admire the initial results of your stenciling work.
Step 6: Allow the Paint to Dry
Allow the paint to dry completely before moving on to any additional steps or adding any protective sealant. The drying time can vary depending on the type and thickness of paint used, so refer to the paint’s instructions for guidance.
Step 7: Optional Finishing Touches
Once the paint is dry, you can choose to add some finishing touches to enhance the design. You can use a fine brush or a stencil brush to add shading, highlights, or additional details to the painted design. This step allows you to personalize and customize your stenciled wood piece.
Step 8: Seal the Paint (Optional)
If your stenciled wood piece will be exposed to frequent handling or environmental elements, consider applying a protective sealant. This will help preserve the paint and extend the longevity of your stenciled design. Select an appropriate sealant based on the type of paint used and the desired finish (matte, satin, or glossy).
In summary, applying paint with stencils on wood is a creative and enjoyable way to add personalized designs and patterns to your wooden items. By following these step-by-step instructions and taking your time to ensure precision, you can achieve stunning results that will enhance the aesthetic appeal of your wood projects.
Adding Depth and Texture with Multiple Stencil Layers
Stencil art is a popular form of artistic expression that involves creating intricate designs by cutting or painting through a stencil onto a surface. While stenciling can produce beautiful and striking images on its own, adding depth and texture to your stencil art can take it to the next level.
One way to achieve depth and texture in your stencil art is by using multiple layers of stencils. By layering different stencil designs on top of each other, you can create a multi-dimensional effect that adds visual interest and complexity to your artwork.
Here are some tips and techniques for adding depth and texture with multiple stencil layers:
1. Plan your design
Before you start stenciling, it’s important to plan out your design and determine which elements you want to add depth to. Think about how the different stencil layers will interact with each other and how they will contribute to the overall composition of your artwork.
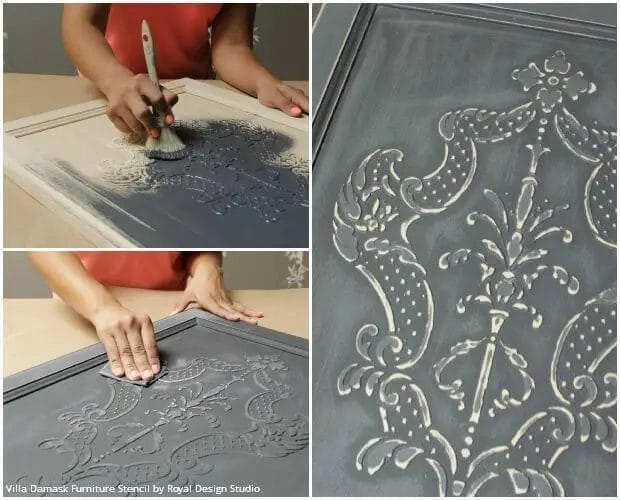
2. Start with a base layer
Begin by stenciling your base layer onto the surface. This could be a simple background or a foundational element that will serve as the backdrop for your design. Use a stencil brush or sponge to apply paint evenly and avoid smudging.
3. Choose complementary stencil designs
Select stencil designs that complement each other and will add dimension to your artwork. Consider using stencils with different shapes, sizes, and patterns to create contrast and visual interest. You can also experiment with overlapping stencil designs to create unique effects.
4. Layer the stencils
Once your base layer is dry, position the second stencil layer on top of it. Secure the stencil in place with masking tape to prevent any movement. Then, using a different color or shade of paint, stencil the second layer onto the surface. Be mindful of aligning the stencil accurately to create a seamless transition between the layers.
5. Repeat the process
If you want to add even more depth and texture to your artwork, you can repeat the layering process with additional stencil designs. Just make sure each layer is completely dry before moving on to the next one. This will prevent any smudging or blending of the paint.
6. Experiment with different techniques
Don’t be afraid to get creative and experiment with different techniques to enhance the depth and texture of your stencil art. You can try using different types of paint, such as metallic or textured paints, to add a unique touch. You can also use shading techniques to create the illusion of depth and dimension.
7. Finishing touches
Once you’re satisfied with the depth and texture of your stencil art, you can add some finishing touches to complete the piece. This could include adding highlights or shadows, adding additional details with a fine brush, or applying a protective sealant to preserve your artwork.
In summary, adding depth and texture to your stencil art can be achieved through the use of multiple stencil layers. By carefully planning your design, choosing complementary stencil designs, and layering them strategically, you can create visually captivating and dynamic artwork. Don’t be afraid to experiment with different techniques and materials to add your own personal touch to your stencil art.
Finishing and Sealing the Painted Wood Surface
Once you have completed painting your wooden surface, it is important to properly finish and seal it to protect the paint and enhance its durability. This final step will not only ensure that your painted wood looks its best, but also prolong its lifespan.
Here are some essential tips for finishing and sealing a painted wood surface:
1. Allow Sufficient Drying Time
Before applying any finishing or sealing product, make sure to allow sufficient drying time for the paint to cure completely. This will typically take anywhere from 24 to 48 hours, depending on the type of paint used and environmental conditions. Rushing this process may result in a compromised finish.
2. Sand the Surface
Prior to applying any finish, it is recommended to lightly sand the painted surface. This will help smooth out any imperfections, remove any brushstrokes or drips, and provide a better bonding surface for the finish. Use a fine-grit sandpaper and sand in the direction of the wood grain.
3. Choose the Right Finish
When it comes to finishing a painted wood surface, there are various options to consider. It is important to choose a finish that suits your desired look and provides the necessary protection. Common finishing options include clear varnish, polyurethane, lacquer, or wax. Each has its own advantages and considerations, so do some research or consult with a professional to determine the best choice for your project.
4. Apply the Finish
Once you have selected the appropriate finish, carefully apply it to the painted wood surface. Follow the manufacturer’s instructions for the specific product you are using. Generally, it is best to use a high-quality brush, foam applicator, or sprayer to ensure an even and smooth application. Apply thin coats to avoid drips or pooling of the finish.
5. Allow Sufficient Drying and Curing Time
After applying the finish, allow sufficient drying and curing time as per the manufacturer’s instructions. This can range from a few hours to several days, depending on the type of finish and environmental conditions. Avoid touching or using the finished surface until it is fully cured to prevent any damage or smudging.
6. Sand and Repeat (Optional)
If desired, you can repeat the process of sanding and applying additional coats of finish for a smoother and more durable surface. This step can help achieve a professional-looking finish, especially for high-traffic or outdoor applications. Remember to sand lightly between coats for better adhesion and a smoother result.
7. Maintain and Protect
Once the finish has fully cured, it is important to maintain and protect the painted wood surface. Regular cleaning with a mild soap and water solution or a specifically formulated wood cleaner will help remove any dirt or debris. Avoid using abrasive cleaners or harsh chemicals that may damage the finish. Additionally, consider using protective pads or coasters to prevent scratches and moisture damage.
In summary, finishing and sealing a painted wood surface is a crucial step in the painting process. It not only enhances the appearance of the wood but also provides much-needed protection against wear, moisture, and UV damage. By following the steps outlined above, you can ensure that your painted wood surface remains beautiful and durable for years to come.
Frequently Asked Questions (FAQs)
1. How do I paint with stencils on wood?
To paint with stencils on wood, first, secure the stencil to the wood surface using tape or adhesive. Then, dip a stencil brush or sponge into acrylic paint and dab off any excess before gently applying the paint over the stencil openings. Peel off the stencil carefully while the paint is still wet, and let it dry completely.
2. What type of paint should I use for stenciling on wood?
For stenciling on wood, it is recommended to use acrylic paint. Acrylic paint adheres well to wood surfaces and offers a wide range of vibrant colors to choose from. It dries quickly, is water-resistant, and provides excellent coverage, making it ideal for stenciling projects on wood.
3. How can I ensure clean and crisp stencil designs on wood?
To achieve clean and crisp stencil designs on wood, make sure the stencil is securely taped or adhered to the wood surface to prevent any movement. Apply the paint gently and with a light hand to avoid bleeding or smudging. Use a stencil brush or sponge to dab the paint instead of brushing it on, and remove the stencil carefully while the paint is still wet.
Conclusion
In conclusion, painting with stencils on wood is a creative and fun way to add unique designs to your projects. Whether you are a beginner or experienced artist, stencils offer an easy and precise method for achieving professional-looking results. By selecting the right stencil, preparing the wood surface properly, and using the right painting techniques, you can create stunning artwork on wood in no time.
Remember to choose high-quality stencils that are suitable for wood surfaces and use durable paints that will withstand the test of time. Experiment with different colors and patterns to achieve the desired effect. With practice and patience, you will be able to create beautiful stenciled wood pieces that will impress and inspire.
So, grab your stencils, gather your supplies, and start creating your own customized wooden masterpieces today!