If you’re looking to restore the beauty of your teak wood furniture or flooring, look no further. Teak wood is known for its durability and natural beauty, but over time it can become weathered and lose its luster. In this guide, we’ll show you step-by-step how to bring back the rich, warm tones of teak wood using simple restoration techniques. From cleaning and sanding to applying teak oil, we’ve got you covered. So, let’s dive in and discover how to restore teak wood to its former glory.
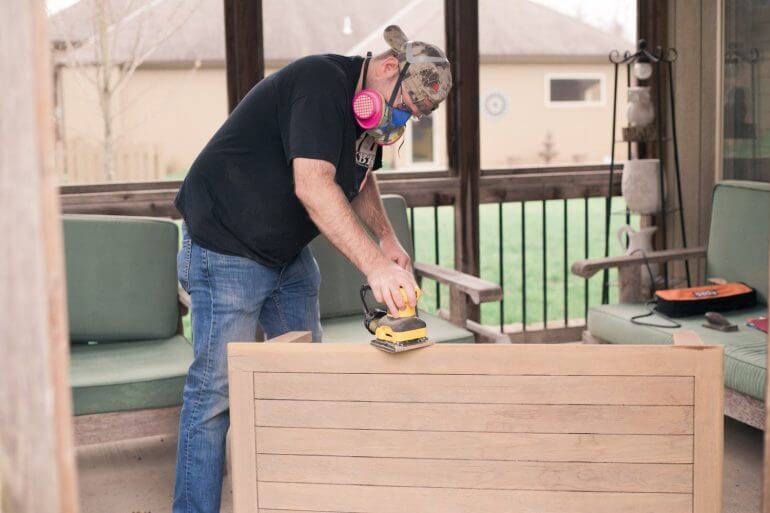
Cleaning and Sanding: Preparing the Teak Wood Surface
Before starting any teak wood restoration project, it is important to properly prepare the surface to ensure optimal results. This involves cleaning the wood and sanding it to create a smooth and even surface.

Cleaning the Teak Wood
The first step in preparing the teak wood surface is to clean it thoroughly. Over time, teak wood can accumulate dirt, grime, and even mildew, which can affect the appearance and longevity of the wood. Here’s how you can clean the teak wood:
- Start by removing any loose dirt or debris from the surface using a soft brush or cloth.
- Next, create a cleaning solution by mixing equal parts water and mild dish soap.
- Dip a sponge or soft cloth into the cleaning solution and gently scrub the teak wood surface. Make sure to cover all areas, including the corners and crevices.
- Rinse the wood thoroughly with clean water to remove any soap residue.
- Allow the teak wood to dry completely before proceeding to the next step.
Sanding the Teak Wood
Once the teak wood is clean and dry, the next step is to sand it to achieve a smooth and even surface. Sanding helps to remove any roughness, discoloration, or imperfections in the wood. Here’s how you can sand the teak wood:
- Begin by selecting the appropriate grit sandpaper. For initial sanding, start with a coarse grit (around 80-100) to remove any stubborn spots or blemishes. Then, switch to a finer grit (around 120-180) for a smoother finish.
- Wrap the sandpaper around a sanding block or use a mechanical sander for larger surfaces.
- Start sanding the teak wood surface using long, smooth strokes in the direction of the wood grain. Avoid applying excessive pressure, as this can damage the wood.
- Continue sanding until the surface is smooth and even. Check for any remaining rough spots or imperfections and sand them as needed.
- Once the sanding is complete, wipe away any dust or debris with a clean cloth.
By following these steps to clean and sand the teak wood surface, you are ensuring that the wood is properly prepared for the next stage of the restoration process. This will result in a beautiful and long-lasting finish for your teak wood furniture, decking, or other applications.
Applying Teak Oil: Restoring the Natural Shine and Color
Teak wood is a popular choice for outdoor furniture and decking due to its natural durability and resistance to rot and decay. Over time, however, teak wood can lose its original shine and color due to exposure to sunlight and other elements. Fortunately, restoring the natural beauty of teak wood is relatively easy with regular maintenance and the application of teak oil. In this section, we will discuss the steps involved in applying teak oil and how it can help revitalize your teak wood.
1. Prepare the Surface
Before applying teak oil, it is important to prepare the surface by cleaning it thoroughly. Use a mild detergent mixed with warm water to remove any dirt, grime, or stains from the teak wood. Scrub the surface gently with a soft brush or sponge, working in the direction of the wood grain. Rinse the wood thoroughly with clean water and allow it to dry completely.
2. Sand the Surface
If the teak wood has rough or weathered spots, sanding the surface can help to smooth out imperfections and prepare it for the application of teak oil. Use fine-grit sandpaper and sand in the direction of the wood grain. Be careful not to apply too much pressure, as it can damage the wood. Once you have finished sanding, remove any dust or debris with a clean cloth.
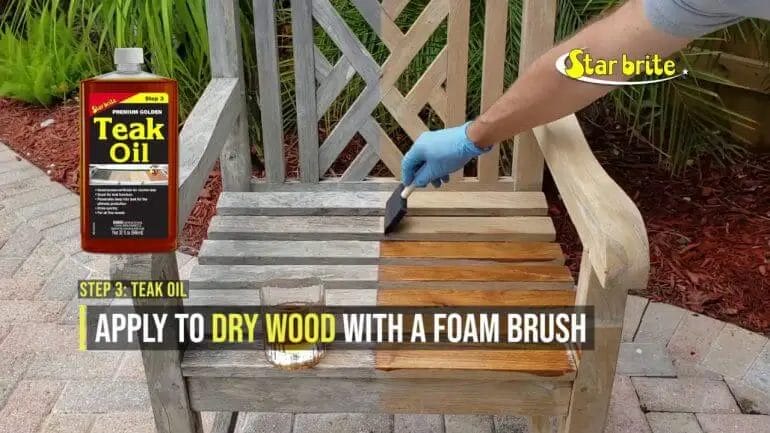
3. Apply Teak Oil
Now that the surface is clean and smooth, it is time to apply the teak oil. Start by shaking the teak oil container well to ensure proper mixing of the product. Using a brush or a clean cloth, apply a thin and even coat of teak oil to the teak wood, working in the direction of the wood grain. Ensure that the entire surface is covered, paying special attention to any hard-to-reach areas or joints.
4. Allow Absorption and Wipe Off Excess
After applying the teak oil, allow it to sit on the surface for about 15-30 minutes to allow for proper absorption. The wood will appear darker as it absorbs the oil. Once the oil has penetrated the wood, use a clean cloth to wipe off any excess oil that has not been absorbed. This step is crucial to prevent the oil from becoming sticky or tacky.
5. Repeat the Process
Depending on the condition of the teak wood, you may need to repeat the process of applying teak oil to achieve the desired results. For severely weathered or neglected teak wood, multiple coats may be necessary. Allow each coat to fully dry before applying the next one.
6. Maintain and Protect
Regular maintenance is key to keep your teak wood looking its best. Periodically clean the surface with a mild detergent and warm water, followed by a rinse with clean water. Avoid using harsh chemicals or abrasive cleaners, as they can damage the wood. Additionally, consider using a teak sealer or protector to provide an extra layer of protection against the elements.
In summary, applying teak oil is an effective way to restore the natural shine and color of teak wood. By following the steps outlined above, you can revitalize your teak furniture or decking and keep it looking beautiful for years to come.
Repairing Cracks and Damage: Restoring the Integrity of the Teak Wood
Teak wood is known for its durability and strength, but over time, it can develop cracks and damage due to various factors such as weather exposure, moisture, and regular wear and tear. Fortunately, with proper care and maintenance, you can restore the integrity of teak wood and make it look as good as new. In this section, we will discuss the steps you can take to repair cracks and damage in teak wood.
1. Cleaning and preparing the damaged area
The first step in repairing cracks and damage in teak wood is to clean the affected area. Use a mild detergent and water to gently wash the surface, removing any dirt, grime, or debris. Once the area is clean, allow it to dry completely before proceeding to the next step.
2. Filling the cracks
After the damaged area is clean and dry, you can proceed to fill the cracks. There are several options available for filling cracks in teak wood, including epoxy resin, wood filler, or a teak-specific filler. Choose a filler that matches the color of your teak wood for a seamless repair.
Apply the filler to the crack, using a putty knife or a spatula. Make sure to push the filler deep into the crack to ensure a strong bond. Smooth out the surface of the filler and remove any excess with a clean cloth or a plastic scraper. Allow the filler to dry according to the manufacturer’s instructions.
3. Sanding the repaired area
Once the filler has dried, use sandpaper to smooth out the repaired area. Start with a coarse-grit sandpaper and gradually move to finer grits for a smooth finish. Sand in the direction of the wood grain to avoid scratching the surface. Be careful not to sand too aggressively, as it can cause further damage to the wood.
4. Applying teak oil
After sanding, it’s time to apply teak oil to the repaired area. Teak oil not only enhances the natural beauty of the wood but also provides protection against moisture and UV damage. Use a clean cloth or a brush to apply a thin, even coat of teak oil to the repaired area. Allow the oil to penetrate the wood for a few minutes, and then wipe off any excess with a clean cloth.
5. Regular maintenance and care
To ensure the longevity of the repaired teak wood, it is essential to perform regular maintenance and care. Keep the wood clean by regularly dusting and wiping it with a soft cloth. Avoid using harsh chemicals or abrasive cleaners that can damage the wood. Apply teak oil or a protective sealant periodically to maintain the wood’s moisture balance and protect it from environmental damage.
In summary, repairing cracks and damage in teak wood requires proper cleaning, filling, sanding, and applying teak oil. By following these steps and performing regular maintenance, you can restore the integrity and beauty of your teak wood furniture or fixtures. Remember to always use the appropriate products and techniques to ensure the best results.
Sealing and Protecting: Preserving the Beauty of Restored Teak Wood
Teak wood is renowned for its durability, natural beauty, and resistance to rot and decay. It is a popular choice for outdoor furniture, decks, and other exterior applications. However, over time, teak wood can lose its luster and become weathered and gray. Restoring teak wood can bring back its original beauty, but sealing and protecting the wood is essential to maintain its appearance and protect it from further damage.
Why Seal Teak Wood?
Sealing teak wood serves multiple purposes. Firstly, it helps to preserve the natural color of the wood, preventing it from turning gray and weathering. Teak wood contains natural oils that provide some protection, but these oils can fade over time. Sealing the wood helps to replenish and enhance these oils, keeping the wood looking vibrant and rich.
Secondly, sealing teak wood helps to protect it from the damaging effects of moisture, sunlight, and other environmental elements. Teak wood is naturally resistant to rot and decay, but prolonged exposure to moisture can still cause damage. Sealing the wood creates a protective barrier that prevents moisture from penetrating the surface and causing warping, cracking, or splitting.
The Sealing Process
Before sealing teak wood, it is important to ensure that the surface is clean and free of any dirt, grime, or previous sealants. Start by washing the wood with a mild detergent and water to remove any surface dirt. Use a soft brush or sponge to gently scrub the wood, then rinse thoroughly and allow it to dry completely.
Once the wood is clean and dry, it is ready for sealing. There are several options for sealing teak wood, including teak oil, teak sealers, and teak protectants. Each option has its advantages and disadvantages, so it is important to choose the right product for your specific needs.
Teak oil is a popular choice for sealing teak wood. It penetrates the wood, enhancing its natural color and providing protection against moisture and UV rays. However, teak oil needs to be reapplied regularly to maintain its effectiveness.
Teak sealers, on the other hand, create a protective barrier on the surface of the wood. They require less maintenance and provide longer-lasting protection. However, they may alter the natural color of the wood to some extent.
Teak protectants offer a combination of the benefits of teak oil and teak sealers. They penetrate the wood like teak oil, but also form a protective layer on the surface like teak sealers. This provides enhanced protection against moisture, UV rays, and stains.
Regardless of the product chosen, it is important to follow the manufacturer’s instructions for application. Apply the sealer in thin, even coats, using a brush or a cloth. Allow each coat to dry thoroughly before applying the next one. Depending on the product, multiple coats may be required for optimal protection.
Maintenance and Care
Proper maintenance and care are essential to preserve the beauty and longevity of sealed teak wood. Regular cleaning with a mild detergent and water, followed by rinsing and drying, will help to keep the wood looking its best. Avoid using harsh chemicals or abrasive cleaners, as they can damage the sealer and the wood surface.
Over time, the sealer may start to wear off, especially in high-traffic areas. When this happens, it is important to reapply the sealer to maintain the wood’s protection. Check the manufacturer’s recommendations for the frequency of reapplication, as it can vary depending on the product and the level of exposure to the elements.
In summary, sealing and protecting restored teak wood is crucial for preserving its beauty and ensuring its longevity. Sealing helps to maintain the natural color of the wood, protect it from moisture and environmental damage, and prolong its lifespan. By following the proper sealing process and regular maintenance, you can enjoy the timeless beauty of teak wood for years to come.
Maintenance Tips: Ensuring Long-lasting Restoration Results
Once you’ve invested in a restoration project, whether it’s restoring a historic building or a piece of furniture, it’s essential to properly maintain the results to ensure their longevity. Maintenance plays a vital role in preserving the restored elements and preventing any damage or deterioration over time. Here are some essential maintenance tips to help you maintain and prolong the results of your restoration project.
Create a Regular Cleaning Routine
Regular cleaning is crucial for maintaining your restored items. Dust, dirt, and other debris can accumulate over time and cause damage to the restored surfaces. Depending on the nature of the restoration, there are specific cleaning techniques and products recommended. For example, if you have restored wooden furniture, avoid using harsh chemical cleaners and opt for mild, wood-safe cleaners. Regularly dusting and wiping the surfaces with a soft cloth can go a long way in maintaining their appearance and preventing damage.
Protect from Environmental Factors
Environmental factors such as sunlight, moisture, and temperature fluctuations can have a significant impact on the longevity of restored items. Take proactive measures to protect your restoration results from these elements. For instance, if you have restored a painting, display it away from direct sunlight to prevent fading. Similarly, if you have restored a wooden structure, ensure it is adequately protected from moisture by applying a suitable sealant or varnish. Maintaining a consistent temperature and humidity level in your restoration space can also help prevent any unnecessary stress on the restored items.
Address Maintenance Issues Promptly
Regular inspections are essential to identify any signs of wear, damage, or maintenance issues that may require attention. If you notice any scratches, chips, or other forms of damage on your restored items, it’s crucial to address them promptly. Ignoring these issues can lead to further deterioration and may require more extensive repairs down the line. By addressing maintenance issues promptly, you can prevent them from escalating and ensure the long-lasting results of your restoration project.
Follow Professional Guidance
When it comes to maintaining your restoration results, it’s always beneficial to seek professional guidance. Restoration experts can provide you with specific instructions and recommendations tailored to the nature of your restoration project. They can advise you on the best cleaning techniques, maintenance products, and preventive measures to ensure the longevity of the restored items. Following their guidance can help you avoid any unintentional damage or mistakes during the maintenance process.
Document and Preserve
Lastly, it’s essential to document and preserve the details of your restoration project. Keeping records of the materials used, restoration techniques applied, and any other relevant information can be valuable for future maintenance and reference. These records can help you make informed decisions and ensure that you are following the correct maintenance procedures specific to your restoration project.
In summary, proper maintenance is crucial for ensuring the long-lasting results of your restoration project. By creating a regular cleaning routine, protecting from environmental factors, addressing maintenance issues promptly, seeking professional guidance, and documenting the details, you can preserve and extend the life of your restored items. With these maintenance tips in mind, you can enjoy the beauty and authenticity of your restoration for years to come.
FAQs
1. How to restore teak wood?
To restore teak wood, start by gently cleaning it with a mixture of mild soap and water. Scrub the surface using a soft brush or sponge. Rinse thoroughly and allow it to dry completely. Next, lightly sand the wood to remove any roughness or stains. Apply teak oil or a teak sealer to protect and enhance the wood’s natural beauty. Repeat the oiling or sealing process every few months for optimal results.
2. Can I use bleach to clean teak wood?
No, it is not recommended to use bleach to clean teak wood. Bleach can damage the wood and cause it to become discolored. Instead, use a gentle soap and water solution or a specialized teak cleaner to clean the wood.
3. How do I remove stains from teak wood?
To remove stains from teak wood, you can try using a mixture of equal parts vinegar and water. Apply the solution to the stained area and let it sit for a few minutes. Then, gently scrub the stain with a soft brush or sponge. Rinse thoroughly and repeat if necessary. For stubborn stains, you may need to use a specialized teak stain remover.
Conclusion:
In conclusion, restoring teak wood furniture can be a rewarding and satisfying process. By following the steps outlined in this guide, you can bring back the natural beauty and durability of your teak wood pieces. Remember to start by cleaning the furniture thoroughly, then sanding away any imperfections. Apply a teak oil or sealer to protect and enhance the wood’s color. Regular maintenance, including cleaning and occasional resealing, will help keep your teak furniture looking its best for years to come.
Restoring teak wood requires patience and attention to detail, but the results are well worth the effort. Whether you have a teak dining set or a teak bench, following these restoration steps will help you revive its natural charm and extend its lifespan. So, don’t let weathered or worn teak wood furniture go to waste – with a little care and maintenance, you can enjoy its beauty for generations.
Ready to restore your teak wood furniture? Follow the steps outlined in this guide, and you’ll be amazed at the transformation.