If you’re looking to sand teak wood, you’ve come to the right place. Sanding teak wood is a crucial step in the refinishing or restoration process, as it helps to bring out the wood’s natural beauty and smooth out any imperfections. By carefully sanding teak wood, you can remove stains, scratches, and old finishes, allowing you to achieve a fresh, clean surface ready for staining or sealing. In this guide, we’ll provide you with all the information you need to successfully sand teak wood and achieve professional-looking results.

The Benefits of Sanding Teak Wood for a Smooth Finish
Teak wood is a popular choice for outdoor furniture and decking due to its durability and natural beauty. However, over time, teak wood can become weathered and lose its smooth finish. One way to restore the luster and smoothness of teak wood is by sanding it. Sanding teak wood offers several benefits that not only enhance its appearance but also prolong its lifespan. In this section, we will explore the advantages of sanding teak wood for a smooth finish.

1. Restores the Natural Color
Teak wood develops a silver-gray patina over time when exposed to sunlight and moisture. While some people prefer this weathered look, others prefer the original warm honey color of teak. Sanding teak wood removes the outer layer of weathered wood and exposes the fresh, natural color underneath. This restores the original beauty of the wood and gives it a warm glow.
2. Smooths Out Imperfections
As teak wood ages, it may develop small cracks, splinters, or rough patches. Sanding the wood helps to smooth out these imperfections, making it safe and comfortable to touch. It also ensures that the wood surface is even and level, providing a smooth finish that is both aesthetically pleasing and functional.
3. Removes Stains and Discoloration
Teak wood is naturally resistant to stains and discoloration. However, if the wood has been neglected or exposed to harsh elements, it may develop stubborn stains or discoloration. Sanding teak wood can effectively remove these blemishes, restoring the wood’s original color and eliminating any unsightly marks.
4. Enhances Absorption of Protective Coatings
Applying protective coatings, such as teak oil or sealant, is essential to maintain the longevity and appearance of teak wood. Sanding the wood before applying these coatings creates a smooth and porous surface that enhances the absorption of the protective products. This allows the wood to be better protected from moisture, UV rays, and other environmental factors that can cause damage.
5. Extends the Lifespan of Teak Wood
By regularly sanding teak wood, you can help extend its lifespan. Sanding removes the damaged outer layer and exposes fresh, healthy wood. This not only enhances the appearance of the wood but also helps to prevent further deterioration. With proper care and maintenance, including sanding, teak wood can last for decades and continue to showcase its timeless beauty.
In summary, sanding teak wood offers numerous benefits. It restores the natural color, smooths out imperfections, removes stains and discoloration, enhances the absorption of protective coatings, and extends the lifespan of the wood. By investing time and effort in sanding, you can revive the beauty of your teak wood furniture or decking, ensuring that it remains a stunning addition to your outdoor space for years to come.
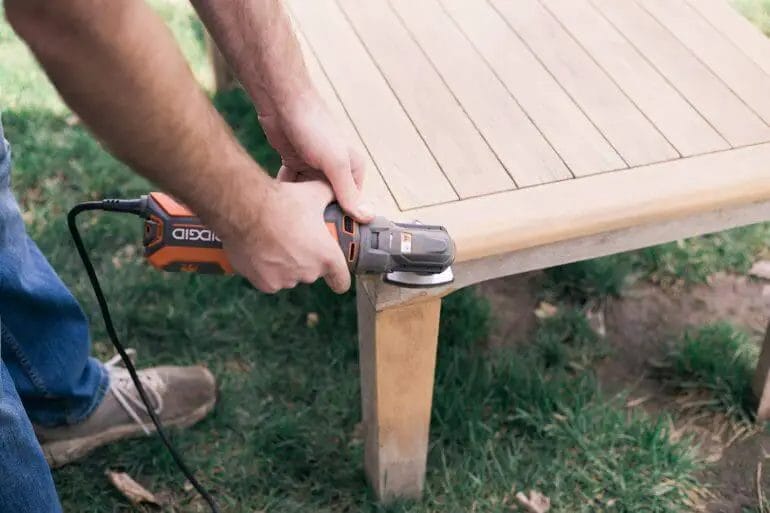
Step-by-Step Guide: How to Properly Sand Teak Wood
Teak wood is a popular choice for outdoor furniture and boat decks due to its natural durability and resistance to moisture. However, over time, teak wood can become weathered and require sanding to restore its original beauty. Sanding teak wood is a simple process that can be done by following these steps:
Materials You Will Need:
- Teak wood piece
- Sandpaper (80-grit, 120-grit, and 220-grit)
- Sandpaper block or electric sander
- Dust mask
- Protective eyewear
- Lint-free cloth
- Tack cloth
- Teak oil or sealant
- Paintbrush or cloth for application
Step 1: Preparation
Before you start sanding, ensure that the teak wood piece is clean and free from any dust or debris. Wipe it down with a damp cloth to remove any surface dirt. Put on a dust mask and protective eyewear to protect yourself from the sanding dust.
Step 2: Coarse Sanding
Begin with the 80-grit sandpaper. Use a sanding block or an electric sander for larger surfaces. Sand the entire teak wood piece in the direction of the wood grain. Apply even pressure and make sure to reach all the nooks and corners. This step is important to remove any major imperfections and to smooth out the wood surface.
Step 3: Medium Sanding
Once you have completed the coarse sanding, switch to the 120-grit sandpaper. This will help to refine the surface and remove any scratches left by the previous sanding. Again, sand in the direction of the wood grain, applying even pressure.
Step 4: Fine Sanding
For the final sanding, use the 220-grit sandpaper. This step will provide a smooth and polished finish to the teak wood. Sand in the direction of the wood grain, ensuring that the surface is evenly sanded.
Step 5: Removing Sanding Dust
After sanding, use a lint-free cloth to wipe away the sanding dust. Make sure to clean all surfaces thoroughly, including the corners and crevices. Then, use a tack cloth to remove any remaining dust particles. This step is crucial to prepare the teak wood for the application of teak oil or sealant.
Step 6: Applying Teak Oil or Sealant
Using a clean cloth or a paintbrush, apply a generous amount of teak oil or sealant to the sanded surface. Make sure to follow the manufacturer’s instructions for application and drying times. Allow the teak oil or sealant to penetrate the wood and provide protection against moisture and UV damage.
Step 7: Maintenance
To keep your teak wood looking its best, it is recommended to regularly clean and reapply teak oil or sealant. This will help to maintain its natural color and protect it from the elements.
Summary
Sanding teak wood is a straightforward process that can be done by following a few simple steps. By properly sanding and sealing teak wood, you can restore its original beauty and ensure its longevity. Regular maintenance will help to keep your teak wood furniture or boat deck looking great for years to come.
Choosing the Right Sandpaper Grit for Teak Wood Sanding
When it comes to sanding teak wood, selecting the correct sandpaper grit is essential to achieve a smooth and flawless finish. The sandpaper grit you choose will determine the level of abrasiveness and the amount of material that will be removed during the sanding process. Different grits are designed for specific purposes, so it’s important to understand which grit is best suited for your teak wood project.
1. Understanding Sandpaper Grits
Sandpaper is available in various grit sizes, ranging from coarse to fine. The grit number indicates the size of the abrasive particles on the sandpaper. Lower grit numbers are coarser and remove material more aggressively, while higher grit numbers are finer and offer a smoother finish with less material removal. The most commonly used grits for teak wood sanding are 80, 120, 220, and 320.
2. Coarse Grits (80-120)
Coarse grit sandpapers, such as 80 or 120, are best suited for initial sanding and removing deep scratches, stains, or uneven surfaces from teak wood. These grits are highly abrasive and should be used with caution to prevent over-sanding. Start with a coarse grit to level the surface and remove imperfections before progressing to finer grits.
3. Medium Grits (120-220)
Medium grit sandpapers, ranging from 120 to 220, are ideal for further smoothing the teak wood surface while removing any remaining scratches or marks left by the coarse grit. These grits help refine the surface and prepare it for the final sanding stages. They are also suitable for removing old finishes or paint from teak wood.
4. Fine Grits (220-320)
Fine grit sandpapers, such as 220 or 320, provide the smoothest finish for teak wood. These grits are used in the final sanding stages to achieve a polished and flawless surface. Fine grits also help to buff out any remaining imperfections, ensuring a professional-looking result.
5. The Sanding Process
When sanding teak wood, it’s important to progress gradually from coarser to finer grits. Start with a coarse grit to remove any roughness or surface imperfections, then move on to medium grits to further refine the surface. Finally, use fine grits to achieve a smooth and polished finish.
It’s also crucial to sand in the direction of the wood grain to avoid cross-grain scratches. Apply even pressure and use smooth, long strokes during the sanding process. Be mindful not to apply excessive pressure, as it can result in uneven sanding and damage to the wood.
Summary
Choosing the right sandpaper grit is crucial for achieving the desired results when sanding teak wood. Coarse grits like 80 or 120 are ideal for initial sanding, while medium grits ranging from 120 to 220 help refine the surface. Fine grits such as 220 or 320 are used for the final sanding stages to achieve a smooth and flawless finish. Remember to sand in the direction of the wood grain and apply even pressure for optimal results.
Common Mistakes to Avoid When Sanding Teak Wood
Sanding teak wood is an important step in maintaining its beauty and longevity. However, if not done properly, it can result in damage to the wood and a less desirable finish. To ensure a successful sanding project, it is crucial to avoid common mistakes that can occur during the process. Here are some key mistakes to watch out for when sanding teak wood:
1. Using the Wrong Grit Sandpaper
One of the most common mistakes when sanding teak wood is using the wrong grit sandpaper. Teak is a dense hardwood, and using a sandpaper that is too coarse can cause deep scratches and damage to the wood. On the other hand, using a sandpaper that is too fine may not effectively remove the old finish or smooth out imperfections. It is important to start with a medium grit sandpaper and gradually progress to finer grits until the desired smoothness is achieved.
2. Applying Too Much Pressure
Another mistake to avoid is applying too much pressure while sanding teak wood. Applying excessive force can lead to uneven sanding and create unwanted dips and grooves in the wood surface. It is important to let the sandpaper do the work and apply gentle, even pressure to ensure an even and smooth finish. Take your time and let the sandpaper glide over the wood in a controlled manner.
3. Neglecting to Sand with the Grain
Sanding against the grain is a mistake that can result in visible scratches and an uneven finish on teak wood. It is crucial to always sand with the grain, following the natural direction of the wood fibers. Sanding with the grain helps to prevent damage to the wood surface and ensures a smooth and uniform finish. Take care to change the direction of your sanding strokes as you progress through different grits of sandpaper.
4. Skipping Grit Progression
Avoid the mistake of skipping grit progression when sanding teak wood. Grit progression refers to the process of starting with a coarser grit sandpaper and gradually moving to finer grits. Each grit helps to remove deeper scratches left by the previous grit and refine the surface. Skipping grits can result in an uneven finish and require additional sanding or refinishing to achieve the desired smoothness. Take the time to progress through the grits systematically for optimal results.
5. Not Removing Dust Between Sanding Steps
Failure to remove dust between sanding steps is a common oversight that can compromise the quality of the final finish. Dust particles left on the wood surface can become trapped in the next layer of finish or stain, causing blemishes and imperfections. It is important to thoroughly clean the wood surface between sanding steps using a tack cloth or vacuum to ensure a clean and smooth surface for the next sanding pass.
In summary, when sanding teak wood, it is essential to avoid common mistakes to achieve a desirable finish. Using the correct grit sandpaper, applying gentle pressure, sanding with the grain, following grit progression, and removing dust between sanding steps are key practices to ensure a successful sanding project. By avoiding these mistakes, you can maintain the natural beauty of teak wood and prolong its lifespan.
Finishing Touches: Tips for Sealing or Staining Teak Wood After Sanding
After sanding your teak wood furniture to perfection, it’s time to give it the finishing touches that will protect and enhance its natural beauty. Sealing or staining the teak wood not only adds a layer of protection but also helps to bring out the rich color and grain patterns of the wood. Here are some tips to help you achieve the best results when sealing or staining teak wood after sanding:
1. Choose the Right Finish
Before you begin the sealing or staining process, it’s important to choose the right finish for your teak wood. There are various options available, including teak oil, sealers, and stains. Teak oil is often used to nourish and protect the wood without altering its natural color. Sealers, on the other hand, provide a clear protective layer that helps to prevent moisture damage. Stains can be used to enhance the color of the teak wood, giving it a darker or richer tone.
2. Prepare the Surface
Before applying any finish to the teak wood, it’s essential to prepare the surface properly. Start by cleaning the wood with a mild detergent and water to remove any dirt or debris. Rinse the wood thoroughly and allow it to dry completely. Once the wood is dry, use a fine-grit sandpaper to smooth out any rough spots or imperfections. Sand in the direction of the wood grain to avoid damaging the surface.
3. Apply the Finish
When it comes to applying the finish, follow the manufacturer’s instructions carefully. Use a brush, cloth, or sponge to evenly apply the finish to the teak wood. Work in small sections, making sure to cover the entire surface. Allow the finish to penetrate the wood for the recommended amount of time, typically around 10-15 minutes. Then, use a clean cloth to wipe off any excess finish and ensure an even application.
4. Multiple Coats
If you’re looking for a more durable finish, consider applying multiple coats of the chosen finish. Allow each coat to dry completely before applying the next one. This will help to build up a protective layer and enhance the appearance of the teak wood. Be sure to lightly sand the wood between coats to ensure proper adhesion.
5. Maintenance and Care
Once you’ve sealed or stained your teak wood furniture, it’s important to maintain and care for it properly. Avoid placing hot items directly on the wood surface to prevent heat marks. Use coasters or placemats to protect the wood from spills or stains. Regularly clean the furniture with a mild soap and water solution to remove dirt and grime. If the wood starts to lose its shine, you can apply a fresh coat of teak oil or reseal the wood as needed.
In summary, sealing or staining teak wood after sanding is a crucial step in preserving and enhancing its natural beauty. By choosing the right finish, preparing the surface properly, and applying the finish with care, you can protect and bring out the best in your teak wood furniture. Remember to follow the manufacturer’s instructions, apply multiple coats for added durability, and maintain the wood regularly to ensure its longevity.
Frequently Asked Questions
Can teak wood be sanded?
Yes, teak wood can be sanded. Sanding teak wood helps to remove any surface imperfections, stains, or old finishes, and can also help to restore its natural color and smoothness. It is recommended to use fine-grit sandpaper and sand in the direction of the wood grain for best results.
How often should I sand teak wood furniture?
The frequency of sanding teak wood furniture depends on its condition and how it is used. Generally, it is recommended to sand teak furniture every 1-2 years to maintain its appearance and remove any built-up dirt or grime. However, if the furniture is exposed to harsh weather conditions or intense use, more frequent sanding may be required.
Can I sand teak wood by hand?
Yes, you can sand teak wood by hand. However, using power tools like an orbital sander can make the process quicker and more efficient. If sanding by hand, it is important to use consistent pressure and sand in the direction of the wood grain to avoid creating uneven surfaces or scratches.
Conclusion
In conclusion, sanding teak wood is an essential step in the process of refinishing or restoring teak furniture. It helps to remove old finish, stains, and imperfections, allowing the natural beauty of the wood to shine through. The use of proper sanding techniques and grits of sandpaper is crucial to achieve a smooth and even surface. Sanding also prepares the teak wood for the application of a new finish or oil, ensuring longevity and protection against weathering and damage. So, whether you are working on a teak deck, table, or chair, don’t forget the importance of sanding for a flawless final result.
