If you’re looking to install a shower base on a wooden floor, it’s important to ensure proper installation to prevent leaks and water damage.
First, start by measuring the area and selecting a shower base that fits your space. Next, prepare the wooden floor by removing any existing flooring and ensuring it is level and structurally sound.

Apply a layer of waterproofing membrane to the wooden floor to create a barrier against moisture. Then, place the shower base on top, making sure it is centered and level.
Secure the shower base to the wooden floor using screws or nails, ensuring it is tightly fastened. Finally, connect the necessary plumbing and test for any leaks before finishing your installation.
By following these steps, you can successfully install a shower base on a wooden floor, creating a functional and waterproof shower area in your bathroom.

Preparing the Wooden Floor for Shower Base Installation
Installing a shower base on a wooden floor requires careful preparation to ensure a sturdy and waterproof foundation. In this section, we will discuss the necessary steps to prepare the wooden floor for shower base installation. Following these steps will help you create a solid base that can withstand the moisture and weight of the shower.
1. Check the Subfloor
The first step is to check the condition of the subfloor. Ensure that it is sturdy, level, and free from any damage. If there are any loose or damaged boards, replace them before proceeding. It is crucial to have a stable subfloor to support the shower base and prevent any sagging or shifting over time.
2. Remove Existing Flooring
If you have any existing flooring, such as tiles or linoleum, remove them to expose the wooden subfloor. Use a pry bar or scraper to carefully lift and detach the flooring material. Make sure to remove any adhesive or residue left behind to create a clean and smooth surface.
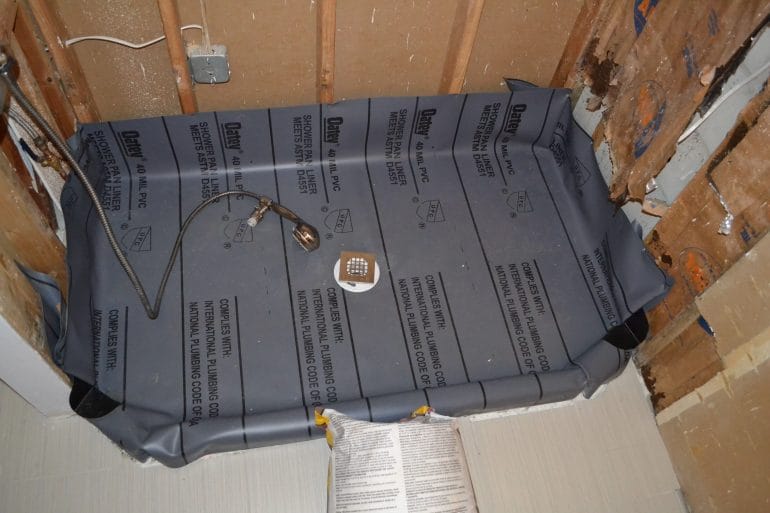
3. Install a Vapor Barrier
To protect the wooden floor from moisture, it is essential to install a vapor barrier. This barrier will help prevent water damage and mold growth. Roll out a waterproof membrane or plastic sheeting over the entire floor area, ensuring that it overlaps the walls by a few inches. Secure the barrier in place using adhesive or tape.
4. Reinforce the Subfloor
Depending on the condition of your subfloor, you may need to reinforce it further to provide additional support for the shower base. If there are any areas that feel weak or spongy, reinforce them by adding extra subflooring or bracing. This will help distribute the weight of the shower evenly and prevent any structural issues in the future.
5. Waterproof the Floor
An important step in preparing the wooden floor is to make it waterproof. Apply a waterproofing membrane or sealer specifically designed for wooden floors. Ensure that you cover the entire floor area, including the seams and corners. This will create a protective barrier that will prevent water from seeping into the wood and causing damage.
6. Allow Sufficient Drying Time
After applying the waterproofing product, allow sufficient time for it to dry completely. Follow the manufacturer’s instructions regarding drying time and curing. It is crucial to wait until the floor is completely dry before proceeding with the shower base installation to avoid compromising the effectiveness of the waterproofing.
7. Level the Floor
Before installing the shower base, ensure that the floor is perfectly level. Use a leveling tool, such as a laser level or a spirit level, to check for any uneven areas. If you find any low spots or unevenness, use a leveling compound or shims to even out the surface. A level floor is essential for proper installation and to prevent any water pooling.
8. Follow Manufacturer’s Instructions
Lastly, carefully read and follow the manufacturer’s instructions for installing the specific shower base you have chosen. Different shower bases may have different installation requirements, so it is essential to adhere to the provided guidelines. This will ensure a proper and secure installation that will stand the test of time.
In summary, preparing the wooden floor for shower base installation involves checking the subfloor, removing existing flooring, installing a vapor barrier, reinforcing the subfloor if necessary, waterproofing the floor, allowing sufficient drying time, leveling the floor, and following the manufacturer’s instructions. By following these steps, you can create a solid foundation for your shower base that is both waterproof and structurally sound.

Step-by-Step Guide to Installing a Shower Base on a Wooden Floor
If you are planning to install a shower base on a wooden floor, it is important to follow a step-by-step process to ensure a proper and secure installation. This guide will walk you through the installation process, providing you with the necessary steps and tips for a successful installation.
Step 1: Gather the tools and materials
Before you begin the installation process, gather all the necessary tools and materials. This typically includes a shower base, wooden floor support, adhesive or mortar, screws, screwdriver, level, measuring tape, and a saw.
Step 2: Prepare the wooden floor
Start by preparing the wooden floor for the installation. Ensure that the floor is clean, dry, and free from any debris. If necessary, repair any damaged areas of the floor.
Step 3: Measure and mark the area
Using a measuring tape, measure the dimensions of the shower base and mark the area on the wooden floor. This will help you ensure that the base is properly aligned and centered.
Step 4: Install the wooden floor support
To provide additional support for the shower base, install a wooden floor support system. This can be done by attaching wooden blocks or beams to the floor using screws. Make sure that the support is level and secure.
Step 5: Apply adhesive or mortar
Apply a layer of adhesive or mortar to the wooden floor, following the manufacturer’s instructions. This will create a stable and level surface for the shower base.
Step 6: Position and secure the shower base
Carefully position the shower base on top of the adhesive or mortar, ensuring that it fits within the marked area. Use a level to check for proper alignment and adjust if necessary. Once the base is in the desired position, secure it to the wooden floor using screws or the recommended installation method provided by the manufacturer.
Step 7: Test for stability
After securing the shower base, test its stability by applying pressure and checking for any movement or shifting. If the base feels secure, proceed to the next step. If not, readjust and reinforce the installation as needed.
Step 8: Connect plumbing fixtures
Finally, connect the plumbing fixtures to the shower base according to the manufacturer’s instructions. This typically involves connecting the drain and any additional plumbing components.
Step 9: Complete the installation
Once the shower base is securely installed and the plumbing fixtures are connected, complete the installation by sealing any gaps or seams with a waterproof sealant. This will help prevent water damage and ensure a watertight installation.
Summary
Installing a shower base on a wooden floor requires careful planning and attention to detail. By following this step-by-step guide, you can ensure a successful installation that provides a sturdy and secure foundation for your shower. Remember to gather all necessary tools and materials, prepare the wooden floor, measure and mark the area, install a wooden floor support system, apply adhesive or mortar, position and secure the shower base, test for stability, connect plumbing fixtures, and seal any gaps or seams. With proper installation, you can enjoy a functional and aesthetically pleasing shower for years to come.
Common Mistakes to Avoid When Installing a Shower Base on a Wooden Floor
Installing a shower base on a wooden floor can be a tricky task. A shower base serves as the foundation for your shower, providing structural support and preventing leaks. However, if not installed properly, it can lead to costly repairs and water damage. To ensure a successful installation, it is important to avoid these common mistakes:
1. Insufficient Floor Preparation
One of the most common mistakes when installing a shower base on a wooden floor is failing to properly prepare the floor. Before installation, it is crucial to ensure that the floor is level, dry, and free of any debris or protruding nails. Additionally, you should consider reinforcing the floor to provide extra support for the shower base.
2. Using the Wrong Type of Shower Base
Choosing the right shower base is essential for a successful installation. Ensure that you select a base that is specifically designed for wooden floors. Using a base that is not compatible with a wooden floor can lead to instability and leaks. Look for shower bases that come with detailed installation instructions and are recommended for wooden floor installations.
3. Improper Sealant Application
Proper sealing around the shower base is crucial to prevent water from seeping into the wooden floor. Many DIYers make the mistake of not applying enough sealant or not using a high-quality waterproof sealant. Take the time to carefully apply the sealant around the edges of the shower base, ensuring a watertight seal. It is also recommended to use a silicone-based sealant that is specifically designed for wet environments.
4. Neglecting to Use Reinforcements
Wooden floors may not provide enough stability on their own to support the weight of a shower base and the occupants. Neglecting to use reinforcements, such as additional support beams or braces, can lead to sagging or even collapsing of the floor. It is essential to consult with a professional or follow manufacturer guidelines to determine the appropriate reinforcements needed for your specific shower base installation.
5. Ignoring Proper Drain Installation
The drain is an integral part of a shower base installation and should not be overlooked. It is essential to ensure that the drain is properly installed and securely connected to the plumbing system. A poorly installed drain can cause leaks, water damage, and unpleasant odors. Follow the manufacturer’s instructions carefully and consider seeking professional help if needed.
6. Rushing the Installation Process
Installing a shower base on a wooden floor requires careful attention to detail and precision. Rushing the installation process can lead to mistakes and poor results. Take the time to thoroughly read and understand the installation instructions provided by the manufacturer. Plan ahead and allocate enough time to complete the installation properly, allowing for any necessary drying or curing time.
7. Not Seeking Professional Help When Needed
If you are unsure about any aspect of the shower base installation, it is always better to seek professional help. Installing a shower base on a wooden floor requires a certain level of expertise and experience. A professional can ensure that the installation is done correctly, minimizing the risk of damage and ensuring the longevity of your shower.
In summary, installing a shower base on a wooden floor can be challenging, but avoiding these common mistakes can help ensure a successful and leak-free installation. Take the time to properly prepare the floor, choose the right shower base, apply sealant correctly, use appropriate reinforcements, install the drain properly, avoid rushing the installation process, and seek professional help when needed. By following these guidelines, you can enjoy a sturdy and durable shower base for years to come.
Essential Tips for Maintaining and Extending the Lifespan of Your Shower Base on a Wooden Floor
Installing a shower base on a wooden floor requires careful consideration and proper maintenance to ensure its longevity and functionality. Without proper care, water damage and mold growth can occur, leading to costly repairs or even the need for a complete replacement. To help you avoid these issues and extend the lifespan of your shower base, we have compiled a list of essential tips:
1. Choose the Right Shower Base
When selecting a shower base for a wooden floor, it is crucial to choose one that is specifically designed for this purpose. Look for a shower base made of materials that are resistant to water damage, such as acrylic or fiberglass. These materials are less likely to warp or crack due to exposure to moisture.
2. Properly Seal the Shower Base
Before installing the shower base, ensure that the wooden floor is properly sealed to prevent water from seeping through. Apply a waterproofing membrane or a suitable sealant to protect the wood from moisture. This step is crucial in preventing water damage and mold growth.
3. Regularly Inspect for Leaks
Regularly inspect the shower base and the surrounding area for any signs of leaks. Look for water stains, dampness, or discoloration on the floor or walls. If you notice any signs of a leak, address the issue immediately to prevent further damage. Repair any damaged seals or caulking promptly.
4. Maintain Proper Ventilation
Poor ventilation can lead to increased humidity levels in the bathroom, which can contribute to water damage and mold growth. Ensure that your bathroom is adequately ventilated by installing an exhaust fan or opening windows during and after showering. This helps to remove excess moisture from the air and prevent it from accumulating on the shower base and wooden floor.
5. Clean and Dry the Shower Base Regularly
Regular cleaning and drying of the shower base are essential to prevent the buildup of soap scum, dirt, and grime. Use a non-abrasive cleaner and a soft cloth or sponge to clean the base after each use. Avoid using harsh chemicals or abrasive scrubbers, as they can damage the surface of the shower base. After cleaning, ensure that the base is thoroughly dried to prevent moisture from causing damage.
6. Use Mats or Rugs
Consider placing mats or rugs outside and inside the shower to absorb excess water and prevent it from reaching the wooden floor. These mats can help to protect the floor from water damage and reduce the risk of slips and falls. Ensure that the mats are regularly cleaned and dried to avoid mold or mildew growth.
7. Address any Plumbing Issues Promptly
If you notice any plumbing issues, such as slow drains or dripping faucets, address them promptly. Plumbing problems can lead to water pooling on the shower base and floor, causing damage over time. Fixing these issues as soon as possible can help to prevent further damage to the wooden floor and the shower base.
8. Schedule Regular Maintenance Checks
Consider scheduling regular maintenance checks with a professional to ensure that your shower base and wooden floor are in good condition. A professional can identify any potential issues early on and provide the necessary repairs or recommendations for extending the lifespan of your shower base.
By following these essential tips, you can maintain and extend the lifespan of your shower base on a wooden floor. Proper care and regular maintenance are key to preventing water damage, mold growth, and costly repairs. Remember to choose the right shower base, seal it properly, inspect for leaks, maintain ventilation, clean and dry the base regularly, use mats or rugs, address plumbing issues promptly, and schedule regular maintenance checks. With these precautions in place, you can enjoy a functional and durable shower base for years to come.
FAQs
Q: How to install a shower base on a wooden floor?
To install a shower base on a wooden floor, start by ensuring the floor is level and sturdy. Apply a layer of waterproofing membrane to the floor and walls. Place the shower base on top of the membrane and align it with the drainpipe. Secure the base to the floor using screws or adhesive. Finally, connect the drainpipe and test for leaks.
Conclusion
In conclusion, installing a shower base on a wooden floor is a manageable DIY project that can enhance the functionality and aesthetics of your bathroom. By following the step-by-step instructions and using the right tools and materials, you can ensure a sturdy and watertight installation. Remember to properly prepare the wooden floor, use a waterproof membrane, and apply a high-quality sealant to prevent water damage. Additionally, regular maintenance and inspections will help prolong the lifespan of your shower base and ensure its optimal performance. Take the plunge and enjoy the convenience and comfort of a well-installed shower base on your wooden floor!
