Looking to add a touch of warmth and charm to your home? Installing wood paneling is a fantastic way to achieve that timeless and rustic look. Whether you’re revamping a room or adding an accent wall, this guide will walk you through the step-by-step process of installing wood paneling with ease. From choosing the right type of paneling to preparing the walls and ensuring a seamless installation, get ready to transform your space into a cozy retreat.
Finding the Right Type of Wood Paneling for Your Space
When it comes to adding warmth and character to your living space, wood paneling is a timeless choice. Whether you’re looking to create a rustic cabin feel or a sleek and modern aesthetic, choosing the right type of wood paneling is essential. In this section, we will explore different types of wood paneling and provide tips on how to select the perfect option for your space.

1. Tongue and Groove Paneling
Tongue and groove paneling is a popular option that offers a seamless and elegant look. This type of paneling consists of interlocking boards with a tongue on one edge and a groove on the other. The tongue fits into the groove, creating a strong and secure connection between the panels. Tongue and groove paneling is known for its durability and can withstand the test of time.
One advantage of tongue and groove paneling is that it can be installed vertically, horizontally, or even diagonally, allowing for versatile design options. This type of paneling is often used in traditional and farmhouse-style spaces, but it can also work well in modern and contemporary settings.
2. Shiplap Paneling
Shiplap paneling has gained popularity in recent years, thanks to its rustic and coastal charm. This type of paneling features long, horizontally installed boards with a slight gap between them. The overlapping design creates a distinctive shadow line, adding depth and visual interest to your walls.
Shiplap paneling is commonly made from pine or cedar wood, although other wood species can also be used. It is often associated with beach houses and cottages, but it can complement a variety of interior styles. Shiplap paneling works particularly well in coastal, farmhouse, and Scandinavian-inspired spaces.
3. Reclaimed Wood Paneling
If you’re looking to add a touch of history and character to your space, consider using reclaimed wood paneling. This type of paneling is made from salvaged wood that has been repurposed from old barns, factories, or other structures. Reclaimed wood paneling showcases the natural beauty of aged wood, complete with knots, nail holes, and weathered textures.
Reclaimed wood paneling offers a unique and authentic look that cannot be replicated with new wood. It brings a sense of warmth and nostalgia to any room and works well in both traditional and contemporary settings. However, it’s important to note that reclaimed wood paneling requires proper maintenance and care to ensure its longevity.
4. Plywood Paneling
Plywood paneling is a budget-friendly option that is often used in more casual and informal spaces. It is made from multiple layers of thin wood veneers, which are glued together to form a sturdy panel. Plywood paneling is available in various grades and finishes, allowing you to find the right one for your desired aesthetic.
One advantage of plywood paneling is its versatility. It can be painted, stained, or left unfinished for a natural look. Plywood paneling can be used in a range of interior styles, from rustic cabins to modern lofts. It’s important to choose a higher-grade plywood for better durability and visual appeal.
5. Beadboard Paneling
Beadboard paneling is characterized by its distinctive vertical grooves, or “beads,” that run the length of each board. It adds a classic and timeless touch to any space and is often associated with traditional and cottage-style interiors. Beadboard paneling can be made from solid wood or medium-density fiberboard (MDF).
This type of paneling is commonly used in entryways, bathrooms, and kitchen backsplashes. It can also be applied to full walls or used as wainscoting for a decorative touch. Beadboard paneling is available in various heights and can be painted in any color to suit your desired look.
Summary
Choosing the right type of wood paneling is crucial for achieving the desired aesthetic in your space. Tongue and groove paneling offers a seamless and elegant look, while shiplap paneling adds rustic charm. Reclaimed wood paneling brings a sense of history and character, while plywood paneling provides a budget-friendly option. Beadboard paneling adds a classic touch to any room. Consider the style, durability, and maintenance requirements of each type of wood paneling before making your decision. With the perfect wood paneling, you can transform your space into a warm and inviting haven.

Step-by-Step Guide to Installing Wood Paneling in Your Home
Are you looking to add warmth and character to your home? Installing wood paneling is a great way to achieve that timeless and rustic look. With the right tools and a little bit of know-how, you can transform any room into a cozy retreat. In this section, we will provide you with a step-by-step guide on how to install wood paneling in your home.
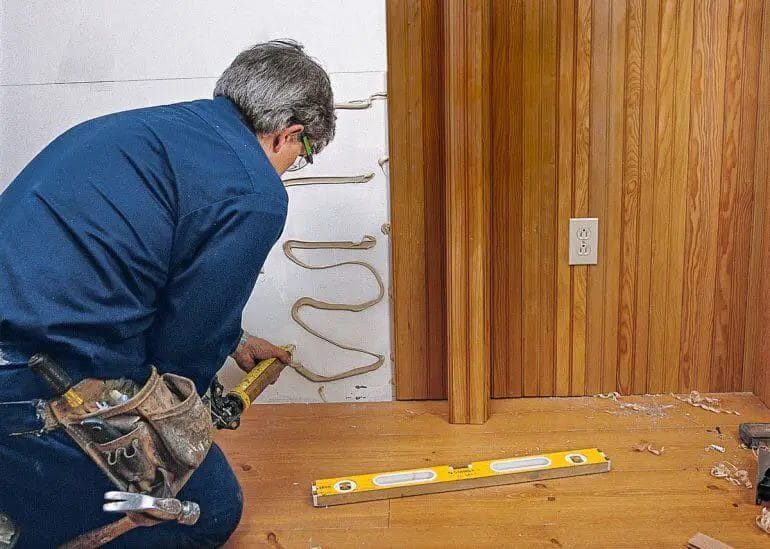
1. Measure and Prepare
The first step in installing wood paneling is to measure the walls where you plan to install the panels. Measure the height and width of each wall, and calculate the square footage to determine how much paneling you will need.
Once you have your measurements, it’s time to prepare the walls. Remove any existing trim, outlet covers, and switch plates. Clean the walls thoroughly to ensure a smooth surface for the paneling.
2. Choose the Right Paneling
There are various types of wood paneling to choose from, including solid wood, veneer, and engineered wood panels. Consider the style and ambiance you want to create in your space when selecting the type of paneling. Solid wood offers durability and authenticity, while veneer provides a more affordable option.
Additionally, choose the finish or stain color that complements your existing decor. Take into account the natural lighting in the room and the overall color scheme.
3. Acclimate the Wood Paneling
Before installing the paneling, allow it to acclimate to the room’s temperature and humidity for at least 48 hours. This step ensures that the wood adjusts to the environment, minimizing the risk of warping or shrinking after installation.
4. Install the Paneling
Start by finding the center point of the wall and mark it with a vertical line. This will serve as your guide for installing the first panel. Apply construction adhesive or paneling adhesive to the back of the panel and place it on the wall, aligning it with the center line.
Continue installing the panels, using a level to ensure they are straight and plumb. Secure the panels to the wall with finishing nails or a pneumatic nail gun. Leave a small gap between each panel to allow for expansion and contraction.
5. Trim and Finish
Once all the panels are installed, it’s time to add the finishing touches. Install new trim around the edges of the panels to create a polished look. Use a miter saw to make precise cuts for each corner.
If desired, you can stain or paint the wood paneling to enhance its appearance. Choose a finish that complements the overall style of the room.
6. Clean and Maintain
To keep your wood paneling looking its best, regularly dust it with a soft cloth or vacuum using a brush attachment. Avoid using harsh chemicals or abrasive cleaners that can damage the finish.
If you notice any scratches or dents, you can easily repair them with wood putty and a touch-up stain or paint.
Summary
Installing wood paneling in your home can transform any space into a cozy retreat. By following this step-by-step guide, you can achieve a professional-looking installation that adds warmth and character to your home.
Remember to measure and prepare the walls, choose the right paneling, acclimate the wood, install the paneling with care, trim and finish the edges, and maintain the wood paneling for long-lasting beauty. Enjoy the rustic charm and inviting atmosphere that wood paneling can bring to your home!
Tips and Tricks for a Professional-Looking Wood Paneling Installation
Wood paneling is a popular option for adding warmth and character to any space. Whether you’re installing it in your living room, bedroom, or office, a professional-looking installation can make a significant difference in the overall aesthetic appeal of the room. To help you achieve a flawless wood paneling installation, here are some tips and tricks to consider:
1. Choose the Right Type of Wood
Before starting your installation, it’s essential to choose the right type of wood paneling for your project. Consider factors such as the room’s style, your budget, and the level of maintenance you’re willing to invest in. Popular options include solid wood paneling, veneer paneling, and engineered wood paneling.
2. Prepare the Surface
Proper surface preparation is crucial for a seamless wood paneling installation. Begin by removing any existing wall coverings, such as wallpaper or paint. Ensure that the surface is smooth, clean, and free from any imperfections. Fill in any holes or cracks and sand the surface to create a flat and even base for the paneling.
3. Measure and Plan
Accurate measurements and careful planning are essential to avoid any wasted materials or improper alignment. Measure the walls and sketch a layout plan to determine the amount of paneling needed. Take into account any doors, windows, or electrical outlets present on the walls. This step will help you calculate the precise size and number of panels required.
4. Start with a Level and Plumb Line
Begin your installation by establishing a level and plumb reference line on the wall. This line will serve as a guide to ensure that your paneling is straight and properly aligned. Use a level to draw a perfectly vertical line from floor to ceiling, marking the starting point for your first panel.
5. Use Adhesive and Nails
When applying adhesive for paneling installation, it’s important to use the correct type and follow the manufacturer’s instructions. Apply the adhesive evenly on the backside of each panel, using a notched trowel for a consistent spread. Additionally, use brad nails to secure the panels in place while the adhesive dries.
6. Cut Precisely
Accurate and precise cuts are crucial for a professional-looking installation. Use a sharp utility knife or a power saw to cut the paneling to size. Take caution while cutting around obstacles such as outlets or light switches, ensuring a proper fit and a seamless appearance.
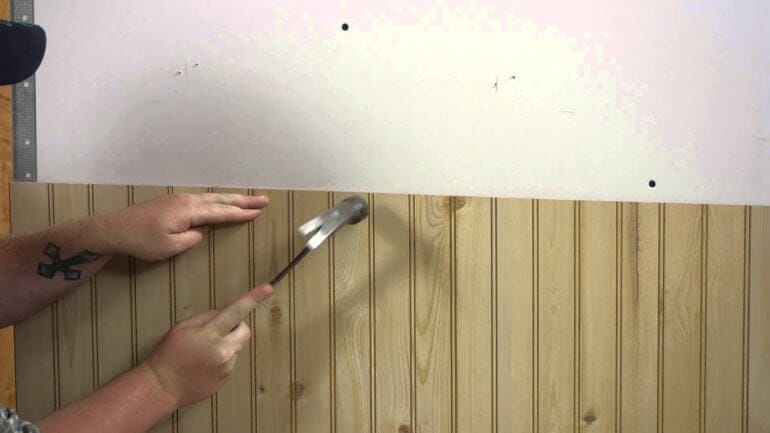
7. Pay Attention to Detail
Ensure that the paneling is aligned properly and fits snugly together. Use a rubber mallet or a block of wood and a hammer to gently tap the panels into place, creating tight joints. Check for any gaps, misalignments, or unevenness as you progress and make adjustments accordingly.
8. Finishing Touches
After securing all the panels in place, it’s time for the finishing touches. Fill any nail holes or gaps with wood filler and sand them down for a smooth surface. Apply a coat of wood stain or paint to enhance the wood paneling’s appearance, following the manufacturer’s instructions for best results. Finally, install any necessary trim or molding to complete the professional look.
9. Regular Maintenance
To ensure that your wood paneling maintains its professional appearance, it’s essential to perform regular maintenance. Clean the panels regularly using a damp cloth or mild wood cleaner to remove any dust or grime. Avoid using harsh chemicals or abrasive materials that may damage the wood’s finish.
In summary, achieving a professional-looking wood paneling installation requires careful planning, precise measurements, and attention to detail. By following these tips and tricks, you can transform your space with a stunning wood paneling design that exudes warmth and sophistication.
Maintaining and Caring for Your Wood Paneling to Ensure Longevity
Wood paneling can add warmth, character, and elegance to any space. Whether you have it installed on your walls or as a decorative element, it’s important to properly maintain and care for your wood paneling to ensure its longevity and beauty. In this section, we will explore some essential tips and techniques to help you keep your wood paneling in top condition.
1. Regular Cleaning
Regular cleaning is essential to prevent dirt, dust, and grime buildup on your wood paneling. Start by dusting the surface with a soft, dry cloth or a microfiber duster to remove loose particles. Avoid using abrasive materials or harsh chemical cleaners as they can damage the wood. Instead, opt for a mild detergent mixed with water and gently wipe the paneling using a soft cloth. Rinse the cloth frequently to avoid spreading dirt.
2. Avoid Excessive Moisture
Excessive moisture can be detrimental to wood paneling, causing it to warp, swell, or even develop mold and mildew. To prevent this, avoid placing your wood paneling in areas with high humidity levels, such as bathrooms or kitchens without proper ventilation. In case of spills, immediately wipe them off with a dry cloth to prevent moisture absorption.
3. Protect from Sunlight
Direct sunlight can fade and discolor wood paneling over time. To protect your paneling from sun damage, consider using curtains, blinds, or UV-protective window film to minimize the exposure to harsh sunlight. If possible, rearrange furniture or use area rugs to prevent uneven fading and keep the paneling looking its best.
4. Avoid Sharp Objects
Avoid using sharp objects or abrasive materials that can scratch or dent the surface of your wood paneling. Be cautious when moving furniture or other objects near the paneling, as accidental bumps can cause irreversible damage. To prevent scratches, consider using furniture pads or felt protectors on the legs of chairs, tables, and other items.
5. Regular Inspections
Regularly inspect your wood paneling for any signs of damage or wear. Look for cracks, splits, or loose pieces of wood. If you notice any issues, address them promptly to prevent further deterioration. Depending on the severity of the damage, you may consider DIY repairs or consulting a professional for assistance.
6. Apply Protective Finish
Applying a protective finish to your wood paneling can enhance its durability and resistance to stains and scratches. Prior to applying any finish, ensure the surface is clean and dry. Choose a finish specifically designed for wood paneling and follow the manufacturer’s instructions for application. Regularly reapply the finish as needed to maintain its protective properties.
7. Temperature and Humidity Control
Wood paneling is sensitive to fluctuations in temperature and humidity. To prevent warping or shrinking, maintain a stable indoor environment by using a humidifier in dry seasons and a dehumidifier in humid climates. Keep the temperature within a comfortable range and avoid extreme conditions.
8. Professional Maintenance
For more intensive cleaning or restoration, it might be necessary to seek professional maintenance services. Professional cleaners and wood experts have the knowledge and tools to deep clean, refinish, or repair your wood paneling without causing further damage. Consider consulting them periodically to keep your paneling in optimal condition.
In summary, proper maintenance and care are essential to ensure the longevity and beauty of your wood paneling. Regular cleaning, protection from moisture and sunlight, avoiding sharp objects, regular inspections, applying a protective finish, temperature and humidity control, and occasional professional maintenance are all key factors in maintaining your wood paneling. By following these tips, you can enjoy the timeless elegance of wood paneling for years to come.
FAQs
How to install wood paneling?
To install wood paneling, start by preparing the wall surface and measuring the area. Then, apply adhesive or nails to secure the panels to the wall. Make sure to align the panels properly and use a level to ensure they are straight. Finally, trim any excess paneling and finish with stain or paint as desired.
Conclusion
In conclusion, installing wood paneling can transform the look and feel of any space, adding warmth and character to your walls. Whether you choose to install it yourself or hire a professional, the process can be straightforward and rewarding. By following the right steps, such as measuring and prepping the walls, choosing the right type of wood paneling, and using the proper tools and techniques, you can achieve a beautiful and durable installation.
Wood paneling offers a versatile and timeless design option that can complement various interior styles, from rustic to modern. It not only enhances the aesthetic appeal of your home but also provides additional insulation and soundproofing. With proper care and maintenance, your wood paneling can last for years to come, adding value to your property.
So, whether you’re looking to update a single room or give your entire home a facelift, consider installing wood paneling to create a stunning and inviting atmosphere that you’ll enjoy for years to come.
