If you have weathered wood, don’t worry! Restoring it to its former glory is easier than you think. With the right techniques and a little bit of effort, you can revive the natural beauty of your weathered wood. In this guide, we will walk you through the step-by-step process of restoring weathered wood, from cleaning and sanding to staining and sealing. So, let’s get started and bring back the charm of your weathered wood!
Expert Tips for Revitalizing Weathered Wood Surfaces
Weathered wood can add a rustic charm to any space, but over time, it can become worn, faded, and damaged. If you have weathered wood surfaces that are in need of a revival, fear not! With a few expert tips and tricks, you can bring back the beauty and luster of your weathered wood surfaces. Whether it’s a wooden deck, fence, or furniture, these revitalization techniques will help you breathe new life into your weathered wood.

1. Clean the Surface
The first step in revitalizing weathered wood is to clean the surface thoroughly. Use a mild detergent or specially formulated wood cleaner to remove dirt, grime, and mildew. Scrub the wood gently with a soft-bristle brush or sponge, paying attention to any stubborn stains or mold. Rinse the surface with clean water and allow it to dry completely before moving on to the next step.
2. Sand the Wood
After cleaning the wood, it’s time to sand away any rough or splintered areas. Use a medium-grit sandpaper to smooth out the surface and remove any loose or peeling paint. Be sure to sand with the grain of the wood to avoid damaging the surface further. After sanding, wipe away any dust or debris with a clean cloth.
3. Apply Wood Stain or Sealant
To enhance the natural beauty of the weathered wood and protect it from further damage, apply a wood stain or sealant. Choose a stain or sealant that is specifically designed for exterior use and matches the desired color tone. Using a brush or roller, apply the stain or sealant evenly, following the manufacturer’s instructions. Allow the wood to dry completely before applying a second coat, if necessary.
4. Repair Damaged Areas
If your weathered wood has any cracks, splits, or rotting areas, it’s important to repair them before moving forward. Use a wood filler or epoxy putty to fill in the damaged areas, following the product instructions. Once the filler has dried, sand it down to create a smooth, even surface. If necessary, touch up the repaired areas with paint or stain to match the surrounding wood.
5. Protect with a UV-Resistant Finish
One of the main causes of weathered wood is exposure to the sun’s harmful UV rays. To protect your newly revitalized wood surfaces from future weathering, apply a UV-resistant finish. This can be a clear varnish, polyurethane, or an outdoor-specific paint. The finish will provide an extra layer of protection against sun damage, moisture, and other outdoor elements, prolonging the life of your weathered wood.
6. Regular Maintenance
To keep your revitalized weathered wood surfaces looking their best, it’s important to establish a regular maintenance routine. This may include cleaning the wood periodically, reapplying a protective finish as needed, and inspecting for any signs of damage or wear. By staying on top of maintenance, you can ensure that your weathered wood continues to shine for years to come.
Summary
Revitalizing weathered wood surfaces doesn’t have to be a daunting task. By following these expert tips, you can transform your weathered wood into a stunning focal point in any space. From cleaning and sanding to staining and protecting, these steps will help you bring back the natural beauty of your weathered wood. With regular maintenance, your revitalized wood surfaces will continue to stand the test of time.
DIY Techniques to Bring Back the Beauty of Weathered Wood
If you have weathered wood in your home or outdoor space, you may be wondering how to restore its beauty and bring it back to life. Weathered wood can add a unique charm to your decor, but it’s important to take care of it to ensure its longevity. In this section, we will explore some DIY techniques that you can use to rejuvenate weathered wood and enhance its natural beauty.
Cleaning the Wood
The first step in restoring weathered wood is to clean it thoroughly. Over time, dirt, grime, and other debris can accumulate on the surface, dulling its appearance. To clean the wood, start by removing any loose dirt or dust using a soft brush or a vacuum cleaner with a brush attachment. Next, mix a gentle wood cleaner with water according to the manufacturer’s instructions. Using a sponge or a soft cloth, apply the cleaning solution to the wood, working in the direction of the grain. Rinse the wood with clean water and allow it to dry completely before moving on to the next step.
Sanding
Once the wood is clean and dry, sanding is an effective way to remove any remaining dirt, stains, or rough spots. Start with a coarse-grit sandpaper and sand the surface in the direction of the grain. Be sure to sand evenly and apply consistent pressure to achieve a smooth and even finish. After sanding with the coarse-grit sandpaper, switch to a finer-grit sandpaper to further smooth the wood. Remember to always sand in the direction of the grain to avoid damaging the wood fibers. Once you are satisfied with the smoothness of the wood, wipe away any dust with a clean cloth.
Applying a Wood Stain or Sealant
To enhance the natural beauty of weathered wood and protect it from further damage, applying a wood stain or sealant is essential. Wood stains come in a variety of colors and can help to revive the rich tones of the wood. Choose a stain that complements the overall aesthetic of your space and apply it evenly using a brush or a cloth. Allow the stain to penetrate the wood according to the manufacturer’s instructions, and then wipe away any excess with a clean cloth. If you prefer a clear finish, you can opt for a wood sealant instead of a stain. Apply the sealant in thin, even coats, allowing each coat to dry completely before applying the next.
Proper Maintenance
Once you have restored the beauty of your weathered wood, it’s important to maintain it properly to ensure its longevity. Regularly dusting the wood with a soft cloth and periodically cleaning it with a gentle wood cleaner will help to prevent dirt and grime from building up. Additionally, consider applying a coat of wood wax or polish to protect the wood and enhance its shine. Avoid placing hot or wet objects directly on the wood surface to prevent damage. If your weathered wood is exposed to the elements, consider applying a weatherproofing sealant to protect it from moisture and UV rays.
In summary, weathered wood can be restored to its former glory with some simple DIY techniques. By cleaning the wood, sanding away imperfections, and applying a wood stain or sealant, you can bring back its natural beauty and protect it for years to come. Remember to maintain the wood properly by regularly cleaning and protecting it from environmental factors. With a little effort and care, your weathered wood can become a stunning focal point in your home or outdoor space.
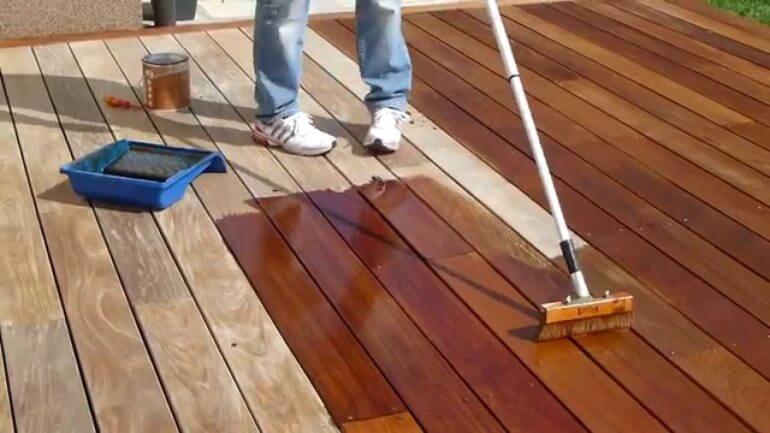
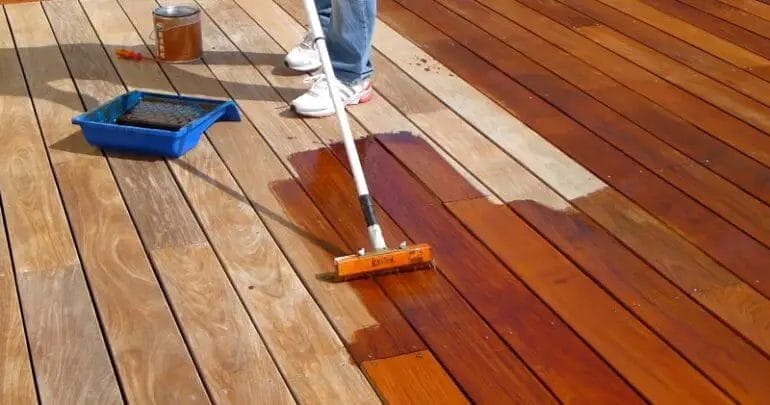
Proven Methods for Restoring Weathered Wood Decking
Over time, wood decking can become weathered and worn due to exposure to the elements. This can result in a dull, faded appearance and even structural damage if left untreated. Fortunately, there are several proven methods for restoring weathered wood decking and bringing it back to its former glory. In this section, we will explore these methods in detail and provide step-by-step instructions for each.
1. Cleaning the Deck
The first step in restoring weathered wood decking is to give it a thorough cleaning. This will remove dirt, grime, and any mildew or mold that may have accumulated over time. There are several cleaning options available, including bleach-based cleaners, oxygen bleach, and commercial deck cleaners. Choose the product that best suits your needs and follow the instructions on the label for application.
Start by sweeping the deck to remove any loose debris. Then, apply the cleaning solution using a pump sprayer or a brush. Allow the cleaner to sit on the deck for the recommended amount of time, usually around 10-15 minutes. Scrub the surface with a stiff brush or a power washer to remove stubborn stains. Rinse thoroughly with water and allow the deck to dry completely before proceeding to the next step.
2. Sanding the Deck
After cleaning, the next step is to sand the deck to remove any remaining stains, rough patches, or splinters. This will also help to smooth out the surface and prepare it for the application of a protective finish. Start by using a coarse-grit sandpaper or a deck sander to remove the top layer of weathered wood. Be sure to sand along the grain of the wood to avoid causing damage.
Once you have sanded the entire surface, switch to a finer-grit sandpaper to achieve a smoother finish. Pay extra attention to areas with stubborn stains or rough spots. After sanding, use a broom or a vacuum cleaner to remove any dust or debris from the deck.
3. Applying a Protective Finish
Once the deck is clean and sanded, it’s time to apply a protective finish to restore its natural beauty and protect it from future weathering. There are several options available, including stains, sealers, and paints. Choose a product that is specifically designed for use on exterior wood surfaces and offers UV protection and water resistance.
Before applying the finish, make sure the deck is dry and free from any dust or debris. Stir the finish thoroughly and apply it using a brush, roller, or sprayer, following the manufacturer’s instructions. Work in small sections, and be sure to apply an even coat. Allow the finish to dry completely before using the deck.
4. Regular Maintenance
To keep your restored wood decking looking its best, regular maintenance is key. This includes regularly cleaning the deck with a mild detergent and water, inspecting for any signs of damage or wear, and reapplying a protective finish every few years or as needed. Also, consider using furniture pads or mats to protect the deck from scratches and placing potted plants on saucers to prevent water damage.
By following these proven methods for restoring weathered wood decking and practicing regular maintenance, you can extend the lifespan of your deck and enjoy its natural beauty for years to come.
Quick and Easy Steps to Renew Weathered Wood Outdoor Structures
Outdoor structures made of wood, such as decks, fences, and pergolas, are exposed to harsh weather conditions year-round. Over time, this exposure can cause the wood to become weathered and worn, losing its original beauty and durability. However, with a few simple steps, you can renew and revitalize your weathered wood outdoor structures, giving them a fresh and appealing look.
Clean the Surface
The first step in renewing weathered wood is to thoroughly clean the surface. Remove any debris, dirt, or loose wood fibers using a stiff brush or broom. For more stubborn dirt and stains, you can use a wood cleaner or a mixture of mild soap and water. Scrub the surface gently, ensuring that you cover all areas. Rinse the wood thoroughly with clean water and allow it to dry completely before proceeding to the next step.
Sand the Wood
After cleaning, it’s essential to sand the wood to remove any roughness or splinters. Use a medium-grit sandpaper to sand the entire surface area, following the direction of the wood grain. Sanding will help smooth out the wood and prepare it for the next steps of the renewal process. Once you have finished sanding, remove any dust or debris using a brush or a tack cloth.
Apply a Wood Brightener
To enhance the natural color of the wood and prepare it for the final steps, apply a wood brightener. A wood brightener helps to remove any remaining stains, tannins, or discoloration from the wood’s surface. Follow the instructions on the product carefully and apply it evenly using a brush or a sprayer. Allow the wood brightener to sit for the recommended time and then rinse it off with clean water.
Protect the Wood with Stain or Sealant
To protect the renewed wood and enhance its longevity, it’s crucial to apply a high-quality stain or sealant. Stains not only add color to the wood but also provide a protective barrier against moisture, UV rays, and other environmental factors. Choose a stain that is specifically designed for outdoor use and apply it using a brush, roller, or sprayer. Ensure that you cover all surfaces evenly and follow the manufacturer’s instructions for drying time and reapplication if necessary.
Maintain Regular Maintenance
Once you have successfully renewed your weathered wood outdoor structures, it’s important to maintain regular maintenance to keep them looking their best. Regularly clean the wood surface, sweep away debris, and inspect for any signs of damage or wear. Depending on the type of stain or sealant used, you may need to reapply every few years to maintain optimal protection.
Summary
Renewing weathered wood outdoor structures is a straightforward process that can significantly improve the appearance and longevity of your outdoor spaces. By following these quick and easy steps of cleaning, sanding, applying a wood brightener, and protecting the wood with a stain or sealant, you can revitalize your weathered wood structures and enjoy their beauty for years to come. Remember to maintain regular maintenance to ensure the continued health and beauty of your outdoor wood structures.
FAQs
1. How can I restore weathered wood?
To restore weathered wood, start by cleaning the surface with a mild detergent and water. Next, sand the wood to remove any roughness. Apply a wood conditioner to improve absorption, then use a stain or paint to protect and enhance the wood’s appearance. Finish by sealing the wood with a clear coat for added durability.
2. What products should I use to restore weathered wood?
For cleaning, use a mild detergent and water. To sand the wood, you can use sandpaper or a handheld sander. A wood conditioner helps improve absorption, while stains and paints provide protection and color. Finish with a clear coat or sealant to enhance durability.
3. Can I restore weathered wood without using chemicals or sanding?
While sanding and using certain products can yield better results, you can try restoring weathered wood without chemicals or sanding. Start by cleaning the wood with a mixture of vinegar and water, and scrub with a brush. Rinse and let it dry. Then, apply a wood stain or paint to protect and rejuvenate the wood.
Conclusion:
In conclusion, restoring weathered wood can bring new life to your furniture and outdoor structures. By following the right techniques and using suitable products, you can achieve impressive results. Whether you are dealing with faded wooden decks, worn-out furniture, or weathered fences, there are several methods available to restore their original beauty.
Remember to start by cleaning the wood thoroughly and removing any dirt or debris. Then, depending on the condition of the wood, you can choose between sanding, staining, or painting. Finish the restoration process by applying a protective sealant to ensure longevity.
With patience and proper care, you can transform weathered wood into a stunning and long-lasting feature of your home or outdoor space.