Want to add a touch of elegance to your woodworking projects? Look no further than the wood grain tool. This handy tool allows you to create realistic wood grain patterns on various surfaces, including furniture, walls, and even crafts. Whether you’re a seasoned woodworker or a DIY enthusiast, learning how to use a wood grain tool is a skill that can take your projects to the next level.
Using a wood grain tool is simple and straightforward. Begin by applying a base coat of paint or stain to your surface. Once it’s dry, load the wood grain tool with a contrasting color. Gently drag the tool across the surface, creating lines and curves that mimic the natural wood grain. Experiment with different pressure and angles to achieve your desired effect.
With a wood grain tool, you can transform plain surfaces into stunning pieces that resemble the beauty of real wood. Whether you’re looking to give your furniture a rustic look or add depth to a piece of artwork, this tool is a must-have in your toolkit. So, unleash your creativity and explore the endless possibilities of using a wood grain tool in your projects.

Preparing the Surface for Wood Grain Tool Application
Before applying the wood grain tool to a surface, it is important to properly prepare the surface to ensure the best results. By taking the time to clean and prime the surface, you can create a smooth and even canvas for the wood grain tool application. Here are some steps to follow:
Clean the Surface:
The first step in preparing the surface is to clean it thoroughly. Remove any dust, dirt, or debris from the surface using a damp cloth or sponge. Pay close attention to areas that may have accumulated grime or grease, such as kitchen cabinets or furniture surfaces. For stubborn stains or grease, use a mild detergent and water solution to gently clean the surface. Allow the surface to dry completely before moving on to the next step.
Repair Any Damaged Areas:
If the surface has any cracks, dents, or other forms of damage, it is important to repair them prior to applying the wood grain tool. Use a suitable filler or wood putty to fill in any holes or cracks on the surface. Follow the manufacturer’s instructions for the filler or putty and allow it to dry completely. Once dry, sand the repaired areas until they are smooth and blend seamlessly with the rest of the surface.
Prime the Surface:
Next, apply a coat of primer to the surface. Primer helps to create a smooth and even base for the wood grain tool application. Choose a primer that is suitable for the type of surface you are working on, such as wood, metal, or plastic. Use a brush or roller to apply the primer evenly, following the grain of the surface. Allow the primer to dry completely before proceeding.
Sand the Surface:
After the primer has dried, lightly sand the surface using fine-grit sandpaper. This step helps to further smooth out any imperfections and creates a better surface for the wood grain tool application. Use a sanding block or sandpaper wrapped around a block to ensure even sanding. Wipe away any dust or debris with a clean cloth or tack cloth.
Apply a Base Coat:
Before using the wood grain tool, it is recommended to apply a base coat of paint or stain to the surface. This helps to enhance the wood grain effect and provides a solid foundation for the final finish. Choose a paint or stain color that resembles the type of wood grain you want to achieve. Apply the base coat evenly using a brush or roller, following the grain of the surface. Allow the base coat to dry completely before moving on to the wood grain tool application.
In summary, preparing the surface for wood grain tool application involves cleaning the surface, repairing any damaged areas, priming the surface, sanding it, and applying a base coat. By following these steps, you can ensure a smooth and even surface that will enhance the wood grain effect and create a realistic finish.

Applying the Wood Grain Effect with the Tool
One of the most popular and effective techniques in woodworking is the wood grain effect. It adds depth and character to any piece of furniture or woodworking project. With the right tools and some patience, you can achieve a realistic wood grain finish that will enhance the beauty of your work.
To create the wood grain effect, you will need a variety of tools, including a wood graining tool. This tool is specifically designed to create the appearance of wood grain on surfaces. It typically consists of a rubber roller or brush with grooves that mimic the look of wood grain.
Here are the steps to apply the wood grain effect using the tool:
- Prepare the surface: Before applying the wood grain effect, make sure the surface is clean and smooth. Sand it down if necessary to remove any imperfections.
- Choose the base color: Decide on the base color for your wood grain effect. It should be a shade that closely resembles the type of wood you are trying to imitate.
- Apply the base coat: Use a brush or roller to apply the base coat evenly on the surface. Allow it to dry completely before proceeding to the next step.
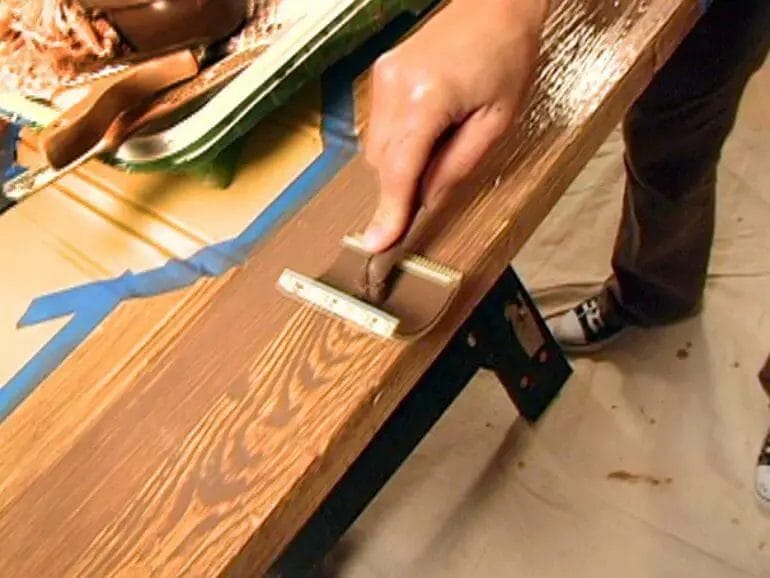
- Prepare the wood graining tool: Dip the wood graining tool into the wood stain or glaze, ensuring that the grooves are well coated.
- Start graining: Hold the wood graining tool at a slight angle and begin dragging it along the surface in long, fluid motions. Vary the pressure and direction to create a natural-looking wood grain pattern.
- Work in sections: To achieve a consistent grain pattern, work in small sections at a time. Blend each section into the previous one to create a seamless finish.
- Refine the grain: Once the entire surface is grained, use a clean brush or rag to soften any harsh lines or edges. This will give the wood grain a more organic and realistic appearance.
- Protect the finish: Apply a clear protective finish, such as varnish or polyurethane, to seal and protect the wood grain effect. Follow the manufacturer’s instructions for the best results.
With practice and experimentation, you can achieve different wood grain patterns and variations. Don’t be afraid to try different techniques and colors to create the desired effect. Remember, the key is to mimic the natural patterns and texture of wood.
In summary, applying the wood grain effect with the tool requires careful preparation, the right materials, and a bit of artistic skill. By following the steps outlined above, you can transform ordinary surfaces into stunning wood grain masterpieces.
Enhancing the Wood Grain Effect with Staining and Finishing
Wood is a versatile and timeless material that can add warmth and character to any space. One of the most appealing features of wood is its natural grain pattern, which varies from species to species and adds a unique beauty to each piece. To further enhance the wood grain effect, staining and finishing techniques can be applied. In this section, we will explore how staining and finishing can bring out the best in wood and create stunning results.
1. Choosing the Right Stain
Before diving into the staining process, it is essential to select the right stain color for your project. Stains come in a wide range of hues, from light and natural tones to dark and rich shades. Consider the overall aesthetic you want to achieve and the existing color palette of your space. Lighter stains tend to highlight the natural grain, while darker stains can create a more dramatic and intense look. It is recommended to test the stain on a small, inconspicuous area of the wood to ensure it achieves the desired effect.
2. Properly Preparing the Wood
Before applying any stain, it is crucial to prepare the wood surface properly. Start by sanding the wood to remove any imperfections, such as rough spots or previous finishes. Use a fine-grit sandpaper and sand in the direction of the grain to avoid damaging the wood fibers. After sanding, ensure the surface is clean and free from dust or debris. This will ensure that the stain adheres evenly and produces a smooth finish.
3. Applying the Stain
When applying the stain, it is important to follow the manufacturer’s instructions and work in a well-ventilated area. Using a brush, sponge, or cloth, apply an even coat of stain in the direction of the wood grain. Allow the stain to penetrate the wood for the recommended amount of time before wiping off any excess with a clean cloth. This step is crucial in achieving an even color and preventing blotches or streaks.
4. Enhancing the Grain with a Wood Conditioner
In some cases, certain woods may have a more closed grain structure, making it difficult for the stain to penetrate and highlight the natural patterns. To overcome this, a wood conditioner can be applied before staining. Wood conditioners help to open up the pores of the wood, allowing for a more even and consistent stain absorption. Apply the conditioner following the manufacturer’s instructions and proceed with the staining process.
5. Sealing and Finishing
Once the desired color is achieved, it is essential to seal and protect the stained wood. A clear topcoat or finish will not only provide a protective layer but also enhance the richness of the stain and make the wood grain stand out. There are various types of finishes to choose from, including polyurethane, lacquer, or oil-based finishes. Each has its own advantages and application method. Select a finish that suits your project and follow the instructions for proper application.
Summary
Staining and finishing are crucial steps in enhancing the wood grain effect and bringing out the natural beauty of wood. By selecting the right stain, properly preparing the wood surface, and applying the stain with care, you can achieve stunning results. Additionally, using a wood conditioner and sealing the stained wood with a suitable finish will enhance the grain and provide long-lasting protection. So, whether you are refinishing furniture or adding a new wood element to your space, staining and finishing techniques can help you create a captivating wood grain effect.
Tips and Tricks for Using a Wood Grain Tool
Creating a realistic wood grain effect on various surfaces can add a touch of elegance and sophistication to your home decor projects. One of the best tools to achieve this effect is a wood grain tool. Whether you are a beginner or an experienced DIY enthusiast, here are some tips and tricks to ensure you get the most out of your wood grain tool.
1. Prepare the Surface
Before you start using the wood grain tool, it is essential to properly prepare the surface you will be working on. Make sure to clean the surface to remove any dirt or debris. Sanding the surface can help create a smooth and even base for the wood grain effect. Additionally, applying a primer or base coat can improve the adhesion of the paint or glaze.
2. Choose the Right Colors
The selection of colors is crucial when aiming for a realistic wood grain effect. Consider the type of wood you want to replicate and choose appropriate colors for the base coat and grain. Generally, a darker base coat with lighter grain colors is recommended. Experiment with different shades and tones to achieve the desired effect.
3. Practice on a Sample Board
Before applying the wood grain effect to your desired surface, it is advisable to practice on a sample board. This allows you to test different techniques and color combinations. You can also adjust the pressure and angle of the wood grain tool to achieve different effects. Keep practicing until you feel confident in your technique.
4. Use a Natural Motion
When using the wood grain tool, it is important to mimic the natural grain patterns found in wood. Move the tool in a fluid and organic motion, following the direction of the grain. Avoid creating repetitive or unnatural patterns. Vary the pressure and angle of the tool to create a more realistic look.
5. Experiment with Different Tools
While a wood grain tool is the most common choice for creating a wood grain effect, don’t be afraid to experiment with other tools. Some alternatives include a comb, a brush, or even a rag. Each tool can produce a unique texture and pattern, allowing you to customize your wood grain effect further.
6. Layer and Blend Colors
To achieve depth and dimension in your wood grain effect, consider layering and blending different colors. Start with the base coat and gradually add layers of lighter or darker hues to create shading and highlights. Use a dry brush technique to blend the colors together smoothly.
7. Seal and Protect
Once you have achieved the desired wood grain effect, it is essential to seal and protect your work. Apply a clear topcoat or varnish to protect the surface from scratches and moisture. This step will also enhance the overall appearance and durability of your wood grain finish.
8. Practice Patience
Creating a realistic wood grain effect requires patience and practice. Take your time, and don’t rush the process. Allow each layer to dry completely before adding additional layers or proceeding to the next step. With practice, you will develop your technique and achieve stunning wood grain effects.
By following these tips and tricks, you can make the most of your wood grain tool and create beautiful wood-like finishes on various surfaces. Remember to experiment and have fun with your projects, and soon you’ll be able to achieve professional-looking results.
FAQs
1. How do I use a wood grain tool?
To use a wood grain tool, start by applying a base coat of paint or stain to your desired surface. Then, dip the wood grain tool into a contrasting color and drag it across the wet base coat in long, even strokes. Repeat this process until you achieve the desired wood grain effect. Finish with a protective top coat.
2. Can I use a wood grain tool on any surface?
Yes, you can use a wood grain tool on various surfaces such as wood, plastic, metal, or even drywall. However, it’s recommended to test the technique on a small, inconspicuous area first to ensure desired results.
3. Can I create different wood grain patterns using a wood grain tool?
Yes, by changing the movement and pressure applied with the wood grain tool, you can create different wood grain patterns such as oak, pine, or walnut. Experiment with different techniques to achieve the desired effect.
Conclusion
In conclusion, using a wood grain tool can add a unique and realistic texture to your woodworking projects. Whether you’re a professional or a DIY enthusiast, this tool allows you to create stunning wood grains with ease. By simply applying pressure and dragging the tool along the wood surface, you can achieve lifelike grain patterns that enhance the overall appearance of your work.
Furthermore, the versatility of a wood grain tool allows you to experiment with different techniques and designs. You can create subtle or bold grain patterns depending on your preferences. Additionally, this tool enables you to mimic various wood species, giving your projects an authentic and natural look.
In summary, by incorporating a wood grain tool into your woodworking arsenal, you can elevate the visual appeal of your projects and achieve professional-looking results. So, grab a wood grain tool and start adding beautiful and realistic wood grains to your next woodworking masterpiece!