When it comes to treating and preserving wood, using a wood conditioner can greatly enhance the results. A wood conditioner is a pre-stain treatment that helps to even out the absorption of stain or finish, ensuring a consistent and smooth application. By penetrating the wood fibers and minimizing blotchiness, a wood conditioner allows for a more uniform and attractive final finish. Whether you are working on a furniture project or refinishing a wooden floor, using a wood conditioner is highly recommended to achieve professional-looking results.

How to Choose the Right Wood Conditioner for Your Needs
Wood conditioner is an essential product when it comes to preparing wood surfaces for staining or finishing. It helps to ensure that the wood absorbs the stain or finish evenly, resulting in a more consistent and professional-looking outcome. However, with so many options available on the market, it can be challenging to determine which wood conditioner is the right one for your specific needs. In this section, we will provide you with a step-by-step guide to help you choose the perfect wood conditioner for your project.

1. Consider the Type of Wood
The first step in selecting the right wood conditioner is to consider the type of wood you will be working with. Different wood species have different characteristics and absorb stains and finishes at varying rates. Some woods, such as pine or maple, have a more porous grain structure and require a more potent wood conditioner to achieve an even finish. In contrast, hardwoods like oak or mahogany may require a less intense wood conditioner.
2. Assess the Condition of the Wood
The next factor to consider is the condition of the wood surface. If the wood is brand new or in excellent condition, a lighter wood conditioner may suffice. However, if the wood has imperfections, such as scratches, dents, or rough patches, you may need a more substantial wood conditioner that can penetrate and seal the damaged areas.
3. Determine the Desired Outcome
Before making a final decision, it’s important to determine the desired outcome for your project. Are you aiming for a natural, transparent finish that showcases the wood’s grain, or do you prefer a more opaque, painted look? Certain wood conditioners are specifically designed to enhance the natural beauty of the wood, while others are better suited for providing a solid base for paint or varnish. Clarifying your desired outcome will help narrow down your options.
4. Research and Read Reviews
Once you have a better understanding of your specific needs, it’s time to research different wood conditioner brands and read customer reviews. Look for products that have received positive feedback for their effectiveness and ease of use. Pay attention to any potential drawbacks or limitations mentioned by users to ensure the product aligns with your expectations.
5. Seek Professional Advice
If you’re still unsure about which wood conditioner to choose, consider seeking advice from a professional. Local woodworking or home improvement stores often have knowledgeable staff who can provide recommendations based on your project requirements and budget. They can also answer any questions you may have and offer additional tips and tricks for achieving the best results.
6. Test the Wood Conditioner
Before applying the wood conditioner to your entire project, it’s essential to conduct a test on a small, inconspicuous area. This step will allow you to see how the wood conditioner interacts with the specific type of wood you’re working with and evaluate the level of absorption and color enhancement. If the test results meet your expectations, you can proceed with confidence.
7. Follow the Application Instructions
Finally, always carefully read and follow the manufacturer’s instructions when applying the wood conditioner. Each product may have specific application techniques or drying times that need to be adhered to for optimal results. Deviating from the instructions may affect the conditioner’s effectiveness or lead to an uneven finish.
In summary, choosing the right wood conditioner involves considering the type of wood, assessing the condition of the wood, determining the desired outcome, researching and reading reviews, seeking professional advice, testing the product, and following the application instructions. By following these steps, you can select the perfect wood conditioner for your project and achieve a beautifully finished wood surface.
Tips for Applying Wood Conditioner Effectively
Preparing wood before applying a finish is essential to achieve a smooth and even result. One important step in this process is applying a wood conditioner, which helps the wood absorb stain or paint more evenly. To ensure the best results, here are some tips for applying wood conditioner effectively:
1. Choose the Right Wood Conditioner
There are different types of wood conditioners available in the market, including oil-based and water-based options. It’s important to choose a conditioner that is compatible with the type of finish you plan to use. Water-based conditioners are suitable for water-based finishes, while oil-based conditioners work well with oil-based products.
2. Sand the Wood Surface
Before applying the wood conditioner, it’s important to sand the wood surface to ensure it is smooth and free from imperfections. Use sandpaper with a grit between 180 and 220 to remove any roughness or blemishes. Sanding also helps the wood absorb the conditioner more evenly.
3. Clean the Surface
Prior to applying the conditioner, make sure the wood surface is clean and free from dust, dirt, and any debris. Use a soft cloth or a tack cloth to wipe away any particles that may affect the absorption of the conditioner.
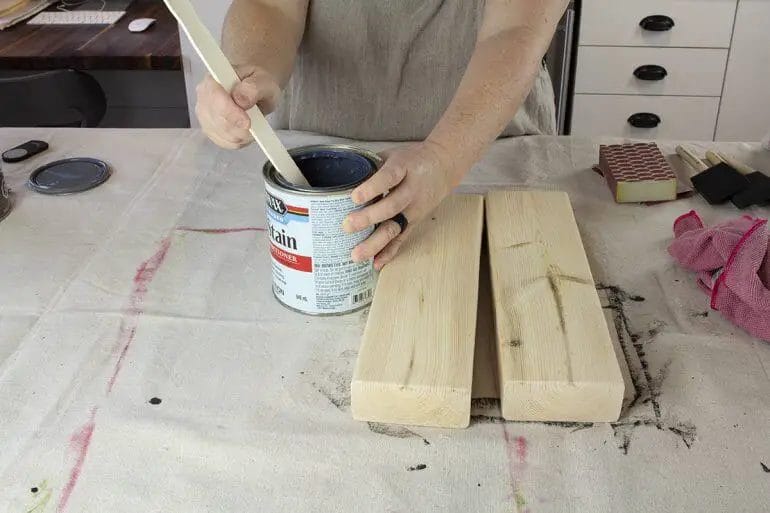
4. Apply the Conditioner Evenly
Using a clean paintbrush or a lint-free cloth, apply the wood conditioner in the direction of the wood grain. Ensure that the conditioner is applied evenly, covering the entire surface. Avoid leaving excess conditioner on the wood, as it can affect the final finish.
5. Allow Sufficient Drying Time
After applying the wood conditioner, it’s important to allow sufficient drying time before proceeding with the next step. Follow the manufacturer’s instructions regarding the recommended drying time, as it may vary depending on the type of conditioner and environmental conditions.
6. Sand the Surface Again (Optional)
If desired, you can lightly sand the wood surface again after the conditioner has dried. This step helps to further smooth the surface and prepares it for the application of the final finish.
7. Apply the Finish
Once the wood conditioner is fully dry and the surface has been sanded (if necessary), you can proceed with applying the desired finish, such as stain or paint. Follow the instructions on the finish product for the best application technique and drying time.
8. Clean Up
After finishing the project, clean your brushes or cloths thoroughly with warm soapy water if using a water-based conditioner, or with mineral spirits if using an oil-based conditioner. Proper cleanup helps prolong the lifespan of your tools and ensures they are ready for future projects.
By following these tips for applying wood conditioner effectively, you can enhance the appearance and longevity of your finished wood projects. Properly preparing the wood surface with a conditioner ensures a more even finish and helps the wood retain its natural beauty for years to come.
Common misconceptions about wood conditioner debunked
Wood conditioner is a popular product used by many woodworkers and DIY enthusiasts to prepare wood surfaces for staining or finishing. However, there are several misconceptions and misunderstandings surrounding wood conditioner that can lead to confusion and incorrect application. In this section, we will debunk some of the most common misconceptions about wood conditioner.
Myth 1: Wood conditioner is only necessary for softwoods
This is a common misconception about wood conditioner. While it is true that softwoods such as pine and cedar are more prone to blotching and uneven staining, the use of wood conditioner is not limited to these types of wood. In fact, using wood conditioner on hardwoods can also yield excellent results.
The purpose of wood conditioner is to seal the wood pores and create a more uniform surface for staining or finishing. This helps to prevent blotching and ensures an even color penetration. Whether you are working with softwoods or hardwoods, using a wood conditioner can greatly improve the overall appearance of your project.
Myth 2: Wood conditioner is a substitute for sanding
This is another misconception that needs to be debunked. Wood conditioner is not a substitute for sanding; rather, it is a complementary step that should be done after sanding. Sanding helps to smooth the wood surface and remove any imperfections, while wood conditioner prepares the wood for staining or finishing.
If you skip the sanding step and apply wood conditioner directly to the raw wood, it may not adhere properly and result in a subpar finish. It is important to properly sand the wood before applying wood conditioner to ensure optimal results.
Myth 3: Wood conditioner is only for professionals
Some people believe that wood conditioner is a product exclusively meant for professional woodworkers. However, this is far from the truth. Wood conditioner is designed to be user-friendly and can be used by DIY enthusiasts of all skill levels.
With clear instructions and easy application methods, anyone can use wood conditioner to achieve professional-looking results. Whether you are a beginner or an experienced woodworker, incorporating wood conditioner into your finishing process can greatly enhance the outcome of your project.
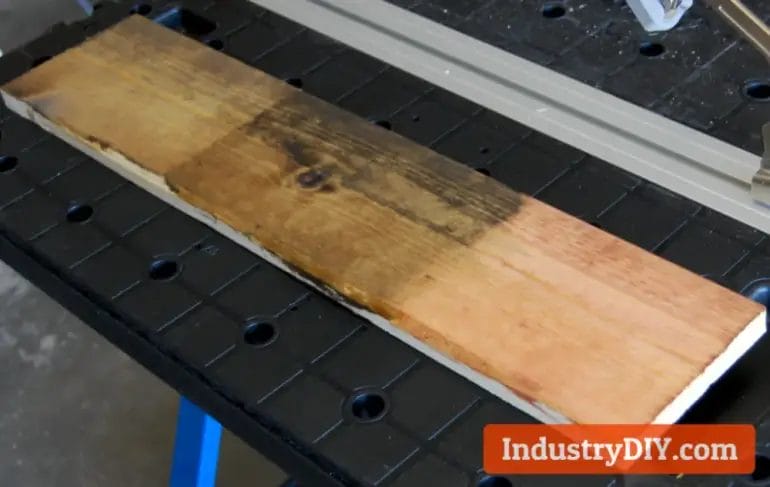
Myth 4: Wood conditioner will completely prevent blotching
While wood conditioner is effective in minimizing blotching, it does not guarantee complete prevention. Blotching can occur due to various factors, including wood species, grain orientation, and the type of stain used.
Wood conditioner works by partially sealing the wood pores, which helps to reduce the absorption of stain in certain areas. However, it cannot completely eliminate the possibility of blotching, especially in highly porous woods or when using certain dark-colored stains.
To minimize blotching, it is important to follow the manufacturer’s instructions for applying wood conditioner and choose an appropriate stain for the wood species you are working with. Additionally, testing the stain on a sample piece of wood before applying it to your project can help identify any potential issues.
Summary
Wood conditioner is a valuable tool in the woodworking and finishing process. By debunking these common misconceptions, we hope to provide a clearer understanding of its purpose and application. Wood conditioner can be used on both softwoods and hardwoods, is not a substitute for sanding, is suitable for DIY enthusiasts, and helps minimize blotching but does not guarantee complete prevention. By using wood conditioner correctly and in combination with proper sanding techniques, you can achieve beautiful and professional-looking results on your woodworking projects.
Alternatives to Wood Conditioner for Prepping and Finishing Wood
Wood conditioning is an important step in prepping and finishing wood projects. It helps to seal the wood and create a smooth surface that is ready for staining or painting. While wood conditioners are commonly used for this purpose, there are alternative methods and materials that can achieve similar results. In this section, we will explore some of these alternatives.
1. Sanding
One of the most common alternatives to wood conditioner is sanding. Sanding the wood surface before applying a finish helps to remove any rough patches or imperfections, creating a smoother surface. This allows the finish to be applied more evenly and effectively. Depending on the type of wood and the desired outcome, different grits of sandpaper can be used to achieve the desired smoothness.
2. Shellac
Shellac is a natural resin that can be used as an alternative to wood conditioner. It acts as a sealer and provides a smooth surface for the finish to adhere to. Shellac is easy to apply and dries quickly, making it a convenient option for prepping and finishing wood. It also has the added benefit of enhancing the natural beauty of the wood.
3. Danish Oil
Danish oil is another alternative to wood conditioner that provides both conditioning and finishing properties. It is a blend of natural oils and varnish that penetrates the wood, enhancing its color and grain while providing a protective layer. Danish oil is relatively easy to apply and dries to a durable, satin finish.
4. Water-based Sealers
Water-based sealers offer an alternative to traditional oil-based wood conditioners. These sealers are environmentally friendly and have low volatile organic compound (VOC) content. They penetrate the wood fibers, sealing the surface and preparing it for the application of a finish. Water-based sealers are available in a range of tints and can be easily applied with a brush or spray.
5. Tung Oil
Tung oil is a natural oil derived from the seeds of the tung tree. It is often used as a wood conditioner and finish because of its excellent penetrating properties. Tung oil enhances the natural beauty of the wood and provides a protective layer that is resistant to water and other liquids. It is important to note that pure tung oil can take a longer time to dry compared to other alternatives.
6. Primers
Using a primer before applying the finish can also serve as an alternative to wood conditioner. Primers create a smooth and uniform surface, filling in any imperfections in the wood. They also improve the adhesion of the finish, ensuring a long-lasting result. Choose a primer that is suitable for the type of finish you will be applying.
7. Wood Stains with Conditioner
Some wood stains come with built-in conditioners, eliminating the need for a separate wood conditioner. These stains are formulated to penetrate and condition the wood simultaneously, saving time and effort. They provide a consistent and uniform finish while enhancing the natural beauty of the wood.
In summary, wood conditioning is an important step in prepping and finishing wood projects. While wood conditioners are commonly used, there are several alternatives available. Sanding, shellac, Danish oil, water-based sealers, tung oil, primers, and wood stains with conditioner are all viable options that can help achieve a smooth and well-prepared wood surface. Consider the type of wood, desired finish, and personal preference when choosing an alternative to wood conditioner.
FAQs
Is wood conditioner necessary?
Wood conditioner is not always necessary, but it can be beneficial when working with certain types of wood, such as pine or oak, that have a tendency to absorb stains unevenly. It helps to condition the wood and create a more even stain application. However, for some types of wood, like maple or cherry, wood conditioner may not be needed.
Conclusion:
Wood conditioner is a highly beneficial product for anyone working with wood. It helps to ensure that the wood absorbs stain or paint more evenly, resulting in a smoother and more professional finish. While it may not be absolutely necessary in all cases, using a wood conditioner can greatly improve the overall appearance and quality of your woodworking projects.
By prepping the wood with a conditioner, you can reduce the risk of blotching, streaking, or uneven color absorption. This is especially important when working with softwoods or porous woods that have a tendency to absorb stain unevenly. So, if you want to achieve a flawless and professional look, using a wood conditioner is highly recommended.
