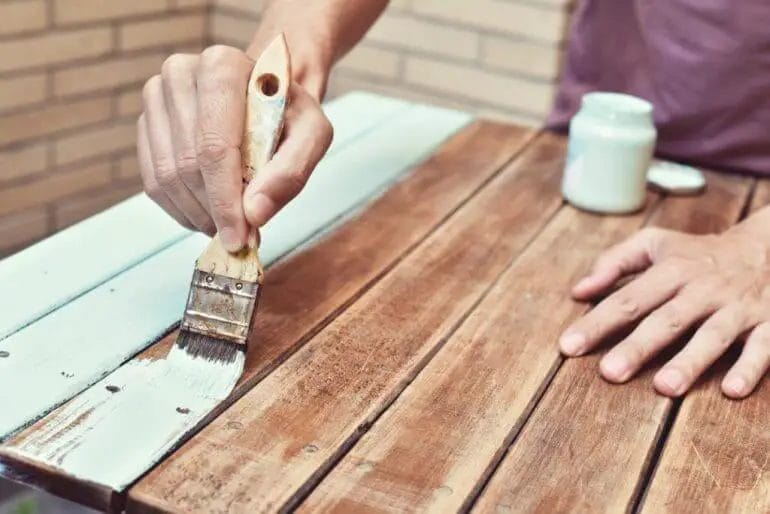
Yes, you can paint stained wood to give it a new look and freshen up your space. Painting over stained wood is a great way to update furniture, cabinets, or trim that may have become outdated or worn over time. By choosing the right paint and properly preparing the surface, you can achieve a smooth and durable finish that will transform your stained wood into a beautiful and customized piece.
Before painting stained wood, it is important to thoroughly clean and sand the surface to remove any dirt, grease, or rough areas. This will ensure proper adhesion of the paint and a smooth finish. Additionally, using a primer specifically designed for use on stained wood can help to prevent any bleed-through of the original stain color and create a solid base for the paint. Once the surface is prepped and primed, you can apply your desired paint color, using a brush or roller for larger areas and a smaller brush for detailed work.

When choosing paint for stained wood, consider using a high-quality acrylic or latex paint that is specifically formulated for use on wood surfaces. This type of paint is durable, easy to clean, and provides a smooth and professional-looking finish. You can also consider using a paint with built-in primer for added convenience. Be sure to follow the manufacturer’s instructions for application and drying times to achieve the best results.
Whether you want to update a tired piece of furniture, give your cabinets a new look, or refresh the
Transforming Stained Wood: A Guide to Painting Techniques
Wood furniture and surfaces add warmth and elegance to any space. However, if you have stained wood that no longer matches your decor or has seen better days, painting it can provide a fresh new look. In this section, we will explore various techniques to transform stained wood through painting.
1. Preparing the Surface
Before you begin the painting process, it is crucial to prepare the surface properly. This step ensures better adhesion and a smoother finish. Here are some essential steps to follow:
- Clean the surface thoroughly: Remove any dirt, dust, or grime using a mild detergent and water. Rinse well and allow the surface to dry completely.
- Sand the wood: Use a fine-grit sandpaper to gently sand the surface. This step helps in creating a smooth and even base for the paint to adhere to. Remember to sand along the grain for the best results.
- Fill in imperfections: If there are any cracks, holes, or gouges in the wood, use wood filler to fill them in. Allow the filler to dry and sand it down until it is level with the surrounding surface.
2. Choosing the Right Paint
When it comes to painting stained wood, selecting the right paint is crucial for achieving the desired results. Consider the following factors when choosing your paint:
- Type of paint: Latex or acrylic-based paints are popular choices for painting wood surfaces. They offer good adhesion, durability, and easy cleanup. However, if you are painting high-traffic areas or outdoor furniture, consider using an oil-based paint for added durability.
- Finish: Choose a finish that suits your preferences and the overall look you want to achieve. Options include matte, satin, semi-gloss, and high-gloss finishes.
- Color: Select a color that complements your existing decor or the new design scheme you have in mind. Consider creating a color palette to ensure harmony within the space.
3. Applying the Paint
Now that you have prepared the surface and chosen the right paint, it’s time to apply the paint to the stained wood. Follow these steps for a successful painting process:
- Prime the surface: Applying a primer on the stained wood helps to seal the surface, provide better adhesion, and ensure a more even finish. Choose a primer suitable for your chosen paint type.
- Stir the paint: Use a stir stick to thoroughly mix the paint before application. This step ensures an even distribution of color and pigments.
- Apply the first coat: Use a paintbrush or roller to apply the first coat of paint. Work in long, even strokes, following the wood grain. Allow the first coat to dry completely before applying additional coats.
- Apply additional coats: Depending on the desired level of coverage, apply one or more additional coats of paint. Sand lightly between coats to remove any imperfections and create a smooth surface.
- Protect the finish: Once the final coat has dried, consider applying a clear topcoat or sealant to protect the paint finish from scratches, moisture, and UV damage.
4. Adding Decorative Finishes
To further enhance the transformation of stained wood, you can consider adding decorative finishes. These techniques add texture, depth, and visual interest to your painted wood surfaces. Here are a few ideas:
- Distressing: Create a vintage or aged look by distressing the painted wood using sandpaper, a hammer, or other tools. Focus on corners, edges, and areas that would naturally experience wear and tear.
- Stenciling: Use stencils to add patterns, designs, or motifs to your painted wood surfaces. This technique allows you to personalize your furniture and make it truly unique.
- Antiquing: Apply a glaze or tinted wax to give your painted wood an antique or aged appearance. This technique adds depth and dimension to the surface.
In summary, transforming stained wood through painting is a fantastic way to update your furniture and surfaces. By following the proper preparation steps, selecting the right paint, applying it correctly, and adding decorative finishes, you can achieve a beautiful and customized look that complements your space’s style and ambiance.
Painting over Stained Wood: How to Achieve a Flawless Finish
Painting over stained wood can be a challenging task, but with the right techniques and tools, you can achieve a flawless finish. Whether you want to update the look of your furniture, cabinets, or trim, painting over stained wood can give a fresh and modern look to any space. In this section, we will explore the step-by-step process to ensure a successful paint job on stained wood.
1. Prepare the Surface
The first step in painting over stained wood is to prepare the surface. Start by cleaning the wood thoroughly to remove any dirt, grease, or debris. You can use a mild detergent and water solution for this purpose. After cleaning, sand the wood surface gently using fine-grit sandpaper. This will help create a smooth and even surface for the paint to adhere to.
Next, inspect the wood for any imperfections such as scratches, dents, or nail holes. Fill these imperfections with wood filler and allow it to dry. Once dry, sand the filled areas lightly to ensure a seamless finish.
2. Prime the Wood
Before applying paint, it is important to prime the wood. Priming helps seal the wood and provides a smooth base for the paint. Choose a high-quality primer that is suitable for the type of paint you will be using.
Apply the primer evenly using a brush or roller, following the grain of the wood. Make sure to cover the entire surface and allow the primer to dry according to the manufacturer’s instructions. Sand the primed surface lightly with fine-grit sandpaper to remove any brushstrokes or imperfections.
3. Choose the Right Paint
When selecting paint for stained wood, it is important to choose a high-quality paint that is specifically designed for wood surfaces. Opt for a paint that offers good coverage and durability. Water-based paints are often a popular choice for painting over stained wood, as they are easier to clean up and dry faster than oil-based paints.
Consider the color and finish you desire for your project. Matte or satin finishes are commonly used for a more subtle and modern look, while gloss finishes can provide a sleek and polished appearance.
4. Apply the Paint
Now it’s time to apply the paint to the stained wood. Start by stirring the paint thoroughly to ensure an even consistency. Use a brush or roller to apply the paint, again following the direction of the wood grain for a professional finish.
Apply thin and even coats of paint, allowing each coat to dry completely before applying the next. This will help prevent drips, streaks, and an uneven finish. If needed, sand lightly between coats to smooth out any imperfections.
5. Finishing Touches
Once you have achieved the desired coverage and finish, allow the final coat of paint to dry completely. Inspect the painted surface for any touch-ups or areas that may require additional paint. Use a fine brush to carefully correct any imperfections.
In summary, painting over stained wood requires proper preparation, including cleaning, sanding, and filling imperfections. Priming the wood is essential to create a smooth base, and choosing the right paint and applying it in thin, even coats will result in a flawless finish. With these steps, you can transform your stained wood surfaces into a fresh and updated look.
Advantages of Painting Stained Wood: Why You Should Consider It
Painting stained wood may seem like an unconventional choice, but it offers several advantages that make it worth considering. While stained wood has its own charm, painting it can transform the look and feel of your furniture, cabinetry, or any wooden surface. In this section, we will explore the various benefits of painting stained wood.
1. Enhanced Aesthetic Appeal
Painting stained wood allows you to create a customized look that complements your personal style and home decor. With a vast range of colors available, you have the freedom to choose a shade that matches your desired aesthetic. Whether you prefer a bold and vibrant pop of color or a more subtle and muted tone, painting stained wood gives you the flexibility to achieve the desired look and feel.
2. Conceals Imperfections
If your stained wood has imperfections, such as scratches, dents, or discoloration, painting can be a great solution. The paint provides a uniform surface, effectively hiding any flaws or blemishes that may be present. By concealing these imperfections, painting stained wood can give your furniture or wooden surfaces a fresh and flawless appearance.
3. Protection from Damage
Paint acts as a protective barrier against external elements, including moisture, UV rays, and general wear and tear. When applied to stained wood, paint helps to prevent water damage, sun fading, and scratches. This added layer of protection can significantly extend the lifespan of your wooden furniture or surfaces, saving you both time and money on repairs or replacements in the long run.
4. Versatility
Painting stained wood allows you to experiment with different textures and finishes. Whether you opt for a glossy, matte, or distressed finish, the choice is yours. This versatility enables you to adapt your wooden surfaces to match the changing trends and styles, ensuring that your home always looks fresh and up-to-date.
5. Easy Maintenance
Stained wood requires regular upkeep, including polishing and re-staining. However, painted wood is generally easier to maintain. A simple wipe down with a mild detergent and water is usually sufficient to keep the painted surface clean and free from dust or grime. Additionally, if any minor touch-ups are needed over time, painting allows for easy spot repairs without the need for extensive sanding and refinishing.
6. Cost-Effective Solution
If you have outdated or worn-out stained wood furniture or surfaces, painting can be a cost-effective alternative to replacing them entirely. Painting allows you to breathe new life into your existing wooden pieces without breaking the bank. By investing in a fresh coat of paint, you can achieve a whole new look and avoid the expense of purchasing new furniture or cabinetry.
7. Increased Resale Value
If you plan on selling your home in the future, painting stained wood can significantly boost its curb appeal and overall value. Potential buyers are often drawn to homes with modern and well-maintained interiors. By painting stained wood surfaces, you can present your home in a more contemporary and appealing light, attracting more interested buyers and potentially increasing your property’s resale value.
In summary, painting stained wood offers a multitude of advantages. It enhances the aesthetic appeal of your wooden surfaces, conceals imperfections, provides protection against damage, allows for versatility in texture and finish, requires easy maintenance, proves to be a cost-effective solution, and can increase your home’s resale value. Consider taking the leap and explore the possibilities of painting stained wood to transform and elevate your living spaces.
Step-by-Step Process of Painting Stained Wood Like a Pro
If you have stained wood surfaces in your home that are starting to look worn out or outdated, painting them can give them a fresh new look. However, painting over stained wood requires careful preparation and execution to ensure a professional-looking finish. In this section, we will guide you through a step-by-step process of painting stained wood like a pro.
1. Prepare the Surface
The first step in painting stained wood is to properly prepare the surface. Start by cleaning the wood with a mild detergent and water to remove any dirt, grease, or grime. If there are any rough or uneven areas, sand them down using sandpaper. This will help the paint adhere better to the surface.
2. Remove the Stain
If the stained wood has a thick or dark stain, you may need to remove it before painting. This can be done using a chemical stain remover or by sanding the wood until the stain is completely gone. Make sure to wear protective gloves and a mask when working with chemicals or sanding.
3. Fill in any Holes or Cracks
Inspect the wood for any holes, cracks, or imperfections. Use a wood filler to fill in these areas and allow it to dry completely. Once dry, sand the filled areas until they are smooth and level with the rest of the wood surface.
4. Prime the Surface
Before applying the paint, it is important to prime the stained wood. Primer helps create a smooth and even surface for the paint to adhere to, as well as improves the paint’s durability. Apply a coat of primer using a brush or roller, following the manufacturer’s instructions. Allow the primer to dry completely before moving on to the next step.
5. Choose the Right Paint
When painting stained wood, it is crucial to select the right type of paint. Look for a paint that is specifically formulated for wood surfaces and offers good coverage. Consider the finish as well, whether you prefer a glossy, satin, or matte finish. Consult with a paint specialist at your local home improvement store for recommendations.
6. Apply the Paint
Once the primer is dry, it’s time to apply the paint. Start by stirring the paint thoroughly to ensure an even consistency. Use a brush or roller to apply the paint in smooth, even strokes, following the grain of the wood. Work in small sections at a time, and make sure to overlap each stroke slightly to avoid streaks or uneven coverage. Allow the first coat to dry completely before applying additional coats if necessary.
7. Sand and Finish
After the final coat of paint has dried, you can sand the surface lightly with fine-grit sandpaper to smooth out any imperfections or brush marks. Wipe away any dust with a clean cloth. To protect the painted surface and enhance its durability, apply a clear topcoat or sealer according to the product instructions.
8. Clean Up
Once you have finished painting the stained wood, clean your brushes and rollers immediately to prevent the paint from drying and ruining the tools. Use warm, soapy water to remove the paint, and rinse them thoroughly. Store your painting supplies properly for future use.
Summary
Painting stained wood can be a rewarding DIY project that breathes new life into your home. By following the step-by-step process outlined above, you can achieve professional-looking results. Remember to prepare the surface, remove the stain if necessary, fill in any holes or cracks, prime the surface, choose the right paint, apply it carefully, sand and finish, and clean up properly. With a little patience and attention to detail, you can transform stained wood surfaces into beautiful, painted masterpieces.
Choosing the Right Paint for Stained Wood Surfaces
When it comes to refreshing the look of stained wood surfaces, choosing the right paint is essential. Whether you want to change the color of your stained wood furniture or give your stained wood trim a fresh new coat, selecting the appropriate paint can make a significant difference in achieving the desired results. In this section, we will explore the factors to consider when choosing the right paint for stained wood surfaces.
1. Surface Preparation
Before applying paint to any stained wood surface, proper preparation is crucial. Start by thoroughly cleaning the surface with a mild detergent and water to remove any dirt, dust, or grime. Next, lightly sand the stained wood surface using fine-grit sandpaper to create a rough texture that will help the paint adhere better. After sanding, wipe away any sanding dust with a clean cloth.
2. Type of Paint
When it comes to painting stained wood, it is important to choose the right type of paint. There are two main options to consider:
- Acrylic Latex Paint: This type of paint is water-based, dries quickly, and has low levels of volatile organic compounds (VOCs). It is a popular choice for painting stained wood surfaces, as it offers good adhesion, durability, and easy cleanup. Acrylic latex paint is available in a wide range of colors and finishes, allowing you to achieve the desired look for your stained wood.
- Oil-based Paint: Oil-based paint provides a durable and long-lasting finish, making it suitable for high-traffic areas and outdoor applications. However, it has a strong odor, longer drying time, and requires mineral spirits for cleanup. Oil-based paint is best suited for heavily stained or damaged wood surfaces that need extra protection.
Consider the specific needs of your project and choose the type of paint that best suits your requirements.
3. Primer
Applying a primer before painting stained wood surfaces can greatly enhance the adhesion and durability of the paint. A primer creates a smooth and even surface, allowing the paint to adhere better and providing a more professional-looking finish. Choose a primer that is specifically designed for use on stained wood surfaces and follow the manufacturer’s instructions for application.
4. Finishing Techniques
Depending on the desired outcome, there are various finishing techniques you can use to enhance the appearance of painted stained wood surfaces. Some popular options include:
- Distressing: This technique involves intentionally creating a weathered or aged look by sanding or scraping away certain areas of the paint.
- Antiquing: Antiquing involves applying a glaze or stain over the painted surface to create an aged or vintage effect.
- Giving a faux wood grain: This technique involves using a special tool or brush to create the appearance of wood grain on the painted surface.
Research and experiment with different finishing techniques to add depth and character to your painted stained wood surfaces.
5. Maintenance and Durability
Consider the maintenance and durability of the paint when choosing a product for stained wood surfaces. Look for paints that offer excellent resistance to scratches, stains, and fading. Additionally, consider if the paint can be easily touched up in the future to maintain the integrity of the finished surface.
6. Test and Sample
Before committing to painting the entire stained wood surface, it is advisable to test the paint on a small, inconspicuous area first. This will allow you to assess the color, adhesion, and overall appearance of the paint before proceeding with the full application. Consider obtaining paint samples or swatches to compare and see how they look in different lighting conditions.
Summary
Choosing the right paint for stained wood surfaces involves considering factors such as surface preparation, type of paint, primer, finishing techniques, maintenance and durability, and conducting tests and samples. By taking these factors into account, you can ensure that your painted stained wood surfaces look beautiful, last long, and withstand the test of time.
FAQs
Can I paint stained wood?
Yes, you can paint stained wood. However, it is important to properly prepare the surface by sanding it lightly and applying a primer before painting. This will help the paint adhere to the wood and ensure better results.
How long does it take for paint to dry?
The drying time of paint can vary depending on several factors such as the type of paint, humidity, and temperature. Generally, it takes around 1-2 hours for paint to dry to the touch, but it can take up to 24 hours or longer for it to fully cure and harden.
Can I paint over wallpaper?
While it is possible to paint over wallpaper, it is generally not recommended. The texture and seams of the wallpaper can show through the paint, and the moisture from the paint may cause the wallpaper to peel or bubble. It is usually best to remove the wallpaper before painting.
Conclusion:
In conclusion, painting stained wood is indeed possible and can be a great way to give your furniture or surfaces a fresh new look. By following the right steps, such as cleaning and sanding the wood, applying a primer, and choosing the right paint, you can achieve a smooth and durable finish. However, it is important to note that painting stained wood may require additional time and effort compared to painting untreated wood. It is also recommended to consult with a professional or do thorough research before beginning the project to ensure the best results. So go ahead, unleash your creativity, and transform your stained wood into a work of art!