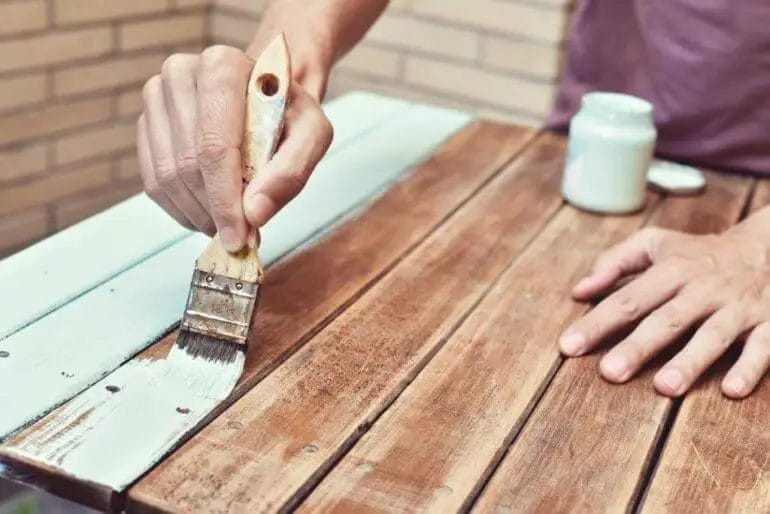
Painting stained wood can be a great way to transform the look of furniture, cabinets, or other wooden surfaces. Whether you want to cover up an old stain or simply want to add a fresh new color, this process can give your wood a whole new lease on life. In this guide, we’ll walk you through the steps to achieve a professional finish when painting over stained wood. So, let’s dive in and learn how to paint stain wood like a pro!
The first step in painting stained wood is to prepare the surface. Start by cleaning the wood to remove any dirt, dust, or grease. Sand the surface lightly to create a smooth base for the paint. Next, apply a primer to ensure better adhesion and durability of the paint. Once the primer is dry, it’s time to choose your paint color.

When selecting a paint color for stained wood, consider the overall look you want to achieve. Opt for lighter colors to brighten up the space or darker shades for a more dramatic effect. Make sure to choose a paint specifically designed for use on wood surfaces to ensure longevity and a smooth finish.
Before applying the paint, stir it thoroughly to achieve an even consistency. Use a brush or roller to apply the paint, following the grain of the wood. Apply multiple thin coats rather than one thick coat for a more professional finish. Allow each coat to dry completely before applying the next layer.
After
Choosing the Right Wood Stain: Tips and Tricks
When it comes to enhancing the natural beauty of wood, there’s nothing quite like a high-quality wood stain. Whether you’re embarking on a DIY project or working with a professional, choosing the right wood stain can make all the difference in the final result. In this section, we will explore some valuable tips and tricks to help you navigate the world of wood stains and make the best choice for your project.
1. Consider the Wood Type
The type of wood you’re working with plays a significant role in determining the best wood stain. Different wood species absorb stains differently, and certain stains may bring out the grain and characteristics of specific woods more effectively. For example, lighter wood stains work well with pine and maple, while darker stains complement the rich hues of mahogany or walnut. Consider the natural color and grain of the wood when selecting a stain to achieve the desired look.
2. Assess the Desired Finish
Before choosing a wood stain, it’s essential to determine the finish you want to achieve. Wood stains are available in a variety of finishes, including matte, satin, semi-gloss, and gloss. Each finish creates a distinct look, from a subtle sheen to a high-shine effect. Consider the overall aesthetic of your project and select a finish that complements the style and ambiance you’re aiming for.
3. Test the Stain on a Sample Piece
It’s always a good idea to test a wood stain on a sample piece before committing to the entire project. This will give you a better understanding of how the stain will interact with your specific wood type and help you gauge the desired color and finish. Apply the stain to an inconspicuous area and allow it to dry completely. Evaluate the results in different lighting conditions to ensure it meets your expectations.
4. Understand the Different Types of Stains
Wood stains come in various formulations, each with its unique properties. Familiarize yourself with the different types of wood stains to make an informed decision:
- Oil-based stains: These stains provide deep penetration into the wood, enhancing grain clarity and offering long-lasting durability.
- Water-based stains: Environmentally friendly and low in VOCs, water-based stains dry quickly and are easy to clean up. They are available in a wide range of colors.
- Gel stains: Gel stains have a thick consistency that allows for easy application on vertical surfaces. They provide a more uniform color and are ideal for achieving a consistent finish.
5. Consider Additional Protective Features
Some wood stains offer additional protective features, such as UV resistance, mold and mildew resistance, or waterproofing properties. These added benefits can prolong the lifespan of your wood and protect it from harsh environmental conditions. Depending on the intended use and location of your wood project, consider choosing a stain that offers the necessary protection for long-term durability.
6. Seek Expert Advice
If you’re unsure about which wood stain to choose or need further guidance, don’t hesitate to consult with a professional or an experienced DIY enthusiast. They can provide valuable insights, recommend suitable products, and share their expertise to ensure you achieve the desired outcome for your wood project.
In summary, choosing the right wood stain involves considering the wood type, assessing the desired finish, testing the stain on a sample piece, understanding the different types of stains, considering additional protective features, and seeking expert advice when needed. By following these tips and tricks, you can confidently select the perfect wood stain for your project, resulting in a beautiful and durable finish that enhances the natural charm of wood.
Step-by-Step Guide to Preparing Wood for Staining
Staining wood can be a rewarding and transformative process that enhances the natural beauty of the wood while also protecting it. However, before you can start applying the stain, it is crucial to properly prepare the wood surface to ensure a smooth and flawless finish. In this section, we will provide you with a step-by-step guide on how to prepare wood for staining.
1. Gather the necessary tools and materials
Before you begin the preparation process, make sure you have all the tools and materials you will need. This includes:
- Sandpaper (in different grits)
- Wood cleaner or detergent
- Soft-bristle brush
- Tack cloth
- Wood filler (if needed)
- Putty knife
- Painter’s tape
- Drop cloth or plastic sheeting
2. Clean the wood surface
The first step in preparing wood for staining is to clean the surface thoroughly. Use a wood cleaner or detergent mixed with water to remove any dirt, dust, or grease. Apply the cleaner with a soft-bristle brush and scrub the wood gently. Rinse off the cleaner with clean water and allow the wood to dry completely.
3. Sand the wood
Once the wood is dry, it’s time to sand the surface. Start with a coarse-grit sandpaper (around 80 or 100 grit) to remove any roughness, imperfections, or old finishes. Sand the wood in the direction of the grain, applying even pressure. As you progress, switch to finer-grit sandpaper (around 150 to 220 grit) to achieve a smoother surface. Sanding helps open up the wood pores and allows the stain to penetrate evenly.
4. Fill any cracks or holes
If you come across any cracks, holes, or dents in the wood surface, it’s important to fill them before staining. Use a wood filler that matches the color of the wood and fill in the imperfections using a putty knife. Scrape off any excess filler and let it dry according to the manufacturer’s instructions. Once dry, sand the filled areas lightly to ensure a seamless finish.
5. Protect surrounding areas
Before you start applying the stain, take the necessary precautions to protect any surrounding areas that you don’t want to be stained. Use painter’s tape to cover edges, trims, or other surfaces that should remain stain-free. Lay down a drop cloth or plastic sheeting to catch any drips or spills.
6. Remove any dust
After sanding and filling, it’s crucial to remove any dust or debris from the wood surface. Use a tack cloth to wipe down the entire surface, ensuring a clean and smooth base for the stain.
7. Test the stain
Before applying the stain to the entire wood surface, it’s a good idea to test it on a small, inconspicuous area. This will allow you to see how the stain looks on the wood and make any necessary adjustments before proceeding.
8. Apply the stain
Once you are satisfied with the test results, it’s time to apply the stain. Use a brush, sponge, or cloth to apply the stain in the direction of the wood grain. Work in small sections, ensuring even coverage. Allow the stain to penetrate for the recommended amount of time, as specified by the manufacturer.
9. Wipe off excess stain
After the recommended staining time, use a clean cloth or rag to wipe off any excess stain. This will help achieve a more even and natural-looking finish. Make sure to follow the manufacturer’s instructions for wiping off the excess stain.
10. Allow the stain to dry
Lastly, allow the stained wood to dry completely before applying any sealant or topcoat. This typically takes a few hours to overnight, depending on the type of stain and environmental conditions. Follow the manufacturer’s recommended drying time for best results.
In summary, preparing wood for staining involves gathering the necessary tools, cleaning the wood surface, sanding to achieve a smooth finish, filling any cracks or holes, protecting surrounding areas, removing dust, testing the stain, applying the stain in the direction of the wood grain, wiping off excess stain, and allowing the stain
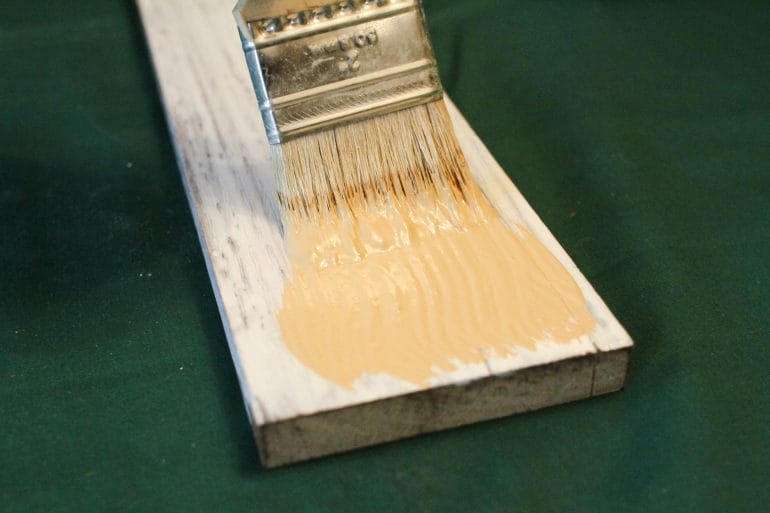
Techniques for Applying Wood Stain: Brushing, Ragging, and Wiping
When it comes to enhancing the look of wood surfaces, applying a wood stain is a popular choice. A wood stain not only adds color to the wood but also helps to protect it from damage. However, applying a wood stain requires some skill and technique to achieve the desired results. In this section, we will explore three common techniques for applying wood stain: brushing, ragging, and wiping.
1. Brushing
Brushing is the most traditional and commonly used technique for applying wood stain. It involves using a brush to apply the stain evenly onto the wood surface. To brush on the stain, follow these steps:
- Start by preparing the wood surface. Sand it smooth and remove any dust or debris.
- Stir the wood stain thoroughly to ensure an even consistency.
- Dip the brush into the stain, allowing the bristles to absorb the liquid.
- Apply the stain onto the wood surface using long, even strokes in the direction of the wood grain.
- Work in small sections, ensuring that the stain is evenly applied and there are no drips or puddles.
- Allow the stain to penetrate the wood for the recommended amount of time.
- After the recommended time, wipe off any excess stain with a clean cloth.
- Allow the stained wood to dry completely before applying any additional coats or finishes.
Brushing is a versatile technique that allows for better control and coverage. It is ideal for larger surfaces such as floors, decks, and furniture.
2. Ragging
Ragging, also known as wiping-on, is a technique that involves using a rag or cloth to apply the wood stain. This method provides a more subtle and textured finish compared to brushing. Here’s how to achieve a ragged finish:
- Prepare the wood surface by sanding it smooth and removing any dust or debris.
- Wear gloves to protect your hands from the stain.
- Apply a small amount of stain onto a clean rag or cloth.
- Gently rub the stain onto the wood surface using circular motions.
- Continue applying the stain until you achieve the desired color and coverage.
- Allow the stain to penetrate the wood for the recommended amount of time.
- After the recommended time, wipe off any excess stain with a clean cloth.
- Allow the stained wood to dry completely before applying any additional coats or finishes.
Ragging is best suited for smaller projects or when you want to achieve a more rustic or aged look on the wood surface.
3. Wiping
Wiping is a technique that combines the brushing and ragging methods. It involves applying the stain with a brush and then using a cloth to remove the excess. This technique allows for better control over the color intensity and the ability to create unique effects. Follow these steps to achieve a wiped finish:
- Prepare the wood surface by sanding it smooth and removing any dust or debris.
- Stir the wood stain thoroughly to ensure an even consistency.
- Using a brush, apply the stain onto the wood surface, working in the direction of the wood grain.
- After applying the stain, immediately use a clean cloth to wipe off the excess stain.
- Continue working in small sections, applying and wiping off the stain until you achieve the desired color and coverage.
- Allow the stain to dry completely before applying any additional coats or finishes.
Wiping is a versatile technique that allows for more control over the final outcome. It is commonly used for furniture, cabinets, and trim.
Summary
Applying wood stain requires skill and technique to achieve the desired results. Brushing, ragging, and wiping are three common techniques used in wood staining. Brushing involves applying the stain with a brush in even strokes, while ragging utilizes a rag or cloth for a more textured finish. Wiping combines both brushing and ragging methods to create unique effects. Each technique has its own advantages and is suitable for different projects. With the right technique and proper application, you can transform your wood surfaces and enhance their beauty.
Enhancing the Beauty of Stained Wood: Adding a Polyurethane Finish
Stained wood is a popular choice for furniture, flooring, and other wooden surfaces due to its warm and inviting appeal. However, to truly bring out the natural beauty and protect the wood, adding a polyurethane finish is essential. In this section, we will explore the process of enhancing the beauty of stained wood by applying a polyurethane finish.
1. Understanding the Benefits of a Polyurethane Finish
A polyurethane finish offers numerous advantages when it comes to enhancing the beauty of stained wood. Some of the key benefits include:
- Enhanced durability: Polyurethane creates a tough protective layer that helps safeguard the wood against scratches, stains, and moisture.
- Improved appearance: The finish adds depth, richness, and luster to the stained wood, enhancing its natural beauty and highlighting the grain patterns.
- Easy maintenance: Polyurethane finishes are relatively low maintenance and can be easily cleaned with mild soap and water.
- Long-lasting protection: Once applied, a polyurethane finish can provide long-lasting protection to the stained wood surface, ensuring its beauty for years to come.
2. Preparing the Wood Surface
Before applying the polyurethane finish, it is crucial to properly prepare the wood surface. Here are the necessary steps:
- Sanding: Use fine-grit sandpaper to smooth out any imperfections, ensuring a smooth and even surface for the finish to adhere to.
- Removing dust: Thoroughly clean the wood surface to remove any dust or debris using a tack cloth or a soft, lint-free cloth.
- Applying a wood conditioner (optional): If the wood is porous or unevenly textured, applying a wood conditioner can help achieve an even finish by minimizing the absorption of the polyurethane.
3. Applying the Polyurethane Finish
Once the wood surface is properly prepared, it is time to apply the polyurethane finish. Here’s how:
- Choose the right type of polyurethane: There are two main types of polyurethane finishes – oil-based and water-based. Consider the specific requirements of your project and select the appropriate type.
- Stir the finish: Thoroughly stir the polyurethane finish to ensure it is well mixed.
- Apply thin coats: Using a high-quality brush or roller, apply thin and even coats of polyurethane onto the wood surface. Avoid applying the finish too thickly, as it can result in drips and an uneven finish.
- Sand between coats: After each coat has dried, lightly sand the surface with fine-grit sandpaper. This helps create a smooth surface and promotes better adhesion for subsequent coats.
- Repeat the process: Apply multiple coats of polyurethane until the desired level of durability and sheen is achieved. Follow the manufacturer’s instructions regarding drying times between coats.
4. Finishing Touches and Maintenance
Once the final coat of polyurethane has dried, the stained wood will have a beautiful and protective finish. Here are a few additional finishing touches and maintenance tips:
- Inspect for imperfections: After the finish has fully dried, inspect the wood surface for any imperfections or uneven areas. If necessary, lightly sand those spots and apply an additional coat of polyurethane.
- Regular cleaning: To maintain the beauty of the stained wood, regularly clean the surface with a mild soap and water solution. Avoid using abrasive cleaners or harsh chemicals that can damage the finish.
- Protective measures: Use coasters, placemats, or tablecloths on furniture surfaces to protect the polyurethane finish from excessive heat, moisture, and spills.
- Periodic maintenance: Over time, the polyurethane finish may show signs of wear. It is recommended to periodically apply a fresh coat of polyurethane to maintain the wood’s appearance and protection.
In summary, adding a polyurethane finish to stained wood is an excellent way to enhance its beauty and protect it from daily wear and tear. By following the proper preparation and application techniques, you can achieve a stunning and long-lasting finish that will preserve the natural elegance of the wood for years to come.
5. Maintaining and Caring for Stained Wood Surfaces
Wood surfaces stained with beautiful finishes add warmth and elegance to any space. However, to keep them looking their best, regular maintenance and proper care are essential. In this section, we will discuss some important tips and techniques for maintaining and caring for stained wood surfaces.
1. Regular Cleaning
Regular cleaning is crucial to keep your stained wood surfaces free from dirt, dust, and grime. Use a soft cloth or feather duster to remove loose particles from the surface. Avoid using abrasive cleaners or rough materials that can scratch the finish. Instead, dampen a microfiber cloth with a gentle wood cleaner or a mixture of mild soap and water, and wipe the surface in the direction of the wood grain. Rinse the cloth frequently and avoid excessive moisture on the surface.
2. Avoiding Excessive Moisture
Wood is sensitive to changes in moisture levels, which can cause it to warp, crack, or swell. To protect your stained wood surfaces, avoid placing them in areas with high humidity or near direct sources of moisture, such as bathrooms or kitchens. Use coasters or placemats under beverages and hot dishes to prevent water rings or heat damage. In case of spills, immediately blot them with a clean, dry cloth to prevent the liquid from penetrating the wood.
3. Regular Dusting and Polishing
Dusting stained wood surfaces on a regular basis helps prevent the buildup of dirt and dust. Use a soft cloth or a microfiber duster to gently remove dust from the surface. To maintain the luster of the finish, you can also use a quality wood polish. Apply a small amount of the polish on a clean, soft cloth and wipe the surface, following the direction of the wood grain. Avoid applying too much polish, as it can leave a residue or create a sticky surface.
4. Protective Measures
To protect your stained wood surfaces from scratches and dents, consider using protective measures. Place felt pads under furniture legs to prevent them from scratching the surface when moved. Use coasters or trivets under decorative objects or hot items to avoid direct contact with the wood. Avoid dragging heavy objects across the surface, as it can cause deep scratches or gouges. Additionally, consider using blinds or curtains to reduce direct sunlight exposure, as prolonged exposure can cause the wood to fade or discolor.
5. Professional Maintenance
While regular cleaning and care can significantly extend the lifespan of your stained wood surfaces, there may be times when professional maintenance is necessary. If the finish becomes worn, scratched, or dull, consider consulting a professional woodworker or furniture restorer to refinish the surface. They can strip off the old finish, repair any damages, and apply a fresh coat of stain and protective sealant to restore its beauty.
In summary, maintaining and caring for stained wood surfaces requires regular cleaning, avoiding excessive moisture, dusting, and polishing. Taking protective measures and seeking professional maintenance when needed will help preserve the beauty and longevity of your stained wood surfaces for years to come.
FAQs
1. How do I paint stained wood?
To paint stained wood, first, sand the surface to remove any shiny finish or rough spots. Clean the wood with a tack cloth. Apply a coat of primer to help the paint adhere better. Once the primer is dry, you can apply the paint using a brush or roller in even strokes. Allow the paint to dry and apply additional coats if necessary.
2. Can you paint over dark stained wood?
Yes, you can paint over dark stained wood. However, it is recommended to use a primer before applying the paint. The primer will help to cover the dark stain and create a smooth surface for the paint to adhere to. Be sure to choose a paint color that will effectively cover the dark stain.
3. Do you need to sand stained wood before painting?
Yes, it is generally recommended to sand stained wood before painting. Sanding helps to remove any existing finish, smooth out rough areas, and create a better surface for the paint to adhere to. It also helps to remove any unevenness or imperfections in the wood, resulting in a smoother paint finish.
Conclusion:
In conclusion, learning how to paint stain wood can greatly enhance the appearance and durability of your wooden surfaces. By following the proper steps, such as preparing the wood, choosing the right stain and paint, and applying them evenly, you can achieve professional-looking results. Additionally, by sealing the stained wood with a protective topcoat, you can ensure its longevity and resistance to wear and tear. Remember to practice proper safety precautions, such as working in a well-ventilated area and wearing protective gear. With patience and attention to detail, you can transform your wooden furniture, floors, or other surfaces into beautiful, customized pieces that will stand the test of time.
So, whether you’re looking to refresh your home decor, restore worn-out wooden items, or simply add a personal touch to your living space, painting stain wood is a rewarding and cost-effective solution. With a wide range of stain colors and paint finishes available, you have the opportunity to express your creativity and achieve the desired aesthetic for your wood project. So, why wait? Get started and enjoy the process of turning ordinary wood into extraordinary pieces that will make a lasting impression.