Yes, you can screw into wood filler. Wood filler is a versatile product that can be used to fill in gaps, holes, or damaged areas in wood surfaces. It is typically made from a combination of wood fibers and binders, making it sturdy enough to hold screws. However, it is important to note that wood filler may not provide the same level of strength and stability as solid wood. Ensure that the wood filler is completely dry and hardened before attempting to screw into it to avoid any issues.

Using Wood Filler for Screw Holes: A Step-by-Step Guide
Wood filler is a versatile product that can be used to fill in various imperfections in wood surfaces. One common use for wood filler is to fill screw holes in wood. Whether you are working on a DIY project or repairing furniture, using wood filler for screw holes can help restore the appearance and functionality of the wood surface.

Gather the Necessary Materials
Before you begin, gather all the materials you will need for this project. Here is a list of the essential materials:
- Wood filler
- Putty knife or a similar tool
- Sandpaper (medium and fine grit)
- Paint or stain (if desired)
- Paintbrush (if using paint or stain)
Clean the Area
Start by cleaning the area around the screw hole. Use a soft cloth or a brush to remove any dust or debris. Cleaning the area ensures that the wood filler will adhere properly and create a seamless finish.
Apply the Wood Filler
Take a small amount of wood filler on a putty knife or a similar tool. Press the filler into the screw hole, making sure to fill it completely. Use the putty knife to level the filler and remove any excess. Smooth out the surface to create a flush finish.
Allow the Filler to Dry
Once the wood filler is applied, allow it to dry according to the manufacturer’s instructions. The drying time may vary depending on the type and brand of wood filler used. Ensure that the filler is completely dry before proceeding to the next step.
Sand the Filled Area
After the filler has dried, use medium grit sandpaper to sand down the filled area. Start by sanding in a circular motion and then switch to a back-and-forth motion to create a smooth surface. Once the filled area is smooth, switch to a fine grit sandpaper for a finer finish.
Finish the Surface (Optional)
If desired, you can finish the surface by applying paint or stain. Choose a color that matches the surrounding wood to achieve a seamless look. Use a paintbrush to apply the paint or stain evenly, following the grain of the wood. Allow the paint or stain to dry completely before using or handling the wood surface.
Summary
Using wood filler for screw holes is an effective way to restore the appearance and functionality of wood surfaces. By following this step-by-step guide, you can easily fill screw holes and achieve a seamless finish. Remember to gather all the necessary materials, clean the area, apply the wood filler, allow it to dry, sand the filled area, and finish the surface with paint or stain if desired. With proper technique and care, your wood surface will look as good as new.
Ensuring Proper Screw Stability in Wood Filler
Wood filler is a versatile material that can be used to repair and restore damaged wood. It is commonly used to fill holes, cracks, and gaps in wooden surfaces, providing a smooth and even finish. However, when it comes to attaching screws in wood filler, ensuring proper stability is crucial to avoid any structural issues or damage.
Why is screw stability important?
When screws are inserted into wood filler, they rely on the filler to provide support and hold them in place. If the filler is not stable enough, it may not be able to bear the load or endure the pressure applied to it. This can result in loosened screws, weakened structures, or even complete failure of the attachment.
Therefore, it is essential to follow certain guidelines and techniques to ensure proper screw stability in wood filler.
Choosing the right wood filler
Not all wood fillers are created equal when it comes to screw stability. It is important to select a high-quality wood filler that is specifically designed for structural repairs. Look for a filler that has high bonding strength and is suitable for both indoor and outdoor use.
Additionally, consider the type of wood you are working with. Different wood species have different porosities and densities, which can affect the performance of the filler. Choose a wood filler that is compatible with the type of wood you are using to achieve optimal screw stability.
Preparing the surface
Proper surface preparation is crucial for ensuring a strong bond between the wood filler and the surrounding wood. Before applying the filler, clean the surface thoroughly to remove any dirt, dust, or debris. Use a sandpaper or a sanding block to smooth out the area around the hole or crack.
Make sure the surface is dry and free from moisture before applying the filler. Moisture can interfere with the adhesion and curing process of the filler, compromising its stability.
Applying the wood filler
When applying the wood filler, follow the manufacturer’s instructions carefully. Use a putty knife or a spatula to fill the hole or crack, ensuring that the filler is packed tightly into the void. Overfill the area slightly to compensate for any shrinkage that may occur during the drying process.
Smooth out the surface of the filler using the putty knife or a damp cloth. This will help create a flush and even surface for screw insertion.
Allowing proper curing time
After applying the wood filler, it is crucial to allow it to fully cure before attempting to insert screws. Curing time can vary depending on the type and brand of filler used, as well as environmental conditions. Refer to the manufacturer’s instructions for the recommended curing time.
Rushing the curing process can compromise the stability of the filler and weaken its bond with the surrounding wood. Ensure that the filler is completely dry and hardened before proceeding with screw insertion.
Securing screws in the wood filler
When it is time to insert screws into the wood filler, use caution and follow these steps:
- Choose the appropriate size and type of screw for the intended application.
- Pre-drill pilot holes to guide the screws into the wood filler. This helps prevent the filler from cracking or splitting when the screw is inserted.
- Drive the screws slowly and steadily, ensuring that they are fully engaged in the wood filler without stripping the material.
- Do not overtighten the screws, as this can cause the filler to crack or weaken its stability.
Summary
Ensuring proper screw stability in wood filler is essential for maintaining the structural integrity of wooden surfaces. By selecting the right filler, preparing the surface correctly, applying the filler properly, allowing sufficient curing time, and securing screws with care, you can achieve a strong and stable attachment. Remember to always follow the manufacturer’s instructions and guidelines for best results.
3. Dos and Don’ts of Screwing into Wood Filler
Wood filler is a popular choice for repairing small imperfections and holes in wooden surfaces. It is a versatile and easy-to-use product that can give new life to damaged wood. However, when it comes to screwing into wood filler, there are certain dos and don’ts that you should keep in mind to ensure a successful outcome. In this section, we will discuss the important guidelines for screwing into wood filler.
Do’s:
- Choose the right type of wood filler: When selecting a wood filler for your project, make sure to choose a high-quality product that is suitable for screwing. Look for a wood filler that is strong, durable, and specifically designed to hold screws.
- Prepare the surface: Before applying the wood filler, clean and prepare the surface properly. Remove any loose debris, dust, or old filler to ensure a strong bond between the wood filler and the wood surface.
- Apply the wood filler carefully: Follow the manufacturer’s instructions for applying the wood filler. Use a putty knife or a similar tool to spread the filler evenly over the damaged area. Make sure to fill the hole completely and remove any excess filler.
- Allow the wood filler to dry: Give the wood filler enough time to dry and cure properly. The drying time may vary depending on the brand and type of wood filler you are using. Check the manufacturer’s instructions for the recommended drying time.
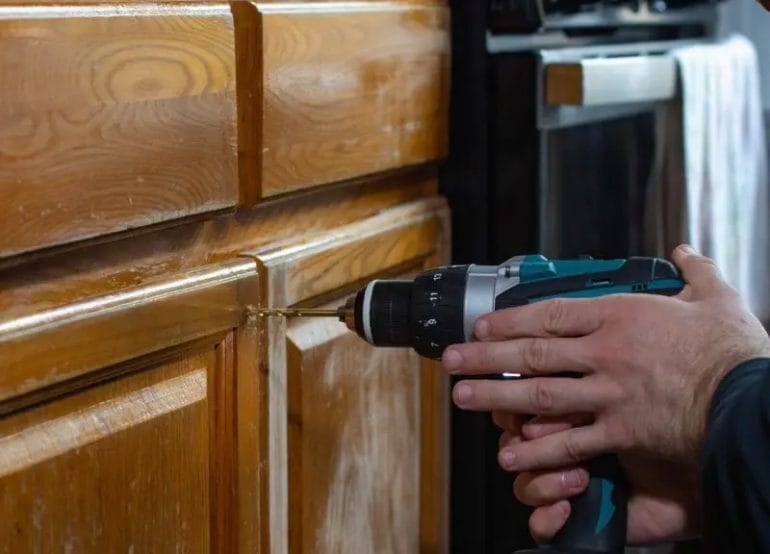
- Pre-drill pilot holes: When you are ready to screw into the wood filler, it is recommended to pre-drill pilot holes. This will prevent the wood filler from cracking or splitting when the screw is inserted.
- Choose the right screws: Select screws that are appropriate for the thickness of the wood and the intended use. Make sure the screws are long enough to securely hold the wood together, but not so long that they protrude out the other side.
- Screw carefully: When screwing into wood filler, apply gentle pressure and turn the screw slowly to avoid damaging the filler. Take your time and ensure that the screw is securely fastened without overtightening.
- Allow for additional drying time: After screwing into the wood filler, it is recommended to give it some additional drying time before putting any weight or stress on the repaired area. This will help to ensure a strong and durable bond.
Don’ts:
- Don’t use low-quality wood filler: Using a low-quality or unsuitable wood filler can result in a weak bond and may cause the filler to crack or crumble when screws are inserted. It is important to choose a reliable and appropriate wood filler for the job.
- Don’t rush the drying process: It is crucial to allow the wood filler to dry completely before attempting to screw into it. Rushing the drying process can lead to a weakened bond and compromised durability.
- Don’t overtighten the screws: Over-tightening screws can put excessive stress on the wood filler, causing it to crack or break. Use a steady and controlled force when screwing into wood filler to avoid damaging the repaired area.
- Don’t overload the repaired area: Avoid applying excessive weight or pressure on the repaired area immediately after screwing into the wood filler. Give it ample time to fully cure before subjecting it to heavy loads or stress.
- Don’t neglect proper maintenance: After successfully screwing into wood filler, it is important to maintain the repaired area properly. Regularly inspect the screws and the surrounding wood, and address any issues promptly to prevent further damage.
In summary, screwing into wood filler can be a successful and durable solution for repairing damaged wood surfaces. By following the dos and don’ts outlined above, you can ensure a strong bond, prevent cracking or splitting, and enjoy the longevity of your repair. Remember to choose a high-quality wood filler, prepare the surface properly, use the right screws, and allow for sufficient drying time. With proper care and maintenance, your repaired wood surface can regain its strength and functionality.
Common Mistakes to Avoid When Screwing into Wood Filler
Wood filler is a useful product that fills in gaps, cracks, or holes in wood surfaces, allowing for a smooth and even finish. It can be a great solution for repairing damaged wood or preparing it for painting or staining. However, when it comes to screwing into wood filler, there are some common mistakes that you should avoid to ensure a successful outcome.
1. Using the Wrong Type of Screw
One of the most common mistakes when screwing into wood filler is using the wrong type of screw. Wood filler is not as strong or durable as solid wood, so it’s important to use screws that are appropriate for the material. Avoid using long or heavy-duty screws that may cause the filler to crack or break. Instead, opt for shorter screws that are specifically designed for use with wood filler.
2. Not Pre-Drilling Holes
Another mistake to avoid is not pre-drilling holes before screwing into wood filler. Unlike solid wood, wood filler is not as dense and can easily crack or split when a screw is directly inserted. By pre-drilling pilot holes, you can create a path for the screw to follow without damaging the filler. This will help prevent any cracking or splitting and ensure a secure attachment.
3. Over-Tightening the Screws
Over-tightening the screws is a common mistake that can lead to problems when screwing into wood filler. The excessive force can cause the filler to compress or buckle, compromising its stability. It’s important to tighten the screws just enough to secure the object without putting too much pressure on the wood filler. Use a screwdriver or drill with a clutch setting to control the torque and avoid over-tightening.
4. Neglecting to Sand and Seal the Filled Area
After screwing into wood filler, it’s crucial to properly finish the filled area. Neglecting to sand and seal the wood filler can result in an uneven or rough surface. Take the time to sand the filled area with fine-grit sandpaper to create a smooth finish that blends seamlessly with the surrounding wood. Then, apply a suitable sealant or primer to protect the filler and ensure a professional-looking result.
5. Not Allowing Sufficient Drying Time
Wood filler requires adequate drying time before it can be subjected to any stress, such as screwing. Not allowing sufficient drying time can lead to a weaker bond and potential failure of the wood filler. Read the manufacturer’s instructions to determine the recommended drying time for the specific product you are using. It’s better to wait a little longer and ensure the filler is fully cured before proceeding with screwing or any other finishing work.
6. Failing to Test the Stability
Before relying on a screw in wood filler to hold a significant load or weight, it’s essential to test the stability of the attachment. Give the screw a gentle tug or apply light pressure to ensure that it is securely anchored in the filler. If there is any movement or instability, it may be necessary to reinforce the attachment with additional screws or consider an alternative fixing method.
7. Not Using the Correct Wood Filler
Using the correct wood filler for your specific project is crucial to avoid problems when screwing. There are different types of wood fillers available, such as water-based or solvent-based fillers, each with its own characteristics and recommended applications. Make sure to choose a wood filler that is compatible with the type of wood you are working with and suitable for the desired finish.
Summary
When it comes to screwing into wood filler, it’s important to avoid common mistakes that can compromise the integrity and stability of the attachment. Use the right type of screw, pre-drill holes, avoid over-tightening, sand and seal the filled area, allow sufficient drying time, test the stability, and select the correct wood filler for your project. By following these guidelines, you can ensure a successful and long-lasting result when working with wood filler.
Exploring Alternative Methods for Screw Placement in Wood Filler
Wood filler is a commonly used material in woodworking projects to fill gaps, cracks, and holes in wood surfaces. It provides a smooth and even finish, making the wood surface ready for painting or staining. One challenge faced by woodworkers is the proper placement of screws in wood filler without compromising the structural integrity of the project. In this section, we will explore alternative methods for screw placement in wood filler to achieve strong and durable connections.
1. Pre-drilling Holes
Pre-drilling holes is a traditional method used to prevent wood from splitting when screws are inserted. This method involves drilling a hole slightly smaller in diameter than the screw before driving it into the wood filler. By pre-drilling the holes, the wood filler is less likely to crack or break under the pressure of the screw, ensuring a secure attachment.
2. Using Dowels
Another method for screw placement in wood filler is by using dowels. Dowels are cylindrical rods made of wood or other materials that can be inserted into pre-drilled holes. By placing dowels in the wood filler, the screws can be driven into the dowels, providing a strong and stable connection. This method is particularly useful when working with large or heavy pieces of wood that require additional support.
3. Reinforcing with Metal Strips
To further enhance the strength of screw placement in wood filler, metal strips can be used as reinforcement. Metal strips, such as mending plates or corner brackets, can be attached to the wood surface before applying the wood filler. These strips provide additional support and stability, preventing the wood filler from cracking or breaking when screws are inserted.
4. Using Epoxy Resin
Epoxy resin is a versatile adhesive that can be used to strengthen the bond between screws and wood filler. By mixing and applying epoxy resin to the pre-drilled holes, the screws can be securely fastened to the wood filler. Epoxy resin creates a strong and durable connection, ensuring that the screws will not loosen or pull out over time.
5. Reinforcing the Wood Filler
In some cases, reinforcing the wood filler itself can be an effective method for screw placement. This can be done by adding additional materials, such as fiberglass or metal shavings, to the wood filler mixture. These materials increase the strength and stability of the wood filler, allowing screws to be securely inserted without compromising the structural integrity of the project.
In summary, there are several alternative methods for screw placement in wood filler that can help achieve strong and durable connections. Pre-drilling holes, using dowels, reinforcing with metal strips, using epoxy resin, and reinforcing the wood filler itself are all viable options to consider. By employing these methods, woodworkers can ensure that their projects have secure and long-lasting screw connections in wood filler.
FAQs
Can I screw into wood filler?
No, it is not recommended to screw into wood filler. Wood filler is a product used to fill cracks, holes, or gaps in wood, and it is not designed to provide structural support. If you need to screw into wood, it is best to find a solid area of wood to secure your screws.
Conclusion:
In conclusion, while wood filler can provide a temporary solution for minor repairs or cosmetic touch-ups on wooden surfaces, it is not recommended to screw directly into it. Wood filler is not as strong or reliable as solid wood, and attempting to screw into it may cause the filler to crack or become loose over time.
For a secure and durable connection, it is best to locate a solid, structural part of the wood and drill a pilot hole before inserting a screw. This will ensure that the screw can grip the wood properly and provide a strong hold. Additionally, using wood glue or epoxy alongside screws can further reinforce the connection and prevent any potential issues.
Remember to always follow proper woodworking techniques and consult professional advice for specific projects to achieve the best results and maintain the integrity of your woodwork.