If you’re wondering whether you can use Rust-Oleum on wood, the answer is a resounding yes! Rust-Oleum offers a wide range of products specifically designed to protect and enhance the natural beauty of wood surfaces. Whether you’re looking to refinish furniture, restore a deck, or add a pop of color to your wooden decor, Rust-Oleum has you covered. With its durable formulas and easy application, Rust-Oleum is a trusted choice for DIY enthusiasts and professionals alike. Say goodbye to dull wood surfaces and hello to a vibrant and long-lasting finish with Rust-Oleum!
Benefits of Using Rustoleum on Wood Surfaces
When it comes to protecting and enhancing wood surfaces, Rustoleum is a popular choice among homeowners and professionals alike. With its advanced formula and high-quality performance, Rustoleum offers several benefits that make it the go-to product for wood projects. In this section, we will explore the advantages of using Rustoleum on wood surfaces.

1. Superior Protection
Rustoleum provides superior protection for wood surfaces, shielding them from various damaging factors. Its durable formula creates a protective barrier against moisture, UV rays, and harsh weather conditions. This helps prevent wood rot, warping, cracking, and fading, ensuring the longevity of your wood surfaces.
2. Excellent Adhesion
One of the key benefits of Rustoleum is its excellent adhesion to wood surfaces. Whether you are working with bare or previously painted wood, Rustoleum adheres exceptionally well, creating a strong bond that resists peeling and chipping. This ensures a long-lasting finish that stays intact even in high-traffic areas.
3. Versatile Application
Rustoleum can be applied to a wide range of wood surfaces, making it a versatile solution for various projects. Whether you are refinishing furniture, cabinets, decks, or fences, Rustoleum is suitable for both indoor and outdoor applications. Its versatility allows you to achieve professional-looking results on different wood surfaces.
4. Easy Application
Another advantage of using Rustoleum on wood surfaces is its ease of application. Rustoleum comes in various formats, including spray cans and brush-on formulations, allowing you to choose the most convenient option for your project. Its smooth and consistent consistency ensures easy and even application, saving you time and effort.
5. Wide Range of Colors and Finishes
Rustoleum offers a wide range of colors and finishes, allowing you to customize the look of your wood surfaces. Whether you prefer a natural wood grain appearance or a bold and vibrant color, Rustoleum has options to suit every style and preference. This versatility enables you to transform ordinary wood surfaces into stunning focal points.
6. Long-Lasting Results
When you choose Rustoleum for your wood surfaces, you can expect long-lasting results. Its durable formula and excellent adhesion ensure that the finish stays intact for years to come. This means less maintenance and upkeep, saving you time and money in the long run.
7. Environmentally Friendly
Rustoleum is committed to environmental sustainability and offers eco-friendly options for wood projects. Some Rustoleum products are low in VOCs (volatile organic compounds), reducing harmful emissions and promoting a healthier indoor environment. By choosing Rustoleum, you can protect your wood surfaces while being mindful of the environment.
Summary
Using Rustoleum on wood surfaces provides numerous benefits, including superior protection, excellent adhesion, versatile application, easy application, a wide range of colors and finishes, long-lasting results, and environmental friendliness. Whether you are a DIY enthusiast or a professional woodworker, Rustoleum is a trusted solution that delivers exceptional performance and enhances the beauty of your wood projects.
Step-by-Step Guide for Applying Rustoleum on Wood
Are you looking to give your wooden furniture or surfaces a fresh new look? Rustoleum is a popular brand known for its high-quality paints and finishes that can transform your wood into a beautiful and durable masterpiece. In this section, we will provide you with a step-by-step guide on how to apply Rustoleum on wood.
1. Prepare the Surface
The first step is to ensure that the wood surface is clean and free from any dust, dirt, or grease. Start by wiping the surface with a damp cloth to remove any loose particles. For stubborn stains or grease, use a mild detergent diluted in water and scrub the surface gently. Rinse thoroughly and let the surface dry completely before proceeding to the next step.
2. Sand the Surface
Next, you need to sand the wood surface to create a smooth and even base for the Rustoleum paint. Use sandpaper with a medium grit to remove any rough patches or imperfections. Sand in the direction of the wood grain to avoid damaging the surface. After sanding, wipe away any dust or debris with a clean cloth.
3. Apply Primer (if needed)
If you are working with bare wood or a surface with stains and dark colors, it is recommended to apply a primer before using Rustoleum paint. The primer will help the paint adhere better and create a more even finish. Choose a primer that is compatible with Rustoleum paint and follow the manufacturer’s instructions for application.
4. Stir and Test the Paint
Prior to applying Rustoleum paint on the wood, it is crucial to stir the paint thoroughly to ensure that all the pigments are well-mixed. This will help achieve a consistent color throughout the project. Additionally, it is advisable to perform a small test on an inconspicuous area of the wood to ensure that the paint adheres well and dries to your desired finish.
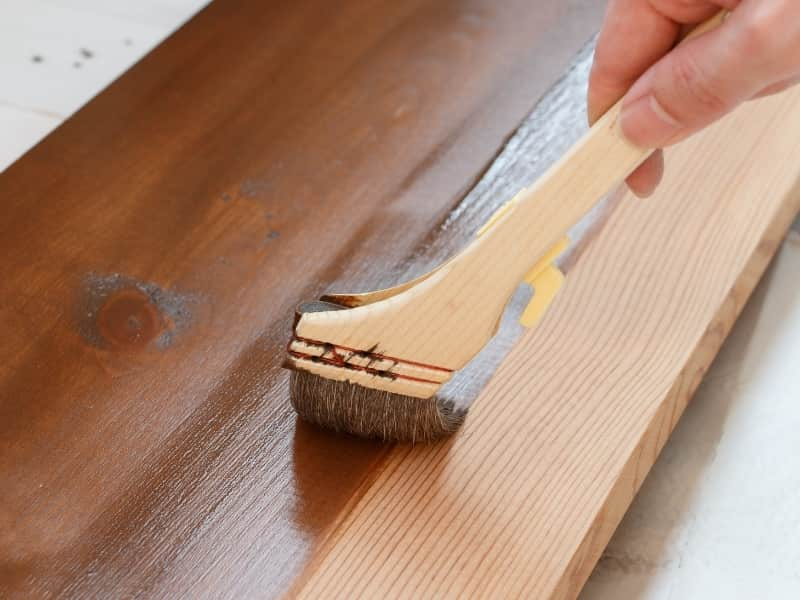
5. Begin Painting
Start by applying a thin and even coat of Rustoleum paint using a high-quality brush or roller. Work in long, smooth strokes, following the direction of the wood grain. Avoid applying too much paint at once, as it can lead to drips and an uneven finish. Allow the first coat to dry completely according to the manufacturer’s instructions.
6. Sand and Repeat
Once the first coat is dry, lightly sand the surface with fine-grit sandpaper to smooth out any imperfections or brush strokes. Wipe away any dust and apply a second coat of Rustoleum paint. Repeat this process if necessary, depending on the desired level of coverage and finish.
7. Let it Cure
After applying the final coat of Rustoleum paint, allow the wood surface to cure for the recommended time provided by the manufacturer. This will ensure that the paint fully adheres and dries to its maximum durability.
8. Apply a Protective Finish (optional)
If you want to further enhance the durability and longevity of your painted wood surface, you can apply a clear protective finish. This will provide an additional layer of protection against scratches, moisture, and UV rays. Choose a finish that is compatible with Rustoleum paint and follow the instructions for application.
In summary, applying Rustoleum on wood requires proper surface preparation, sanding, and the use of a brush or roller to apply thin, even coats of paint. By following this step-by-step guide, you can achieve a professional-looking finish on your wood surfaces and enjoy the beauty and durability that Rustoleum paint offers.
Preparing Wood Surfaces for Rustoleum Application
Before you can apply Rustoleum paint to a wood surface, it is important to properly prepare the surface to ensure a smooth and durable finish. This preparation process involves a few key steps that will help to remove any dirt, grime, or existing finishes, and create an ideal surface for the paint to adhere to. In this section, we will outline the necessary steps to prepare wood surfaces for Rustoleum application.
1. Clean the Surface
The first step in preparing a wood surface for Rustoleum application is to thoroughly clean the surface. Start by removing any loose dirt and debris with a brush or vacuum cleaner. Next, use a mild detergent mixed with water to gently scrub the surface, removing any grease, oil, or stains. Rinse the surface thoroughly with clean water and allow it to dry completely before moving on to the next step.
2. Sand the Surface
After the wood surface is clean and dry, the next step is to sand the surface. Sanding helps to smooth out any rough areas, remove any existing finishes or coatings, and create a rough surface for the paint to adhere to. Start with a coarse-grit sandpaper (around 80-100 grit) to remove any existing finishes or rough spots. Sand in the direction of the wood grain, applying even pressure. Once the surface is smooth and any previous coatings are removed, switch to a finer grit sandpaper (around 120-150 grit) to create a smoother surface. Again, sand in the direction of the wood grain and remove any dust or debris with a brush or vacuum cleaner.
3. Fill in any Holes or Cracks
If there are any holes, cracks, or imperfections in the wood surface, it is important to fill them in before applying Rustoleum paint. Use a wood filler or putty to fill in any gaps or damaged areas. Apply the filler or putty according to the manufacturer’s instructions, ensuring that it is smooth and level with the surrounding wood surface. Allow the filler to dry completely and sand it down with a fine-grit sandpaper to ensure a seamless finish.
4. Prime the Surface (if needed)
Depending on the type of wood and the desired finish, you may need to prime the surface before applying Rustoleum paint. Primer helps to seal the wood and create a uniform surface for the paint to adhere to. Choose a high-quality wood primer that is compatible with Rustoleum paint and apply it according to the manufacturer’s instructions. Allow the primer to dry completely before moving on to the final step.
5. Apply Rustoleum Paint
Once the wood surface is properly cleaned, sanded, filled, and primed (if necessary), it is ready for the application of Rustoleum paint. Stir the paint thoroughly to ensure an even consistency. Use a high-quality brush or roller to apply the paint, working in smooth, even strokes in the direction of the wood grain. Apply multiple thin coats, allowing each coat to dry completely before applying the next. Follow the drying and recoat times recommended by Rustoleum for the best results.
In summary, preparing wood surfaces for Rustoleum application involves cleaning the surface, sanding to create a smooth and roughened surface, filling in any holes or cracks, priming (if necessary), and finally applying Rustoleum paint in multiple thin coats. By following these steps, you can ensure a properly prepared wood surface that will result in a beautiful and long-lasting finish.
Top Tips for Achieving a Professional Finish with Rustoleum on Wood
If you’re looking to refurbish or revamp your wooden furniture or surfaces, using Rustoleum can give you a professional-looking finish. Rustoleum is a popular brand known for its high-quality coatings and finishes, and with the right application techniques, you can achieve a flawless result. In this section, we will share some top tips to help you achieve that professional finish with Rustoleum on wood.
1. Prepare the Surface
Before applying Rustoleum to your wooden surface, it is crucial to prepare the surface properly. Start by cleaning the wood to remove any dirt, dust, or grease. You can use a mild detergent and water solution or a wood cleaner for this purpose. After cleaning, sand the surface gently to remove any existing finish or imperfections. This step will help the Rustoleum adhere better to the wood and give you a smoother finish.
2. Choose the Right Rustoleum Product
Rustoleum offers a variety of products designed specifically for wood surfaces. Depending on your project, choose the appropriate Rustoleum product such as Rustoleum Wood Stain, Rustoleum Chalked Paint, or Rustoleum Polyurethane. Read the product labels carefully to ensure that you select the right one for your desired finish and level of durability.
3. Apply Thin Coats
When applying Rustoleum on wood, it is best to apply thin coats rather than one thick coat. Thin coats allow for better control and help prevent drips or uneven application. Use a quality brush, roller, or sprayer to evenly distribute the Rustoleum onto the wood surface. Ensure that each coat is fully dry before applying the next one.
4. Sand Between Coats
To achieve a smooth and professional finish, lightly sand the surface between coats of Rustoleum. This step helps to remove any imperfections, such as brush marks or bubbles, and allows for better adhesion of subsequent coats. Use fine-grit sandpaper or a sanding block and gently sand the surface in the direction of the wood grain.
5. Follow the Instructions
Always follow the instructions provided by Rustoleum for the specific product you are using. Each Rustoleum product may have specific application instructions, such as drying times, recoating intervals, or temperature requirements. Adhering to these instructions will ensure optimal results and a professional finish.
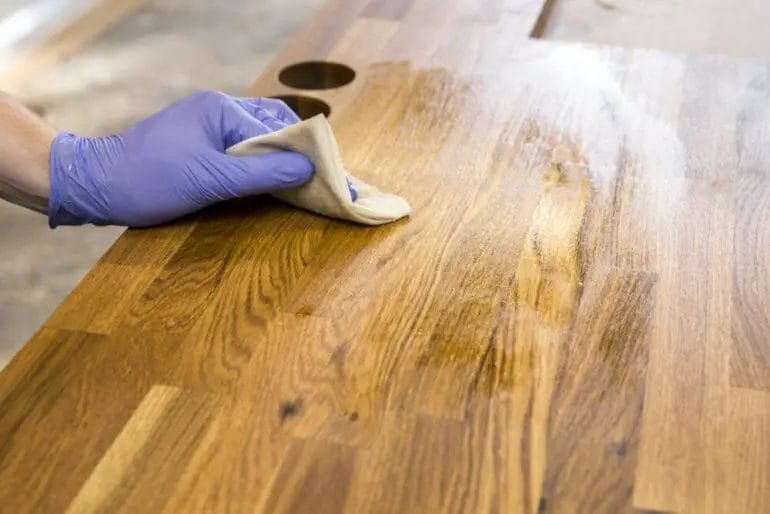
6. Protect and Maintain
Once you have achieved the desired finish with Rustoleum on your wood surface, it is essential to protect and maintain it properly. Apply a clear topcoat or sealer, such as Rustoleum Clear Protective Finish, to seal and protect the painted or stained surface. Regularly clean the surface with a mild detergent and avoid using harsh chemicals or abrasive cleaners that can damage the finish.
7. Practice and Experiment
Lastly, achieving a professional finish with Rustoleum on wood may require some practice and experimentation. Before tackling a larger project, consider testing the Rustoleum product on a small, inconspicuous area to ensure that you are comfortable with the application technique and satisfied with the result. This allows you to make any necessary adjustments before tackling the entire surface.
In summary, achieving a professional finish with Rustoleum on wood involves proper surface preparation, selecting the right product, applying thin coats, sanding between coats, following instructions, protecting and maintaining the finish, and practicing before tackling larger projects. By following these top tips, you can transform your wooden surfaces into beautifully finished pieces that will impress.
Alternative Paint Brands for Wood Surfaces
When it comes to painting wood surfaces, finding the right paint brand is crucial for achieving a durable and long-lasting finish. While there are numerous options available in the market, not all paint brands are created equal. In this section, we will explore some alternative paint brands that are known for their quality and performance on wood surfaces.
1. Benjamin Moore
Benjamin Moore is a well-established paint brand known for its wide range of high-quality paints. They offer a variety of paint options specifically designed for wood surfaces, including interior and exterior wood paints. Benjamin Moore paints are known for their excellent coverage, durability, and smooth finish. They also offer a vast selection of colors, allowing you to find the perfect shade for your wood project.
2. Sherwin-Williams
Sherwin-Williams is another reputable paint brand that offers excellent options for painting wood surfaces. They have a range of paints suitable for both interior and exterior wood applications. Sherwin-Williams paints are known for their durability, resistance to weathering, and fade resistance. They also offer paints with low VOC (volatile organic compounds) levels, making them a more environmentally friendly choice.
3. Behr
Behr is a popular paint brand known for its affordability and wide availability. They offer a range of paints suitable for wood surfaces, including interior and exterior options. Behr paints are known for their great coverage and adhesion, allowing for a smooth and long-lasting finish. They also offer paints with stain-blocking properties, making them ideal for covering stains or discolorations on wood surfaces.
4. Valspar
Valspar is a trusted name in the paint industry and offers a variety of paint options for wood surfaces. Their paints are known for their excellent resistance to cracking, peeling, and fading. Valspar offers both water-based and oil-based paints, providing options for different wood projects and preferences. They also have a range of finishes, from matte to high gloss, to suit your desired look.
5. PPG
PPG is a global paint and coatings company that offers a range of high-quality paints for wood surfaces. They have a wide selection of interior and exterior paints formulated specifically for wood applications. PPG paints are known for their durability, adhesion, and color retention. They also offer paints with enhanced UV protection, making them ideal for outdoor wood surfaces.
When choosing an alternative paint brand for wood surfaces, it is important to consider factors such as durability, coverage, color options, and environmental impact. Each of these paint brands mentioned has its own unique strengths and may cater to specific preferences or project requirements. It is recommended to consult with professionals or refer to customer reviews to ensure you select the best paint brand for your wood painting project.
FAQs
Can I use Rustoleum on wood?
Yes, Rustoleum can be used on wood surfaces. It is a versatile paint that can adhere well to wood, providing a durable and long-lasting finish. However, it is essential to properly prepare the wood surface, such as sanding and cleaning, before applying Rustoleum for the best results.
Conclusion:
In conclusion, Rust-Oleum is a versatile and reliable option for protecting and enhancing the beauty of wood surfaces. Whether you are looking to restore an old piece of furniture or add a fresh coat to a new project, Rust-Oleum’s range of wood-specific products offer excellent coverage and durability.
With Rust-Oleum, you can achieve a professional finish that is resistant to chipping, fading, and peeling. Its innovative formula provides a protective barrier against moisture, UV rays, and other environmental factors that can damage wood over time. Furthermore, Rust-Oleum’s wide range of finishes and colors allows you to customize your wood projects to suit your personal style and aesthetic preferences.
So, when it comes to using Rust-Oleum on wood, you can trust in its quality and performance to enhance and protect your projects for years to come.