Yes, you can paint over wood filler to achieve a seamless and finished look for your wooden surfaces. Whether you are repairing cracks, holes, or dents on furniture, cabinets, or other wooden items, painting over the wood filler helps to blend it with the surrounding wood. By properly preparing the wood surface, applying primer, and using the right type of paint, you can ensure a durable and aesthetically pleasing finish that covers the wood filler effectively.
Proper preparation before painting over wood filler
When it comes to painting over wood filler, proper preparation is key to achieving a smooth and professional finish. Wood filler is used to fill in gaps, cracks, and holes in wood surfaces, creating a more even and seamless surface for painting. However, if not properly prepared, the paint may not adhere well to the wood filler, resulting in a less durable and aesthetically pleasing finish. In this section, we will discuss the necessary steps to take before painting over wood filler.

1. Sanding the wood filler
The first step in preparing the wood filler for painting is to sand the surface. Use a fine-grit sandpaper to gently sand the filled area until it is smooth and level with the surrounding wood. This will help create an even surface for the paint to adhere to and prevent any noticeable transitions between the filler and the wood. Be sure to remove any dust or debris with a clean cloth or brush before moving on to the next step.
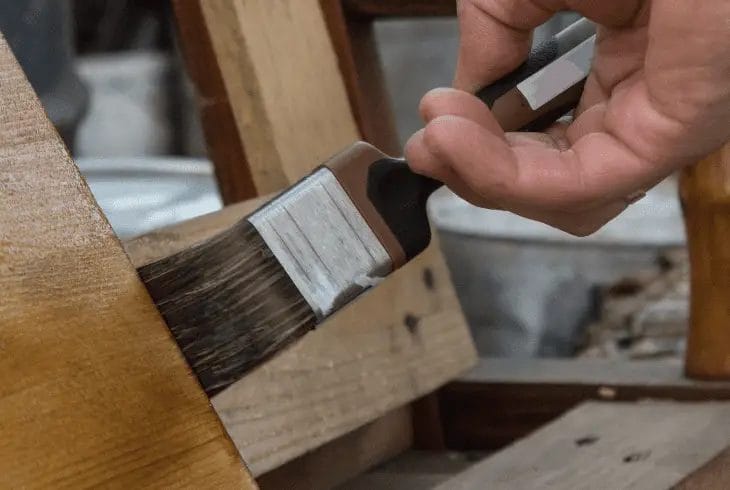
2. Priming the surface
Applying a primer is essential when painting over wood filler. A primer helps to seal the wood filler, providing a surface that the paint can adhere to more effectively. Choose a primer that is specifically designed for wood surfaces and follow the manufacturer’s instructions for application. Apply a thin and even coat of primer using a brush or roller, making sure to cover the entire filled area and any surrounding wood that will be painted.
3. Allowing proper drying time
After applying the primer, it is important to allow sufficient drying time before moving on to the next step. Refer to the product instructions for the recommended drying time, as it may vary depending on the type of primer used. Rushing the drying process can result in a compromised finish, so be patient and allow the primer to fully dry before proceeding.
4. Sanding and smoothing the primed surface
Once the primer has dried, lightly sand the primed surface using a fine-grit sandpaper. This step helps to smooth out any imperfections and ensures an even and seamless finish. Be careful not to sand too aggressively, as you do not want to remove the primer or damage the surrounding wood. After sanding, wipe away any dust with a clean cloth.
5. Applying the paint
Now that the wood filler has been properly sanded, primed, and smoothed, it is time to apply the paint. Choose a high-quality paint that is suitable for the type of wood and desired finish. Apply the paint using a brush or roller, following the manufacturer’s instructions for application and drying times. Apply multiple thin coats, allowing sufficient drying time between each coat for the best results.
6. Finishing touches
After the paint has dried, carefully inspect the painted surface for any imperfections or areas that may require touch-ups. If needed, lightly sand the painted surface and apply additional coats of paint to achieve the desired finish. Once you are satisfied with the painted surface, allow it to cure fully before subjecting it to any heavy use or cleaning.
In summary, proper preparation is crucial when painting over wood filler. By sanding the filler, applying a primer, allowing adequate drying time, and applying multiple coats of paint, you can ensure a smooth and long-lasting finish. Take your time and follow these steps to achieve the best results.

Tips for Achieving a Smooth and Seamless Finish when Painting over Wood Filler
When it comes to painting over wood filler, achieving a smooth and seamless finish can be a bit challenging. However, with the right techniques and tools, you can achieve professional-looking results. In this section, we will discuss some useful tips that will help you achieve a smooth and seamless finish when painting over wood filler.
1. Choose the Right Wood Filler
The first step in achieving a smooth finish is choosing the right wood filler. Opt for a high-quality wood filler that is specifically designed for painting. Look for a product that is easy to sand and has good adhesion properties. This will ensure that the filler blends seamlessly with the surrounding wood and accepts paint evenly.
2. Prepare the Surface
Before applying the wood filler, it is essential to prepare the surface properly. Start by removing any loose or flaking paint, dirt, and debris from the area. Use sandpaper or a sanding block to smooth out the surface and create a clean and smooth canvas for the wood filler.
3. Apply the Wood Filler
Once the surface is prepared, it’s time to apply the wood filler. Begin by filling in the damaged or uneven areas with the filler using a putty knife or a spatula. Make sure to apply the filler evenly and slightly overfill the damaged area to allow for sanding later. Smooth out the filler using the putty knife, ensuring that it is level with the surrounding wood surface.
4. Sand the Filled Area
After the wood filler has dried completely, it’s time to sand the filled area. Use fine-grit sandpaper or a sanding block to gently sand the wood filler until it is smooth and level with the surrounding wood. Be careful not to sand too aggressively, as this can damage the surrounding surface. Regularly check the smoothness of the filler by running your hand over it or using a light to detect any imperfections.
5. Prime the Surface
Before painting, it is crucial to prime the surface to ensure proper paint adhesion and a smooth finish. Apply a coat of high-quality primer specifically designed for wood surfaces. Use a brush or a roller to evenly apply the primer, following the manufacturer’s instructions. Allow the primer to dry completely before applying the paint.
6. Paint over the Wood Filler
Finally, it’s time to paint over the wood filler. Choose a paint color that matches the surrounding wood or the desired finish. Use a brush or a roller to apply the paint evenly, following the grain of the wood. Apply multiple thin coats of paint, allowing each coat to dry completely before applying the next one. This will help achieve a smooth and seamless finish.
7. Finishing Touches
Once the paint has dried, inspect the area for any imperfections or unevenness. If necessary, lightly sand the painted surface and apply an additional coat of paint to achieve a flawless finish. Take your time and pay attention to detail to ensure a professional-looking result.
In summary, achieving a smooth and seamless finish when painting over wood filler requires careful preparation, proper application, and attention to detail. By following these tips and using the right techniques and tools, you can achieve professional-looking results that will enhance the overall appearance of your wood surfaces.

Common Mistakes to Avoid When Painting Over Wood Filler
If you’re looking to achieve a smooth and flawless finish when painting over wood filler, it’s important to avoid certain common mistakes. Wood filler is a versatile product used to fill gaps, cracks, and holes in wood surfaces before painting. However, if not applied and prepared properly, it can cause issues that affect the overall appearance and durability of your paint job. In this section, we’ll discuss some of the most common mistakes to avoid when painting over wood filler.
1. Insufficient Drying Time
One of the biggest mistakes people make when painting over wood filler is not allowing enough time for it to dry completely. Wood filler needs sufficient time to harden and cure before it can be painted. If you rush the process and apply paint too soon, it can cause the filler to shrink or crack, leading to an uneven surface. Always follow the manufacturer’s instructions for the drying time of the specific wood filler you are using.
2. Poor Surface Preparation
Proper surface preparation is crucial for a successful paint job. Before applying wood filler, make sure the surface is clean, dry, and free from any loose debris. Sand the area around the wood filler to create a smooth and even surface. Removing any existing paint or finish will also help the wood filler adhere better. Additionally, consider using a primer before applying the paint to ensure better adhesion and a more durable finish.
3. Incorrect Application Techniques
Using the wrong application techniques can lead to visible seams and uneven surfaces when painting over wood filler. Avoid applying wood filler using excessive force or pressure, as it may result in an uneven application. Use a putty knife or a similar tool to apply the filler in thin layers, pressing it into the gaps and smoothing it out. Allow each layer to dry completely before applying the next one, if necessary.
4. Not Sanding Between Layers
Sanding between layers of wood filler is essential to achieve a smooth and seamless finish. After each layer of filler has dried, use fine-grit sandpaper to gently sand the surface until it is smooth and level with the surrounding wood. This helps to blend the wood filler with the rest of the surface and creates a more uniform base for painting.
5. Skipping the Primer
Applying a primer before painting over wood filler is highly recommended. A primer helps to promote better adhesion of the paint and provides an additional protective layer for the wood surface. It also helps to even out the surface and prevent the paint from being absorbed unevenly. Choose a primer that is compatible with both the wood filler and the paint you plan to use.
6. Neglecting Proper Drying and Curing Time
Once you have applied the paint over the wood filler, it’s important to allow sufficient drying and curing time before exposing the surface to any stress or moisture. Even if the paint feels dry to the touch, it may take several days or weeks for it to fully cure and harden. Avoid placing objects on the painted surface or subjecting it to excessive humidity or temperature changes during this time.
In summary, achieving a professional-looking finish when painting over wood filler requires attention to detail and avoiding common mistakes. Remember to allow sufficient drying time, prepare the surface properly, use correct application techniques, sand between layers, apply a primer, and give ample time for the paint to dry and cure. By following these guidelines, you can ensure a beautiful and long-lasting paint job on wood surfaces.
How to Ensure Long-Lasting Durability When Painting Over Wood Filler
Wood filler is a great tool for repairing and fixing imperfections in wood surfaces. Whether you are working on furniture, cabinets, or other wooden items, using wood filler before painting can help create a smooth and seamless finish. However, to ensure that your paint job stands the test of time, there are a few steps you can take to maximize the durability of the paint when applied over wood filler.
1. Choose the Right Wood Filler
Not all wood fillers are created equal, and it is important to choose a high-quality filler that is specifically designed for painting. Look for a wood filler that is labeled as paintable and stainable, as this means it is formulated to better adhere to paint and provide a durable finish. Additionally, opt for a filler that is water-based, as these tend to be more flexible and less prone to cracking or shrinking over time.
2. Properly Prepare the Surface
Before applying wood filler, it is crucial to properly prepare the surface. Start by cleaning the area to remove any dirt, dust, or grease. Sand the wood surface lightly to create a rough texture, which will allow the filler to adhere better. Make sure to remove any loose or flaking wood particles before proceeding with the filler application.
3. Apply the Wood Filler Correctly
When applying the wood filler, follow the manufacturer’s instructions carefully. Use a putty knife or a spatula to spread the filler evenly over the damaged area. Make sure to press the filler firmly into the wood to ensure a strong bond. Remove any excess filler using the edge of the putty knife, and smooth the surface as much as possible. Allow the filler to dry completely before moving on to the next step.
4. Sand the Filled Area
After the wood filler has dried, sand the filled area gently using fine-grit sandpaper. This will help to smooth out any rough edges or imperfections, ensuring a seamless finish. Take care not to sand too aggressively, as this can damage the surrounding wood or remove too much of the filler.
5. Prime the Surface
Before painting over the wood filler, it is essential to apply a coat of primer to the surface. Primer helps to seal the wood and provides a better surface for the paint to adhere to. Choose a high-quality primer that is compatible with your chosen paint type. Apply the primer evenly using a brush or roller, and allow it to dry completely before proceeding.
6. Use High-Quality Paint
When it comes to painting over wood filler, using a high-quality paint is essential for achieving long-lasting durability. Choose a paint that is specifically formulated for wood surfaces and is suitable for the desired finish, such as satin or semi-gloss. Apply the paint evenly using a brush or roller, and follow the manufacturer’s instructions regarding drying times and additional coats.
7. Apply Multiple Coats
To ensure maximum durability, it is recommended to apply multiple coats of paint. Allow each coat to dry completely before applying the next. This will help to build up a strong and protective layer of paint over the wood filler, ensuring a longer-lasting finish.
8. Seal the Painted Surface
Once the paint has dried, consider applying a clear protective sealer over the painted surface. This will add an extra layer of protection and help to prevent the paint from chipping, cracking, or fading over time. Choose a sealer that is compatible with your paint type and follow the manufacturer’s instructions for application.
By following these steps, you can ensure long-lasting durability when painting over wood filler. Choosing the right filler, properly preparing the surface, applying the filler correctly, sanding, priming, using high-quality paint, applying multiple coats, and sealing the painted surface are all crucial steps in achieving a professional and durable finish. Taking the time to follow these steps will help your paint job withstand the test of time and ensure a beautiful and long-lasting result.
FAQs
Can you paint over wood filler?
Yes, you can paint over wood filler. Once the wood filler has dried and hardened, it can be sanded smooth and then painted over using any type of paint. Just make sure to properly prepare the surface and apply a suitable primer before painting.
Conclusion
In conclusion, painting over wood filler is indeed possible and a common practice in many DIY projects. Wood filler serves as an essential tool for repairing and filling in gaps and cracks in wooden surfaces. By applying a layer of primer, followed by the desired paint color, you can seamlessly blend the wood filler with the surrounding surface. However, it is crucial to ensure that the wood filler is properly cured and sanded before painting to achieve a smooth and flawless finish. Remember to choose a paint that is compatible with the type of wood filler used for optimal results.
Painting over wood filler not only restores the appearance of damaged wood but also enhances its durability and longevity. Whether you’re renovating furniture, repairing floors, or rejuvenating wooden trim, properly applying paint over wood filler can significantly improve the overall aesthetics of your project. With proper preparation and attention to detail, you can achieve professional-looking results and enjoy a seamless, flawless finish on your wooden surfaces.