If you’re wondering whether you can use joint compound on wood, the answer is yes! Joint compound is typically used for filling and smoothing seams in drywall, but it can also be used on wood surfaces. It’s a versatile material that can help you achieve a seamless and smooth finish on your woodwork projects. Whether you’re repairing damaged wood or creating a flawless surface for paint or stain, joint compound can be a useful tool in your arsenal. Read on to learn more about how to use joint compound on wood and the benefits it offers.

Using Joint Compound on Wood: Pros and Cons
Joint compound, commonly used in drywall installations and repairs, has become a popular option for preparing and finishing wood surfaces as well. While it may seem unconventional, using joint compound on wood can have its benefits and drawbacks. In this section, we will explore the pros and cons of using joint compound on wood to help you make an informed decision.

Pros of Using Joint Compound on Wood
1. Smooth Finish: Joint compound is designed to create a smooth and flawless finish on surfaces. When applied correctly, it can help to fill in imperfections, cracks, and gaps in wood, resulting in a seamless surface ready for painting or staining.
2. Affordable Option: Joint compound is relatively inexpensive compared to other wood fillers or putties. This makes it an attractive choice for those on a budget or working on large-scale wood projects where cost-effectiveness is essential.
3. Easy Application: Applying joint compound on wood is a straightforward process. It can be easily spread with a putty knife or a trowel, allowing for precise and controlled application. Its smooth consistency ensures even coverage, making it ideal for both small touch-ups and larger wood repairs.
4. Versatility: Joint compound can be used on various wood surfaces, including plywood, MDF, and hardwood. Whether you are working on furniture, cabinets, or trim, joint compound can be a versatile solution for filling, repairing, and finishing wood.
5. Sandable and Paintable: Once dried, joint compound can be sanded to achieve the desired smoothness. It is also paintable, allowing you to match the finish with the rest of your woodwork. This flexibility makes it a convenient choice for both professional carpenters and DIY enthusiasts.
Cons of Using Joint Compound on Wood
1. Limited Durability: While joint compound is suitable for small repairs and filling minor imperfections, it may not offer the same level of durability as other wood fillers. Over time, joint compound may shrink, crack, or become less stable, especially in high-traffic areas or exposed to moisture.
2. Not Ideal for Load-Bearing Areas: Joint compound is not recommended for use in load-bearing areas of wood structures or surfaces that require substantial structural integrity. It is primarily designed for cosmetic purposes and may not provide the necessary strength and support needed in such applications.
3. Prone to Moisture Damage: Wood is naturally susceptible to moisture damage, and joint compound can exacerbate this issue if not properly sealed. If exposed to moisture or humidity, joint compound applied on wood can soften or deteriorate over time, compromising the stability and appearance of the wood surface.
4. Time-Consuming Process: Working with joint compound on wood requires careful preparation, application, and drying time. The process of applying multiple layers, allowing each coat to dry, and sanding between coats can be time-consuming, especially for larger wood projects. Patience and attention to detail are key for achieving the desired results.
5. Requires Regular Maintenance: If joint compound is used on wood surfaces that are prone to wear and tear, regular maintenance may be necessary. Cracks or chips in the joint compound should be repaired promptly to prevent further damage and maintain the overall appearance of the wood.
In summary, using joint compound on wood can provide a smooth finish, affordability, easy application, versatility, and the ability to sand and paint. However, it may have drawbacks such as limited durability, unsuitability for load-bearing areas, vulnerability to moisture damage, time-consuming application process, and the need for regular maintenance. Consider these pros and cons when deciding whether to use joint compound on your wood projects.
Step-by-Step Guide: Applying Joint Compound on Wood Surfaces
Joint compound is a versatile material commonly used in the construction and renovation industry. It is primarily used for filling, patching, and smoothing drywall surfaces. However, joint compound can also be applied on wood surfaces to achieve a smooth and seamless finish. In this guide, we will walk you through the step-by-step process of applying joint compound on wood surfaces.
Materials You’ll Need
Before you begin, gather the following materials:
- Joint compound
- Putty knife or trowel
- Sandpaper (medium and fine grit)
- Painter’s tape
- Drop cloth or plastic sheet
- Water (for thinning the joint compound, if needed)
- Clean cloth
Preparation
Prepare the wood surface before applying joint compound:
- Clean the wood surface to remove any dust, dirt, or debris. Use a clean cloth or brush for this purpose.
- Inspect the wood surface for any cracks, holes, or imperfections. Fill them with wood filler and allow it to dry completely.
- If the wood surface has existing paint or finish, sand it lightly to create a rough surface for better adhesion of the joint compound.
- Use painter’s tape to protect any adjacent areas that you don’t want to get joint compound on.
- Place a drop cloth or plastic sheet on the floor or work surface to catch any drips or spills.
Applying Joint Compound
Now it’s time to apply the joint compound:
- Open the container of joint compound and mix it thoroughly using a putty knife or trowel. If the joint compound seems too thick, you can add a small amount of water and mix again until you achieve a creamy consistency.
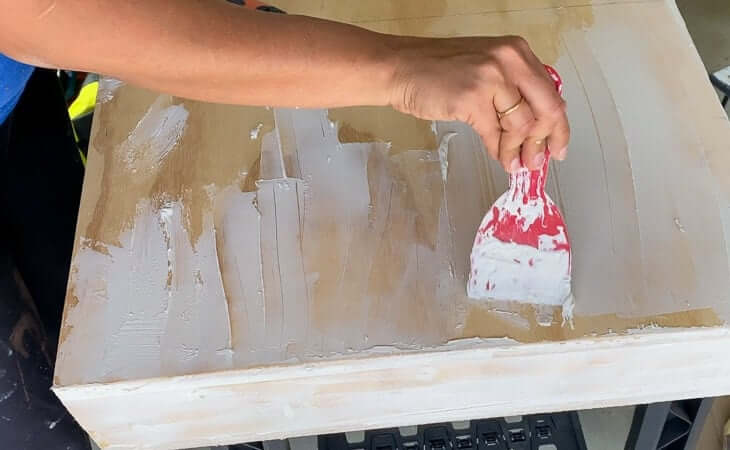
- Using the putty knife or trowel, scoop a small amount of joint compound and apply it onto the wood surface. Start from one corner and work your way towards the opposite end.
- Hold the putty knife or trowel at a slight angle and spread the joint compound evenly over the wood surface. Apply a thin layer, ensuring that it fills any cracks or imperfections.
- Continue applying the joint compound in sections until you have covered the entire wood surface. Smooth out any ridges or excess compound using the putty knife or trowel.
- Allow the joint compound to dry completely. The drying time may vary depending on the brand and type of joint compound used. Refer to the manufacturer’s instructions for the recommended drying time.
Sanding and Finishing
Once the joint compound is dry, it’s time to sand and finish the wood surface:
- Use medium-grit sandpaper to sand the dried joint compound. Sand in a circular motion, applying light pressure. This will help smoothen out any uneven areas.
- After sanding, wipe away the dust with a clean cloth.
- Switch to fine-grit sandpaper and sand the wood surface again, this time in a back-and-forth motion. This will further refine the smoothness of the joint compound.
- Remove the dust again using a clean cloth.
- Inspect the wood surface for any remaining imperfections. If needed, apply another thin layer of joint compound and repeat the sanding process.
- Once you are satisfied with the smoothness of the wood surface, wipe away any dust and proceed with your desired finish, such as painting or staining.
Summary
Applying joint compound on wood surfaces can help achieve a flawless finish. By following this step-by-step guide, you can effectively apply joint compound on wood and create a smooth and seamless surface. Remember to prepare the wood surface, apply the joint compound evenly, allow it to dry, and finish with sanding for the best results. With proper application and finishing, your wood surfaces will be ready for the next coating or finish of your choice.
Tips for Achieving a Smooth Finish with Joint Compound on Wood
When it comes to finishing wood surfaces, achieving a smooth and flawless result can be a challenging task. However, with the right techniques and a little practice, you can achieve a professional-looking finish using joint compound. Whether you are refinishing furniture, repairing a wooden surface, or working on a woodworking project, these tips will help you achieve a smooth finish with joint compound on wood.
1. Prepare the Wood Surface
Before applying joint compound, it is important to prepare the wood surface properly. Start by cleaning the surface to remove any dirt, dust, or grease. Sand the wood using fine-grit sandpaper to create a smooth and even surface. This will help the joint compound adhere better and result in a smoother finish.
2. Choose the Right Joint Compound
There are different types and brands of joint compound available in the market. Selecting the right one for your project is crucial. Opt for a lightweight joint compound specifically designed for wood surfaces. These lightweight compounds are easier to work with and provide a smoother finish. Make sure to read the manufacturer’s instructions for proper application and drying times.
3. Apply Thin Layers
When applying joint compound on wood, it is best to apply thin layers rather than a thick coat. This will help prevent cracking and ensure a smoother finish. Start by applying a thin layer of joint compound using a putty knife. Spread it evenly and smoothly across the wood surface, focusing on any imperfections or uneven areas. Allow each layer to dry completely before applying the next one.
4. Sand between Layers
To achieve a truly smooth finish, it is essential to sand between each layer of joint compound. Use fine-grit sandpaper or a sanding block to gently sand the dried joint compound. This will help remove any bumps, ridges, or imperfections, resulting in a smoother surface. Be sure to clean off any dust before applying the next layer.
5. Feather the Edges
Feathering the edges is a technique used to blend the joint compound with the surrounding wood surface, creating a seamless finish. To feather the edges, use a wider putty knife and apply less pressure towards the outer edges. This will gradually taper the joint compound, creating a smooth transition between the compound and the wood.
6. Prime and Paint
Once you have achieved a smooth finish with joint compound, it is time to prime and paint the wood surface. Before painting, apply a coat of primer to seal the joint compound and provide a better surface for paint adhesion. Choose a high-quality paint suitable for wood surfaces and apply it according to the manufacturer’s instructions. Multiple thin coats of paint will give you a more professional-looking finish.
7. Practice and Patience
Achieving a smooth finish with joint compound on wood requires practice and patience. It may take a few attempts to master the techniques and achieve the desired results. Don’t be discouraged if your first attempt doesn’t turn out perfectly. Keep practicing and refining your skills, and soon you will be able to achieve a flawless finish.
In summary, achieving a smooth finish with joint compound on wood is possible with the right techniques and a little practice. Prepare the wood surface properly, choose the right joint compound, apply thin layers, sand between layers, feather the edges, and finish with priming and painting. With these tips, you can transform your wooden surfaces into professional-looking pieces with a smooth and flawless finish.
Exploring Alternative Wood Fillers for Different Woodworking Projects
Wood fillers are an essential component in woodworking projects as they help repair, restore, and enhance the appearance of wood surfaces. Traditional wood fillers are typically made from synthetic materials such as epoxy or vinyl compounds. However, there is a growing interest in exploring alternative wood fillers that offer unique properties and benefits. In this section, we will delve into some of these alternative wood fillers and their suitability for various woodworking projects.
Natural Wood Fillers
One alternative option to synthetic wood fillers is natural wood fillers. These fillers are made from natural ingredients such as sawdust, wood fibers, or flour mixed with an adhesive binder. Natural wood fillers blend seamlessly with the wood surface, offering a more natural and organic appearance. They are particularly suitable for repairing small cracks, holes, or gaps in wooden furniture or cabinetry.
One of the advantages of natural wood fillers is that they can be easily customized to match the color and grain of the surrounding wood. This makes them an ideal choice for projects where aesthetics are of utmost importance. Additionally, natural wood fillers are environmentally friendly and do not release any harmful chemicals during application or curing.
Bio-based Wood Fillers
Another category of alternative wood fillers is bio-based fillers. These fillers are derived from renewable resources such as plant fibers or agricultural waste. Bio-based wood fillers are gaining popularity due to their sustainability and eco-friendliness. They offer similar repair and restoration capabilities as traditional synthetic fillers while reducing the environmental impact.
One example of a bio-based wood filler is cellulose nanofiber filler. This filler is made from cellulose fibers extracted from plants and has excellent bonding properties. It can be used to fill larger cracks or voids in woodworking projects and provides good adhesion to various wood surfaces.
Epoxy-based Wood Fillers
Epoxy-based wood fillers are a popular choice for more demanding woodworking projects. These fillers consist of a two-part epoxy resin and a hardener. When mixed together, they form a strong and durable filler that can be shaped, sanded, and stained to blend seamlessly with the wood. Epoxy-based fillers are known for their high strength and resistance to moisture and temperature changes.
One advantage of epoxy-based fillers is their versatility. They can be used for both small repairs and larger structural applications. They are ideal for filling deep cracks, knots, or voids in wooden surfaces. Additionally, epoxy-based fillers have excellent bonding properties, ensuring a long-lasting and reliable repair.
Color-matched Wood Fillers
Color-matched wood fillers are specially formulated to match the exact color and tone of different wood species. These fillers come in a wide range of shades and can be used to repair scratches, dents, or imperfections in wood surfaces. They are particularly useful for projects where a seamless finish is desired, such as furniture restoration or finishing.
Color-matched wood fillers are typically available as a premixed paste or putty. They can be easily applied using a putty knife or a spatula and can be sanded and stained to achieve a perfect match with the surrounding wood. These fillers offer convenience and efficiency, saving time and effort in color matching and blending.
Exploring alternative wood fillers opens up a world of possibilities in woodworking projects. Whether you prefer natural, bio-based, or epoxy-based fillers, there is a suitable option for every need. Consider the specific requirements of your project, such as the size of the repair, desired aesthetics, and durability, to choose the right wood filler. With the right filler, you can achieve seamless repairs, enhance the beauty of wood surfaces, and ensure the longevity of your woodworking creations.
Prepping Wood for Joint Compound Application: Essential Techniques
When it comes to achieving a smooth and flawless finish on wooden surfaces, proper preparation is key. This is especially true when applying joint compound, a versatile material used for filling and smoothing imperfections in wood. In this section, we will explore essential techniques for prepping wood before applying joint compound, ensuring a professional-quality result.
Gathering the Necessary Tools
Before diving into the prep work, it is important to gather all the necessary tools and materials. Here is a list of items you will need:
- Sandpaper (medium and fine grit)
- Putty knife or scraper
- Tack cloth or damp cloth
- Painters tape
- Wood filler
- Primer
- Paintbrush
Having these tools on hand will make the wood prepping process much smoother and efficient.
Inspecting and Repairing the Wood
Before applying joint compound, it is crucial to thoroughly inspect the wood surface for any damages or imperfections. Look out for cracks, dents, or nail holes that need attention. Use a putty knife or scraper to remove any loose or flaking paint, as well as to scrape away any debris or old adhesive.
Once the surface is clean and free from any loose material, use a wood filler to repair any visible cracks or holes. Follow the manufacturer’s instructions for the specific wood filler you are using. Apply the filler using a putty knife, ensuring it is spread evenly and smoothly across the damaged areas. Allow the filler to dry completely before moving on to the next step.
Sanding the Wood Surface
After the wood filler has dried, it’s time to sand the surface to achieve a smooth and even finish. Start with medium-grit sandpaper to remove any excess filler and gently sand the repaired areas. Use long, even strokes in the direction of the wood grain. Be careful not to apply too much pressure, as this can damage the wood.
Once you have finished sanding with the medium-grit sandpaper, switch to a finer grit sandpaper to smooth out the surface further. This will help to eliminate any visible scratches or roughness. Again, sand in the direction of the wood grain and use light, consistent pressure.
Cleaning the Wood Surface
After sanding, it is crucial to clean the wood surface to remove any dust or debris that could interfere with the adhesion of the joint compound. Use a tack cloth or a slightly damp cloth to wipe down the surface, ensuring it is completely clean and free from any particles.
Applying Primer
Before applying joint compound, it is recommended to apply a coat of primer to the prepped wood surface. Primer helps to seal the wood and provides an even base for the joint compound. Use a paintbrush to apply the primer evenly, making sure to cover the entire surface. Allow the primer to dry according to the manufacturer’s instructions.
Final Inspection and Touch-ups
Once the primer is dry, inspect the prepped wood surface for any remaining imperfections. If necessary, repeat the process of applying wood filler, sanding, and cleaning until the surface is smooth and flawless. Taking the time to complete these final touch-ups will ensure a professional-looking finish.
In summary, properly prepping wood before applying joint compound is essential for achieving a smooth and flawless finish. By following these essential techniques, including inspecting and repairing the wood, sanding the surface, cleaning thoroughly, applying primer, and conducting a final inspection, you can ensure a professional-quality result. Taking the time to prep the wood properly will ultimately enhance the overall appearance and durability of your project.
FAQs
Can you use joint compound on wood?
Yes, joint compound can be used on wood surfaces. It is commonly used for filling cracks, nail holes, and smoothing out imperfections on wood. However, it is important to properly prepare the wood surface by sanding it and applying a primer before applying joint compound.
How long does joint compound take to dry?
The drying time of joint compound can vary depending on factors like temperature and humidity. Generally, it takes about 24-48 hours for joint compound to fully dry. However, it is recommended to wait at least 48 hours before sanding, priming, or painting over the joint compound.
Can joint compound be used for texturing walls?
Yes, joint compound can be used to create textured finishes on walls. It can be applied using various techniques such as stippling, swirls, or knockdown texture. However, it is important to practice the technique on a small area first and allow the joint compound to dry completely before applying paint or other finishes.
Conclusion
In conclusion, while joint compound is primarily used for repairing and finishing drywall, it is not recommended to use it on wood surfaces. Joint compound is designed to adhere to and bond with drywall, which has a different texture and composition compared to wood. Applying joint compound to wood can result in poor adhesion, cracking, and flaking over time.
If you need to repair or finish wood surfaces, it is best to use wood-specific products such as wood filler or putty. These products are specifically formulated to work with wood and provide better adhesion, flexibility, and durability. Additionally, they can be sanded, stained, and painted to match the surrounding wood, ensuring a seamless and professional finish.
