Wondering how long you should wait before removing clamps from your wood project after applying wood glue? The drying time for wood glue can vary based on factors such as temperature, humidity, and the type of glue used.
In general, most wood glues require clamping for at least 30 minutes to 1 hour to ensure a strong bond. However, it’s always best to consult the manufacturer’s instructions for specific drying times.

Properly drying the wood glue before removing clamps is crucial to prevent any weakening of the bond, so be patient and allow sufficient time for the glue to fully set.
Remember, rushing the process may result in a weaker bond and compromise the durability of your woodwork. So, take your time and follow the recommended drying time provided by the manufacturer, ensuring a sturdy and long-lasting result.
Quick Drying Wood Glue: How to Speed Up the Drying Process for Quicker Clamp Removal?
Woodworking projects often require the use of wood glue to ensure strong and durable joints. However, waiting for the glue to dry can be time-consuming, especially if you need to remove clamps and continue working on the project. Fortunately, there are several techniques you can use to speed up the drying process of wood glue, allowing for quicker clamp removal and faster project completion.
1. Choose the Right Wood Glue
Not all wood glues dry at the same speed. When selecting a wood glue, consider opting for a quick-drying variant. Quick-drying wood glues are specifically formulated to dry faster, allowing for shorter clamp times. Look for glues that advertise quick drying times on the label.
2. Apply Thin and Even Layers
One of the key factors that affect the drying time of wood glue is the thickness of the glue layer. Thicker layers take longer to dry, so it’s important to apply thin and even coats of glue. Use a brush or a roller to spread the glue evenly on both surfaces that need to be joined.
3. Increase Airflow
Improving airflow around the glued joint can significantly speed up the drying process. You can achieve this by using a small fan or opening windows to create a cross breeze. Increased airflow helps moisture evaporate from the glue, reducing drying time.
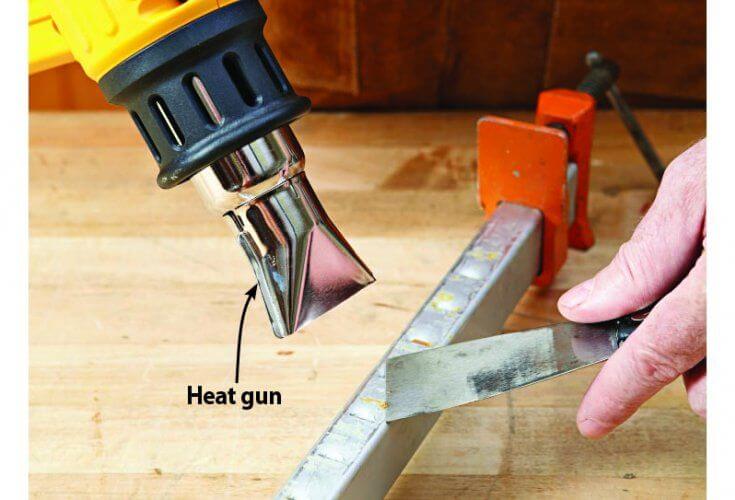
4. Use a Heat Source
Applying heat to the glued joint can accelerate the drying process. However, it’s important to note that excessive heat can weaken the bond, so it’s crucial to use caution. Gentle heat from a hairdryer or a heat gun on the low setting can be used to speed up drying. Keep the heat source moving to distribute the heat evenly and prevent overheating specific areas.
5. Use a Moisture Meter
Wood glue requires the right amount of moisture to dry properly. Using a moisture meter can help you determine the moisture content of the wood and ensure optimal drying conditions. Follow the manufacturer’s instructions to use the moisture meter correctly and adjust the environment if necessary.
6. Consider Using Accelerators
Wood glue accelerators, also known as activators, are substances that can speed up the curing time of wood glue. These products are typically sprayed onto the glue joint after assembly, and they work by promoting a chemical reaction that rapidly hardens the glue. However, it’s important to note that accelerators may affect the strength of the bond, so use them judiciously and follow the manufacturer’s instructions.
7. Allow Sufficient Drying Time
While it’s important to speed up the drying process, it’s equally crucial to allow sufficient drying time for a strong and durable bond. Even with the techniques mentioned above, it’s recommended to keep the project clamped for at least the recommended drying time specified on the wood glue label. Rushing the drying process may compromise the integrity of the joint.
8. Test the Strength
Before removing the clamps and continuing with your project, it’s a good practice to test the strength of the glue joint. Apply gentle pressure to the joint and make sure it feels solid. If the joint feels weak or moves easily, allow more drying time before removing the clamps.
In summary, speeding up the drying process of wood glue can be achieved by choosing the right glue, applying thin and even layers, increasing airflow, using heat sources cautiously, using a moisture meter, considering accelerators, allowing sufficient drying time, and testing the strength of the bond before removing clamps. By implementing these techniques, you can minimize wait times and continue working on your woodworking projects more efficiently.
Testing the Strength: When is the wood glue fully cured and ready to withstand pressure?
Wood glue is a commonly used adhesive in woodworking projects. It is essential to know when the glue is fully cured and ready to withstand pressure to ensure the durability and stability of the project. There are several methods and indicators that can be used to determine if the wood glue has reached its maximum strength.
1. Drying Time
One of the most straightforward ways to gauge the curing process of wood glue is to consider its drying time. Each type and brand of wood glue has specific recommendations for drying time. These guidelines can usually be found on the glue bottle or packaging. It is important to follow these recommended drying times as they have been tested and optimized for each particular glue formulation.
Typically, wood glue needs at least 24 hours to dry before it can bear any load or pressure. However, this can vary depending on several factors, such as temperature, humidity, and the type of wood being glued. In some cases, it may take up to 48 hours for the glue to fully cure.
2. Visual Inspection
Performing a visual inspection can provide valuable information about the curing progress of the wood glue. In the early stages of drying, the glue will appear white and wet. As it cures, the color will change to a translucent or amber shade. When the glue is fully cured, it should have a clear and dry appearance.
Additionally, check for any signs of tackiness or stickiness on the surface of the glue. If the glue feels sticky to the touch, it is an indication that it has not yet fully cured. On the other hand, if the glue feels dry and hard, it is likely that the curing process is complete.
3. Joint Flexibility
Another way to test the strength of wood glue is by assessing the flexibility of the joint. Once the glue has dried, gently apply pressure or try to flex the glued pieces. If the joint remains rigid and does not move or separate, it indicates that the glue has achieved a strong bond and is ready to withstand pressure.
However, it is important to exercise caution when applying pressure to newly glued joints, as excessive force can cause damage before the glue has fully cured. Gradually increase the pressure and monitor the joint to ensure it remains intact.
4. Stress Testing
If you want to be absolutely sure about the strength of the wood glue, you can perform a stress test. This involves subjecting the glued joint to gradual increments of pressure to evaluate its resistance. By observing how the joint reacts under stress, you can determine if the glue has reached its maximum strength.
It is crucial to note that stress testing should be done carefully and incrementally to avoid any sudden failure or damage to the project. Gradually increase the pressure and monitor the joint’s response. If the joint can withstand the desired pressure without any signs of loosening or failure, it indicates that the wood glue is fully cured and ready to bear loads.
5. Manufacturer Recommendations
Lastly, it is always advisable to refer to the manufacturer’s recommendations for specific information on the curing process of the wood glue you are using. Different glues may have variations in drying time, curing properties, and maximum load-bearing capabilities. Following the manufacturer’s guidelines ensures that you achieve the best results and maintain the integrity of your woodworking project.
Summary
Testing the strength of wood glue is essential to ensure the durability and stability of woodworking projects. Key indicators of fully cured wood glue include following the recommended drying time, visual inspection for a clear and dry appearance, assessing joint flexibility, performing stress tests, and referring to the manufacturer’s guidelines. By employing these testing methods, you can confidently determine when the wood glue is fully cured and ready to withstand pressure.

Factors Affecting Drying Time: Understanding the variables that influence the drying time of wood glue
Wood glue is a popular adhesive used in various woodworking projects. Whether you are a professional woodworker or a DIY enthusiast, understanding the factors that affect the drying time of wood glue can help you achieve the best results in your projects.
1. Type of Wood Glue
The type of wood glue you use plays a significant role in determining the drying time. There are different types of wood glue available in the market, such as PVA (Polyvinyl Acetate), epoxy, and polyurethane glue. Each type has its unique properties and drying characteristics.
PVA glue is the most commonly used wood glue and is known for its fast-drying properties. It typically dries within 30 minutes to an hour, depending on factors like humidity and temperature. Epoxy and polyurethane glues, on the other hand, have longer drying times and may require several hours or even overnight to fully cure.
2. Humidity Levels
Humidity levels can significantly impact the drying time of wood glue. High humidity slows down the evaporation process, prolonging the drying time. Conversely, low humidity speeds up the drying process as moisture evaporates more quickly.
If you are working in a humid environment, you may need to give the wood glue additional time to dry. Using a dehumidifier or working in a climate-controlled area can help regulate the humidity levels and ensure proper drying.
3. Temperature
Temperature is another important factor that affects the drying time of wood glue. Generally, higher temperatures accelerate the drying process, while lower temperatures slow it down. The ideal temperature for most wood glues is around 70°F (21°C).
If you are working in colder temperatures, you may need to provide extra time for the glue to dry. Conversely, working in hot temperatures can speed up the drying process, so you need to work quickly and efficiently.
4. Thickness of Glue Application
The thickness of the glue application also influences the drying time. Thicker layers of glue take longer to dry compared to thinner layers. It is essential to apply an even and consistent layer of glue to ensure proper adhesion and minimize drying time.
When applying wood glue, spread it evenly using a brush or a roller, ensuring that the glue is evenly distributed. If you apply a thick layer of glue, consider clamping the wood pieces together to prevent any movement during the drying process.
5. Type and Condition of Wood
The type and condition of the wood used in your project can affect the drying time of the glue. Softwoods tend to absorb moisture more quickly, leading to faster drying times. Hardwoods, on the other hand, are denser and may require more time for the glue to dry completely.
Additionally, the moisture content of the wood is crucial. If the wood has a high moisture content, it can slow down the drying process as the excess moisture needs to evaporate. It is recommended to use properly seasoned or kiln-dried wood for optimal drying times.
Summary
In summary, several factors can influence the drying time of wood glue. The type of wood glue, humidity levels, temperature, thickness of glue application, and the type and condition of the wood all play a role in determining how long it takes for the glue to dry. By considering these factors and ensuring proper application and environmental conditions, you can achieve the best results in your woodworking projects.
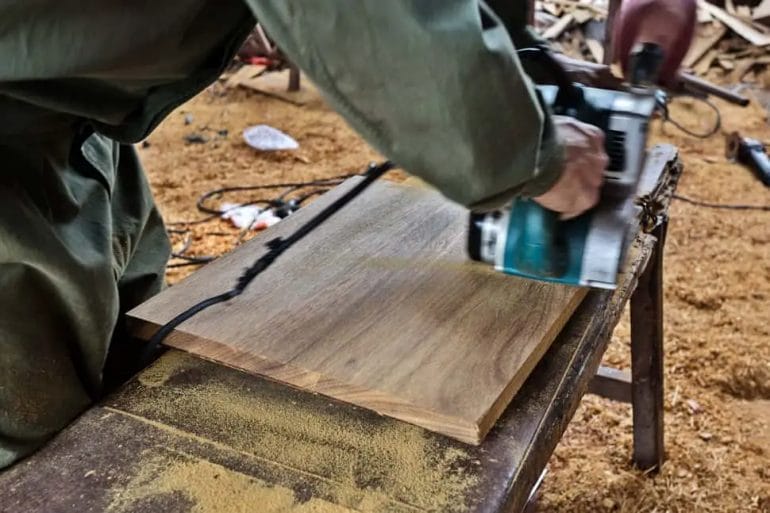
Proper Clamp Removal Techniques
After applying wood glue to a project, it is important to secure the pieces together with clamps to ensure a strong bond. Once the glue has dried, it is time to remove the clamps. However, removing the clamps improperly can result in damage to your project. In this section, we will provide a step-by-step guide on safely and effectively removing clamps after wood glue application.
Step 1: Determine the Drying Time
The first step in removing clamps is to determine the recommended drying time for the specific wood glue you used. Different glues may have different drying times, so it is important to consult the instructions provided by the manufacturer. This will ensure that the glue has fully cured and is ready to be unclamped.
Step 2: Loosen the Clamps
Once the glue has dried, carefully loosen the clamps by turning the handles counterclockwise. It is important to do this step slowly and evenly to prevent any sudden movements that could potentially damage the project.
Step 3: Remove the Clamps
After loosening the clamps, you can proceed to remove them from the project. Start by removing the clamps that are furthest away from you and work your way towards the clamps that are closest to you. This will help maintain stability and prevent any accidental bumps or movements that could disrupt the bond.
Step 4: Inspect the Bond
Once all the clamps have been removed, carefully inspect the bond to ensure that it is secure and free from any gaps or inconsistencies. If you notice any issues, such as weak spots or uneven surfaces, you may need to reapply glue and clamp the project again before proceeding with any further steps.
Step 5: Clean Up
After confirming the bond’s quality, it is time to clean up any excess glue that may have squeezed out during the clamping process. Use a damp cloth or sponge to gently wipe away the excess glue. Be careful not to apply too much pressure or rub aggressively, as this could damage the wood surface.
Step 6: Final Finishing Touches
With the clamps removed and the excess glue cleaned up, you can now proceed with any final finishing touches to your project. This may include sanding, staining, or applying a protective coat of varnish or paint. Follow the appropriate techniques and allow sufficient drying time for these additional steps.
In summary, proper clamp removal techniques are crucial to ensure the success of your woodworking project. By following these step-by-step guidelines, you can safely and effectively remove clamps after wood glue application, resulting in a strong and secure bond. Remember to take your time, inspect the bond, and clean up any excess glue before proceeding with final finishing touches.
FAQs
How long should wood glue dry before removing clamps?
Wood glue generally requires at least 30 minutes to set, but it’s recommended to leave clamps on for a minimum of 2 hours to ensure a strong bond. However, for optimal results, it’s best to leave the clamps on for 24 hours to allow the glue to fully cure.
Conclusion
In summary, when using wood glue, it is essential to allow sufficient drying time before removing clamps to ensure a strong and reliable bond. The drying time for wood glue can vary depending on factors such as temperature, humidity, and the specific type of glue used. It is generally recommended to wait at least 24 hours before removing clamps. This allows the glue to cure fully and ensures that the joint is secure and ready for use. Rushing the drying process by removing clamps too soon can result in weak bonds and potential project failures. So, exercise patience and give the wood glue ample time to dry before removing clamps.
