If you want to attach glass to wood, there are a few different methods you can try. One popular option is using silicone adhesive, which provides a strong and durable bond. Another option is using mirror clips or glass clips, which securely hold the glass in place. Additionally, you can use wood molding or a frame to secure the glass onto the wood surface. Whichever method you choose, be sure to follow the instructions carefully and take proper safety precautions.
Step-by-Step Guide for Attaching Glass to Wood
If you want to attach glass to wood for a project, whether it’s for a picture frame, a tabletop, or a decorative piece, it’s important to do it correctly to ensure the safety and stability of the glass. Here is a step-by-step guide to help you through the process:

1. Gather the necessary materials:
Before you begin, make sure you have all the materials you’ll need. This includes:
- Wooden frame or surface
- Glass pane
- Glass adhesive or silicone sealant
- Clamps or weights
- Protective gloves
- Cloth or sponge
- Isopropyl alcohol (optional)
2. Prepare the wood surface:
Clean the surface of the wood where the glass will be attached. Use a cloth or sponge to remove any dust, dirt, or grease. If necessary, you can also use isopropyl alcohol to ensure a clean and dry surface.
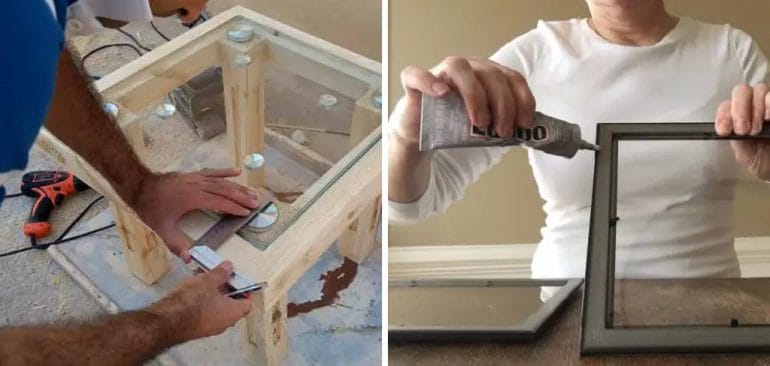
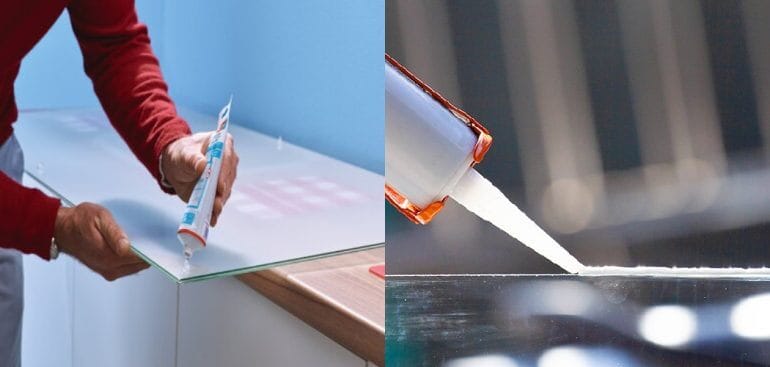
3. Apply the adhesive:
Apply a thin, even layer of glass adhesive or silicone sealant along the edges of the wood surface where the glass will be attached. Make sure to cover the entire perimeter to create a strong bond.
4. Position the glass:
Carefully place the glass pane onto the adhesive, aligning it with the edges of the wood. Press down gently to ensure proper contact between the glass and the adhesive. If needed, you can use clamps or weights to hold the glass in place while the adhesive dries.
5. Remove excess adhesive:
After the adhesive has dried according to the manufacturer’s instructions, remove any excess adhesive that may have squeezed out from between the glass and the wood. Use a cloth or sponge dampened with soapy water to clean up any residue.
6. Allow for curing time:
Depending on the type of adhesive or silicone sealant used, it’s important to allow for sufficient curing time before handling or moving the glass. Follow the manufacturer’s instructions for the recommended curing time.
7. Test for stability:
Once the adhesive has fully cured, gently test the stability of the glass by applying slight pressure or tapping on it. If the glass feels secure and does not move or rattle, it is successfully attached to the wood.
By following these step-by-step instructions, you can ensure a secure attachment of glass to wood for your project. Remember to prioritize safety and take your time during each step to achieve the best results.
Common Mistakes to Avoid When Attaching Glass to Wood
Attaching glass to wood can be a challenging task, as it requires precision and careful handling. Whether you are working on a DIY project or a professional installation, there are some common mistakes that you should avoid to ensure a successful and secure attachment. In this section, we will discuss these common mistakes and provide tips on how to avoid them.
1. Using the Wrong Adhesive
One of the most common mistakes is using the wrong adhesive when attaching glass to wood. It is important to choose an adhesive that is specifically designed for bonding glass and wood surfaces. Using the wrong adhesive can lead to weak bonds and potential failure of the attachment. Make sure to read the label and select an adhesive that is suitable for both materials.
2. Insufficient Surface Preparation
Another mistake is neglecting to properly prepare the surfaces before attaching the glass to the wood. Both the glass and wood surfaces should be clean, dry, and free from any dust, dirt, or grease. Failure to adequately prepare the surfaces can result in a weak bond and compromise the overall attachment. It is recommended to use a glass cleaner and sandpaper to ensure proper surface preparation.
3. Overlooking Safety Precautions
Attaching glass to wood requires caution and adherence to safety precautions. One common mistake is not wearing appropriate personal protective equipment (PPE), such as safety goggles and gloves. Glass can break during the attachment process, and failing to protect yourself can lead to serious injuries. Additionally, it is important to work in a well-ventilated area to avoid inhaling any harmful fumes from the adhesive.
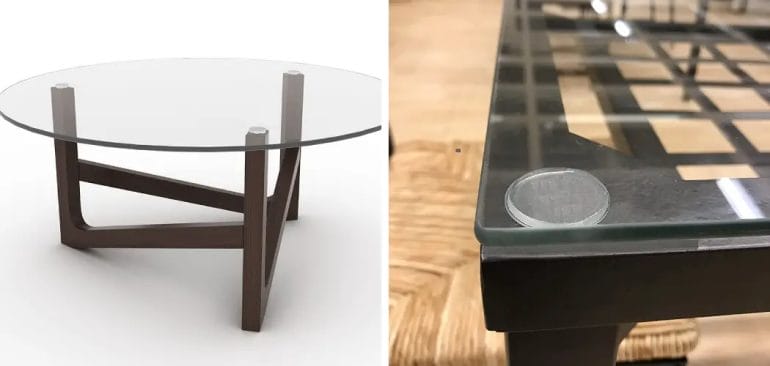
4. Inadequate Support
Another mistake to avoid is not providing adequate support for the glass while attaching it to the wood. Glass is a heavy and fragile material, and improper support can lead to cracks or breaks during the attachment process. It is recommended to use clamps or supports to hold the glass firmly in place until the adhesive has fully cured. This will ensure a secure attachment and prevent any damage to the glass.
5. Ignoring Weight Limitations
Each adhesive has weight limitations that should be considered when attaching glass to wood. Failure to follow these weight limitations can result in a weak bond or even the detachment of the glass from the wood. It is important to carefully read the instructions and ensure that the adhesive can support the weight of the glass. If necessary, use additional supports or consider using a stronger adhesive.
6. Rushing the Curing Process
Allowing the adhesive to properly cure is crucial for a strong and secure attachment. Rushing the curing process is a common mistake that can compromise the bond between the glass and wood. It is important to follow the manufacturer’s instructions regarding the curing time and avoid putting any stress on the attachment before it is fully cured. Patience is key to achieving a successful and durable attachment.
7. Failing to Test the Attachment
Before considering the attachment complete, it is essential to test its strength and stability. Failing to perform a test can lead to unexpected failures or accidents later on. Apply gentle pressure or give a slight tug to ensure that the glass is securely attached to the wood. If there are any signs of weakness or movement, reinforce the attachment or consider using a different adhesive.
Summary
When attaching glass to wood, it is important to avoid common mistakes that can compromise the strength and durability of the attachment. This includes using the wrong adhesive, insufficient surface preparation, neglecting safety precautions, inadequate support, ignoring weight limitations, rushing the curing process, and failing to test the attachment. By following these tips and taking the necessary precautions, you can ensure a successful and secure attachment of glass to wood.
4. Tips for Choosing the Right Glass for Wood Attachments
When it comes to choosing the right glass for wood attachments, there are a few important factors to consider. The type of glass you select can have a significant impact on the overall aesthetics, functionality, and durability of your wood attachments. Here are some tips to help you choose the right glass for your specific needs:
4.1 Glass Thickness
The first thing to consider when selecting glass for wood attachments is the thickness. The thickness of the glass will determine its strength and durability. Thicker glass is generally more resistant to breakage and provides better insulation. However, thicker glass can be heavier and may require additional support in your wood attachments. It’s important to strike a balance between thickness and weight to ensure the stability and safety of your wood attachments.
4.2 Glass Type
There are various types of glass available for wood attachments, each with its unique characteristics. Some common options include:
- Tempered Glass: This type of glass is heat-treated, making it stronger and more impact-resistant than regular glass. Tempered glass is an excellent choice for wood attachments that require increased safety and durability.
- Laminated Glass: Laminated glass consists of two or more layers of glass with an interlayer of plastic. This type of glass provides enhanced security and is designed to hold together even when shattered.
- Low-E Glass: Low-emissivity (Low-E) glass is coated with a thin metallic layer that helps reflect heat and reduce UV rays. It enhances energy efficiency and can help regulate temperatures within your wood attachments.
4.3 Glass Transparency
The level of transparency or opacity of the glass is another crucial factor to consider. Depending on your preferences and the intended use of your wood attachments, you may opt for clear glass for unobstructed views, frosted or textured glass for added privacy, or even colored glass for a unique aesthetic appeal. Take into account the amount of natural light you want to let in and how the glass will complement the overall design of your wood attachments.
4.4 Energy Efficiency
If energy efficiency is a priority for your wood attachments, consider opting for double or triple glazing. These types of glass consist of multiple layers with air or gas-filled gaps, providing enhanced insulation and reducing heat transfer. Energy-efficient glass can help lower your heating and cooling costs while creating a comfortable environment within your wood attachments.
4.5 Safety and Security
Depending on the location and purpose of your wood attachments, you may need to prioritize safety and security. Consider using laminated or tempered glass, as these options offer increased strength and resistance to breakage. Additionally, you can explore options such as impact-resistant glass or security glass for enhanced protection against forced entry.
4.6 Maintenance and Cleaning
Lastly, consider the maintenance and cleaning requirements of the glass you choose. Some types of glass may require specialized cleaning products or techniques, while others may be easier to clean and maintain. Choose a glass option that aligns with your maintenance preferences and ensures long-term durability.
By considering these tips and evaluating your specific needs, you can choose the right glass for your wood attachments. Remember to consult with professionals or experts in the field to ensure you make an informed decision that meets safety standards and enhances the overall functionality and aesthetics of your wood attachments.
Safety Precautions for Attaching Glass to Wood Surfaces
When it comes to attaching glass to wood surfaces, it is important to prioritize safety to prevent any accidents or damage. Whether you are working on a DIY project or a professional installation, following these safety precautions is essential:
1. Wear Safety Gear
Before you start working with glass and wood, make sure to wear the appropriate safety gear. This includes safety goggles to protect your eyes from any flying glass shards, gloves to protect your hands from cuts, and a dust mask when sanding or cutting wood.
2. Prepare the Work Area
Prior to attaching the glass, prepare your work area by clearing away any clutter and ensuring a clean, flat surface. Remove any sharp objects or debris that may pose a risk during the installation process.
3. Use Proper Tools
Using the right tools for the job is crucial to ensure a safe and secure attachment. Make sure to use glass-specific tools, such as glass cutters, suction cups, and clamps. Additionally, use appropriate wood tools, such as a drill and screws, to securely attach the wood surface.
4. Handle Glass with Care
Glass can be fragile and prone to breakage, so it is important to handle it with care. Always lift and carry glass panels from the edges or corners to distribute the weight evenly and reduce the risk of cracking or shattering.
5. Sand and Clean the Wood Surface
Prior to attaching the glass, ensure that the wood surface is smooth and free from any rough edges or splinters. Sand the surface with fine-grit sandpaper and wipe away any dust or debris. This will create a clean and even surface for the glass attachment.
6. Use Proper Adhesive
Choose a high-quality adhesive specifically designed for attaching glass to wood surfaces. Follow the manufacturer’s instructions for proper application and allow sufficient curing time before handling or putting any weight on the attached glass.
7. Secure the Glass Properly
When attaching the glass to the wood surface, ensure that it is securely fastened for stability and safety. Use appropriate clamps or brackets to hold the glass in place while the adhesive cures, and double-check that it is securely attached before moving or using the finished project.
8. Be Mindful of Weight and Load Capacity
Consider the weight and load capacity of the glass and wood surface when attaching glass. Make sure the wood is capable of supporting the weight of the glass, and avoid overloading the attachment point to prevent any structural failures or accidents.
9. Seek Professional Assistance if Needed
If you are unsure about the proper techniques or safety precautions for attaching glass to wood surfaces, it is always best to seek professional assistance. They have the expertise and experience to ensure a safe and successful installation.
In summary, attaching glass to wood surfaces requires careful attention to safety precautions. By wearing the right safety gear, preparing the work area, using proper tools and adhesives, handling glass with care, and being mindful of weight and load capacity, you can ensure a secure and safe attachment. If in doubt, it is always advisable to seek professional assistance to avoid any accidents or damage.
FAQs
How do I attach glass to wood?
To attach glass to wood, you can use a strong adhesive like epoxy or silicone. Apply the adhesive to the wood surface, then carefully place the glass on top. Make sure to apply even pressure and allow the adhesive to cure according to the instructions before handling the glass.
Conclusion
In conclusion, attaching glass to wood can be a straightforward process if done correctly. By following the steps outlined in this guide, you can ensure a secure and reliable attachment. Remember to start by preparing the surface of the wood and glass, using appropriate adhesives or hardware to create a bond. Additionally, consider the weight and size of the glass to determine the best mounting method. Whether you choose adhesive, screws, or clips, always prioritize safety and stability. With the right tools and techniques, you can confidently attach glass to wood for various projects, including furniture, decor, and more.
