If you’re looking to transform the color of your wood, there are several methods you can try. One option is to use a wood stain, which can enhance or change the natural color of the wood while still allowing its texture to show through. Alternatively, you can use wood paint or a wood dye to completely change the color of the wood. You may also consider using a wood bleach to lighten the existing color before applying a new stain or dye. Remember to prepare the wood surface properly and test the color on a small area before applying it to the entire piece.

Staining Techniques for Wood Color Transformation
When it comes to woodworking, one of the most effective ways to transform the appearance of wood is through staining. Staining not only enhances the natural beauty of wood but also allows you to customize its color to fit your aesthetic preferences. In this section, we will explore various staining techniques that can help you achieve the desired color transformation for your wood projects.

1. Surface Preparation
Before applying any stain, it is crucial to prepare the wood surface properly. Start by sanding the wood to remove any imperfections, rough spots, or previous finishes. This step ensures that the stain penetrates the wood evenly and enhances its natural grain.
2. Choosing the Right Stain
There are different types of wood stains available in the market, ranging from oil-based to water-based stains. Each type has its own advantages and considerations. Oil-based stains are known for their deep penetration and rich color, while water-based stains are more environmentally friendly and offer quick drying times. Consider the wood species, project requirements, and desired color outcome when selecting the appropriate stain.
3. Testing on Scrap Wood
Before applying the stain to your actual project, it is always a good idea to test it on a scrap piece of the same wood species. This allows you to preview the color and make any necessary adjustments before committing to the final application. Remember that different wood species may react differently to stains, so testing is essential to achieve the desired results.
4. Applying the Stain
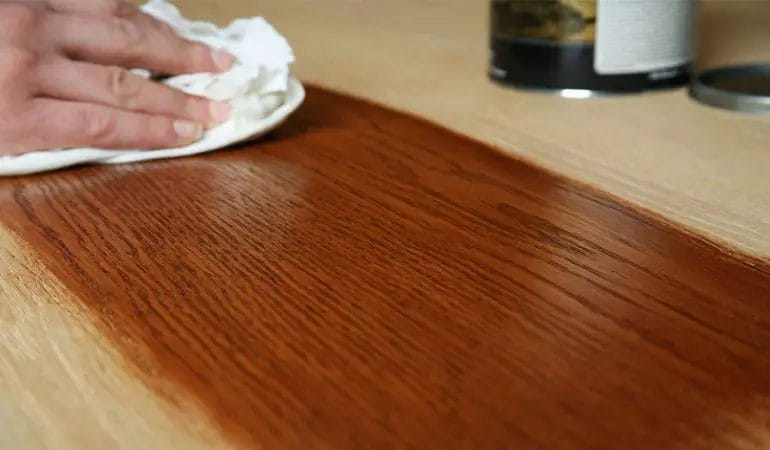
When applying the stain, there are two main techniques: wiping and brushing. The wiping technique involves applying the stain with a cloth or brush and then wiping off the excess, allowing the stain to penetrate the wood pores. This technique is commonly used for achieving an even color and enhancing the wood’s natural grain.
On the other hand, brushing the stain involves using a brush to evenly spread the stain on the wood surface. This technique is often used for larger areas or when a more consistent coloration is desired. It is important to follow the manufacturer’s instructions regarding the application and drying time of the stain.
5. Finishing and Sealing
After the stain has dried, it is crucial to protect and seal the wood to ensure its longevity. Applying a clear topcoat or finish not only enhances the color but also provides protection against moisture, UV rays, and wear. Choose a finish that aligns with your project’s requirements, such as polyurethane, varnish, or lacquer. Apply multiple coats, allowing sufficient drying time between each coat.
6. Maintenance and Care
Once your wood project is stained and finished, it is important to maintain its appearance and protect it from potential damage. Regular cleaning with a mild detergent and soft cloth can help remove dust and dirt. Avoid using harsh chemicals or abrasive materials that can scratch or dull the finish. Additionally, periodic reapplication of a protective finish can revive the color and extend the life of your stained wood.
In summary, staining techniques offer a versatile way to transform the color of wood and enhance its natural beauty. By following proper surface preparation, selecting the right stain, testing on scrap wood, applying the stain effectively, finishing and sealing, and practicing regular maintenance, you can achieve stunning color transformations for your wood projects. Experiment with different techniques and stains to create unique and personalized pieces that showcase the beauty of wood.
Paint and Pigment Options for Changing Wood Color
When it comes to changing the color of wood, there are several options available. Whether you want to give new life to an old piece of furniture or add a touch of color to your wooden surfaces, paint and pigments can help you achieve the desired result. In this section, we will explore some of the popular paint and pigment options that can be used to change the color of wood.
1. Wood Stain
Wood stain is one of the most common options for changing the color of wood. It is a type of paint that is specifically formulated to penetrate the surface of the wood and enhance its natural color. Wood stains come in a wide range of shades, from light to dark, allowing you to choose the perfect color for your project. They can be used on both interior and exterior wood surfaces, such as furniture, decks, and fences.
Applying wood stain is relatively easy. Simply clean and sand the wood surface, then apply the stain using a brush or rag. Allow the stain to penetrate the wood for the recommended time, and then wipe off any excess. The longer you let the stain sit, the darker the color will be. Once the stain is dry, you can apply a protective finish, such as varnish or polyurethane, to seal the wood and enhance its durability.
2. Paint
If you want to completely change the color of your wood surface or cover up imperfections, paint is a great option. Unlike wood stain, paint sits on top of the wood surface and creates a solid colored finish. You can choose from a wide range of paint colors to match your desired aesthetic.
Before painting, it is important to properly prepare the wood surface. Clean the wood to remove any dirt or dust, and sand it to create a smooth and even surface. Apply a primer to help the paint adhere better and prevent any bleed-through of the wood’s natural color. Once the primer is dry, you can apply the paint with a brush or roller. Apply multiple coats if needed, allowing each coat to dry completely before applying the next one. Finally, apply a clear top coat to protect the paint and give it a polished look.
3. Pigment Powders
If you prefer a more customized color for your wood, pigment powders can be a great option. Pigments are finely ground colorants that can be mixed with various mediums, such as paint or varnish, to create a unique color. They come in a wide range of colors, allowing you to experiment and create your own custom shades.
To use pigment powders, mix them with a compatible medium, following the manufacturer’s instructions. You can mix them with paint, varnish, or even epoxy resin for a stunning effect. Once the pigment is mixed, apply it to the wood surface using a brush or sponge. Depending on the desired effect, you can apply multiple layers or mix different pigments to achieve the desired color. Finish off with a clear protective coat to seal the wood and enhance the color.
4. Bleaching
In some cases, you may want to lighten the color of your wood rather than darken it. Bleaching is a technique used to remove or lighten the natural color of wood. It can be used to create a bleached or whitewashed effect, giving the wood a lighter and more rustic appearance.
There are various bleaching products available on the market, each with its own instructions and application methods. Some bleaches are applied directly to the wood surface, while others require mixing with water or a compatible solvent. Follow the manufacturer’s instructions carefully to achieve the desired result.
5. Dye
If you prefer a transparent and more subtle color change, wood dye can be a good option. Wood dye is similar to wood stain but is more concentrated and provides a deeper color penetration. It enhances the natural grain of the wood while adding a touch of color.
Before applying wood dye, it is important to prepare the wood surface by sanding it smooth. Apply the dye using a brush or cloth, working with the grain of the wood. Allow the dye to penetrate the wood for the recommended time, and then wipe off any excess. Repeat the process if you desire a darker color. Once the dye is dry, seal the wood with a protective finish to enhance its durability.
Summary
Changing the color of wood can be a fun and creative way to transform your furniture or enhance the appearance of your wooden surfaces. Whether you choose to use wood stain, paint, pigment powders, bleaching techniques, or wood
Using Dyes and Stains to Alter Wood Color
Wood is a versatile material that can be used for various applications. One way to enhance the appearance of wood is by altering its color. This can be done using dyes and stains, which are specifically designed to change the color of wood while still allowing the natural grain to show through. In this section, we will explore the process of using dyes and stains to achieve the desired wood color.
Dyes
Dyes are a popular choice for changing the color of wood. They are available in various shades and can be mixed to create custom colors. Dyes penetrate into the wood fibers, resulting in a more vibrant and even color. They are often used for coloring hardwoods such as oak, mahogany, and walnut.
Before applying dye, it is essential to prepare the wood surface by sanding it smooth and removing any existing finish. This will ensure that the dye is absorbed evenly. Dye can be applied using a brush, cloth, or spray gun. It is important to follow the manufacturer’s instructions for the specific dye being used.
After applying the dye, it is necessary to let it dry completely. This usually takes a few hours, depending on the type of dye used and the temperature and humidity of the environment. Once dry, the wood can be sealed with a clear coat to protect the color and provide a glossy or matte finish, depending on personal preference.
Stains
Stains are another popular option for altering the color of wood. Unlike dyes, stains do not penetrate as deeply into the wood fibers. Instead, they sit on top of the wood surface, enhancing the existing color and adding a layer of pigmentation.
There are two main types of stains: oil-based and water-based. Oil-based stains provide a richer and more durable finish, while water-based stains are easier to clean up and have less odor. Both types can be applied using a brush, cloth, or sponge.
Before applying the stain, it is important to prepare the wood surface by sanding it smooth and removing any existing finish, just like when using dyes. This will ensure that the stain is absorbed evenly.
After applying the stain, it is recommended to let it sit for a few minutes to allow the color to develop. Then, any excess stain should be wiped off with a clean cloth. It is crucial to follow the manufacturer’s instructions for the specific stain being used.
Once the stain has dried, a clear coat can be applied to protect the finish and enhance the color. This can be a polyurethane, varnish, or lacquer, depending on the desired level of durability and sheen.
Comparison
Both dyes and stains can significantly alter the color of wood, but they have some differences. Dyes tend to provide a more vibrant and even color, while stains enhance the existing color and add pigmentation. Dyes penetrate into the wood fibers, while stains sit on top of the wood surface. Additionally, stains often require a clear coat for added protection, while dyes may not.
When choosing between dyes and stains, it is essential to consider the desired outcome, the type of wood being used, and personal preference. It may be helpful to test different options on a small, inconspicuous area of the wood to determine the best approach.
Using dyes and stains is an effective way to alter the color of wood. Whether you prefer a vibrant and even color or want to enhance the existing color with pigmentation, there are options available to suit your needs. By following the proper preparation and application techniques, you can achieve a beautiful and customized wood color that enhances the overall look of your project.
Creative Techniques for Changing Wood Color
Wood is a versatile material that can be transformed in various ways to achieve different aesthetics. One of the ways to enhance or alter the appearance of wood is by changing its color. Whether you are looking to create a rustic, weathered look or a vibrant, contemporary finish, there are several creative techniques that can be used to change the color of wood.
1. Staining
Staining is one of the most popular methods for changing the color of wood. It involves applying a semi-transparent or transparent colorant to the surface of the wood, allowing the natural grain to show through. Stains are available in a wide range of colors, from light hues to deep, rich tones. They can be easily applied using a brush, rag, or spray gun. Staining not only changes the color of the wood but also enhances its natural beauty.
2. Bleaching
Bleaching is a technique used to lighten the color of wood. It is particularly useful when dealing with dark or heavily stained wood. Bleaching agents are applied to the surface of the wood, which breaks down the pigments and lightens the color. This process can be done using either chlorine bleach or oxalic acid. It is important to follow the manufacturer’s instructions carefully when using bleaching agents, as they can be harmful if not used correctly.
3. Aging and Weathering
If you are looking to achieve a weathered or aged look, there are several techniques you can try. One method is to expose the wood to the elements, such as sun, rain, and wind. Over time, the wood will naturally change color as it weathers. Another technique is to use vinegar or diluted paint to create a distressed or aged effect. This involves applying the solution to the wood and then using a wire brush or sandpaper to distress the surface.
4. Paint and Pigmented Finishes
If you prefer a solid and opaque color for your wood, paint and pigmented finishes are the way to go. Paints offer a wide range of color options and can completely cover the natural grain of the wood. They can be applied using a brush, roller, or spray gun. Pigmented finishes, such as lacquer or varnish, provide a durable and long-lasting colored coating. These finishes can be tinted to achieve the desired color and are available in various sheens, from matte to high gloss.
5. Dyeing
Dyeing is another technique that can be used to change the color of wood. Unlike stains, dyes penetrate deeper into the wood fibers, resulting in a more vibrant and even color. Dyes are available in both water-based and solvent-based formulas. They can be applied using a brush, cloth, or spray gun. Dyes can be mixed to create custom colors, allowing for endless possibilities in wood coloration.
6. Heat Treatment
Heat treatment is a unique technique that changes the color of wood by exposing it to high temperatures. This process causes the natural sugars in the wood to caramelize, resulting in a darker, richer color. Heat treatment can be done using a heat gun, blowtorch, or specialized equipment. It is important to take proper safety precautions when using heat treatment methods and to follow the manufacturer’s instructions.
7. Combination Techniques
For truly unique and custom wood colors, you can experiment with combining different techniques. For example, you can start by staining the wood with a desired color and then distressing it to achieve an aged look. Alternatively, you can bleach the wood to lighten its color and then apply a dye or stain for a subtle tint. The possibilities are endless when it comes to combining different techniques to create one-of-a-kind wood finishes.
Summary
Changing the color of wood is a creative way to enhance its appearance and achieve the desired aesthetic. Whether you choose to stain, bleach, age, paint, dye, heat treat, or combine techniques, each method offers unique results and allows for endless possibilities in wood coloration. So, unleash your creativity and transform ordinary wood into a work of art.
FAQs
1. How can I change the color of wood?
To change the color of wood, you can use a variety of techniques such as staining, painting, or using wood dyes. Staining involves applying a colored stain to the wood, which can enhance its natural grain. Painting wood involves using paint to completely cover the surface, while wood dyes penetrate the wood to change its color while still allowing the grain to show through.
2. Can I lighten the color of dark wood?
Yes, you can lighten the color of dark wood by using a wood bleach or by sanding down the surface to remove some of the dark stain or finish. Wood bleach helps to remove or lighten the color by chemically altering the wood’s pigments. Sanding can remove the top layer, exposing lighter wood underneath.
3. How do I darken the color of light wood?
To darken the color of light wood, you can use wood stains that are darker in color. Apply the stain evenly to the wood surface and allow it to penetrate the wood. You may need to apply multiple coats to achieve the desired darkness. It’s important to test the stain on a small, inconspicuous area first to ensure you like the result.
Conclusion:
In conclusion, changing the color of wood is an excellent way to revitalize your space and give it a fresh new look. By following the right techniques and using the proper products, you can achieve stunning results. Whether you want to lighten or darken the wood, there are various methods available, including staining, painting, or using wood dyes.
Remember to prepare the surface properly, choose the appropriate color, and apply multiple coats for a more uniform finish. It’s also essential to consider the type of wood you’re working with, as different woods absorb colors differently. With a little patience and attention to detail, you can transform the appearance of your wood surfaces and create a beautiful and customized look.