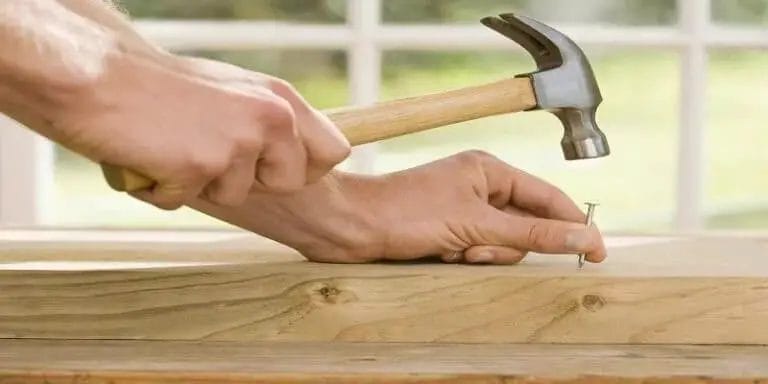
If you have nails sticking out of wood that need to be covered, there are a few simple ways to handle this issue. One option is to use a nail set and hammer to countersink the nail below the wood’s surface. Alternatively, you can use wood filler or putty to conceal the nails and create a smooth surface. Another option is to replace the nails with shorter ones or use a nail punch to drive them deeper into the wood. No matter which method you choose, it’s important to ensure the nails are secure and the wood’s surface is safe and smooth.
Easy DIY Fixes: Solutions for Covering Exposed Nails in Wood
When it comes to woodworking projects, one common issue that often arises is exposed nails. These unsightly protrusions not only detract from the overall appearance of the wood, but they can also pose a safety hazard. Luckily, there are several easy and inexpensive DIY solutions for covering exposed nails in wood. In this section, we will explore some of these solutions and provide step-by-step instructions on how to implement them.

1. Wood Filler
Wood filler is a versatile product that can be used to cover exposed nails in wood. It is a putty-like substance that can be applied directly to the nail hole, filling it in and creating a smooth surface. To use wood filler, follow these steps:
- Start by cleaning the area around the nail hole to ensure proper adhesion of the filler.
- Using a putty knife or a similar tool, apply the wood filler to the nail hole, pressing it firmly into place.
- Smooth out the surface of the wood filler with the putty knife, ensuring it is level with the surrounding wood.
- Allow the wood filler to dry completely according to the manufacturer’s instructions.
- Once dry, sand the filled area until it is smooth and flush with the wood surface.
- Finish off by painting or staining the wood to match the surrounding area.
Wood filler provides a seamless solution for covering exposed nails, and it can be easily customized to match the color of the wood.
2. Wood Plugs
If you prefer a more natural-looking solution, wood plugs are a great option. Wood plugs are small wooden discs that can be inserted into the nail hole, effectively concealing the exposed nail. Here’s how to use wood plugs:
- Choose a wood plug that matches the species of the wood you are working with. You can find pre-made wood plugs at most hardware stores, or you can make your own using a plug cutter.
- Drill a hole slightly smaller than the diameter of the wood plug into the center of the nail hole.
- Apply a small amount of wood glue to the wood plug and insert it into the drilled hole, ensuring it is flush with the wood surface.
- Allow the wood glue to dry completely, following the manufacturer’s instructions.
- Once dry, sand the wood plug until it is smooth and level with the surrounding wood.
- Finish off by applying a protective coating, such as varnish or polyurethane, to the wood surface.
Wood plugs provide a natural and aesthetically pleasing solution for covering exposed nails. They blend seamlessly with the wood grain and can be stained or finished to match the surrounding wood.
3. Decorative Trim
If you want to add an extra touch of style to your woodworking project, decorative trim can be an excellent solution for covering exposed nails. Decorative trim, such as molding or beading, can be strategically placed around the nail hole to create a visually appealing design. Here’s how to use decorative trim:
- Measure the size of the nail hole and cut a piece of decorative trim to fit.
- Apply a small amount of wood glue to the back of the trim piece.
- Position the trim piece around the nail hole, ensuring it covers the exposed nail.
- Secure the trim piece in place with finishing nails or brads.
- Fill in any gaps or nail holes with wood filler and smooth out the surface.
- Paint or stain the decorative trim to match the surrounding wood.
Decorative trim not only covers exposed nails but also adds a touch of elegance to your woodworking project. It can be customized to suit your design preferences and complements the overall aesthetics of the wood.
In summary, when it comes to covering exposed nails in wood, there are several easy DIY fixes available. Wood filler, wood plugs, and decorative trim are all effective solutions that can be implemented with minimal effort and cost. Whether you prefer a seamless finish, a natural look, or a touch of style, these solutions have got you covered. So next time you encounter exposed nails in your woodworking project, don’t fret – try one of these DIY fixes and enjoy a flawless finish.
Camouflaging Nail Protrusions: Tips and Tricks for a Seamless Finish
When it comes to nail care and grooming, achieving a flawless and seamless finish is always the ultimate goal. However, sometimes we may encounter nail protrusions or imperfections that can create a bumpy or uneven surface. But worry not, as there are various tips and tricks you can use to camouflage these nail protrusions and achieve a smooth and professional-looking finish. In this section, we will explore some effective techniques to help you achieve that seamless manicure.
1. Nail Filing
The first step in camouflaging nail protrusions is to properly shape and file your nails. By filing your nails in the right manner, you can create a smoother surface that will minimize the appearance of any bumps or ridges. Start by using a nail file with a fine grit and gently file the edges of your nails in one direction, avoiding harsh back-and-forth motions. This will help to even out the surface and create a more uniform look.
2. Buffing
Buffing is another effective technique to smooth out any nail protrusions. Using a nail buffer, gently rub the surface of your nails in a back-and-forth motion. This will help to remove any ridges or imperfections, creating a smoother canvas for your nail polish application. Be cautious not to over-buff, as this can damage the nail bed. A light touch is all you need to achieve a polished and even surface.
3. Base Coat
Before applying your desired nail polish color, it is important to start with a base coat. A base coat not only helps to protect your nails from staining but also creates a smooth foundation for the polish. Look for a base coat that offers a filling or smoothing effect, as this will further help to camouflage any nail protrusions. Apply a thin layer of base coat and allow it to dry completely before moving on to the next step.
4. Thick Polish Application
When applying your nail polish, opt for a slightly thicker application than usual. This can help to create a cushion-like effect that will help to even out any nail protrusions. Apply the polish in thin, even strokes, and make sure to cover the entire nail surface. Allow each layer to dry before applying another coat to prevent smudging or streaking.
5. Nail Art and Designs
If you still notice any nail protrusions after applying your base coat and nail polish, you can use a clever nail art or design technique to further camouflage them. For example, you can create an accent nail with a textured polish or add embellishments like glitter, studs, or decals to divert attention from any imperfections. These decorative elements can add visual interest to your nails while effectively disguising any protrusions.
6. Top Coat
Once you have achieved the desired look and camouflaged any nail protrusions, finish off with a high-quality top coat. A top coat not only provides a glossy finish but also helps to seal and protect your nail polish. Additionally, it can help to further smooth out the overall surface, giving your nails a flawless and seamless appearance.
In summary, camouflaging nail protrusions is all about creating a smooth and even surface. By following these tips and tricks, you can achieve a seamless finish and enjoy perfectly manicured nails. Remember to be patient and take your time during each step of the process for the best results. With a little practice and the right techniques, you can confidently flaunt your flawless nails.
Quick and Effective Remedies: How to Hide Nails Sticking Out of Wood
Have you ever encountered the problem of nails sticking out of wood? Not only do they pose a safety hazard, but they can also ruin the aesthetic appeal of your wooden furniture or structures. Fortunately, there are simple and effective remedies to hide those unsightly nails. In this section, we will explore various techniques that will help you conceal nails sticking out of wood effortlessly.
1. Sink the Nail
One of the easiest and most common ways to hide a protruding nail is to sink it into the wood. This method requires a hammer and a nail set. Start by placing the nail set on the head of the nail and gently tap it with the hammer until the nail is below the wood’s surface. Once the nail is fully countersunk, you can use wood filler or putty to conceal the hole. Sand the area once the filler is dry, and you’ll have a smooth, nail-free surface.
2. Use Wood Filler
If the nail is already flush with the wood, but still visible, you can make use of wood filler to hide it completely. Wood filler is a dough-like substance that can be applied to the nail hole, creating a seamless surface. Choose a wood filler that matches the color of your wood for a more natural finish. Apply the filler with a putty knife, ensuring that it completely fills the hole. Let it dry according to the manufacturer’s instructions, and then sand the area until it’s smooth and level with the surrounding wood.
3. Camouflage with Wood Stain
Another effective method for hiding nails sticking out of wood is to camouflage them with wood stain. This technique works best when the nail is flush with the surface. Start by sanding the area around the nail to remove any rough edges or splinters. Then, apply wood stain using a brush or cloth, making sure to cover the entire surface. The stain will darken the wood and make the nail less noticeable. You can repeat the process until the desired result is achieved.
4. Conceal with Wood Plug
If you’re dealing with a larger nail or want a more decorative approach, using a wood plug can be a great solution. Wood plugs are small, round pieces of wood that can be inserted into a drilled hole over the nail. Start by drilling a hole slightly larger than the nail’s diameter. Apply a small amount of wood glue to the inside of the hole, insert the wood plug, and tap it gently until it is flush with the surface. Sand the area and apply a finish to match the surrounding wood, and your nail will be completely hidden.
5. Cover with Trim or Molding
For nails that are difficult to hide or if you prefer a more decorative approach, you can use trim or molding to cover them up. Choose a trim or molding design that suits your taste and cut it to the appropriate length. Apply a small amount of wood glue to the back of the trim and press it firmly over the nail. Secure it with finishing nails for added strength. Once the glue is dry, sand the area and apply a finish to blend the trim with the surrounding wood.
In summary, there are several quick and effective remedies to hide nails sticking out of wood. Whether it’s sinking the nail, using wood filler, camouflaging with wood stain, concealing with wood plugs, or covering with trim or molding, you have plenty of options to choose from. By following these techniques, you can easily achieve a seamless and nail-free surface while enhancing the overall appearance of your wooden projects.
The Art of Nail Concealment: Expert Strategies for Concealing Exposed Nails
Exposed nails can be an unsightly blemish on any surface, whether it’s furniture, flooring, or even a simple wooden frame. These protruding nails not only detract from the overall aesthetic appeal but can also pose a safety hazard. Fortunately, there are expert strategies that can help you effectively conceal exposed nails and restore the beauty of your surfaces. In this section, we will explore some tried-and-true methods that will enable you to master the art of nail concealment.
1. Wood Filler
One of the most popular and effective ways to conceal exposed nails is by using wood filler. Wood filler, as the name suggests, is a substance specifically designed to fill in gaps and holes in wooden surfaces. It is available in various colors to match different wood tones, ensuring a seamless blend. To use wood filler, simply apply it to the surface using a putty knife or a small spatula, making sure to press it firmly into the nail hole. Once dry, sand down the area to create a smooth finish, and the nail will be virtually invisible.
2. Nail Set and Putty
If the exposed nail is set below the surface of the material, such as in furniture upholstery or drywall, you can use a nail set and putty to conceal it. Start by using a nail set to gently tap the nail below the surface. Be careful not to damage the surrounding material. Once the nail is flush with the surface, apply a small amount of putty over it, using a putty knife to smooth it out. Allow the putty to dry, then sand the area and apply paint or finish to match the surrounding surface.
3. Trim or Molding
For exposed nails in trim or molding, using additional trim or molding can be an effective solution. Measure the length needed to cover the nail and cut the trim or molding accordingly. Apply a small amount of adhesive to the back of the trim or molding and press it firmly onto the surface, making sure the nail is completely covered. Use finishing nails to secure the trim or molding in place, and then fill in the nail holes with wood filler. Sand and paint the area to achieve a seamless finish.
4. Decorative Accents
If you want to add a touch of creativity while concealing exposed nails, decorative accents can be an excellent choice. Consider incorporating decorative elements such as metal studs, rosettes, or medallions to not only cover the nails but also enhance the visual appeal of the surface. These accents can be attached using adhesive or small nails, depending on the material and design. Make sure to choose accents that complement the overall style of the surface for a cohesive look.
5. Repurposing
Another innovative way to conceal exposed nails is by repurposing materials. Look around your home or workshop for items that can be creatively repurposed to cover the nails. This can include old buttons, decorative knobs, or even pieces of fabric. Simply attach these items over the nails using appropriate adhesive or by securing them with small nails. This method not only conceals the nails but also adds a unique and personal touch to the surface.
6. Professional Help
If you find yourself unable to effectively conceal exposed nails or if the damage is extensive, it may be wise to seek professional help. Professional carpenters or furniture restorers have the expertise and tools to tackle even the most challenging nail concealment projects. They can provide tailored solutions and ensure a flawless finish that will leave your surfaces looking as good as new.
Summary
Exposed nails can be a pesky problem, but with the right strategies, you can successfully conceal them and restore the beauty of your surfaces. Whether you choose to use wood filler, nail set and putty, trim or molding, decorative accents, repurposed materials, or seek professional help, the key is to achieve a seamless finish that blends with the surrounding surface. By mastering the art of nail concealment, you can enjoy surfaces that are both aesthetically pleasing and safe.
FAQs
How do I cover nails sticking out of wood?
To cover nails sticking out of wood, you can use wood filler or putty. First, remove any loose or protruding nails. Then, apply the wood filler or putty over the nail, ensuring it is fully covered. Allow it to dry, and then sand it down until smooth. Finally, paint or stain the patched area to match the surrounding wood.
Conclusion
In conclusion, knowing how to cover nails sticking out of wood is an essential skill for any DIY enthusiast or homeowner. By taking the time to address these protruding nails, you can ensure the safety and aesthetics of your wooden surfaces. Whether you choose to use a nail set and hammer to countersink the nail, or opt for a wood filler or putty to conceal it, the process is relatively straightforward. Remember to sand the area smooth and apply a matching paint or stain to achieve a seamless appearance. By following these steps, you can maintain the integrity of your wood surfaces and enjoy a polished and professional finish.