Electric burners offer a safe and efficient way to burn wood for various purposes. Whether you’re looking to create a cozy ambiance or need to generate heat, electric burners can be a great option. With their easy-to-use design and environmental friendliness, these burners allow you to enjoy the warmth and beauty of a wood fire without the hassle of traditional burning methods. In this article, we will explore the steps and tips to effectively and safely use an electric burner to burn wood.
Firstly, make sure you have a suitable electric burner for burning wood. Look for a model that is specifically designed for this purpose, with features like a temperature control knob and a built-in safety mechanism. Additionally, ensure that your electric burner has a sturdy base and is placed on a heat-resistant surface to prevent any accidents.
Next, gather the necessary materials, including dry and seasoned wood. It is important to use wood that is free from any paint, varnish, or chemicals, as these can release harmful fumes when burned. Hardwoods like oak, maple, or birch are excellent choices for burning in an electric burner.
Before starting the burning process, prepare the wood by cutting it into smaller pieces that can fit comfortably in the electric burner. Remove any excess bark or debris to ensure a cleaner burn. It is also advisable to let the wood sit in a dry area for a few days to further reduce its moisture content.

Preparing the wood for electric burning
Before you start electric burning on wood, it is important to properly prepare the wood to ensure the best results. Here are some steps to follow:
- Selecting the right wood: The type of wood you choose for electric burning can greatly impact the final outcome. Hardwoods such as oak, maple, or birch are often preferred as they tend to burn more evenly and provide better contrast. Softwoods like pine or cedar can also be used, but may require more care due to their softer nature.
- Drying the wood: Moisture content in the wood can affect the burning process. It is important to use dry wood to avoid issues like excessive smoke, uneven burning, or warping. If you are using freshly cut wood, allow it to dry for several months before using it for electric burning. You can speed up the drying process by storing the wood in a well-ventilated area.
- Sanding the wood: Before you begin electric burning, it is recommended to sand the wood surface to create a smooth and even surface. This will help in better transfer of heat and create cleaner and more precise burn marks. Use fine-grit sandpaper to remove any rough spots or imperfections.
- Preparing the design: Plan out your design on the wood surface before starting the electric burning process. You can use a pencil to lightly draw the design or use stencils for more intricate patterns. This will help you stay focused and ensure a more accurate result.
- Protective measures: Electric burning can produce smoke and fumes, so it is important to work in a well-ventilated area or use a fume extractor. Additionally, wearing protective goggles, gloves, and a mask can help prevent any injuries or health issues.
By following these steps, you can properly prepare the wood for electric burning and achieve the desired results. Remember to always prioritize safety and take necessary precautions while working with electric burning tools.
Techniques for Electric Burning on Wood
Electric burning on wood is a popular technique used to create unique and artistic designs on wooden surfaces. It involves using electricity to burn patterns, images, or text onto the wood, resulting in a striking and personalized finish. This technique requires specific tools and precautions to ensure safety and achieve desired results. In this section, we will explore some techniques for electric burning on wood.
1. Choosing the Right Wood
The first step in electric burning on wood is selecting the right type of wood. Different woods have varying densities and burn differently. Hardwoods such as maple, oak, or birch are commonly used for their durability and ability to hold intricate designs. Softwoods like pine or cedar work well for larger, bolder designs. It is essential to choose a wood that is properly seasoned and free from knots or cracks, as these can affect the burning process.
2. Preparing the Wood Surface
Before starting the electric burning process, it is crucial to prepare the wood surface. Begin by sanding the wood to create a smooth and even surface. This will ensure that the burning tool glides easily across the wood and produces clean lines. Remove any dust or debris from the surface before proceeding.
3. Sketching the Design
Next, sketch the desired design onto the wood using a pencil or transfer paper. This will serve as a guide during the burning process and help maintain consistency. You can also use stencils or pre-made templates if you prefer a more precise design. Take your time to ensure the design is accurately transferred onto the wood.
4. Choosing the Burning Tool
The burning tool, also known as a woodburner or pyrography pen, is the key tool used for electric burning on wood. There are various types of burning tools available, ranging from simple pens with interchangeable tips to more advanced models with temperature control. Select a tool that suits your needs and provides the level of control required for your design.
5. Testing and Adjusting
Before starting the actual burning process, it is advisable to test the burning tool on a scrap piece of wood or an inconspicuous area of your project. This will allow you to familiarize yourself with the tool and adjust the temperature or pressure as necessary. Different woods and designs may require different settings, so it is important to experiment and find the optimal settings for your project.
6. Burn with Precision
Once you are confident with the burning tool and have adjusted the settings, you can begin the electric burning process. Hold the tool like a pen and gently apply it to the wood surface, following the sketched design. Apply consistent pressure and move the tool slowly to create clean, precise lines. Take breaks as needed to avoid overheating the tool or wood.
7. Adding Depth and Shading
To create depth and shading in your design, you can vary the pressure and speed while burning. Applying more pressure or moving the tool more slowly will result in darker or deeper burn marks, while lighter pressure or faster movements will create lighter shades. This technique can add dimension and realism to your burned artwork.
8. Finishing and Protecting the Wood
Once the burning process is complete, allow the wood to cool before applying any finishes or protective coatings. Depending on the desired look, you can choose to leave the wood in its natural burned state or apply a finish such as varnish or sealant. These finishes will not only enhance the appearance but also protect the wood from moisture and wear.
In summary, electric burning on wood is a fascinating technique that allows for the creation of intricate designs and artwork. By following the proper techniques and precautions, you can achieve stunning results on various wood surfaces. Remember to choose the right wood, prepare the surface, sketch the design, select the appropriate burning tool, test and adjust, burn with precision, add depth and shading, and finish and protect the wood. With practice and creativity, you can unlock the full potential of electric burning on wood and bring your artistic visions to life.
Safety Tips for Electric Burning on Wood
Electric burning on wood can be a convenient and efficient way to heat your home or create a cozy atmosphere. However, it’s important to ensure that you follow proper safety precautions to prevent accidents and potential hazards. Here are some essential safety tips to keep in mind when using electric burning on wood:
1. Choose a Safe Location
Before setting up your electric burning on wood, make sure to select a safe location. Place it on a sturdy, non-combustible surface, such as a stone or metal hearth. Keep it away from flammable materials like curtains, furniture, and carpets to minimize the risk of fire.
2. Keep Flammable Items Away
Avoid placing any flammable items near the electric burning on wood. This includes newspapers, magazines, and other combustible materials. Keep a safe distance between the unit and any potential fire hazards to reduce the chances of accidental ignition.
3. Install Smoke and Carbon Monoxide Detectors
Ensure that your home is equipped with working smoke and carbon monoxide detectors. These devices can provide early warnings in case of any potential fire or gas leaks. Regularly test the alarms to ensure they are in proper working condition.
4. Use the Right Size of Wood
When using an electric burning on wood, make sure to use the appropriate size of wood. Using oversized logs can cause excessive heat that the unit may not be able to handle, leading to damage or malfunction. Always follow the manufacturer’s guidelines for the recommended wood size.
5. Monitor the Unit
Never leave the electric burning on wood unattended while it is in operation. Keep a close eye on the unit to monitor any signs of malfunction or overheating. If you notice any unusual smells, smoke, or sparks, immediately turn off the unit and contact a professional for assistance.
6. Keep Children and Pets at a Safe Distance
Ensure that children and pets are kept at a safe distance from the electric burning on wood. The unit can become hot during operation and pose a burn risk. Establish a boundary around the unit to prevent accidental contact.
7. Practice Proper Maintenance
Regular maintenance is essential to keep your electric burning on wood operating safely and efficiently. Clean out any accumulated debris or ash from the unit regularly. Check the power cord for any signs of damage and replace it if necessary. Follow the manufacturer’s instructions for routine maintenance tasks.
8. Have a Fire Extinguisher On Hand
It is always a good idea to have a fire extinguisher readily available in case of emergencies. Make sure it is easily accessible and everyone in the household knows how to use it. Regularly check the extinguisher’s pressure gauge to ensure it is in proper working condition.
9. Read the User Manual
Before using an electric burning on wood, carefully read and understand the user manual provided by the manufacturer. It will provide specific safety instructions and guidelines tailored to your particular unit. Following these instructions will help ensure safe and efficient operation.
By following these safety tips, you can enjoy the warmth and ambiance of electric burning on wood while keeping yourself and your household safe. Remember, safety should always be the top priority when using any heating appliance.
Finishing and Preserving Wood Projects using Electric Burning Techniques
Woodworking is a fine craft that allows individuals to showcase their creativity and create beautiful pieces of art. To ensure the longevity and enhance the aesthetic appeal of these wood projects, it is important to finish and preserve them properly. One popular technique that is gaining popularity among woodworkers is using electric burning tools to add decorative details and protect the wood.
1. Understanding Electric Burning Techniques
Electric burning, also known as pyrography, involves using a heated metal tip to create designs or burn patterns onto the wood surface. This technique allows woodworkers to personalize their projects and add intricate details that enhance the overall appeal.
The electric burning tools come in various shapes and sizes, with interchangeable tips that allow for different designs and effects. These tools typically feature adjustable temperature controls, allowing woodworkers to work on different types of wood without causing damage.
2. Preparing the Wood Surface
Before starting the electric burning process, it is essential to prepare the wood surface properly. Here are the steps to follow:
- Clean the wood: Remove any dirt, dust, or debris from the wood surface using a soft brush or cloth. This ensures a smooth and even burning process.
- Sand the wood: Use sandpaper to smoothen the surface and remove any rough spots or imperfections. This step ensures that the design will be applied evenly.
- Apply a finish: Choose a suitable wood finish to protect the wood and enhance its natural beauty. Apply the finish according to the manufacturer’s instructions and allow it to dry completely.
3. Practicing Safety Measures
When working with electric burning tools, it is essential to prioritize safety. Here are some safety measures to follow:
- Wear safety goggles and gloves to protect your eyes and hands from heat and flying debris.
- Work in a well-ventilated area to avoid inhaling fumes or smoke generated during the burning process.
- Avoid wearing loose clothing or accessories that can accidentally come into contact with the heated tip.
- Keep a fire extinguisher nearby as a precautionary measure.
4. Applying Electric Burning Techniques
Once the wood surface is prepared and safety measures are in place, it’s time to apply electric burning techniques to finish and preserve the wood project. Here are some tips:
- Start with a light touch: Begin with a low temperature setting and gradually increase it as needed. This allows for better control and prevents accidental burns.
- Practice on a scrap piece: Before working on the actual project, practice your designs and techniques on a scrap piece of wood. This helps you get familiar with the tool and its effects.
- Experiment with different tips: Electric burning tools often come with a variety of tips, such as fine point, shading, or calligraphy. Experiment with different tips to create a range of textures and effects.
- Take breaks: Burning wood can be a time-consuming process. Take regular breaks to prevent fatigue and maintain focus.
Remember, electric burning is a skill that requires practice and patience. With each project, you’ll become more adept at using the tool and achieving desired results.
5. Sealing and Protecting the Wood
Once the electric burning process is complete, it is crucial to seal and protect the wood to ensure its longevity. Here’s how:
- Allow the wood to cool: After burning, let the wood cool down completely before proceeding.
- Apply a sealant: Choose an appropriate sealant, such as varnish or lacquer, to protect the wood. Apply the sealant evenly using a brush or cloth, following the manufacturer’s instructions.
- Allow the sealant to dry: Once the sealant is applied, allow it to dry completely before handling the wood project.
Summary
Finishing and preserving wood projects using electric burning techniques can add a unique touch and protect the wood from damage. By understanding the techniques, properly preparing the wood surface, practicing safety measures, and sealing the finished project, woodworkers can create stunning pieces that will stand the test of time. Remember to experiment and have fun with electric burning, as it is a versatile skill that allows for endless creativity.
FAQs
How to electrically burn wood?
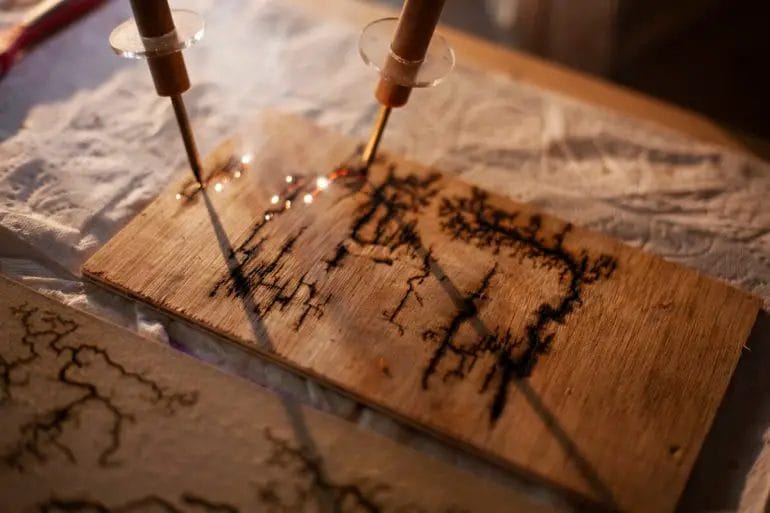
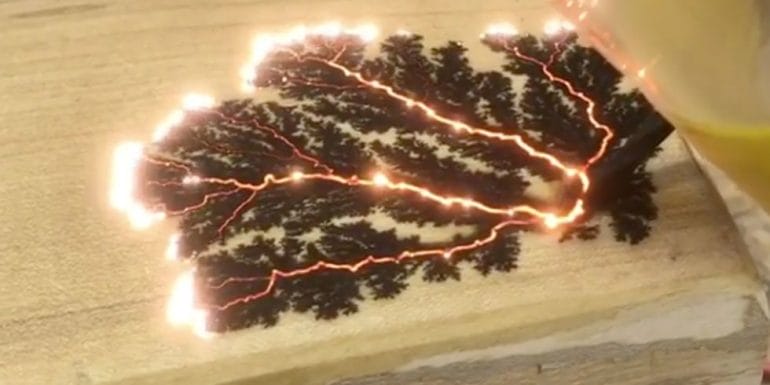
To electrically burn wood, you will need a high-voltage power source, such as an electric arc or electric discharge generator. The wood must be placed in close proximity to the power source, and a sufficient amount of electrical energy must be supplied to ignite and sustain the burning process.
Conclusion
In conclusion, learning how to electric burn wood can be a game-changer for DIY enthusiasts and woodworkers. With the right equipment and safety precautions, electric burners offer a clean and efficient way to create intricate designs, artwork, or even branding on wood surfaces. By using electricity to generate heat, you can achieve precise and controlled burns, resulting in stunning and unique patterns. Whether you’re a hobbyist or a professional, electric burning can add an extra level of creativity and personalization to your wood projects.
However, it’s essential to remember that safety should always be the top priority when working with electric burners. Always follow the manufacturer’s instructions, wear protective gear, and work in a well-ventilated area. Additionally, practice and experimentation are key to mastering this technique. So, don’t be afraid to explore different techniques, patterns, and designs to unleash your creativity and create beautiful, electrically burned wood masterpieces.