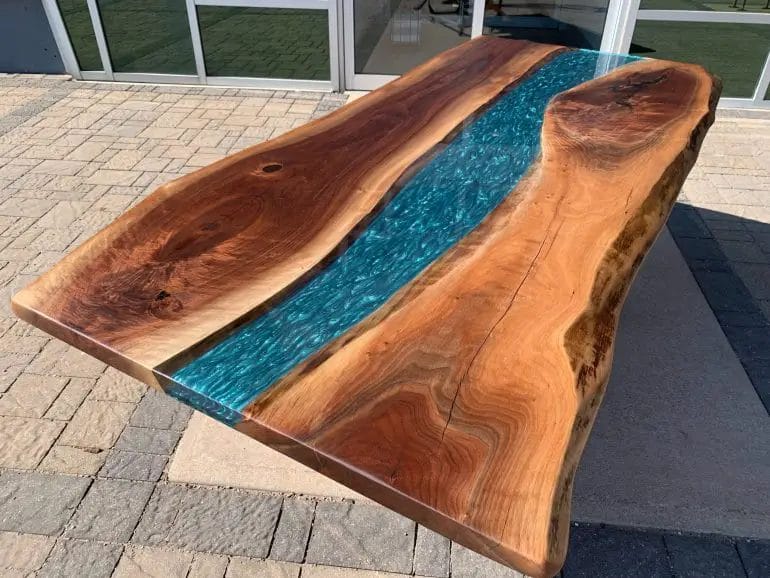
Epoxy is a popular choice for enhancing the beauty and durability of live edge wood with bark. By using epoxy, you can create a stunning, glossy finish that not only protects the wood but also highlights its unique natural features. Whether you’re a DIY enthusiast or a professional woodworker, epoxy can provide a seamless and long-lasting solution for preserving the bark and creating a captivating piece of art.
The process of epoxying live edge wood with bark requires careful preparation and attention to detail. First, you’ll need to clean and dry the wood surface, removing any loose bark or debris. Then, apply a sealant or epoxy primer to prevent any air bubbles from forming.

Next, mix the epoxy resin according to the manufacturer’s instructions, ensuring a thorough and consistent blend. Carefully pour the epoxy onto the wood surface, using a brush or roller to spread it evenly. Take your time to avoid any drips or uneven coverage.
Once the epoxy is applied, you can add additional elements, such as pigments, dyes, or even small objects like stones or shells, to create a unique and personalized design. Allow the epoxy to cure according to the recommended drying time, providing a stable and durable finish.
Finally, sand the epoxy surface to achieve a smooth and polished finish. Use progressively finer grit sandpaper to remove any imperfections or rough edges. Finish off with a coat of polyurethane or a similar protective

Preparing the Live Edge Wood and Bark for Epoxy Application
Live edge wood with its natural curves and unique grains has become a popular choice for furniture and decor. One way to enhance its beauty and durability is by applying epoxy resin. However, before you can start the epoxy application process, it is essential to prepare the live edge wood and bark properly. In this section, we will guide you through the necessary steps to ensure a successful epoxy application.
Step 1: Cleaning the Surface
The first step in preparing the live edge wood and bark is to thoroughly clean the surface. Use a soft brush and gently remove any loose dirt, debris, or loose bark. You can also use compressed air to blow away any remaining dust. Cleaning the surface will help the epoxy bond effectively and prevent any unwanted particles from getting trapped in the resin.
Step 2: Sanding the Wood
After cleaning, it’s time to sand the wood to create a smooth and even surface. Start with a coarse-grit sandpaper (around 80-100 grit) to remove any rough spots, blemishes, or uneven surfaces. Sand in the direction of the wood grain to prevent any scratches or tear-outs. Gradually switch to finer grit sandpapers (such as 120, 220, and 320) to achieve a polished finish. Make sure to sand the live edges and bark as well, as they play a crucial role in the final look of the epoxy project.
Step 3: Filling Cracks and Voids
Live edge wood often has natural cracks and voids that add character but can interfere with the epoxy application. Fill any large cracks and voids with an appropriate wood filler or epoxy resin. Make sure to follow the manufacturer’s instructions and allow the filler to dry completely before moving on to the next step. This step will help create a level and stable surface for the epoxy resin.
Step 4: Masking Off the Surrounding Area
Before applying epoxy, it is essential to protect the surrounding areas, such as the table legs or adjacent wood, from accidental spills or drips. Use painter’s tape or plastic sheets to mask off the areas you want to keep clean. Pay extra attention to any intricate details or joints where epoxy might seep through.
Step 5: Applying a Sealant
To prevent air bubbles from forming during the epoxy pour, it is crucial to apply a sealant to the wood surface. A sealant will fill the pores of the wood and act as a barrier, allowing the epoxy to flow smoothly. There are specific sealants designed for epoxy applications, so make sure to choose a compatible product. Apply the sealant using a brush or a foam roller, following the manufacturer’s instructions.
Step 6: Preparing the Bark
If your live edge wood piece includes bark, it is essential to prepare it for epoxy application as well. Start by gently removing any loose or flaky bark using a small chisel or scraper. Be careful not to damage the bark or the wood underneath. Once the loose bark is removed, sand the remaining bark lightly to create a smooth and clean surface for the epoxy.
Step 7: Final Cleaning and Dust Removal
Before starting the epoxy application process, give the prepared wood and bark a final cleaning. Use a tack cloth or a lint-free cloth to remove any dust, debris, or loose particles from the surface. This step will ensure a clean and clear base for the epoxy resin, resulting in a professional-looking finish.
By following these steps, you can effectively prepare the live edge wood and bark for epoxy application. Proper preparation is key to achieving a flawless and durable epoxy finish that showcases the natural beauty of the wood. Take your time, follow the instructions carefully, and enjoy the rewarding process of transforming your live edge wood into a stunning piece of art.
Applying Epoxy to the Live Edge Wood with Bark
One of the most popular trends in woodworking is incorporating live edge wood with bark in furniture and other decorative pieces. The natural beauty and unique characteristics of the bark add a rustic and organic touch to any project. However, working with live edge wood can be challenging, as it requires special techniques and materials to preserve and enhance its natural features.
To protect the bark and create a smooth and glossy finish, many woodworkers choose to use epoxy resin. Epoxy is a versatile and durable material that can be easily applied to the live edge wood, providing a protective layer and enhancing the overall appearance of the piece.
Step 1: Prepare the Wood
Before applying epoxy to the live edge wood, it is important to properly prepare the surface. Start by removing any loose bark or debris using a wire brush or sandpaper. This will ensure a clean and smooth surface for the epoxy to adhere to.
Next, inspect the wood for any cracks or voids that may need to be filled. Use a wood filler or epoxy putty to fill in any imperfections, and sand the surface until it is flush with the rest of the wood. This step will help to create a seamless and flawless finish.
Step 2: Seal the Bark
Bark is naturally porous, meaning it can absorb moisture and other substances. To prevent the epoxy from seeping into the bark and causing discoloration, it is important to seal the bark before applying the epoxy.
There are several ways to seal the bark, depending on personal preference and the specific project. Some woodworkers prefer to use a clear epoxy primer or a wood sealer, while others opt for a sanding sealer or a combination of shellac and denatured alcohol.
Apply the chosen sealer to the bark using a brush or a rag, making sure to cover the entire surface. Allow the sealer to dry completely before moving on to the next step.
Step 3: Mix and Apply the Epoxy
When working with epoxy resin, it is important to follow the manufacturer’s instructions for mixing and application. Epoxy typically consists of two components – resin and hardener – which need to be mixed in the correct proportions to ensure a proper cure.
Start by preparing a clean and dust-free workspace. Place the live edge wood on a level surface and make sure it is securely supported to prevent any movement during the epoxy application process.
Next, mix the epoxy resin and hardener according to the instructions. Stir the mixture thoroughly, ensuring that the components are well combined. For added visual appeal, you can add pigments or dyes to the epoxy to create a translucent or opaque finish.
Using a brush or a pouring technique, apply the epoxy to the live edge wood, making sure to cover the entire surface. Take care to avoid trapping air bubbles in the epoxy, as these can mar the final result. If air bubbles appear, you can use a heat gun or a torch to gently remove them.
Step 4: Curing and Finishing
After applying the epoxy, it is important to allow it to cure according to the manufacturer’s instructions. This typically involves leaving the piece in a well-ventilated area for a specific length of time.
Once the epoxy has cured, inspect the surface for any imperfections or rough spots. Use sandpaper or a sanding block to smooth out any irregularities, gradually moving from a coarse grit to a finer grit for a polished and smooth finish.
Finally, apply a topcoat or a finish of your choice to protect the epoxy and enhance its shine. This can be a polyurethane varnish, a lacquer, or a wax, depending on the desired outcome and the specific project.
Summary
Applying epoxy to live edge wood with bark is a meticulous process that requires careful preparation and attention to detail. By properly sealing the bark and applying the epoxy in a controlled manner, woodworkers can protect the natural beauty of the wood and create a stunning and durable finish. Whether used in furniture, countertops, or other decorative pieces, epoxy resin can enhance the visual appeal and longevity of live edge wood with bark, making it a popular choice among woodworking enthusiasts.
4. Sanding and Finishing the Epoxy Coated Live Edge Wood with Bark
Once the epoxy coating on your live edge wood with bark has fully cured, it’s time to sand and finish the surface to achieve a smooth and polished look. Sanding and finishing not only enhances the beauty of the wood but also provides protection against wear and tear.
4.1 Sanding the Surface
The first step is to sand the surface of the epoxy coated wood. Start by using a low-grit sandpaper, around 80 or 120, to remove any imperfections, unevenness, or drips in the epoxy. Gently sand the surface, following the wood grain, until it feels smooth to the touch.
Once you’ve achieved a smooth surface with the low-grit sandpaper, move on to a higher-grit sandpaper, such as 220 or 320. This will help to further refine the surface and remove any visible scratches left by the initial sanding. Again, sand with the grain and make sure to cover the entire surface uniformly.
After sanding with the higher-grit sandpaper, you can use an even higher-grit sandpaper, like 400 or 600, for a final sanding. This will create a very smooth surface, ready for the finishing process.
4.2 Finishing Options
When it comes to finishing the epoxy coated live edge wood with bark, you have several options depending on the desired look and level of protection. Here are a few popular finishing options:
4.2.1 Oil Finish
An oil finish is a popular choice for enhancing the natural beauty of the wood while providing a protective layer. You can use oils like tung oil, linseed oil, or Danish oil. Apply the oil liberally using a clean cloth, brush, or foam applicator. Allow the oil to penetrate the wood and wipe off any excess. Repeat this process until you achieve the desired level of sheen and protection.
4.2.2 Polyurethane Finish
A polyurethane finish is a durable and long-lasting option for epoxy coated wood surfaces. It provides a hard protective coat that can withstand heavy use. You can choose between water-based or oil-based polyurethane. Apply thin coats of polyurethane using a brush, foam applicator, or spray gun, following the manufacturer’s instructions. Allow each coat to dry completely before applying the next one.
4.2.3 Epoxy Resin Finish
If you want to achieve a glossy and glass-like finish, you can apply another layer of epoxy resin on top of the cured epoxy coating. This will give your wood a deep, lustrous finish. Make sure to follow the epoxy resin manufacturer’s instructions for mixing and applying the resin. Allow the resin to cure fully before handling or using the finished piece.
4.3 Sanding Between Coats
If you choose to apply multiple coats of your chosen finish, it’s important to sand between each coat to achieve a smooth and professional-looking result. Use a fine-grit sandpaper, such as 400 or 600, to lightly sand the surface after each coat has dried. This will remove any imperfections or dust particles that may have settled on the surface during the drying process. Wipe away the sanding dust with a clean cloth before applying the next coat.
4.4 Final Touches
Once you’ve completed the desired number of finish coats and allowed them to fully dry, give the surface a final sanding with a very fine-grit sandpaper, such as 800 or 1000. This will help to smooth out any remaining imperfections and give the wood a polished appearance. Wipe away any sanding dust, and your epoxy coated live edge wood with bark is ready to be admired and enjoyed.
In summary, sanding and finishing the epoxy coated live edge wood with bark is an important step in the woodworking process. By following the proper sanding techniques and choosing the right finish, you can create a stunning and durable piece that showcases the natural beauty of the wood while protecting it for years to come.
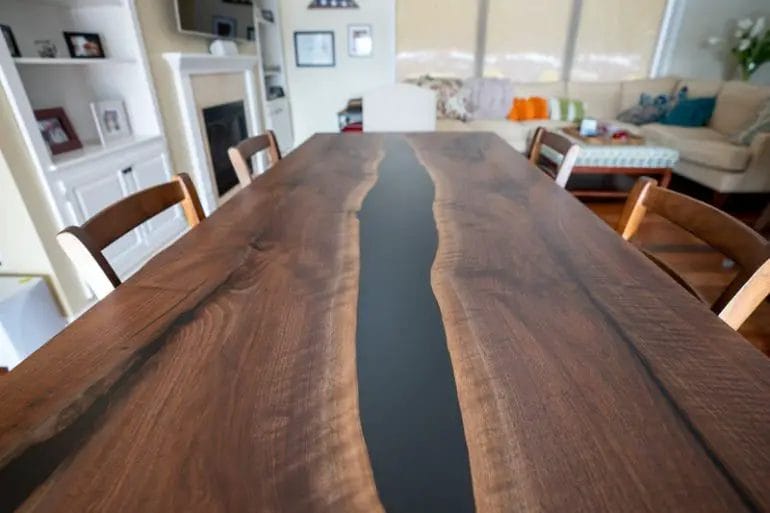
Maintaining and Caring for Epoxy Coated Live Edge Wood with Bark
Epoxy coated live edge wood with bark is a beautiful and unique addition to any home or office. The combination of natural wood grains, live edges, and preserved bark creates a stunning piece of furniture or decor. However, it is important to properly care for and maintain this type of wood to ensure its longevity and beauty. In this section, we will discuss some essential tips and techniques for maintaining and caring for epoxy coated live edge wood with bark.
1. Regular Cleaning
Regular cleaning is vital to keep your epoxy coated live edge wood with bark looking its best. Dust and dirt can accumulate on the surface, dulling its shine and potentially scratching the epoxy finish. To clean the wood, use a soft, lint-free cloth or a microfiber cloth to gently wipe away any dust or dirt. Avoid using abrasive cleaners or scrub brushes, as they can damage the epoxy coating or the bark.
2. Avoid Direct Sunlight
Direct sunlight can cause the epoxy coating to yellow or become discolored over time. To prevent this, it is essential to place your epoxy coated live edge wood away from direct sunlight or use window treatments to block out harmful UV rays. If it is not possible to avoid sunlight entirely, consider applying a UV protective coating to the epoxy to minimize damage.
3. Use Coasters and Trivets
When placing drinks or hot items on your epoxy coated live edge wood, always use coasters or trivets to protect the surface. The epoxy coating can be sensitive to heat and prolonged exposure to moisture. By using coasters and trivets, you can prevent unwanted damage such as rings or burns on the surface.
4. Avoid Sharp Objects
Avoid using sharp objects directly on the surface of your epoxy coated live edge wood. Sharp objects can scratch or chip the epoxy coating, compromising its integrity and appearance. Always use cutting boards or protective mats when working with sharp objects such as knives or tools on the wood surface.
5. Reapply Protective Coating
Over time, the protective coating on your epoxy coated live edge wood may wear off or become dull. To maintain its luster, you can periodically reapply a protective coating. Follow the manufacturer’s instructions for the specific coating you are using and ensure the wood is clean and dry before applying the new coat.
6. Address Stains and Spills Promptly
If any spills or stains occur on your epoxy coated live edge wood, it is crucial to address them promptly. Use a soft cloth and a mild cleaner specifically designed for epoxy surfaces to gently clean the affected area. Avoid using harsh chemicals or abrasive cleaners, as they can damage the epoxy or the wood.
7. Avoid Extreme Temperatures
Extreme temperatures can have a detrimental effect on your epoxy coated live edge wood. Avoid placing it near sources of direct heat, such as fireplaces or radiators, as the sudden temperature changes can cause the wood to warp or crack. Additionally, avoid exposing the wood to excessive cold temperatures, as this can also lead to damage.
8. Professional Refinishing
If your epoxy coated live edge wood with bark starts to show signs of wear or damage that cannot be easily repaired, it may be wise to seek professional refinishing services. Experts in wood restoration and refinishing can assess the condition of the wood, repair any damage, and reapply a fresh epoxy coating to restore its beauty.
Summary
Maintaining and caring for epoxy coated live edge wood with bark is essential to preserve its beauty and extend its lifespan. Regular cleaning, avoiding direct sunlight, using coasters and trivets, avoiding sharp objects, reapplying protective coating, addressing stains and spills promptly, avoiding extreme temperatures, and seeking professional refinishing when needed are all important steps to ensure the longevity and beauty of your epoxy coated live edge wood with bark.
FAQs
1. How do I epoxy live edge wood with bark?
To epoxy live-edge wood with bark, start by cleaning the wood and removing any loose bark. Then, seal the bark with a clear epoxy sealer. Mix the epoxy resin according to the manufacturer’s instructions and carefully pour it onto the wood surface, ensuring it fills any cracks or voids. Use a heat gun or torch to remove air bubbles and let the epoxy cure fully before sanding and finishing.
2. Can I epoxy over loose or peeling bark?
No, it is not recommended to epoxy over loose or peeling bark. The epoxy needs a stable surface to adhere to effectively. If the bark is loose or peeling, it is best to remove it before epoxying the wood. This will ensure a strong bond between the epoxy and the wood surface.
3. How thick should the epoxy layer be on live edge wood with bark?
The thickness of the epoxy layer on live edge wood with bark can vary depending on personal preference and the desired effect. However, it is generally recommended to apply a layer of epoxy that is at least 1/8 inch thick. This thickness helps provide sufficient protection to the wood and enhances the natural beauty of the live edge and bark.
Conclusion
In conclusion, epoxy is a fantastic and versatile option for preserving and enhancing the natural beauty of live edge wood with bark. Its ability to create a durable and glossy finish while maintaining the unique characteristics of the wood and bark is truly remarkable.
The process of epoxying live edge wood with bark requires careful preparation and application. It is important to properly clean and seal the wood before applying the epoxy resin, ensuring a strong bond and preventing any potential damage to the bark.
With the right techniques and materials, you can create stunning and functional pieces of furniture or decorative items using epoxy. Whether you are a DIY enthusiast or a professional woodworker, epoxying live edge wood with bark allows you to showcase nature’s artwork in a truly captivating way.
