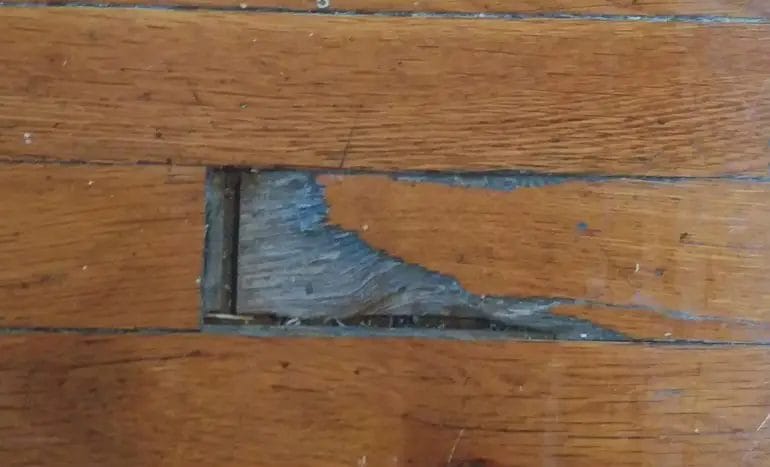
If you’re dealing with unsightly cracks in your wood floor, don’t worry – there are solutions to fix them. Cracks in wood floors can occur due to a variety of factors, such as natural expansion and contraction, moisture, or even normal wear and tear. Fortunately, repairing these cracks is a relatively straightforward process that can restore the beauty and functionality of your wood floor. In this guide, we’ll explore some effective methods to fill cracks in wood floors and restore their pristine appearance.
Before you begin the crack filling process, it’s important to assess the severity of the damage. Minor cracks can often be easily repaired with simple DIY techniques, while more extensive cracks may require professional intervention. By identifying the size and depth of the cracks, you’ll be able to determine the appropriate course of action for your wood floor.

One common method to fill cracks in wood floors is by using wood filler. Wood filler is a versatile product that can be easily applied to cracks, gaps, and imperfections in the wood. It’s available in various shades to match the color of your wood floor, ensuring a seamless and inconspicuous repair. Simply clean the crack, apply the filler, and smooth it out with a putty knife for a flawless finish.
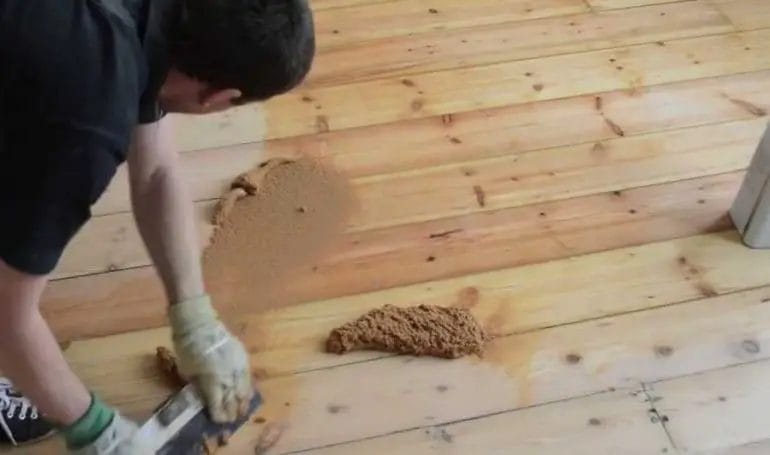
If you prefer a more natural approach, another option is to use a mixture of sawdust and wood glue to fill the cracks. This method involves collecting fine sawdust from the same
Tools and Materials Needed for Filling Cracks
When it comes to filling cracks in various surfaces, having the right tools and materials is essential for achieving a professional and long-lasting result. Whether you are dealing with cracks in walls, floors, or other surfaces, here are some of the key tools and materials you will need:
1. Putty Knife or Scraper
A putty knife or scraper is a versatile tool that is commonly used for filling cracks. It allows you to remove loose debris, old filler, or paint from the crack, creating a clean and smooth surface for the new filler.
2. Sandpaper or Sanding Block
To ensure proper adhesion of the filler, it is important to sand the area around the crack. Sandpaper or a sanding block can be used to roughen the surface and remove any rough edges. This will promote better bonding between the filler and the surface.
3. Filler Material
The type of filler material you choose will depend on the surface you are working on. For small cracks in walls or ceilings, a spackling compound or lightweight joint compound can be used. For larger cracks or cracks in concrete surfaces, you may need a specialized filler such as epoxy or concrete patch.
4. Caulk Gun
If you are dealing with cracks in areas such as windows, doors, or baseboards, a caulk gun will be needed to apply the filler. A caulk gun allows for precise and controlled application of the filler, ensuring that it fills the crack completely.
5. Paintbrush or Roller
If you plan on painting over the filled cracks, a paintbrush or roller will be necessary. This will help you apply a smooth and even coat of paint over the repaired area, blending it seamlessly with the surrounding surface.
6. Safety Equipment
When working with fillers and other materials, it is important to prioritize safety. Be sure to wear protective gloves, safety glasses, and a dust mask to protect yourself from any fumes, dust, or potential skin irritants.
7. Cleaning Supplies
Before filling the cracks, make sure to clean the area thoroughly. You will need a cleaning solution, such as soap and water or a mild detergent, along with a sponge or cloth to remove any dirt, dust, or grease that could affect the adhesion of the filler.
8. Drop Cloth or Plastic Sheeting
To protect the surrounding areas from any spills or drips, it is a good idea to lay down a drop cloth or plastic sheeting. This will make the cleanup process easier and prevent any accidental damage to nearby surfaces.
9. Putty or Spackle Knife
A putty or spackle knife is a smaller version of a putty knife and is used for applying and smoothing the filler in smaller cracks. It allows for more precise application and helps achieve a seamless finish.
10. Primer
After filling the cracks and allowing the filler to dry, applying a primer is recommended before painting. A primer helps to improve the adhesion of the paint and provides a more uniform finish.
By having these essential tools and materials on hand, you will be well-equipped to tackle any crack-filling project and achieve professional-looking results.
Step-by-step guide to fill small cracks in wood floor
If you have a wood floor, you may have encountered small cracks or gaps between the floorboards. These cracks can be unsightly and may even pose a tripping hazard. Fortunately, repairing these cracks is a relatively simple task that you can do on your own. In this guide, we will walk you through the step-by-step process of filling small cracks in a wood floor.
Materials you will need:
- Wood filler
- Putty knife
- Sanding block
- Vacuum or broom
- Damp cloth
- Stain or paint (optional)
Step 1: Prepare the crack
Start by cleaning the crack and the surrounding area. Use a vacuum or broom to remove any dirt or debris that may be lodged in the crack. Make sure the crack is free from dust and loose particles.
Step 2: Apply wood filler
Take your wood filler and scoop out a small amount onto your putty knife. Apply the wood filler directly into the crack, pressing it firmly to ensure it fills the entire gap. Use the putty knife to smooth out the filler and remove any excess.
Step 3: Let it dry
Allow the wood filler to dry according to the manufacturer’s instructions. This typically takes a few hours, but it’s best to check the label for the specific drying time. Avoid walking on the filled crack until it is completely dry.
Step 4: Sand the filled area
Once the wood filler is dry, use a sanding block to gently sand down the filled area. This will help level the filler with the surrounding wood and create a smooth finish. Be careful not to sand too aggressively, as you may damage the surrounding floor.
Step 5: Clean up
After sanding, use a damp cloth to wipe away any dust or residue from the filled crack. This will ensure a clean surface for any further treatment, such as staining or painting.
Step 6: Optional finishing touches
If desired, you can stain or paint the filled crack to match the rest of the wood floor. Choose a stain or paint color that closely matches the existing finish and apply it according to the manufacturer’s instructions. Allow the stain or paint to dry completely before using the floor.
Summary
Filling small cracks in a wood floor is a simple DIY task that can improve the appearance and safety of your floor. By following these step-by-step instructions, you can easily fill and repair the cracks, leaving your wood floor looking flawless. Remember to clean the crack, apply wood filler, let it dry, sand the filled area, clean up, and optionally finish with stain or paint. With a little effort, your wood floor will be as good as new!

How to Fill Larger Cracks in Wood Floor
If you have a wood floor, you may have noticed some cracks or gaps between the planks. While a few minor cracks can be normal due to changes in humidity, larger cracks may need to be filled to prevent further damage and improve the appearance of your floor. In this section, we will discuss the steps involved in filling larger cracks in a wood floor.
1. Assess the Damage
The first step is to assess the size and depth of the cracks in your wood floor. This will help determine the method and materials you will need to use for the repair. If the cracks are wider than 1/4 inch, you will need to follow a different approach compared to smaller cracks.
2. Clean the Cracks
Before filling the cracks, it’s important to clean them thoroughly. Use a vacuum cleaner or a small brush to remove any dirt, debris, or loose wood particles. This will ensure that the filler adheres well and provides a strong bond.
3. Choose a Suitable Filler
There are various types of fillers available for wood floor repairs, such as latex wood fillers, epoxy fillers, or wood putty. Consider the size of the cracks and the type of wood you have to choose the most suitable filler for your needs. Read the manufacturer’s instructions carefully before applying the filler.
4. Apply the Filler
Using a putty knife or a trowel, apply the filler to the cracks in the wood floor. Make sure to push the filler deep into the cracks to ensure a solid repair. Smooth out the filler with the tool, ensuring it is level with the surrounding floor surface. Remove any excess filler before it dries.
5. Let it Dry
Allow the filler to dry completely according to the manufacturer’s instructions. This may take a few hours or overnight, depending on the type of filler used. Avoid walking on the repaired area until the filler is fully cured to prevent any damage or premature wear.
6. Sand and Finish
Once the filler is dry, use sandpaper or a sanding block to smooth the repaired area. Start with a coarse grit sandpaper and gradually move to finer grits for a smooth finish. After sanding, clean the area to remove any dust and debris. Apply a matching finish or sealant to blend the repaired area with the rest of the floor.
7. Regular Maintenance
To prevent future cracking, it’s important to maintain proper humidity levels in your home. Fluctuations in moisture can cause the wood to expand and contract, leading to cracks. Use a humidifier or a dehumidifier to keep the humidity levels within the recommended range for your specific wood flooring.
In summary, filling larger cracks in a wood floor involves assessing the damage, cleaning the cracks, choosing a suitable filler, applying the filler, allowing it to dry, sanding and finishing, and maintaining proper humidity levels. By following these steps, you can restore the appearance and integrity of your wood floor.
Tips for Preventing Cracks in Wood Floors
Wood floors add warmth and elegance to any space, but they can be prone to cracks if not properly cared for. Cracks in wood floors not only affect the aesthetics of your home but can also lead to further damage if left untreated. To help you maintain the beauty and integrity of your wood floors, here are some valuable tips for preventing cracks:
1. Maintain Proper Humidity Levels
Wood floors are sensitive to changes in humidity, as they can cause the wood to expand or contract, leading to cracks. To prevent this, it’s essential to maintain proper humidity levels in your home. Use a humidifier during dry seasons to add moisture to the air and avoid a dry environment that can cause the wood to shrink. Alternatively, use a dehumidifier in humid climates to remove excess moisture and prevent the wood from swelling and warping.
2. Avoid Excessive Direct Sunlight
Direct sunlight can discolor and damage wood floors over time. The UV rays from the sun can cause the wood to fade and become brittle, leading to cracks. To prevent this, consider using curtains, blinds, or UV-filtering window films to block the harsh rays of the sun from directly hitting your floors. Additionally, moving furniture and rugs periodically can help distribute the sunlight’s impact and prevent uneven fading and potential cracks.
3. Use Protective Furniture Pads
Heavy furniture can leave indentations on wood floors, which can gradually develop into cracks. To prevent this, use protective furniture pads or felt pads under the legs of chairs, tables, and other heavy items. These pads provide a cushion and reduce the pressure on the wood, minimizing the risk of cracks and scratches. Make sure to regularly check and replace the pads if they become worn or damaged.
4. Clean Regularly and Gently
Maintaining a clean wood floor is essential to prevent dirt and debris from causing scratches or cracks. However, it’s crucial to clean your floors using gentle methods to avoid any potential damage. Avoid using harsh chemicals or abrasive cleaners that can strip away the protective finish of the wood. Instead, use a soft broom or vacuum with a brush attachment to remove dust and dirt. For deeper cleaning, use a damp mop with a mild solution of water and a wood floor cleaner recommended by the manufacturer.
5. Control Moisture and Spills
Excess moisture and spills can seep into the wood, causing it to swell and potentially crack. To prevent this, promptly wipe up any spills or moisture on your wood floors and ensure they remain dry. Avoid using excessive amounts of water when mopping and make sure to dry the floor thoroughly afterward. Additionally, place mats or rugs in high-traffic areas and near entryways to trap dirt and moisture, preventing it from reaching your wood floors.
6. Regularly Inspect and Maintain
Regular inspections and maintenance are crucial to identify and address any potential issues before they worsen. Check your wood floors periodically for signs of cracks, gaps, or other damage. If you notice any issues, consult a professional wood floor contractor who can assess the situation and recommend the appropriate repairs or treatments. It’s also important to follow the manufacturer’s guidelines for maintenance, such as refinishing or resealing the floors periodically.
By following these tips, you can significantly reduce the risk of cracks in your wood floors and keep them looking beautiful for years to come. Remember, prevention is key when it comes to maintaining the integrity of your wood floors.
FAQs
How can I fill cracks in a wood floor?
To fill cracks in a wood floor, start by cleaning the cracks and removing any debris. Next, use a wood filler to fill the cracks, making sure to press it firmly into the gaps. Allow the filler to dry completely, then sand it down until it is smooth and level with the rest of the floor. Finally, finish off by applying a coat of stain or varnish to match the rest of the floor.
Conclusion
To fill cracks in a wood floor, follow these simple steps to restore its beauty and functionality. First, clean the cracks thoroughly, removing any dirt or debris. Next, apply wood filler or epoxy resin into the cracks, ensuring it fills the entire space. Use a putty knife to level the filler and remove any excess. Allow the filler to dry completely before sanding and refinishing the floor. By addressing cracks promptly, you can prevent further damage and maintain the integrity of your wood floor. Remember, regular maintenance and proper care will help extend the lifespan of your wood flooring.