Looking to add a personalized touch to your wall? Hanging wooden letters is a stylish and creative way to decorate your space. Whether it’s a monogram, a word, or an inspirational quote, wooden letters can instantly elevate the look of any room. In this guide, we will share simple and effective methods to securely hang wooden letters on your wall.
First, gather the necessary tools: wooden letters, a measuring tape, a pencil, adhesive strips or hooks, a level, and a hammer. Start by measuring the wall space where you want to hang the letters and determine the spacing between each letter.
Next, mark the desired placement of each letter on the wall using a pencil. Use a level to ensure the letters are aligned correctly. If you prefer a more temporary option, adhesive strips can be used for lightweight letters, while hooks are recommended for heavier ones.
Apply the adhesive strip or hook to the back of each wooden letter, following the manufacturer’s instructions. Press firmly to ensure a secure attachment. If using hooks, hang each letter individually and adjust their positions as needed.
Once all the letters are securely attached, step back and admire your newly decorated wall. Wooden letters add a charming and personalized touch to any space, making it truly yours. Remember to periodically check the letters to ensure their stability and to make any necessary adjustments.
Now that you know how to hang wooden letters on your wall

Choosing the Right Hanging Method for Wooden Letters
When it comes to decorating your home or office with wooden letters, one of the most important decisions you have to make is how to hang them. The hanging method you choose can greatly affect the overall look and stability of your wooden letters. In this section, we will discuss some popular hanging methods for wooden letters and help you decide which one is best for your needs.
Screw-In Hooks
Screw-in hooks are a popular choice for hanging wooden letters because they provide a secure and stable hanging option. These hooks are typically screwed into the back of the wooden letters and can be easily adjusted to ensure proper alignment. Screw-in hooks are especially useful for larger and heavier wooden letters that require extra support. However, keep in mind that screwing hooks into your wooden letters may leave visible holes on the surface.
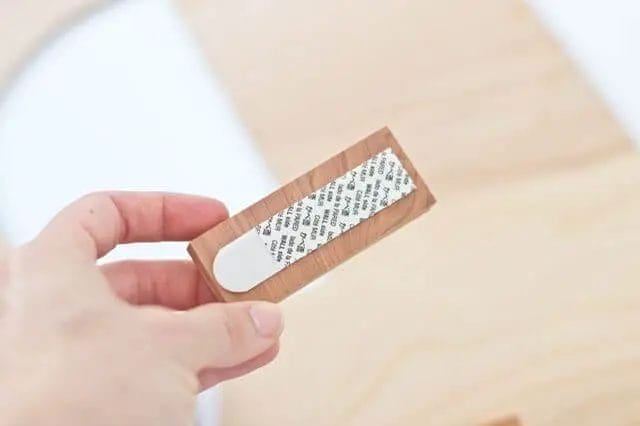
Command Strips
If you prefer a less intrusive hanging method, you may consider using command strips. These adhesive strips are available in various sizes and can hold a significant amount of weight. To hang wooden letters with command strips, simply attach the strips to the back of the letters and press firmly against the wall. Command strips are a great option for those who don’t want to drill or nail into their walls, as they can be easily removed without causing any damage. However, it’s important to note that command strips may not be suitable for hanging larger or heavier wooden letters.
Hanging Wire
Another popular hanging method for wooden letters is using hanging wire. This method is commonly used for letters that have two or more attachment points on the back. To hang wooden letters with wire, simply attach the wire to the attachment points and secure it tightly. You can then hang the letters by attaching the wire to hooks or nails on the wall. Hanging wire provides a sleek and seamless look, as it remains hidden behind the letters. However, it may require some additional tools and skills to properly attach the wire to the wooden letters.
Adhesive Hooks
If you’re looking for a quick and easy hanging method, adhesive hooks can be a suitable option for your wooden letters. These hooks come with a strong adhesive backing that allows you to simply stick them onto the wall. Adhesive hooks are available in various sizes and can hold a moderate amount of weight. They are especially useful for lightweight wooden letters or those with smaller dimensions. However, keep in mind that adhesive hooks may not be as secure as other hanging methods, and they may not be suitable for heavy wooden letters.
Summary
Choosing the right hanging method for your wooden letters is crucial to ensure their stability and aesthetic appeal. Screw-in hooks provide a secure option for larger and heavier letters but may leave visible holes. Command strips offer a non-intrusive option that can be easily removed without damaging the walls. Hanging wire provides a seamless look but requires additional tools and skills. Adhesive hooks are a quick and easy option for lightweight letters but may not be as secure. Consider the weight and size of your wooden letters when choosing the hanging method, and always follow the manufacturer’s instructions for proper installation.
Step-by-step Guide to Hanging Wooden Letters on Wall
If you want to add a touch of personalization to your home decor, hanging wooden letters on the wall is a great idea. Whether it’s your initials, a word, or a meaningful quote, wooden letters can bring a unique and stylish element to any room. In this guide, we will walk you through the step-by-step process of hanging wooden letters on the wall.
Materials You’ll Need:
- Wooden letters
- Measuring tape
- Pencil
- Level
- Command strips or adhesive hooks
- Hammer and nails (optional)
Step 1: Choose the Placement
Decide where you want to hang the wooden letters on the wall. Consider the overall design and layout of the room. Whether it’s above a bed, on a gallery wall, or as a focal point, choose a location that complements the space.
Step 2: Measure and Mark
Using a measuring tape, measure the height and width of the area where the letters will be placed. Use a pencil to mark the center point of the space. This will help ensure that your letters are properly aligned.
Step 3: Arrange the Letters
Lay out the wooden letters in the desired order on a flat surface. This will give you an idea of how the final arrangement will look.
Step 4: Attach Command Strips or Adhesive Hooks
If you prefer a damage-free solution, use command strips or adhesive hooks to attach the wooden letters to the wall. Follow the instructions on the packaging to ensure proper adhesion.
Step 5: Hang the Letters
Place the first letter on the wall, using the center mark as a guide. If you’re hanging multiple letters, start with the middle letter and work your way out. Make sure the letters are level by using a level tool.
Step 6: Secure with Nails (Optional)
If you want a more permanent solution, you can secure the wooden letters to the wall with nails. Use a hammer to gently nail through the back of the letters into the wall. Make sure to use appropriate nails based on the weight and thickness of the letters.
Step 7: Step Back and Enjoy
Once all the letters are securely hung on the wall, step back and admire your handiwork. Take a moment to make any necessary adjustments to ensure everything is aligned properly. Now you can enjoy your personalized wooden letters as a beautiful addition to your home decor.
Remember, the placement and arrangement of your wooden letters are completely up to you. Feel free to get creative and experiment with different fonts, sizes, and colors to create a truly customized look. With this step-by-step guide, you’ll be able to hang wooden letters on your wall with ease.
Tips for Properly Aligning Wooden Letters on Wall
Adding wooden letters to your wall can be a charming and personalized way to spruce up your home decor. Whether you want to display a monogram, a name, or a meaningful quote, properly aligning the wooden letters is crucial to achieve a polished and professional look. Here are some helpful tips to ensure that your wooden letters are perfectly aligned on your wall:
1. Plan Your Layout
Before you start hanging your wooden letters, it’s important to plan your layout. Measure the space where you want to place the letters and determine the desired spacing between each letter. You can use a measuring tape and pencil to mark the positions on the wall. This will help you visualize the final arrangement and ensure accuracy.
2. Use a Level
Using a level is essential to ensure that your wooden letters are straight and aligned correctly. Place the level on top of each letter as you hang it and adjust as necessary. This will help you avoid crooked or unevenly spaced letters.
3. Double-Sided Mounting Tape
Consider using double-sided mounting tape to attach the wooden letters to the wall. This adhesive tape provides a strong bond and is easy to work with. Apply the tape to the back of each letter, following the manufacturer’s instructions, and press firmly onto the wall. This method eliminates the need for nails and allows for easy repositioning if needed.
4. Templates or Stencils
If you’re unsure about positioning the letters manually, you can create templates or stencils to guide you. Trace the outline of each letter onto a piece of cardboard or paper, and cut it out. Use these templates to mark the positions on the wall before attaching the actual wooden letters. This technique helps ensure precise alignment.
5. Take Your Time
Properly aligning wooden letters on a wall requires patience and attention to detail. Take your time during the installation process to make adjustments and ensure everything looks just right. Rushing can lead to mistakes and uneven placement.
6. Step Back and Evaluate
After hanging each letter, step back and evaluate the overall arrangement. Check for any inconsistencies in alignment or spacing. Make any necessary adjustments before moving on to the next letter. Taking a moment to assess the progress will help you achieve a visually appealing display.
7. Consider a Word or Phrase Level
If you are arranging multiple letters to spell out a word or phrase, consider aligning them at the top or bottom edge to create a level appearance. This technique gives a polished and cohesive look to your wall display.
8. Experiment with Different Layouts
Don’t be afraid to experiment with different layouts before committing to a final arrangement. You can use painter’s tape to temporarily attach the wooden letters to the wall and rearrange them until you find the perfect configuration. This allows you to visualize different options without making permanent marks on the wall.
9. Seek Assistance if Needed
If you find it challenging to align the wooden letters on your own, don’t hesitate to seek assistance. Asking a friend or family member for a second opinion or an extra pair of hands can make the process easier and more accurate.
10. Enjoy Your Finished Display
Once you have successfully aligned and hung your wooden letters, step back and admire your finished display. Take pride in your work and enjoy the personalized touch it adds to your home decor.
By following these tips, you can ensure that your wooden letters are properly aligned on the wall, creating a visually appealing and professional-looking display. Whether it’s a monogram, a name, or a motivational quote, your wooden letters will add a touch of charm and uniqueness to your living space.
Creative Ideas for Arranging Wooden Letters on Wall
Wooden letters provide a beautiful and versatile way to personalize your space and add a touch of creativity to your walls. Whether you want to display initials, spell out a meaningful word, or create a unique design, arranging wooden letters on your wall can be a fun and engaging DIY project. Here are some creative ideas to inspire you:
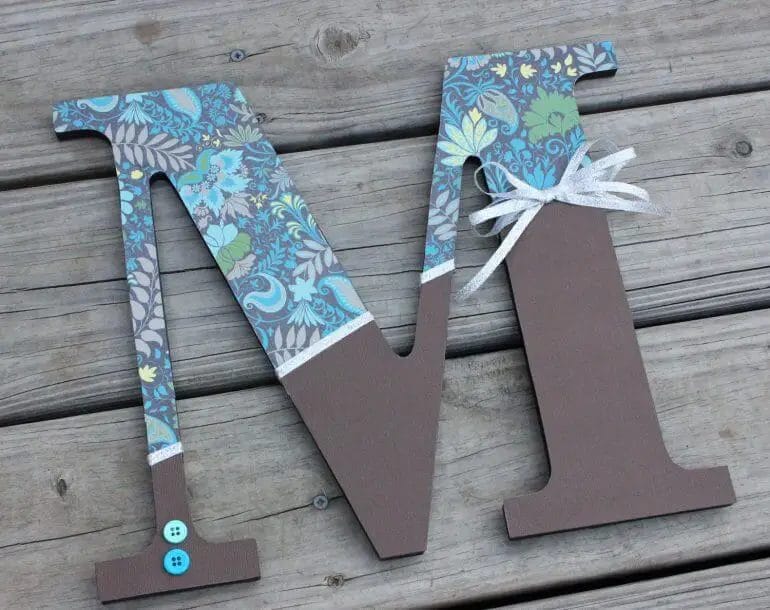
1. Monogram Wall Art
A monogram is a classic and elegant way to showcase your initials or those of your family members. Arrange wooden letters in a stylish font, such as cursive or block letters, and mount them on a decorative board or directly on the wall. You can also add embellishments like flowers or small frames around the letters to make the monogram truly stand out.
2. Inspirational Quotes
Add a dose of positivity and inspiration to your space by arranging wooden letters to spell out your favorite quotes or motivational words. Choose a font that matches the mood, and arrange the letters in a straight line, staggered formation, or even in a circular pattern. This creates a unique focal point and can serve as a daily reminder of your goals and aspirations.
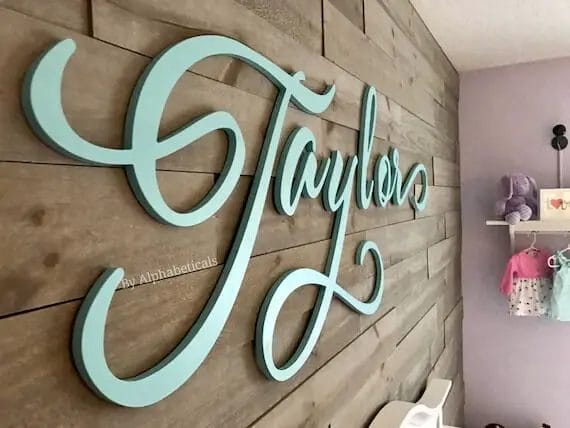
3. Name Wall Art
Personalize a child’s room or nursery by arranging wooden letters to spell out their name. Use colorful letters, different fonts, or even paint each letter a different shade for a playful and eye-catching display. You can arrange the letters vertically, horizontally, or even diagonally for added visual interest.
4. Word Collage
Create a visually striking word collage by arranging wooden letters to spell out different words or phrases that hold significance to you. This could include family names, important dates, or words that represent your interests or values. Experiment with different layouts and arrangements to find a design that speaks to you.
5. Geometric Patterns
If you prefer a more modern and abstract look, consider arranging wooden letters in geometric patterns. Create a chevron design, a honeycomb pattern, or even a large-scale geometric shape using the letters. This adds a unique and contemporary touch to your wall while showcasing your creativity.
6. Themed Displays
For specific occasions or holidays, you can arrange wooden letters to create themed displays. Spell out “BOO” for Halloween, “LOVE” for Valentine’s Day, or “JOY” for Christmas. You can also incorporate other decorative elements like ribbons, twinkle lights, or seasonal foliage to enhance the theme.
7. Three-Dimensional Art
For a more dynamic and artistic display, consider arranging wooden letters in a three-dimensional format. Stack the letters on top of each other, angle them, or attach them to a wire structure to create depth and dimension. This adds a sculptural element to your wall and makes the letters truly stand out.
Remember to consider the size and scale of your wall when arranging wooden letters. You want to ensure that the letters are visible and don’t overpower the space. Experiment with different arrangements, layouts, and color combinations until you find the perfect arrangement that reflects your personal style and adds a touch of creativity to your walls.
Frequently Asked Questions (FAQs)
Q: How do I hang wooden letters on a wall?
To hang wooden letters on a wall, you can use adhesive hooks, nails, or screws. Clean the wall surface, decide on the letter placement, and mark the position on the wall. If using adhesive hooks, follow the instructions on the package. For nails or screws, align the letter and gently hammer the nail or screw into the marked spot. Hang the letter on the nail or screw securely.
Q: Can I hang wooden letters without damaging the wall?
Yes, you can hang wooden letters without damaging the wall by using adhesive hooks specifically designed for hanging lightweight objects. Make sure to follow the instructions on the package and clean the wall before applying the hooks. When you no longer need the letters, gently remove the adhesive hooks without pulling them forcefully to minimize wall damage.
Q: How can I ensure the wooden letters are level when hanging them?
To ensure your wooden letters are level when hanging them, use a spirit level or a laser level. Place the level on top of the letter and adjust its position until the bubble is centered between the marks. Alternatively, you can use a measuring tape and mark equal distances from the ceiling or adjacent walls to ensure the letters are evenly spaced and level.
Conclusion
In conclusion, hanging wooden letters on a wall can be a creative and stylish way to add a personal touch to any space. By following a few simple steps, you can easily showcase your favorite words or initials. Start by selecting the right materials, such as sturdy wooden letters and appropriate hanging hardware. Consider the placement and layout of the letters to achieve the desired aesthetic. Use a level and measuring tape to ensure proper alignment. Finally, carefully attach the letters to the wall using screws, hooks, or adhesive. With these tips in mind, you can confidently hang wooden letters and transform your wall into a personalized statement piece.
