Making a wooden cross is a simple and meaningful DIY project that can be done by anyone with basic woodworking skills.
Whether you want to create a rustic wooden cross for decorative purposes or for religious symbolism, this step-by-step guide will help you create a beautiful cross with wood.
You will need a few essential tools and materials, such as a saw, sandpaper, wood glue, and a sturdy piece of wood.
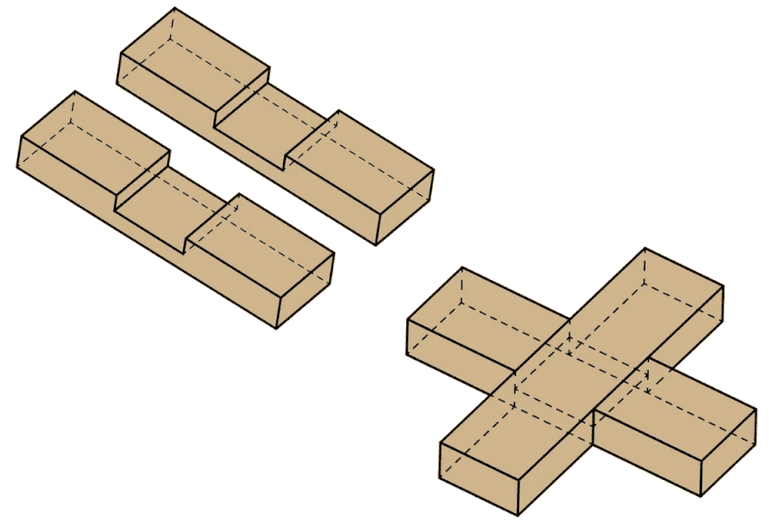
Start by measuring and cutting the wood to the desired size for the cross. Then, sand down the edges to achieve a smooth finish.
Next, carefully join the pieces together using wood glue, ensuring they are aligned correctly. Allow the glue to dry completely.
Once the glue is dry, you can add any additional decorative elements, such as carving designs or applying a wood stain or varnish to enhance the natural beauty of the wood.
Finally, hang your wooden cross on a wall, display it on a shelf, or use it as a centerpiece for a religious ceremony or memorial.
Creating a wooden cross with your own hands is not only a satisfying woodworking project but also a meaningful and personal way to embrace and display your faith or artistic expression.

Choosing the Right Type of Wood for Your Cross
When it comes to creating a cross, selecting the right type of wood is essential. The choice of wood not only affects the overall appearance and durability of the cross but also plays a significant role in the symbolism and meaning behind the finished piece. Here are some factors to consider when choosing the right type of wood for your cross:
1. Durability
Since a cross is often displayed as a religious symbol or used for decorative purposes, it’s important to choose a wood that is durable and long-lasting. Some of the best choices for durability include:
- Oak: Known for its strength and resistance to wear, oak is a popular choice for crosses. It has a beautiful grain pattern and can be easily stained or finished.
- Walnut: Walnut is a hardwood with a rich, dark color and excellent durability. It is often used for high-quality furniture and is a great choice for a cross that will be prominently displayed.
- Maple: Maple wood is known for its strength and durability. It has a light color with a subtle grain pattern, making it a versatile choice for different cross designs.
2. Appearance
The appearance of the wood contributes to the overall aesthetic of the cross. Different types of wood have unique grain patterns, colors, and textures. Consider the following options:
- Mahogany: Mahogany is a luxurious and elegant wood with a beautiful reddish-brown color and distinctive grain pattern. It adds a touch of sophistication to any cross design.
- Cherry: Cherry wood has a warm reddish hue that darkens as it ages, giving the cross a timeless appeal. It has a fine, straight grain that adds character to the piece.
- Pine: Pine is a lighter wood with a straight grain and a pale yellow color. It is a popular choice for a more rustic or natural look.
3. Symbolism
Depending on the intended purpose of your cross, you may want to choose a wood type that carries symbolic meaning. Different woods have been associated with various qualities and symbols throughout history. Here are a few examples:
- Cedar: Cedar wood is often associated with strength, protection, and healing. It is a popular choice for crosses used in religious ceremonies or as a symbol of faith.
- Olive: Olive wood is deeply rooted in religious symbolism, representing peace, spirituality, and the connection to the divine. It is commonly used for crosses that hold religious significance.
- Cypress: Cypress wood is known for its durability and resistance to decay, making it a symbol of eternal life. It is often used for crosses in cemeteries or memorial sites.
When choosing the right type of wood for your cross, it’s important to consider the durability, appearance, and symbolism associated with different wood species. Whether you’re creating a cross for religious purposes or as a decorative piece, selecting the right wood will ensure a beautiful and meaningful finished product.

Step-by-Step Guide to Carving a Wooden Cross
Carving a wooden cross can be a rewarding and fulfilling project for woodworkers of all skill levels. Whether you want to create a decorative piece for your home or a meaningful gift for someone special, this step-by-step guide will walk you through the process of carving a beautiful wooden cross.
Materials and Tools
Before you begin, gather the following materials and tools:
- Wood block (preferably hardwood like oak or walnut)
- Pencil
- Ruler or measuring tape
- Carving knife or chisel set
- Sandpaper (various grits)
- Wood finish (optional)
- Protective gloves and safety goggles
Step 1: Designing the Cross
Start by sketching your desired cross design on the wood block using a pencil. You can choose a traditional cross shape or get creative with intricate patterns and details. Use a ruler or measuring tape to ensure accurate proportions and symmetry.
Step 2: Carving the Outline
Using a carving knife or chisel, carefully carve along the pencil lines to create the outline of the cross. Take your time and make small, controlled cuts to avoid any mistakes or accidents. Remember to wear protective gloves and safety goggles for your safety.
Step 3: Adding Depth and Details
Once the outline is carved, begin adding depth and details to your wooden cross. Use your carving knife or chisel to remove small sections of wood and create texture and dimension. You can carve intricate patterns, symbols, or religious motifs to personalize your cross.
Step 4: Refining and Smoothing
After adding the desired details, use sandpaper of various grits to refine and smooth the surface of your wooden cross. Start with a coarse grit to remove any rough edges or imperfections, then gradually move to finer grits for a smoother finish. This step will give your cross a polished and professional look.
Step 5: Finishing Touches
If desired, you can apply a wood finish to enhance the natural beauty of the wood and protect it from wear and tear. Choose a finish that suits your preference, such as varnish, oil, or wax. Follow the manufacturer’s instructions for application and drying times.
Step 6: Display or Gift
Once your wooden cross is fully carved and finished, decide how you want to display or gift it. You can mount it on a wall, place it on a tabletop, or attach a string or ribbon to hang it as a pendant or ornament. Your finished cross will serve as a beautiful symbol of faith, craftsmanship, and devotion.
In summary, carving a wooden cross is a detailed and artistic process that requires patience, precision, and creativity. By following these step-by-step instructions and using the right tools and materials, you can create a stunning wooden cross that is truly one-of-a-kind. Whether you are a beginner or an experienced woodworker, this project is a great way to hone your carving skills and create a meaningful piece of art.
Finishing and Polishing Techniques for a Beautiful Wooden Cross
Wooden crosses are not only symbols of faith and spirituality but also beautiful pieces of art. Whether you are making a wooden cross for personal use or as a gift, the finishing and polishing techniques play a vital role in enhancing its beauty and longevity. In this section, we will explore some techniques that can help you achieve a stunning finish for your wooden cross.1. Sanding
Sanding is the first step in preparing the wooden cross for a smooth and even finish. Start with a coarse-grit sandpaper (around 80-100 grit) to remove any roughness or imperfections on the surface. Make sure to sand with the grain of the wood to avoid scratching. Gradually move to finer grit sandpapers (such as 120, 180, and 220 grit) to achieve a smoother surface.2. Staining
Staining is an excellent way to enhance the natural beauty of the wood and add depth to the cross. Before applying the stain, ensure that the wood is clean and free from any dust or debris. Use a brush or sponge to apply the stain evenly, following the instructions on the product. Allow the stain to penetrate the wood for the recommended time and wipe off any excess stain with a clean cloth. Consider using a gel stain for better control and consistency.3. Sealing
Sealing the wooden cross is essential to protect it from moisture, UV rays, and everyday wear and tear. There are several options for sealing, such as varnish, polyurethane, shellac, or lacquer. Each has its own application method and drying time, so be sure to read the instructions carefully. Apply multiple coats of the sealer, sanding lightly between each coat for a smoother finish.4. Polishing
Polishing adds a final touch of shine and luster to your wooden cross. After the sealer has dried, you can use a polishing compound or paste wax to achieve a glossy finish. Apply the polish using a soft cloth or applicator pad, following the manufacturer’s instructions. Gently buff the surface in circular motions until you achieve the desired shine.5. Buffing
Buffing the wooden cross can further enhance its beauty and smoothness. You can use a buffing wheel attached to a drill or a handheld buffing pad for smaller projects. Apply a small amount of buffing compound to the wheel or pad and move it across the surface of the cross in a back-and-forth motion. Buff until you achieve a high-gloss finish.6. Finishing Touches
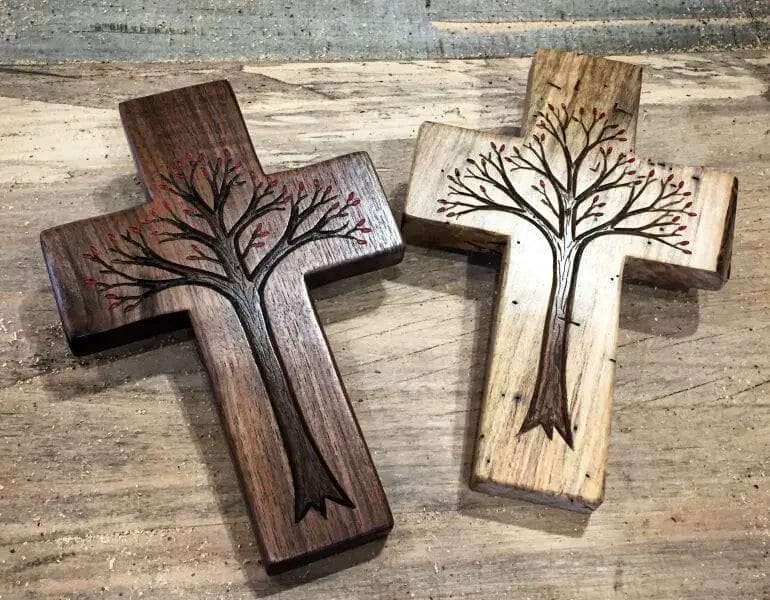
To add additional decorative elements to your wooden cross, consider using techniques such as wood burning, carving, or inlay work. These techniques can create intricate designs or patterns that make your cross truly unique. Remember to seal and polish these additional elements to ensure they blend seamlessly with the overall finish of the cross. In summary, finishing and polishing techniques are crucial for creating a beautiful wooden cross. By using proper sanding, staining, sealing, polishing, buffing, and adding finishing touches, you can achieve a stunning and long-lasting finish. Whether you intend to display the wooden cross in your home or gift it to someone special, these techniques will help elevate its beauty and craftsmanship.Creative Ideas for Decorating and Personalizing Your Wooden Cross
Wooden crosses are not only religious symbols but also beautiful pieces of art that can be personalized and decorated to reflect your style and beliefs. Whether you want to create a unique gift for a loved one or enhance the aesthetic appeal of your home, there are countless creative ideas to explore. In this section, we will delve into some inspiring ways to decorate and personalize your wooden cross.
1. Paint and Stain
One of the simplest yet impactful ways to personalize your wooden cross is by painting or staining it. The choice of colors and finishes can completely transform the look and feel of the cross. For a rustic and natural look, consider using wood stains to enhance the grain and add depth. If you prefer a more vibrant and eye-catching design, opt for acrylic paints in various colors. You can even experiment with different painting techniques, such as stenciling or creating a ombré effect.
2. Embellishments and Accessories
Adding embellishments and accessories can elevate the visual appeal of your wooden cross. Consider attaching decorative elements like beads, rhinestones, shells, or even small metal charms. These can be glued or carefully hammered into the wood. Additionally, you can attach ribbons, bows, or fabric flowers to create a more whimsical and feminine look. The possibilities are endless, and you can let your creativity run wild with this idea.
3. Wood Burning
If you have a steady hand and enjoy intricate designs, wood burning can be a fantastic way to personalize your wooden cross. This technique involves using a heated tool to etch designs into the surface of the wood. You can create intricate patterns, religious symbols, or even personalize the cross with names or meaningful quotes. Be sure to practice on a spare piece of wood before attempting it on your actual cross to ensure precision.
4. Decoupage
Decoupage is a versatile technique that involves adhering paper or fabric onto a surface using a special glue or sealant. It allows you to incorporate various patterns, images, or even meaningful texts onto your wooden cross. You can use patterned scrapbook paper, tissue paper, or even fabric to create a unique and personalized design. Once the decoupage is dry, you can seal it with a clear varnish or sealant for added durability.
5. Mosaic
Creating a mosaic design on your wooden cross can result in a stunning and intricate piece of art. This technique involves arranging small pieces of colored glass, ceramic tiles, or even broken china onto the surface of the cross. You can create vibrant patterns or even use the mosaic to depict meaningful religious symbols. To adhere the pieces, use a strong adhesive specifically designed for mosaic projects. Once the mosaic is complete, apply a grout to fill in the gaps and seal it.
In summary, decorating and personalizing your wooden cross allows you to showcase your creativity and add a unique touch to this religious symbol. Whether you choose to paint, stain, add embellishments, wood burn, decoupage, or create a mosaic, these ideas offer endless possibilities for customization. Let your imagination guide you and create a wooden cross that truly reflects your style and beliefs.
FAQs
1. How do I make a cross with wood?
To make a wooden cross, start by cutting two pieces of wood to the desired length for the vertical and horizontal arms of the cross. Then, sand the edges and surfaces of the wood to smooth them. Next, arrange the pieces in a cross shape and secure them together with wood glue or screws. Finally, finish the wooden cross with paint, stain, or varnish for a polished look.
2. What tools will I need to make a wooden cross?
To make a wooden cross, you’ll need a few basic tools like a saw to cut the wood, sandpaper to smooth the surfaces, a drill or screwdriver to secure the pieces together, and wood glue or screws for assembly. You may also need a measuring tape and a pencil to mark the wood for cutting.
3. Can I personalize a wooden cross?
Yes, you can personalize a wooden cross to make it unique and meaningful. Consider adding decorative elements like carvings, engravings, or inlays. You can also paint or stain the wood in your preferred color and finish. Adding personal touches such as religious symbols or quotes can further enhance the personalization of the wooden cross.
Conclusion
In conclusion, making a cross with wood is a fulfilling and creative project that can be enjoyed by individuals of all skill levels. Whether you’re a seasoned woodworker or just starting out, the process of crafting a wooden cross allows you to showcase your craftsmanship while adding a meaningful symbol to your home or garden. By following the proper steps and using the right tools and materials, you can create a beautiful and durable wooden cross that will stand the test of time. So, gather your supplies, unleash your creativity, and get ready to bring your vision to life with a DIY wooden cross.
Remember, safety should always be your top priority when working with tools and materials. Wear protective gear, work in a well-ventilated area, and follow all instructions carefully. Whether you choose to stain or paint your wooden cross, make sure to seal it properly to protect it from outdoor elements. With practice and patience, you’ll be able to master the art of making wooden crosses and create unique pieces that will be cherished for years to come.
